My thoughts on Slackware, life and everything

Category: Recipes (Page 2 of 4)

Rye Honey Sourdough Bread

Not everybody follows the Google+ community “The art of bread”, so I will duplicate my post about a great bread I baked last week.

Last year during the christmas holiday, I started my bread baking hobby – basically everything created out of yeasted dough. In the beginning I used the regular “fast-action” yeast – commercial granulated yeast available in small sachets. But then I discovered the health benefits of “wild yeasts” and created several “sourdough starters” to experiment with those. It turns out that the breads I bake from my sourdough starters have so much more depth of flavour than the breads I bake with the fast-action commercial yeast… so that’s what we’ve been eating almost exclusively since spring season.

I felt it was time to create a rye sourdough starter this year’s christmas holiday period, to see how different the breads would be using this new starter compared to the wheat based starters I have used so far.
My first attempt to bake something with that new starter (a buckwheat and dried cherry sourdough bread) failed miserably because the dough collapsed just when I wanted to bake it (was it overproofed? Too much buckwheat?). I still baked the sticky mess in a dutch oven to keep it together somewhat… and the result was a very nicely tasting clump of very dense bread.The second attempt went a lot better:
rye_honey_sourdough
My wife gave me a book on sourdough by the Swedish baker/writer Martin Johansson. Using his recipe for Rye and Honey sourdough, I ended up with the big loaf in the picture. I never had a sourdough grow so much in volume during its bulk fermentation and proofing stages, it was amazing! This time, the dough kept its strength and structure and gave a perfect result. The added honey creates a beautiful dark and tasty crust, and the crumb is soft, with a delicious blend of the rye and acacia honey.
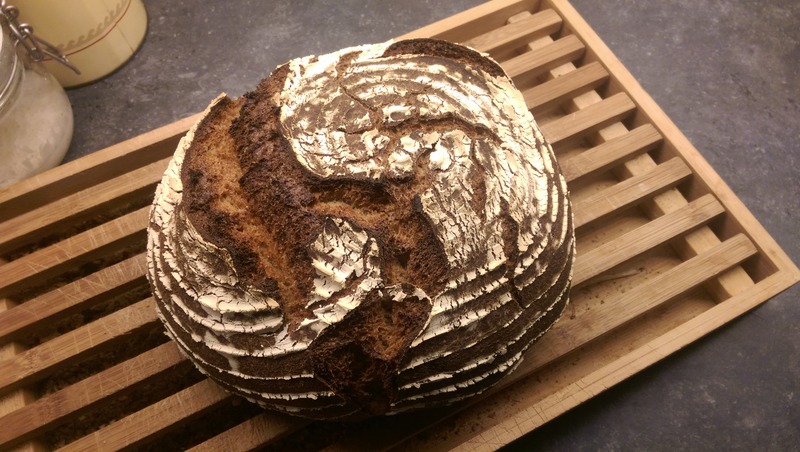
I never cared much for the rye bread we can buy in the shops here in the Netherlands, but I had been adding 10% rye to my whole-wheat sourdough breads lately and that really improved the flavor of my breads. I am glad I finally tried increasing the rye percentage.Here’s the recipe I followed (slightly adapted from the book).The night before you bake, create a levain – mix the following ingredients and leave them to develop overnight (covered under plastic wrap or a towel):

  • 50 gr rye sourdough (100% hydration)
  • 150 gr water
  • 65 gr rye flour (I used stone-milled whole-grain flour)
  • 35 gr whole wheat flour

The next day (in my case, appr. 10 hours later), mix the following together and leave to autolyse for 30 minutes:

  • yesterday’s levain
  • 30 gr honey
  • 165 gr water (tepid)
  • 325 gr strong white flour (I used  200 gr wholewheat and 100 gr plain flour instead)
  • 75 gr rye flour

After the 30 minutes autolyse, mix into the dough:

  • 8 gr salt

Knead the dough by hand for 10 minutes, then leave it in a covered bowl for its bulk fermentation stage. The recipe estimates this to be 3 to 5 hours, but after 3 hours my dough had expanded to more than double the original volume so at that point I decided to continue with the recipe.

Gently press the air out of the dough and fold it into a ball: stretch a bit of the dough to the side and fold it back to the center. Repeat this while rotating the mass of dough. This brings some tension into the skin of the dough ball you are forming.

Dust a round proofing basket with flour (or use any kind of bowl lined with a tea towel and sprinkle the towel generously with flour), and place the dough in the basket with the seam down (the seam-side will be facing upward in the oven, thus creating opportunity for the bread to crack open while baking). Cover the basket (or place it inside a big plastic shopping bag) to prevent draught from messing with it and leave it alone in your kitchen for a further 1.5 hours of proofing.

In the meantime, place an oven stone or pizza stone roughly in the middle of your oven (if you have one of course… the srone adds heat mass which is beneficial for common household ovens), and a metal tray on the oven floor. Pre-heat the oven to 240 C,

When the dough has proofed sufficiently (and roughly doubled in volume again), turn over the basket onto a silicone mat or a sheet of baking parchment, and shove that onto the baking stone in the oven.
Pour a cup of cold water into the metal tray on the oven floor – that will produce steam and develop a great crust.

Bake for 20 minutes on 240 C with the steam, then lower the temp to 210 C, open the oven door slightly to let the steam escape, close the door again and bake for a further 20 minutes.

The smell! The flavor! One of my best.

Waldkorn sourdough bread

Baking with sourdough has its consequences. You have to fit it into your work and life schedule – the fermentation/rising/proofing times are so much longer than when using  commercial fast-action yeast! You have to plan for a 9-hour time span from start mixing to pulling the baked bread out of the oven. Baking after-work is out of the question, so the weekends remain unless I want to get up very early or stay awake all night… not a long-term viable option.

In order to find a way that allows for work during the day, and baking sourdough bread at night, I changed this routine. I did the “bulk fermentation” (the first rise after kneading the dough into a ball) in the fridge at 4 degrees centigrade instead of at room temperature, and it turned out to be a success!

IMAG0529

Fermentation is actually a better name for the process of rising – the yeast consumes sugars and produces alcohol and CO2. The bacteria in the sourdough not only produce lactic and acetic acids but also develop the flavours in the dough. The longer you ferment the dough, the more flavour it gets! Chances are that your bread will become somewhat more sour as well, but I found no evidence of that in my breads.

That is why fermentation in the fridge is not a bad idea at all. The yeast’s metabolic rate is of course a lot lower in the fridge compared to room temperature, therefore the dough can be left alone for much longer when it sits in your fridge. That extra resting time enables me to divide the baking process up. I kept the dough in my fridge for 22 hours (!) and then took it out to warm up to kitchen temperature for two hours.

Ingredients:
100 gr sourdough starter (100% hydration meaning it consists of 50 gr AP flour and 50 gr water)
250 gr cold water
50 gr  AP flour
100 gr whole wheat
300 gr Waldkorn mix (a trademarked dutch multi-grain mix)
25 gr olive oil

7 gr salt

After the 8 o’clock news, I mixed the ingredients to incorporate all the moisture, and hand-kneaded it for 10 minutes (I love hand-kneading… never use a machine).
I then placed the ball of dough in an oiled bowl covered with cling film. That went into the fridge for 22 hours.
Next evening, I took it out of the fridge and left to acclimatize in the kitchen for 2 hours. Then I flattened the dough gently, and shaped it and put it in a flour-dusted proofing basket (a birthday present from my wife), and left it there (covered with cling film) for another 2 hours at room temperature.
I turned the risen dough over onto a baking tray covered with a silicone mat (ideal material for baking a bread, it does not stick), slashed the top and baked for 45 minutes (first 20 minutes at 235 degrees C with steam in the oven, then 25 minutes at 220 degrees C without steam).

The taste of the bread is great! it has complex and subtle flavours and, only the slightest hint of sourness despite the long fermentation time. The typical nutty-sweer flavour of the Waldkorn bread mix is altered by the sourdough’s own flavouring process. My son was not yet sure if he likes this better than the version I usually bake – using fast-action yeast instead of sourdough. Certainly, this sourdough bread is a lot smaller in size… which I like better than the “fluffiness” of the bread baked with commercial yeast.

It’s a win/win: the long fermentation time results in great flavour, and I can now bake sourdough at every day of the week if I want to 🙂

IMAG0527

The finished bread, together with my two sourdough starter cultures

Recipe: rice pie (limburgse rijstevlaai)

When I started baking breads last Christmas holiday, it was mostly because I wanted to know if I could make three particular products: a foccaccia (to revive a memory from an amorous holiday trip with my girlfriend, now wife), a “limburgse kersenvlaai” (a cherry pie) and a “limburgse rijstevlaai” (a pie with rice & egg filling).

I made the foccaccia long ago (and like it a lot), the cherry pie a few weeks ago and last weekend I created the final one on my “bucket list”: the “rijstevlaai“.

IMAG0486

Both pies are made with enriched bread dough. In the old days (centuries ago) fruit pies were a way to preserve the produce of the land (grain, fruits, eggs, milk)  in the region where I was born: Limburg in the southern Netherlands. Rice pies were an influence of the Spaniards invading the southern part of the Netherlands and Belgium in the 80-year war.

The rice pie is relatively complex to make because it needs the right mix of ingredients to produce a good filling:  the cooked rice must be exactly moist and sweet enough.
I must say, the result is great! It’s just a shame that nobody in the family likes it… it’s a typical “Limburgian” treat and the “Hollenders” have a hard time appreciating the taste.


Here is the recipe for those who want to try and repeat it. I took it from an old recipe book (Vlaai en ander Limburgs gebak van Wil en Netty Engels – Geurts) and adapted it slightly (less egg, less sugar).

Ingredients

The dough:

  • 250 gr flour
  • 6 gr fast-action yeast
  • 1 dl milk
  • 25 gr butter (soft)
  • 15 gr caster sugar
  • 4 gr salt

The filling:

  • 1 liter full cream milk
  • 100 gr pudding rice
  • 100 gr caster sugar (70 gr for the rice and 30 gr for the egg mix)
  • 10 gr cornstarch
  • 3 eggs (large, ~200 gr total)

Instructions

Preparation of the filling:

  • Bring the milk to a boil in a pan with a thick bottom, and add the rice and the sugar. Let it come back to a boil, stirring constantly;
  • Turn down the heat as much as you can, cover the pan with a lid and let the rice cook until tender (about 1 hour). Stir the mixture occasionally.
  • Make sure the rice grains are tender and that the rice porridge is thick enough;
  • If you still see some unbound milk in the pan, take 5 to 10 gr cornstarch , mix with a little cold milk and add to the rice while stirring; bring the rice back to a boil and keep it at boiling point for a little bit while stirring constantly;
  • Then take the pan from the fire;
  • Let the rice cool down a bit.

Preparation of the dough :

  • Mix the flour in a bowl with the melted butter, sugar, yeast, milk (I use my hands, not a machine), until it comes together as a rough ball after 2 minutes;
  • Then add the salt and knead into a smooth and elastic dough for 8-10 minutes;
  • Form the dough into a ball and place in a greased bowl; cover with clingfilm and let rise for about 1 hour (until doubled in size).

Creating the pie:

The dough:

  • Transfer the dough to your workbench, gently press the air out with the knuckles of your fists and use a rolling pin to flatten it into a circle of 3 mm thickness that is larger in diameter than the flan tin  (28-30 cm tin);
  • Gently place the dough flap into the greased flan tin. Make sure the dough can bounce back and a piece hangs over the edge;
  • Roll along the sharp edge of the tin with the rolling pin to remove the excess dough;
  • Prick holes in the the dough with a fork to prevent air pockets while baking, and place the tin in a warm place to rise (the dough  becomes thick and fluffy).

The filling:

  • Separate the eggs into yolks and whites and mix the yolks with 30 g sugar until frothy; Beat the egg whites until stiff;
  • Spoon the egg yolk / sugar mixture into the cooled rice porridge;
  • Then fold half of the egg whites carefully through the rice mixture;
  • Spread half of the rice mixture onto the bottom of the pie;
  • Fold the rest of the egg whites gently through the remaining rice;
  • Then spread this again over the pie.

The baking:

  • Pre-heat the oven to 220°C;
  • Place the pie in the middle of the oven and bake for 25 to 30 minutes. The pie is done when the filling and the bottom are brown and the dough separates from the tin.
  • Remove the pie from the oven. Carefully lift it out of the tin and place on a cooling rack.

Don’t cut the pie until it is completely cold.

The rijstevlaai is baked in a tin like this one:

IMG_4301-Kaiser-vlaaivorm-ø-28-cm-aluminium-anti-aanbaklaag


Note: I posted this earlier on Google+’s “the art of bread” community where it was not visible for everyone.

Enjoy! Eric

Corn flour bread rolls

This recipe comes from an American collection of recipes published in 1918 and meant to provide people with ways to conserve precious resources such as wheat flour and sugar. Despite the economy of ingredients these rolls truly taste rich and wholesome, and are well worth trying.

Adapted to metric units and leaving out the lemon zest mentioned in the original recipe by Amelia Doddridge in: “Liberty Recipes”, 1918—USA which was digitized by Google and uploaded to archive.org.

Ingredients:

  • 120 g scalded milk
  • 1 egg, well beaten
  • 30 g sugar
  • 30 g melted butter
  • 3 g fine sea salt
  • 60 g corn flour
  • 5 g active dry yeast dissolved in 30 g warm water
  • 105 g to 210 g bread flour (or as needed – usually around 190 or more)

Instructions:

Pour the scalded milk over the sugar and salt, mix well and set aside to cool. Once the milk mixture is lukewarm add 105 g of bread flour and the dissolved yeast. Mix vigorously and let the sponge ferment,covered, until doubled.

When the sponge is light add the melted butter, egg and corn flour. Mix well at low speed then add just enough bread flour to make a dough that is very soft but well developed and just slightly tacky.  Do not add too much flour or the rolls will turn out dry and heavy.

Lightly grease a bowl and place the dough to rise, covered, until doubled in bulk.

Preheat the oven to 190° C.

Gently transfer the risen dough onto a lightly greased surface and divide it in 12 equal pieces. Shape each into small round rolls (the dough is too soft to keep well any other shape more complex than rounds or ovals). Place each roll onto a rimless baking sheet and lightly brush with milk.

Let the rolls rise, covered, until doubled. Brush again with milk then with sharp kitchen scissors cut a decorative pattern on each roll.

Bake for about 20 minutes until nice and golden.

corn-flour-rolls

I found this recipe mentioned at http://bakinghistory.wordpress.com/2008/08/01/corn-flour-rolls-bbd-12-small-breads/

About ‘sponge’ or ‘poolish’:

A poolish, also called a ‘sponge’, consists of equal (by weight) parts flour and water, with a small amount of yeast added (100% flour, 100% water and 0.2 – 1% dry yeast). The high hydration level makes it look more like a batter than a dough. A poolish is made several hours (at least 2 hours, but 8 or more hours is even better) before creating the final dough by adding the remaining ingredients. Because of the high percentage of water in the poolish, you need to adapt the amount of fluids in the remaing ingredients because in the end, your dough needs to have an average hydration of 60-66% (meaning a ratio of 100% flour to 60 – 66% liquids).

Sponge is a “pre-ferment” using baker’s yeast and its function is similar to a sourdough starter (which contains wild yeast and bacteria). A pre-ferment allows more time for yeast and enzymes to convert the starch and proteins in the dough. This improves the keeping time of the baked bread. Also, the bread’s flavours will become more complex.

Why the scalded milk?

The whey protein in milk weakens the gluten in the bread. Gluten is what gives your bread its elasticity and helps keep the bread its shape. It also goves your bread a “chewy” texture as opposed to dry and crumbly (something you’ll also see when kneading dough for too long, because that too damages the built up gluten). When the gluten structure is broken down, it will prevent the dough from rising properly. Scalding the milk deactivates the whey protein so there is no adverse effect to the gluten.

The final proofing:

The final proofing – when the rolls have been shaped and just before they are baked – ussually takes someting like 45 minutes at room temperature. However want them to be ready to bake when I get out of bed, so I decided to transfer the shaped bread rools to the fridge and let them ferment at 4° C overnight. The 8 hours at the slowed rate at which the yeast operates at that low temperature, should result in rolls that can be transfered to the oven straight out of the fridge in the morning. Ready for breakfast!

My remarks about the recipe:

I have never tried  a slow final rise in the frisge before – in fact, I never made these rolls before, so I will update the article tomorrow after I have baked and eaten the rolls.

There was another challenge: I do not have an electric mixer! When I formed the dough from the sponge and the additional ingredients, I ended up with a dough that was too sticky to manipulate with my hands. I added flour, but I wanted to avoid adding too much, so I decided on a “stretch and fold in the bowl” technique I have seen sometime ago in a video. What I did was use a plastic dough scraper to lift the dough up at one side of the bowl and then fold it inward, repeating this process for several minutes while rotating the bowl a bit after each stretch & fold. After a couple of minutes, the dough was a lot less sticky and nicely developed. Still too sticky to manipulate by hand, so I keft it in its bowl to rise, covered with shrink wrap.

Enjoy Easter! Eric

Recipe: braided cinnamon wreath

aliens_cinnamon_roll

I am currently enjoying three weeks of Christmas holidays. Today was my first day, and after a successful bake of Waldkorn bread last week, I decided to have a go at a bigger version of the bread. My first attempt, creating a small bread,was met with so much approval that I did not get to eat very much of it myself. For your information, Waldkorn is a type of multi-grain bread which is quite light and very tasty. It the Netherlands, you can buy “Waldkorn mix”, containing several flours like wheat, rye, oats, barley as well as some sunflower and lineseed. You complete the bread mix by adding normal white flour, water, yeast and a bit of butter. Yummy! But my wife nudged me to create something different instead, as a holiday treat. She suggested a cinnamon roll.

What we came up with was a recipe for a braided cinnamon roll. Did not take all that much time to create (most of the time is spent waiting for the proving and baking).

Time required:

15 minutes for mixing and kneading, 1 hour for proving, 10 minutes for rolling and braiding, 35 minutes for baking.
Total: ~ 2 hours.

Ingrediënts:

Dough:

  • 125 ml lukewarm milk
  • 1 tbsp sugar
  • 7 gr fast-action yeast (one sachet)
  • 250 gr white flour
  • ½ ts salt
  • 30 gr soft butter
  • 1 eggyolk

Filling:

  • 50 gr molten butter
  • 4-5 tbsp sugar
  • 3 ts cinnamon powder

Preparation:

  • Mix the yeast with the sugar and the warm milk, Allow some time to let the yeast activate and create bubbles and foam.
  • Add the egg-yolk, softened butter, flour and salt. Stick the fingers of your hand in there, it’s fun! Mix the ingredients until the dry components have been absorbed and a dough has been formed. Dump the dough onto your work surface and knead it firmly for 10 minutes until it forms a smooth ball. You’ll feel the transformation in texture when the gluten start to develop.
  • Place the ball of dough into a large, lightly oiled, bowl. Cover with cling film or a tea-towel and place the bowl in a warm environment (room temperature is warm enough, do not put it directly over your central heating!). Leave the dough to prove until it has doubled in size (should take roughly 1 hour).
  • Pre-heat your oven to 200 centigrade.
  • Lightly cover your workspace with some flour, take the dough out of the bowl and use a rolling pin to flatten the dough to a rough rectangle of 1 mm thickness.
  • Spread the largest part of the molten butter over the dough and sprinkle generously with the sugar/cinnamon mix (keep a bit of both butter and sugar/cinnamon for the finishing).
  • Roll up the dough. Using a sharp knife, cut the roll in two halves length-wise.
  • Braid the two halves and make sure to keep the open layered side pointing up and outward (see picture). Place the braid on a baking tray lined with baking paper, and bend it into a circular shape. Tuck one end under the other.
  • Apply the remaining molten butter and sugar/cinnamon mix to the top which gives the finished bread a nice color.

Baking:

  • Bake for 30 to 35 minutes until the top is golden brown. Lower the oven temperature to 180 degrees centigrade after 5-10 minutes of baking.


Well folks… apparently there is nothing more attractive than a bake straight out of the oven. I think that about 10 centimeter of bread is left at the moment. This is the result of all family members sneaking into the kitchen in the evening and pinching pieces of the cinnamon bread. It tastes absolutely delightful! The picture on top is my own produce.

gevlochten_kaneelbrood_2

Original recipe found at: http://totallyloveit.com/braided-cinnamon-rolls/
Photo Credit:Ana Maria Ciolacu from Just Love Cooking

« Older posts Newer posts »

© 2024 Alien Pastures

Theme by Anders NorenUp ↑