My thoughts on Slackware, life and everything

Tag: liveslak (Page 4 of 10)

Secure Boot support landed in liveslak 1.5.0

Secure Boot ???

Secure Boot is part of the UEFI specification and first appeared in the Unified Extensible Firmware Interface (UEFI) 2.3.1 specification (Errata C). It is meant to prevent the execution of unauthorized code upon boot of a computer. Most modern Personal Computers will have a way of enabling Secure Boot in UEFI, but it is common to leave it disabled if you are not running a Microsoft OS on it since Microsoft controls Secure Boot.
For dual-boot scenario’s the story is different however. Microsoft Windows 8 and 10 advise to have Secure Boot enabled but don’t enforce it, but as far as I know, for Microsoft Windows 11 enabling Secure Boot will be a requirement to get full upgrade support.

Microsoft’s own Windows OS-es fully support Secure Boot (naturally), but non-Microsoft Operating Systems that want to boot on a Secure Boot enabled computer, must have an initial bootloader which has been cryptographically signed with the ‘Microsoft UEFI CA‘ key. Getting Microsoft to sign a 3rd-party (mostly Linux) bootloader is a complex procedure which involves money (but not always) and establishment of trust. You need to realize that if a malicious bootloader gets accidentally signed by Microsoft, this bootloader could be used to deliver all kinds of nasty to every Secure Boot platform in existence. And that would defy the whole purpose of a tightly controlled ‘Secure Boot‘ environment.

It’s likely that more and more computers with MS Windows installed or with a dual-boot configuration will have Secure Boot enabled in the near future. For Slackware and its derivatives, including my liveslak based ISOs, this is a potential problem because Secure Boot is not supported yet and therefore our OS will not launch.
Additionally, one of the use-cases of liveslak ISOs is to take it along with you on a USB stick on your key-chain and boot random PC hardware with it – just for fun, or to test the Slackware compatibility of new hardware, or simply to have your Slackware desktop with you on a stick all the time.
A liveslak ISO will be a lot less useful if every PC you encounter has Secure Boot enabled.
So I set out to find a solution.

One possible way out of this dilemma is to acquire a Microsoft-signed first-stage bootloader, just like Red Hat, Fedora, Debian, Ubuntu and the other big brothers already provide. Like said before – this process is complex and I am not able to satisfy the requirements at the moment. In future, who knows? I am working on that.

Alternatively, and other small distros seem to do this too, an already signed bootloader can be ‘borrowed’ from another distro and used to boot a liveslak ISO. But that has consequences which I will elaborate further down. This is the solution I chose.

Note: In case you have doubts: the liveslak ISOs support Secure Boot from now on. But nothing changes when your computer does not have Secure Boot enabled. Slackware Live Edition will boot and work exactly like before.

Boot sequence

Let me give a quick and dirty and possibly not 100% terminology-accurate explanation of the boot procedure in a Secure Boot computer.

  • The TPM chip in the computer may be used to store a bunch of (Microsoft) security certificates which are trusted by the Secure Boot subsystem of UEFI, as well as (potentially) a list of certificates that have been revoked due to security violations. Otherwise these keys are stored in NVRAM (non-volatile RAM).
    Secure Boot will load only bootloaders that have been signed by a trusted Microsoft certificate. The most widely used Linux bootloader which Microsoft accepts for signing is the ‘shim‘, a trivial application which does not do much more than verifying the signatures of the second-stage bootloader which it is hard-coded to look for. A signed  ‘shim’ binary also contains an embedded SSL certificate of the distro that owns the shim binary.
    The shim accepts two certificates when it checks the signature of the second-stage bootloader and other binaries: one is the Microsoft certificate and the other is this embedded distro certificate. This allows such a distro to provide a nice unattended problem-free boot on every computer with Secure Boot enabled.
  • The shim loads the second-stage bootloader, this is most often the Grub2 bootloader but it could be any EFI image file (such as rEFInd). The hard-coded default filename that the shim will attempt to load is ‘grubx64.efi’ so whatever your distro bootloader, it needs to be renamed to that.
    Shim will check the signing certificate of that file and will proceed only if it recognizes the certificate as valid.
  • Grub will be informed by the shim that it loads in a Secure Boot environment and because of that, Grub will ask the shim if it is OK to load the kernel it is configured for. Shim will check the signing certificate of your kernel and will signal an ‘OK’ to Grub only if it recognizes the kernel’s signing certificate as valid.
  • Your Linux OS will now boot properly.
    But what happens if Grub or the kernel are not signed, or when they are signed with an un-recognized certificate? Well, your computer will refuse to boot.

Lack of trust

The problem for liveslak (and for Slackware) is that neither Patrick nor I own any of the private keys corresponding to the SSL certificate that these big distros embed in the signed ‘shim’ binary they provide (naturally). Therefore I must sign the liveslak grub and kernel images using my own private key and public certificate pair.
The public certificate I use for signing is not recognized by UEFI SecureBoot, since it is not embedded in any bootloader which has been signed by the Microsoft Certificate Authority. If Secure Boot is enabled then the signing certificate of liveslak’s grub and kernel images will not be accepted by shim… and the Live OS fails to boot.

As the owner of your PC, you can clear the Microsoft certificates from the local certificate store and load your own certificate instead. Your computer will then boot without issue because your bootloader finds the certificate that it is validating in the trust store.
This is probably the best solution if you are never going to run MS Windows on it anyway. But if you do, or might, or if you want to provide a solution that works on a multitude of computers besides your own, you need to come up with something else.

You are the Machine Owner

Lucky for us poor distro developers, Secure Boot recognizes a database of Machine Owner Keys (MOK) next to the Microsoft trusted keys. And you are the Machine Owner if you have physical access to the computer and know the password to unlock the MOK database (it is empty by default).
The MOK can be populated with public keys of your own making, or of your friends… and/or with liveslak’s public key. And then the shim will accept liveslak’s signed Grub and kernel… and liveslak will boot just fine.

Managing Machine Owner Keys (MOK)

My repository contains two relevant packages: mokutil and sbsigntools. The mokutil package contains the ‘mokutil’ program which allows you to query the SecureBoot NVRAM and to manipulate MOK certificates (the latter only if Secure Boot is enabled). The sbsigntools package contains ‘sbsign’ which is used by liveslak to cryptographically sign the Grub and kernel images.

To check whether Secure Boot is enabled, run:

# mokutil --sb-state

If this returns “Secure Boot enabled” then you are probably running a commercial Linux distro :-). In this case, you can generate a MOK enroll request to the shim before rebooting:

# wget https://download.liveslak.org/secureboot/liveslak.der
# mokutil --import liveslak.der

You will be prompted for an optional password. If you enter one, this password then needs to be entered again after reboot to complete the MOK enrollment.

If Secure Boot is not enabled, don’t worry: you can still enroll this ‘liveslak.der’. Just continue reading.

Adding liveslak.der certificate to MOK database

The remainder of the article will describe in detail how to add the liveslak public key (a SSL certificate) to the MOK if you were unable to use the mokutil program as described above.

Note that adding the certificate is a one-time action. Once the MOK database contains the liveslak certificate, future liveslak ISOs will boot on your SecureBoot-enabled computer out of the box.

Enable Secure Boot in your UEFI (press F1 or whatever key your computer needs to enter setup and find the proper menu to enable SB). Then reboot your computer with a liveslak (1.5.0 or later release) medium inserted.
UEFI will look for the first-stage bootloader on the liveslak medium in the ESP partition (ESP = EFI System Partition which is a FAT partition with partition type 0xEF00). According to UEFI spec, it wants to load the file ‘/EFI/BOOT/bootx64.efi’. The Fedora ‘shim’ binary which is now contained in the liveslak ISO has been renamed to that exact filename. Shim loads, it will try to load our Grub and discovers that its SSL signature is invalid/unknown. Shim will then ask you if it should load the MokManager instead (the ‘mmmx64.efi file in the same directory) which is signed with the distro certificate embedded in the shim.

If you press ‘any key’ within 10 seconds, the MokManager will load and you will have your opportunity to enroll the ‘liveslak.der’ certificate. If you wait instead, the computer reboots and if you had already made an enrollment request as described in the previous paragraph, that request will then be erased and you’ll have to try again.
If MokManager loads, it will show the below screen if you created an enrollment request before the reboot. Select the “Enroll MOK” to complete that enrollment request.


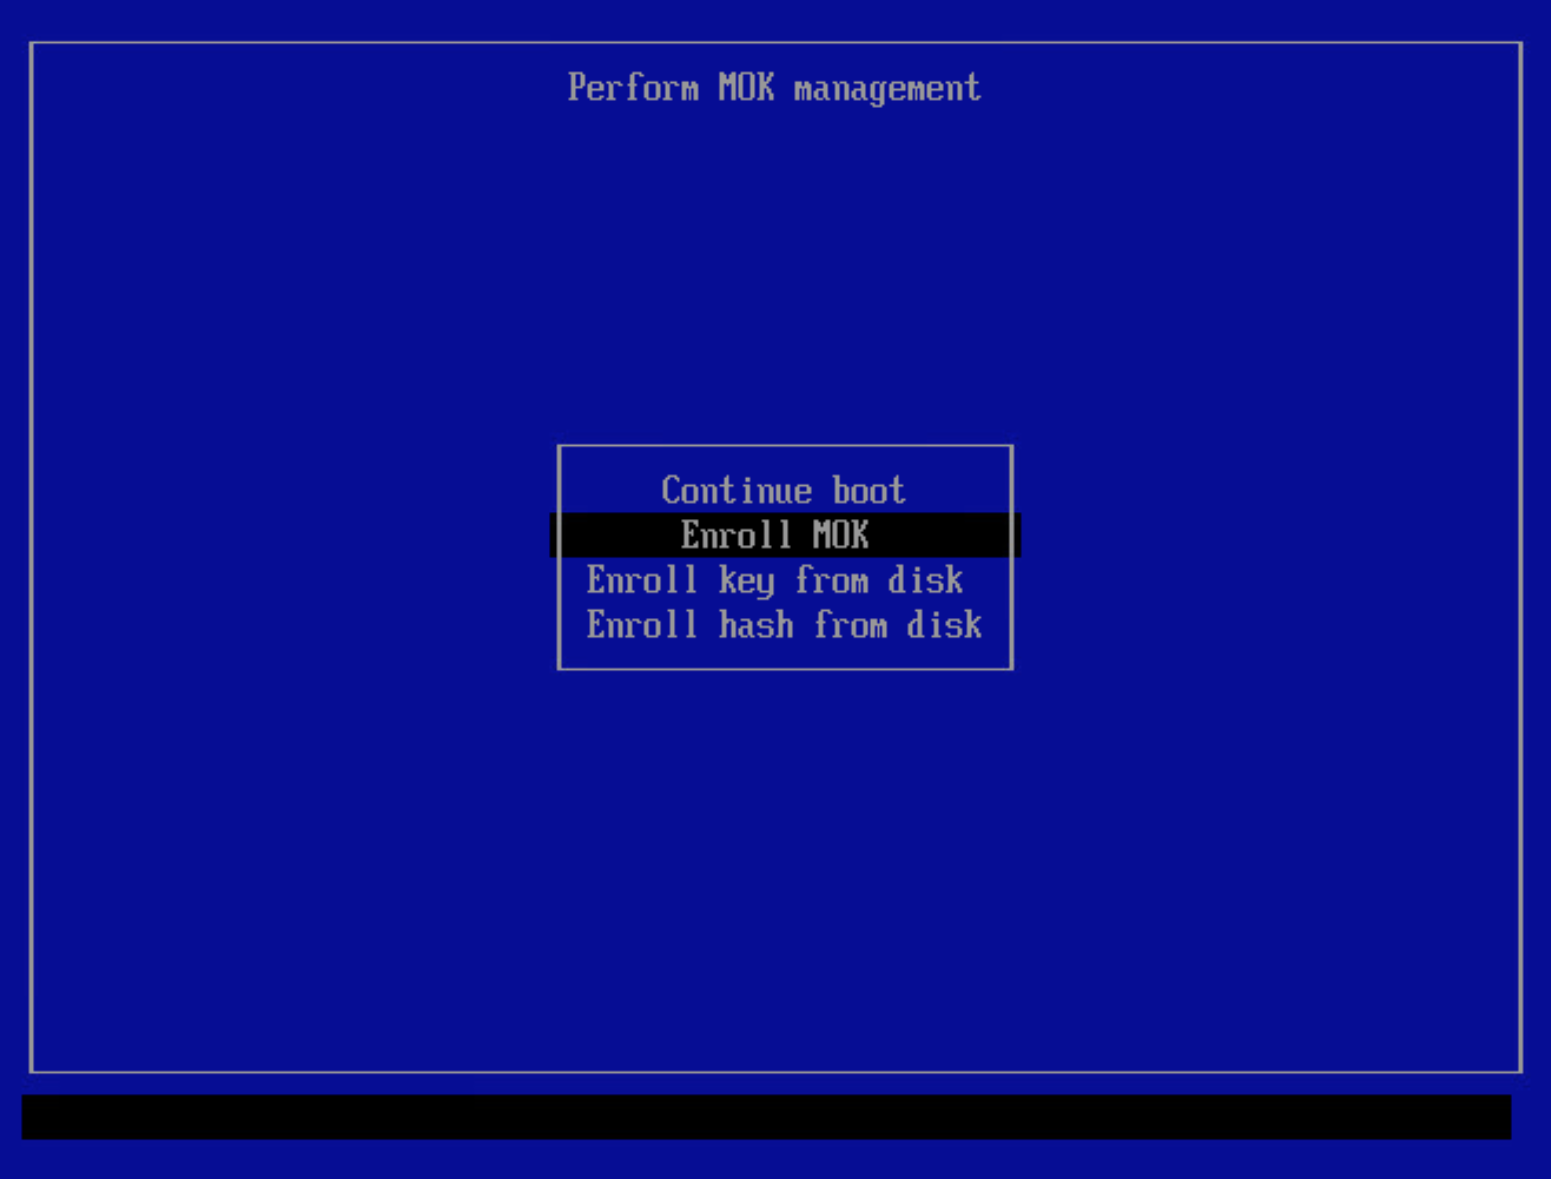
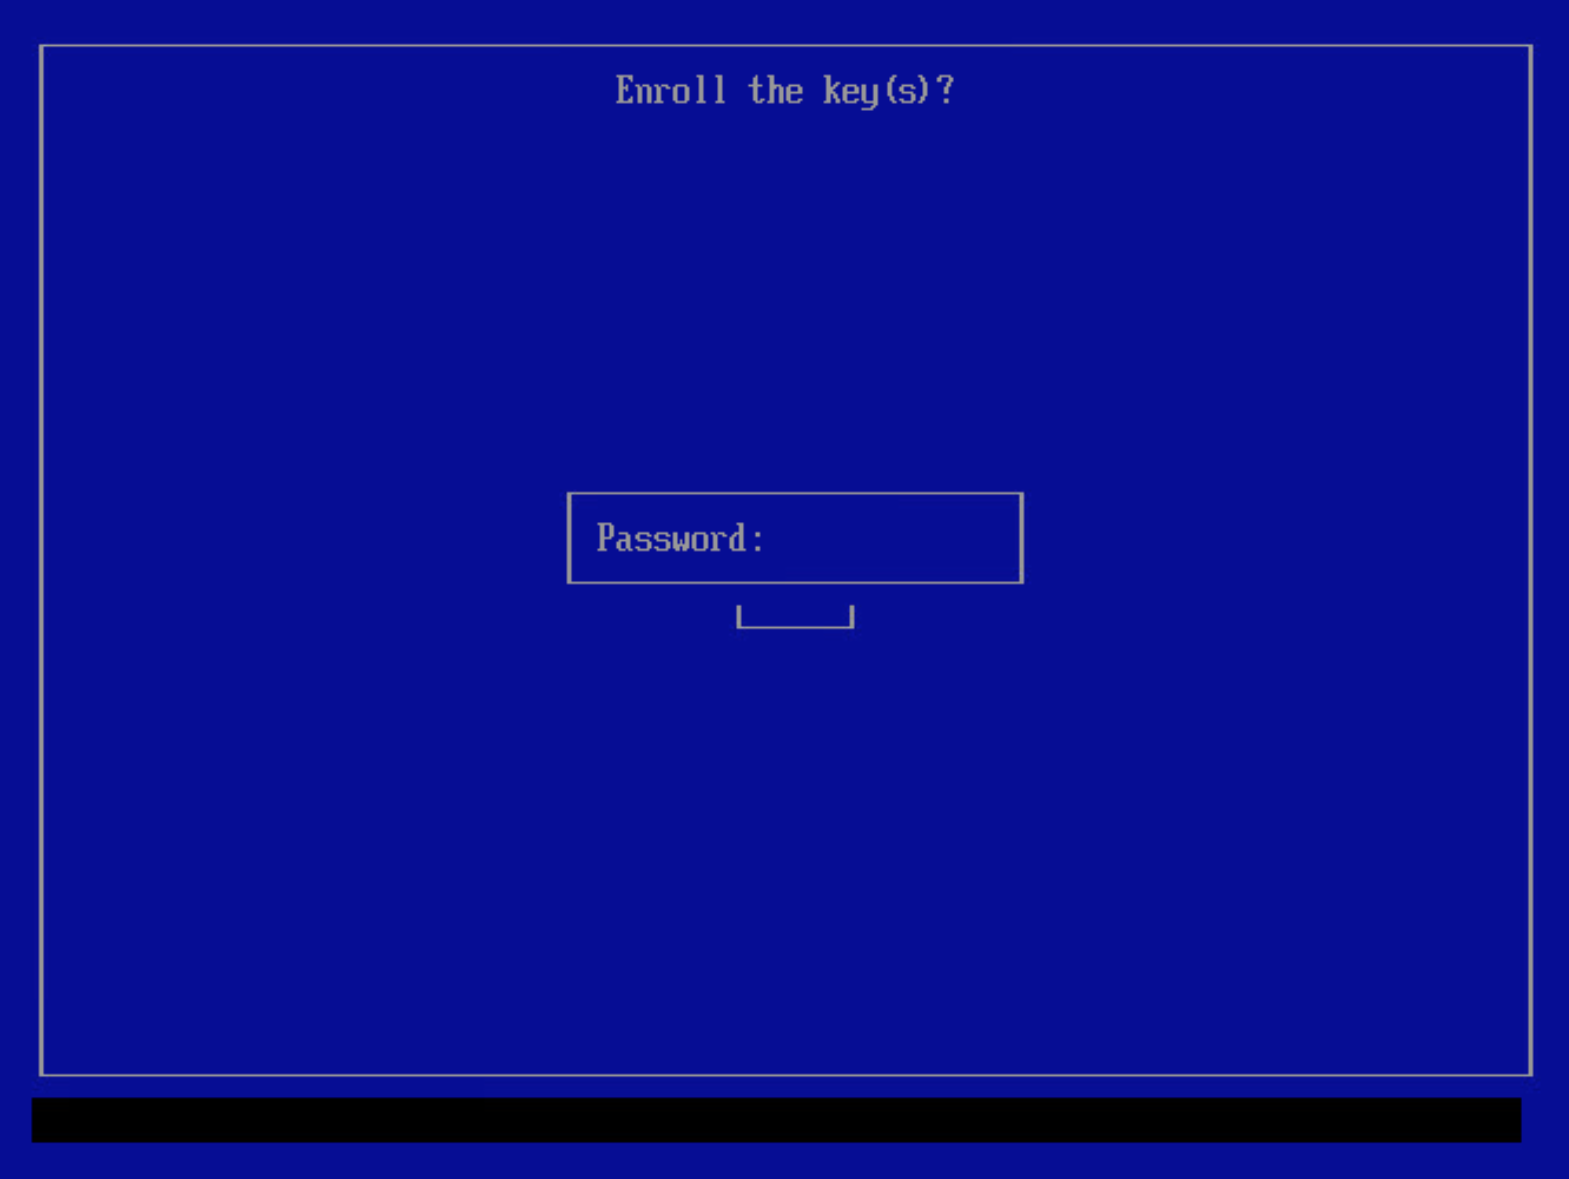
If you entered a password during the “mokutil –import” command you will have to enter that same password next:


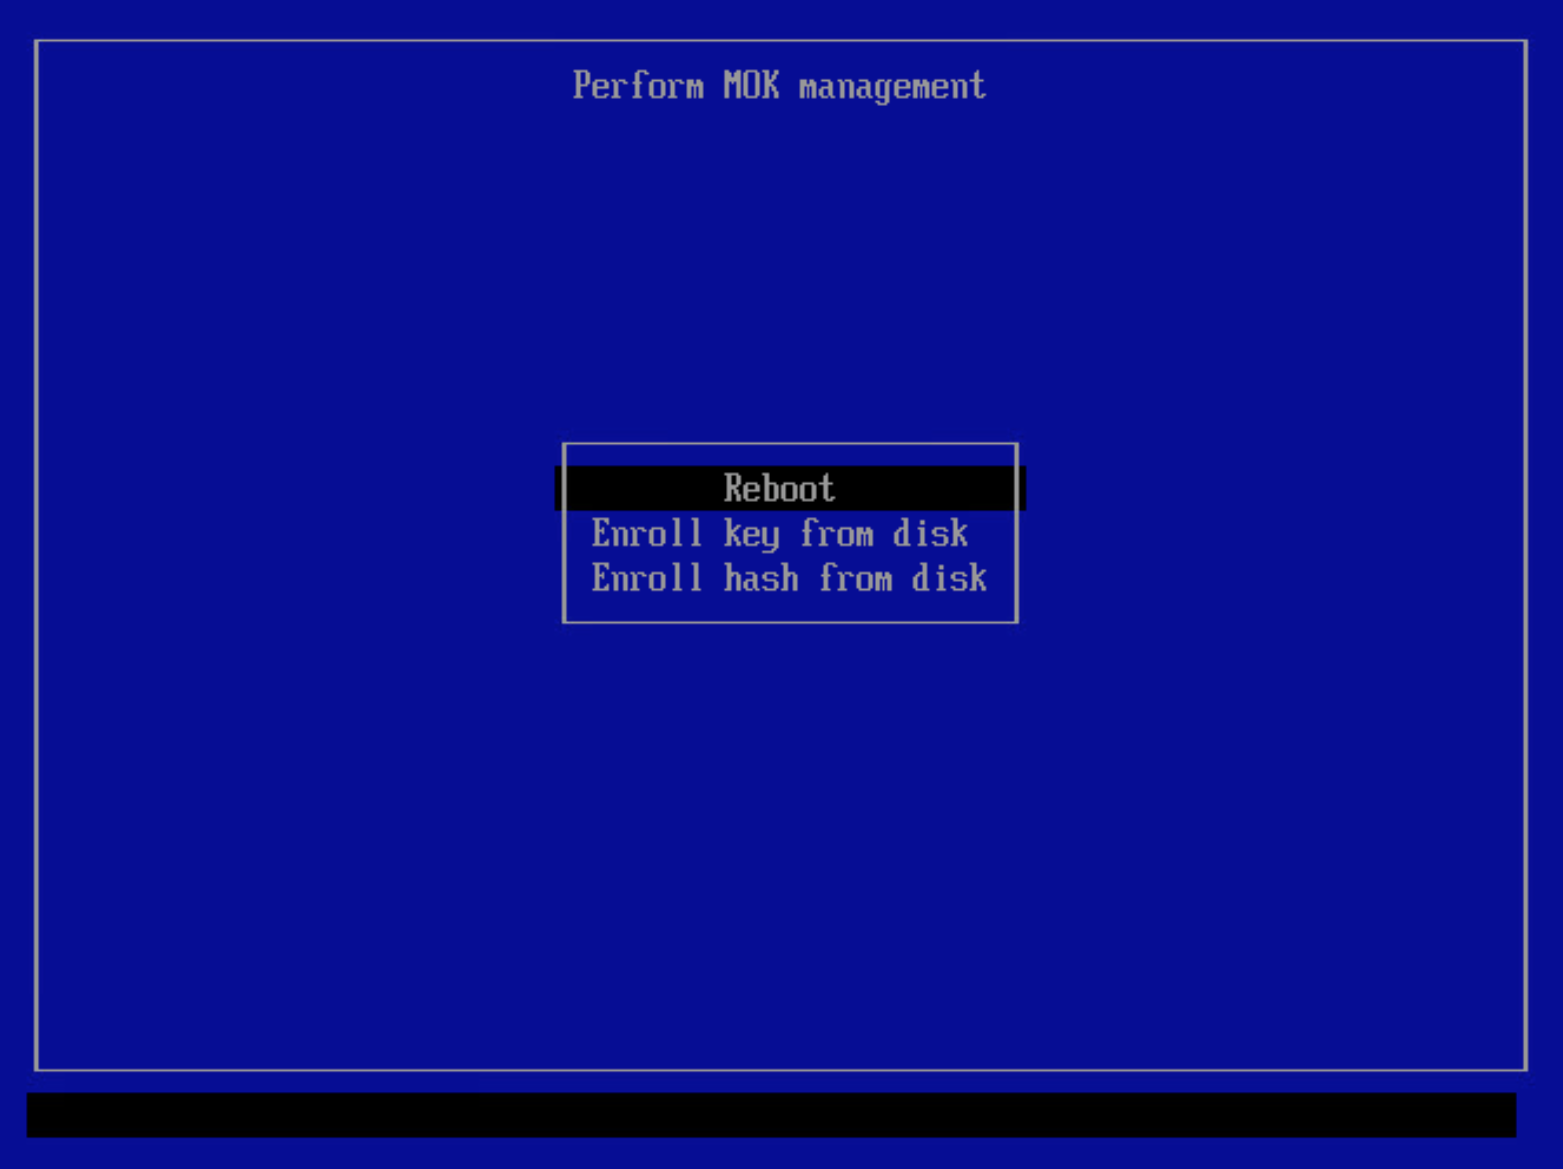
If you did not create an enrollment request prior to reboot, then this particular menu item will not be present and you should use the “Enroll key from disk” menu instead.
A simple and spartan file browser will be your guide towards the ‘/EFI/BOOT/’ directory on the liveslak medium; select ‘liveslak.der’ file and confirm.
After enrollment of the ‘liveslak.der’ certificate, you must reboot.

After the reboot, your Slackware Live Edition should boot as usual. If you watch closely you will see a flash right before Grub loads – that is the shim loading right before it.

Now, you can check that Secure Boot is actually enabled:

root@darkstar:~# dmesg |grep -i secure
[ 0.016864] Secure boot enabled

Cool!

Download Slackware Live Edition

You can find a set of new ISOs based on liveslak on download.liveslak.org/latest/, the 64bit versions of them support Secure Boot.
I tried also generating 32bit ISOs but they refuse to load the init script. The kernel loads, it unpacks the initrd image, but then the boot process stalls right before control is handed over to the initrd. I have no idea why. I tried generating ISOs with an older release of liveslak (1.4.0) that had proven to produce working 32bit ISOs but no luck. Something in the new 5.15 kernel perhaps which liveslak fails to add to the ISO? Suggestions are welcome.

It will probably work best if you use the ‘iso2usb.sh‘ script provided with liveslak to transfer the ISO content to a USB stick, it will give you a persistent environment with optional data encryption and apparently this will allow it to boot on a lot more computers.

Get liveslak sources

The liveslak project is hosted in git. Its browsable cgit interface is here: https://git.liveslak.org/liveslak/

A set of the liveslak scripts can also be downloaded from http://www.slackware.com/~alien/liveslak/ or https://slackware.nl/people/alien/liveslak/

The liveslak public key (SSL certificate in DER encoding) that you need to enroll can be downloaded from https://download.liveslak.org/secureboot/liveslak.der

Let me know your experiences!
Cheers, Eric

liveslak-1.4.0 and new ISO images are available

It’s that time again for a fresh batch of ISOs for Slackware Live Edition.
The ISO files are based on Slackware-current of “Sat Oct 23 18:57:30 UTC 2021” and using the liveslak-1.4.0 scripts.

The Slackware-current snapshot on which the Live ISOs are based contains a Linux 5.14.14 kernel.
This is not yet the pre-emptive variant of 5.14.14 which you can find in “./testing” inside today’s Slackware-current mirrors. However, you can use liveslak’s “upslak.sh” script to easily upgrade the kernel on your persistent USB Live if you want.
It’ll be interesting to see how it improves real-time performance on the DAW Live platform.

The new ISOs for the Slackware Live Edition can be obtained at download.liveslak.org .

Note that a new “DAW” ISO variant is missing for the moment.

Update 28-Oct:
I have uploaded a DAW ISO to the ‘latest‘ folder. It is based on liveslak-1.4.0.1 using kernel 5.14.15 and with full preemption enabled out of the box.

The upgrade in Slackware of Python to version 3.10 forces me to do a lot of re-compilations or upgrades of the software that has a Python3 dependency and unfortunately in the DAW package set, that’s quite many of them.
Give me a couple of days and the new DAW ISO will appear on the above URL. I’ll try and make a liveslak-1.4.0.1 release that supports the preemptive kernel in ‘testing’ and enables the full preemption model on boot of the DAW Live.
In the meantime, you can still obtain a DAW ISO from a month or so ago in the “1.3.10” directory.

I refreshed he ‘bonus‘ section as well with updated live modules for the binary Nvidia driver (already contained in the CINNAMON, DAW and MATE ISOs by the way), the Broadcom STA driver (wl) and an uptodate multilib package collection.

Hghlight for liveslak-1.4.0 is the extended syntax for the ‘persistence’ boot parameter. You can now point your Live OS to a persistence directory or container which is located in a subdirectory below the filesystem root.
Additionally, you can specify the partition containing the filesystem on which the persistence is located, or simply specify ‘scandev’, to request that liveslak tries to find the partition for you:

persistence=/dev/sdX:/path/to/mypersistence
persistence=scandev:/path/to/mypersistence

In addition, a UUID or LABEL value of the filesystem is accepted:

persistence=cd68b6f5-5b5a-4d27-9649-7827489f94a5:/path/to/mypersistence

This creates opportunities for PXE boot where persistence was not possible; the live modules will get mounted from a NFS export and the overlay filesystem does not support writing to a NFS layer. Storing your persistent data on a local hard drive or even a USB stick that you plug into the PXE client computer will solve that predicament.

Have fun! Eric

liveslak-1.3.10 and new ISO images for Slackware Live Edition

The previous batch of ISOs for Slackware Live Edition is already a few months old, so I decided to generate new images.
The ISO files are based on Slackware-current of “Wed Sep 8 18:07:38 UTC 2021” and using the liveslak-1.3.10 scripts, where passwordless login is a new feature.

Slackware-current has the label “15.0 Release Candidate 1” since August 16th but considering the amount of non-trivial updates since that date, I wonder whether the phrase “release candidate” has any relevance here. No sign that we are anywhere nearer to a final 15.0 release.

Let’s hope for the best, and in the meantime fresh ISOs for the Slackware Live Edition can be obtained at download.liveslak.org .

I refreshed he ‘bonus‘ section as well. There you find several squashfs modules you can use with your persistent liveslak USB stick. Copy these module into the ‘addons’ directory on the USB drive. They expand the functionality of the Live OS and allow me to keep the ISO file size within reasonable bounds.
Among these you’ll find the binary nvidia driver (already contained in the CINNAMON, DAW and MATE ISOs by the way); Wine 6.12, multilib, the DAW package collection, and a set from my own repository (chromium, libreoffice, veracrypt, vlc etc).

To end this post, I have a question for you regarding liveslak functionality.
At boot you can add any number of parameters to the kernel commandline, and some of these are used by the liveslak initialization. A subset of these parameters cause modifications of files in the live filesystem. For instance, “livepw=” will update /etc/shadow and /etc/passwd to update the password for the ‘live’ user. You can specify a domain name, custom hostname and a lot more which will cause modifications of files in the live filesystem.
Now the crux of the issue: if you have a persistent Live USB stick, do you want these parameters to make permanent changes to your Live filesystem? Or do you want them to be ignored if you are booting a persistent USB stick?
I can see good reasons for a limitation of the scope of these parameters, to just the non-persistent Slackware Live (i.e. when booting from a DVD). I also realize that it would be a functional change that can impact the way some of you work with a liveslak medium.

Let me know (in the comments section below) if you would like liveslak to ignore certain boot parameters if you boot a persistent medium.

Have fun! Eric

Kernel 5.13 went into Slackware-current; new Live ISOs to celebrate

This week, the Linux 5.13 kernel finally landed in the core distro of Slackware-current after having lived in ‘./testing‘ for a while. Actually it’s the 5.13.2 kernel which had some 800 patches applied compared to 5.13.1.

And with that new 5.13.x kernel series, it looks like a Slackware 15 release is again closer on the horizon.

To celebrate the occasion, I have generated a new batch of ISOs for the Slackware Live Edition. At download.liveslak.org you will find ISO images for the variants based on the latest release of the liveslak scripts (in this case, version 1.3.9.5 of liveslak).
These Live ISOs boot Slackware -current “Thu Jul 15 22:37:59 UTC 2021” with the new 5.13.2 mainline kernel: SLACKWARE (32bit & 64bit), XFCE (32bit & 64bit), CINNAMON, MATE, DAW and LEAN.

The ‘bonus‘ section contains a batch of squashfs modules you can use with your liveslak (copy them into the ‘addons’ directory of your persistent USB drive) if you want to expand the functionality of the Live OS.
Among these you’ll find the binary nvidia driver (already contained in the CINNAMON, DAW and MATE ISOs by the way); the Broadcom STA wireless driver, Wine 6.12, multilib, the DAW package collection, and a set from my own repository (chromium, libreoffice, veracrypt, vlc etc).

Have fun! Eric

December updates and a Christmas goodie for cable geeks

The silent treatment?

Hi there.
I know I have not been posting a lot the past few months. Sorry for that, really.
The last quarter is always a busy time at work and especially so during Corona; my mother fell ill; I sort of crashed when I ran out of energy; and it was a lot of work to clean up shop after my Plasma5 ‘ktown’ first got adopted as Slackware ‘vtown’ in testing and a bit later replaced the old KDE4 in the core distro. Lots of package recompilations and upgrades to work with the newer stuff in Slackware.

I also worked on (finally) migrating the old ‘bear’ server which was hosted in France, to a newer and more powerful server running in an Amsterdam Data Center. The new server ‘martin’ was mostly ready when I thought, let’s reboot ‘bear’ after applying the latest Slackware security fixes. And then it did not come back up… that was not a comfortable moment, since ‘bear’ not only hosts my own package and git repositories, but also The Slack Docs Wiki, the Slack Docs mailing lists, my own personal Wiki and some private family sites. I opened a support ticket and it turned out that the hard drive had crashed and all data on it were irrecoverable.
Luckily I had just finished making a set of backups and right before that fateful reboot, had discovered that my backup scripts omitted part of the server data… which I had also fixed just in time before  that crash.
It took some additional energy to get the services up and running on ‘martin’ again as soon as possible. I had made some new designs for the new server OS configuration and the new configs were un-tested… I hope not too many people noticed the partial down during the second half of November.
The new server runs fine now, has more disk space especially, so I can finally host the full history of Slackware releases and also the DAW and CINNAMON Live ISO images for which there was no room on ‘bear’.
Thanks again to those people who send me money un a regular basis so that I can pay the monthly rent of ‘martin’!

Despite that stress I have been enjoying myself still, just not in the spotlights. The semi-sudden switch in Slackware from KDE4 to Plasma5 and refreshing its XFCE Desktop had some consequences for my liveslak project. It took some time to work out a new optimal package set for the small XFCE image, and in particular the DAW Live image which is based on a bare Plasma5 Desktop needed attention to make it tick again.

So what’s new in Slackware DAW Live?

Remember: DAW = Digital Audio Workstation.
Read my original article documenting the research into a comprehensive collection of musician/producer oriented free and open source software, and a follow-up article on how to transform a Slackware system into a powerful Digital Audio Workstation.

Art work

I asked you in a previous post to come up with ideas for artwork to use in my Slackware Digital Audio Workstation. Thanks for those who contributed graphics and ideas – all of that creativity has been preserved here on the blog.
I decided to use the image to the left of this paragraph – a Slackware ‘S’ with headphones – as the icon to use for the “Slackware Live DAW” submenu. Contributed by Daedra and slightly colored by me.

I needed a second icon as well, to represent the ‘face’ of the Live user account, and for that I picked one of the contributions from Bob Funk: a Slackware ‘S’ with a TRS jack. You’ll see this one when you boot up the ISO and are asked to login at the SDDM graphical session chooser.

More art work was contributed by Sceptical-C, a friend of mine who doubles as a DJ, musician and producer. His black and white photography are the basis for several Plasma5 wallpapers and one of his photographs is also used as the background in the login and lock screens.

DAW_base package

I decided to move the configuration  of the DAW Live OS’ realtime capabilities out of the liveslak scripts and into a new Slackware package. This package called “daw_base” can be installed on any Slackware computer (preferably Slackware-current with PAM). It configures the OS in such a way that a user who is a member of the Slackware “audio” group is allowed to start applications with real-time scheduling priority. You’ll need that if you want to prevent sound drop-outs (also called XRUNs) during performing, recording and mixing. Some more tweaks are being made, they are documented in the package’s README.1st file. This package also contains the Plasma5 wallpapers which are created from the original Sceptical-C black-and-white artwork.
The package creates a new sub-menu in “Applications > Multimedia” called “Slackware DAW” and collects all my DAW related software in there. The submenus in “Multimedia” for the X42 and LSP plugins are moved into the “Slackware DAW” menu to keep it all closely together. This is very similar to what DAW Live also contains. Just the word “Live” is not present in the name of that menu installed by ‘daw_base‘.

The daw_base package also installs a template file for Slackware’s package manager ‘slackpkg‘. The template called “daw” contains a list of all DAW related software in my package repository and it allows for an easy installation and maintenance of that software collection.

New additions to the musician’s toolkit

Several packages needed a recompilation after the recent Slackware upgrades that are related to the new requirements for XFCE and Plasma5. I used that opportunity to upgrade software to their latest versions instead of recompiling – like Ardour, Mixxx, Jamulus, Guitarix for instance. But I also looked into some new stuff, mostly because people asked me about it. Here they are:

Zrythm.
An intuitive digital audio workstation all in itself. It’s under heavy development and nearing a 1.0.0 release. It supports LV2 plugins, offers a high level of automation, and looks really good. Perhaps an alternative for those who feel Ardour’s learning curve is too steep.

VCV Rack.
VCV Rack by the VCV project is a software emulation of the Eurorack Modular Synthesizer.
The project’s mission statement contains this line which resonated with me: “… the principle behind modular synthesizers is identical to the UNIX philosophy, where stable, minimal modules working together are preferred to a monolithic platform controlled by a single vendor (like portable synthesizer keyboards)“.

A short intermezzo first. My first experience with modular synths was as part of the audience when attending a concert by Pere Ubu, 1981 in De Effenaar in EIndhoven. Alan Ravenstine handled a huge contraption full of patch wires that produced all sorts of weird and interesting sounds. It’s what gave Pere Ubu their uniquely distinctive sound. I read later that he worked with EML modular synthesizers a lot but at the time I didn’t know. Damn impressive, but I decided that industrial sounds were more to my liking. This was during the early rise of Electronic Body Music, and that got me hooked for a while. If you can find the documentary “I dream of WIres” I recommend you watch it. The web site http://idreamofwires.org/ is dedicated to documenting the history of electronic music. An excerpt of a little more than 20 minutes is freely available, it contains an interview with Pere Ubu synth players Alan Ravenstine and Robert Wheeler.

Anyway – back in May 2019, a blog comment by ‘Hank’ already referenced VCV Rack with a question whether I would perhaps consider it for inclusion to my DAW software collection. At the time, my focus was on other things and a modular synthesizer is not the easiest instrument to work with, so I let that pass. But some recent youtube footage sparked my interest and here is the result – a Christmas present of sorts for you: packages for VCV Rack, and three free and open source plugins that expand the collection of available modules in Rack: vcvrack, vcvrack-audible-instruments, vcvrack-befaco and vcvrack-bogaudio.

Note that my VCV Rack package ‘vcvrack‘ contains the Fundamental plugin already. The software is quite useless without it so I decided to bundle it, just like the dev’s binary distribution. It is the only plugin which is automatically loaded by VCV Rack. If you install any other plugin, you need to execute one manual command to add the plugin to your user-directory: this will create a symbolic link to the ZIP file containing the modules and Rack will then automatically find and unzip this plugin and make it available to you.

$ ln -s /usr/share/vcvrack/Pluginname.zip ~/.Rack/plugins-v1/

All ZIP files in the VCV Rack system directory (/usr/share/vcvrack/) are module plugins – this is the format for distributing them.

Here is a Youtube tutorial series that you can use as an introduction to modular synthesis and VCV Rack in particular:

Enjoy! Eric

« Older posts Newer posts »

© 2025 Alien Pastures

Theme by Anders NorenUp ↑