This article describes how you transfer the content of a “Slackware Live Edition” ISO file onto a USB stick (aka pendrive) thereby making that USB drive bootable, and persistent. The guide is meant for people who are not already running Slackware but still want to try Slackware on a Live USB medium. Note that the parent article “Slackware Live Edition” describes in detail how Slackware users can create such a Live USB drive.
Basically, this divides the article’s audience into:
- Windows users (Windows 7 and higher) with its Boot Configuration Data (BCD) boot record, and
- Linux/BSD users who use GRUB as their boot manager.
I don’t think that LILO is used anywhere else than in Slackware. LILO does not support ISO images as boot selection, but it is still possible to make LILO boot Slackware Live. If you are not using Slackware but your OS is actually using LILO, let me know in the comments section and I will update this article with guidelines.
Why another guide if there’s a lot of documentation already?
It’s easy to use ‘dd’ or an equivalent Windows tool to copy the ISO file onto a USB stick, but then you end up with a read-only stick. The ISO9660 filesystem which is used for generating the ISO file, is read-only by nature and the ‘dd’ command copies everything, re-creating a read-only filesystem on the target.
People who want a Live USB stick with persistence, need to run the accompanying “iso2usb.sh” script which does some smart thngs to the USB stick to make it writable for the Live OS. However, using that script outside of Slackware seems to be an issue for some people.
Therefore this guide will show you how to:
- boot your computer to Slackware Live directly from a downloaded ISO.
- Subsequently write the ISO’s contents to your USB stick from within Slackware Live Edition. How? Because the “iso2usb.sh” script is contained inside that ISO and will be available to you in the Live OS.
Step 1: adding Slackware Live Edition to your computer’s boot menu
Windows 7 and newer:
Download and install EasyBCD from Neosmart Technologies. This software is free for non-commercial use. EasyBCD will allow you to add a Linux OS partition to the Windows bootmenu (that is what I use it for on computers that need to keep the Windows bootloader instead of switching to LILO or GRUB). It is much more versatile than that: for our current purpose, it is also able to make the computer boot from an ISO image stored on the local harddisk.
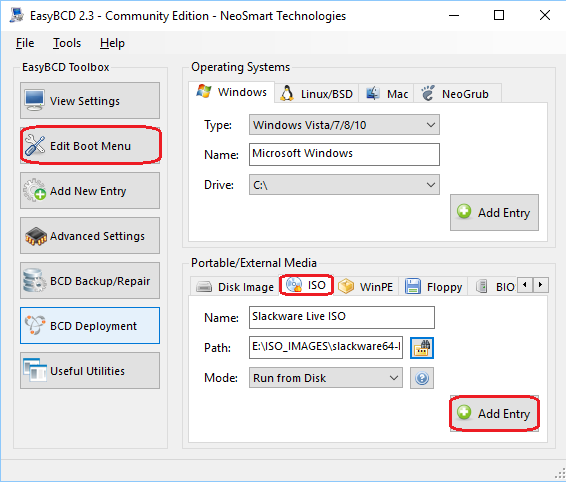
Start EasyBCD (it will ask for permission to run as an administrator) and add a new boot menu entry for the Slackware Live ISO:
- Click the “Add New Entry” button.
- In the “Portable/External Media” area click the “ISO” tab.
- Write the name you want to see in the boot menu, in the “Name” text entry field. For instance “Slackware Live ISO”.
- Leave the “Mode” to the default ‘Run from Disk‘ unless you want to wait a long time for the ISO to load into the computer’s RAM before booting (in which case you can select ‘Load from Memory‘).
- In the “Path” entry field you should select the full path to the ISO file of the Slackware Live Edition which you downloaded to your local hard drive.
- Click the “Add Entry” button.
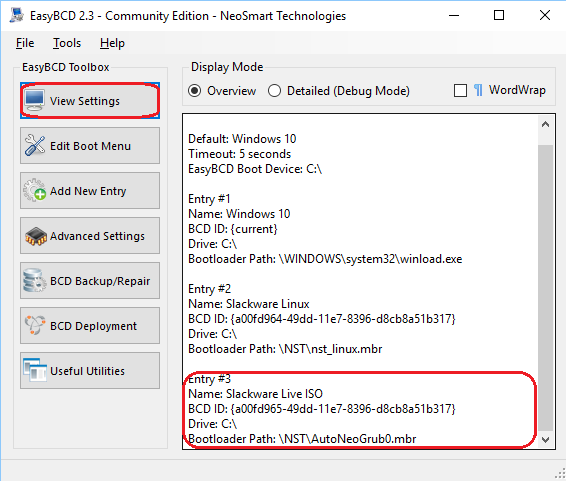
The “View Settings” will now show your new boot entry. You will notice that a new directory was created in the root of the Windows boot drvive (usually that is the C drive), called ‘NST’, which contains a single-purpose master boot record to boot the ISO image:
After rebooting your Windows computer you will see the new option “Slackware Live ISO” in the Windows Boot Manager screen. Select that option and watch your computer boot into Slackware Live. There are some remaining items to take care of before you can login:
- Don’t let the OS boot into the default settings. You have 30 seconds to do the following: in the syslinux or grub boot menu, you need to edit the boot commandline (in syslinux you need to press “TAB” and in grub you need to press “e” to edit the commandline).
- To the existing boot command parameters you have to add one more: “livemedia=/dev/sdX1:/path/to/slackware64-live-current.iso” or else liveslak will not be able to find its own media…
You need to change “/path/to/slackware64-live-current.iso” to the actual full path and filename of the ISO you downloaded. Use Linux forward slashes “/” to separate the directories even though the filesystem is probably NTFS where you would want to use Windows backslashes “\” instead.
The “/dev/sdX1” is your harddisk’s root partition.- Instead of the devicename of the partition (/dev/sdX1), you can also write the UUID or the Label of the partition’s filesystem.
- If the partition containing the ISO file is not the first partition on the disk, you need to adjust the device numbering in the above example (the orange “1” occurrences).
- If you know the filesystem path to the ISO but you do not know how your Windows partition translates to a Linux devicename, you can boot the ISO without the “livemedia” boot parameter but instead use the extra parameter “debug=4“. Then let the ISO boot – it will deliver you into a “debug shell” where you can use a command like “fdisk -l” or “gdisk -l /dev/sda” to inspect the partition layout of your harddisk(s). When you are ready, press the computer’s “RESET” button to reboot and try again.
- In liveslak 1.1.9 and newer, you will not have to worry about the ‘/dev/sdXX’ partition name and you can specify “scandev” instead. The syntax “livemedia=scandev:/path/to/isoimagefile” has been implemented to let liveslak search for the partition itself – you still have to specify the full path to the Live ISO file though.
GRUB version 2 and higher
I do not know about Grub 1.x (Grub Legacy)… probably no one uses this version anymore, but at least GRUB2 is able to loop-mount an ISO file and then access the kernel plus initrd inside the ISO image – and boot from these.
Pre-requisite is that you downloaded the Slackware Live ISO to your local harddisk – let’s assume that it is located in /home/alien/slackware64-live-current.iso .
- Open the grub local customization file in an ASCII editor (as root!): “/etc/grub.d/40_custom”. We will add our custom entry here, and afterwards we run “grub-update” to update the GRUB2 bootmenu.
- To the bottom of that file, add these lines (mind the backslashes – you should remove them, they are only added for better readability on this blog page):
menuentry “Slackware Live ISO” {
set isofile=”/home/alien/slackware64-live-current.iso”
loopback loop (hd0,1)${isofile}
linux (loop)/boot/generic livemedia=scandev:${isofile} \
    load_ramdisk=1 prompt_ramdisk=0 rw printk.time=0 \
    kbd=us tz=localtime locale=us_EN.utf8
initrd (loop)/boot/initrd.img
}
…where “/dev/sdX1” is the Linux naming convention and “(hd0,1)” the grub naming convention for your harddisk’s root partition.
In liveslak 1.1.9 and newer, you will not have to worry about the ‘/dev/sdXX’ partition name, because the syntax “livemedia=scandev:${isofile}” has been implemented to let liveslak search for the partition itself. - In case you are stuck with a pre-1.1.9 release of liveslak and can not use “scandev”, then instead of the devicename of the partition (/dev/sdX1), you can also use the ‘UUID’ or the ‘Label’ of the partition’s filesystem.
If the partition containing the ISO file is not the first partition on the disk, you need to adjust the device numbering in the above example (the orange “1” occurrences).
If you know the filesystem path to the ISO but you do not know how your Windows partition translates to a Linux devicename, you can boot the ISO without the “livemedia” boot parameter but instead use the extra parameter “debug=4”. Then let the ISO boot – it will deliver you into a “debug shell” where you can use a command like “fdisk -l” or “gdisk -l /dev/sda” to inspect the partition layout of your harddisk(s). When you are ready press the computer’s “RESET” button to reboot and try again.
NOTE:
In the “menuentry” example above I have used backslashes ( \ ) to split a long line (the one starting with “linux”) into 3 lines. This was done for readability! When you copy the above example into your “/etc/grub.d/40_custom” file, you must remove the two backslashes ( \ ) and join the three broken-up lines back into one single line that starts with “linux” and ends with “utf8“. - Run “update-grub” to re-generate the Grub master configuration.
If you get a “update-grub: command not found” error, that is easily fixed. In some distro’s the “update-grub” script was added, and some others like Slackware do not have it. The content of that “update-grub” script is:#!/bin/sh set -e exec grub-mkconfig -o /boot/grub/grub.cfg "$@"You can easily create a new file “/sbin/update-grub” as root, copy the above lines into it, and after saving this file you run “chmod +x /sbin/update-grub” to make the script executable.
Note that there may be distributions that rename “grub-mkconfig” to “grub2-mkconfig”. In that case, adjust the contents of your new “update-grub” script accordingly.
After rebooting your Linux computer you will see “Slackware Live ISO” as a new selectable option in your GRUB boot menu. Select that, and watch your computer boot into Slackware Live Edition.
Step 2: transferring the content of the ISO to your USB stick
This is the easy part, as it has been documented extensively in earlier blog articles. Also see the official documentation on Slack Docs for this transferal process. I will repeat it here for completeness’ sake:
After completing Step 1 from this guide, you are now running Slackware Live Edition on your computer, booted straight from the ISO file which is located somewhere on the computer’s harddisk.
Let’s login and mount that harddisk partition’s filesystem into the Live OS:
- Login to the graphical session manager which you see on screen. Use the account “live” with the password “live”.
- You will end up in a graphical desktop session (KDE, XFCE, MATE, PLASMA5 depending on the ISO variant you downloaded. Start a terminal emulator like “konsole” in KDE or a more basic choice like “xterm”. Any terminal will do.
- In the terminal, switch user to become root. The password you need to type for the ‘su’ (and also for ‘sudo’) command is again “live”:
$ su -
- Now that you are root, mount the harddisk partition to the Live OS directory “/mnt/hd” so you can access the ISO file there later:
# mount /dev/sdX1 /mnt/hdLike with Step 1, you must substitute the example “/dev/sdX1” with the actual partition name on the harddisk, to where you downloaded the ISO. Use the command ‘fdisk -l’ to see what partitions are available if you are unsure about which one you need.
- Plug in your USB stick. Make sure it does not get mounted. If it gets mounted automatically, you need to un-mount it again, manually.
- A script is available which allows you to transfer the ISO content to a USB stick, making some modifications depending on the script’s parameters. The USB stick will be erased and re-formatted when running this script! Before inflicting any irreversible damage, the script will show you a prompt at which point you can evaluate whether it is safe to continue.
This script, called ‘iso2usb.sh‘, accepts the following parameters:
-c|--crypt size|%        Add a LUKS encrypted /home ; the parameter
                         is the requested size of the container in
                         kB, MB, GB,or as percentage of free space.
                         Examples: '-c 125M', '-c 1.3G', '-c 20%'.
 -f|--force              Ignore most warnings (except the back-out).
 -h|--help               This help.
 -i|--infile             Full path to the ISO image file.
 -o|--outdev             The device name of your USB drive.
 -p|--persistence        Custom name of the 'persistence' directory/file.
 -r|--refresh            Refresh the USB stick with the ISO content.
                         No formatting, do not touch user content.
 -u|--unattended         Do not ask any questions.
 -v|--verbose            Show verbose messages.
 -w|--wait               Add X seconds wait time to initialize USB.
 -C|--cryptpers size|%   Use a LUKS-encrypted 'persistence' file instead
                         of a directory (for use on FAT filesystem).
 -P|--persistfile        Use an unencrypted 'persistence' file instead
                         of a directory (for use on FAT filesystem).
Examples:
Note1 -the “#” at the beginning of these examples is an indication that you need to run the command as root. The “#” is not part of the command!
Note2 – the value for the output parameter is the device name of the stick and not one of its partitions!
- Create a USB version of Slackware Live, where the USB stick is known to the system as ‘/dev/sdX.
# iso2usb.sh -i /mnt/hd/home/alien/slackware64-live-current.iso -o /dev/sdX - Create a USB Live like above, but this time adding an encrypted /home filesystem with 750 MB of space, and at the same time increase the wait time on boot to 15 seconds (useful for slow USB media that fail to start the Live OS otherwise):
# iso2usb.sh -i /mnt/hd/home/alien/slackware64-live-current.iso -o /dev/sdX -c 750M -w 15 - Create a USB Live with an encrypted /home (allocating 30% of the stick’s free space for /home) and where the persistent data will be stored in a container file instead of a directory:
# iso2usb.sh -i /mnt/hd/home/alien/slackware64-live-current.iso -o /dev/sdX -c 30% -P - Create a USB Live with both the /home and the persistent data encrypted (the persistence filesystem will be 300 MB in size):
# iso2usb.sh -i /mnt/hd/home/alien/slackware64-live-current.iso -o /dev/sdX -c 30% -C 300M
You might have noticed that the “-P” parameter does not accept a size parameter. This is because the un-encrypted container file is created as a ‘sparse’ file that starts at zero size and is allowed to grow dynamically to a maximum of 90% of the initial free space on the Linux partition of the USB stick.
Good luck! Eric
PS: if you took the time to scroll all the way down, and if you would rather want to use the “iso2usb.sh” on your non-Slackware distro instead of going through all the hassle of this guide, please give me feedback about the errors and issues you find when running the script in your distro.
I absolutely wish that the script works perfectly on any distro, not just Slackware. If you have suggestions or patches, those are very welcome!
Finally, i prefer use slackware, 😉
just a joke 😉
It is nice to see someone put this in writing for slackware. I took some flack years ago for running grub then grub2 on Slackware.
Nothing against lilo I wanted to mount and run live disks to see if my programs ran on other distro’s native system.
I have had so much fun building liveslack with full audio and video editing studios for my friends.
Bows to one knee great job.
Glad that there is at least one person who thinks this is a worthwhile article 🙂
Your articles are always interesting, Eric ;
I just came across these articles:
https://docs.kali.org/downloading/kali-linux-live-usb-install
https://docs.kali.org/downloading/kali-linux-live-usb-persistence
Basically what is suggested is to burn the ISO with dd then add persistence afterwards.
Caveat emptor: I didn’t try.
Cheers, Didier
Don’t confuse the issue by pointing to incompatible distro documentation!
The Kali instructions work for Kali Linux Live ISO images. They do not work for Slackware Live Edition.
Hello, Eric.
This article is very interesting and useful. Thanks for share it.
In my machine with Debian 7.11 (wheezy) I \’ve had to change that:
loopback loop (hd0,1)$(isofile)
linux (loop)/boot/generic livemedia=/dev/sdX1:$(isofile)
by this:
loopback loop (hd0,1)${isofile}
linux (loop)/boot/generic livemedia=/dev/sdX1:${isofile}
If not, after \”update-grub\” I received \”syntax error: Incorrect command\”.
Thank you very much for your time and your effort.
Regards.
liberes – indeed that is a miss from my end. Your use of ‘{}’ is in fact correct.
I will update the main article, thanks for your valuable feedback.
Oh, you are welcome. A big thank you for create Slackware Live and the liveslak scripts. I’m writing this message from slackware64-current-plasma5.iso from hd (it works perfect!).
One question: Is it possible use the setup2hd script for install Slackware current in disk from iso? I meant without transfer to usb previously (I haven’t free/working usb ports.)
If yes, I have fun for the weekend: install Slackware current with Plasma5 in this machine.
Best regards.
liberes – the article should help you booting liveslak from an ISO file on your computer. Once you are running liveslak you can use fdisk/gdisk/cfdisk/parted to partition a hard drive in that computer and then you run ‘setup2hd’ to install Slackware from the ISO directly to the hard drive. A USB stick is not required.
Eric
I was wondering how long does it take to complete the setup2hd? I tried it on my laptop and it took up to an hour long, is that normal?
Thanks
Hi Jay, copying the files out of the compressed squashfs modules onto the harddisk takes longer than when installing Slackware packages directly from the .txz files. So, an hour could be correct. It mostly depends on the CPU capabilities of your computer but also you have to take into account that the data is being written of a USB stick which is often slower than when the source is your network or a local harddisk.
That makes sense, usually it take 25minutes to do a full install.
Eric a non related questions, is there anything wrong if I just install from the official 14.2 iso and just execute the upgrade commands to get to the lastest stable updates
Thanks
Jay, indeed. You can install Slackware 14.2 from the official ISO image (after you burn it to a DVD or use ‘dd’ to copy it to a USB stick). After installing Slackware 14.2, you can (and should) upgrade to the latest patches available for Slackware 14.2. The ‘slackpkg’ tool is probably the easiest way to do this, but you can also download and install patches manually.
Note that applying all these security patches will give you an uptodate Slackware 14.2 (i.e. stable release) but it will not upgrade you to slackware-current (development release).
Read more on keeping your system uptodate and safe:
https://docs.slackware.com/slackbook:tracking_updates
https://docs.slackware.com/slackware:beginners_guide#watching_for_updated_packages
> EasyBCD will allow you to add a Linux OS partition to the Windows bootmenu
I am hitting the limitations described here https://neosmart.net/wiki/easybcd/uefi/ right at EasyBCD startup. Add new entry -> Linux/BSD and everything is locked and grayed. What to do?
Anonymous, disable SecureBoot and check if that is sufficient. Otherwise you also need to disable UEFI, but on my Windows 10 PC that was not needed. Else you need to switch to another bootloader than Windows BCD. Just like that page tells you.
Ho un Dell 5770 con hdd ed ssd il so windows e in ssd voorrei installare anche slackware in dualboot, ma il cfdisk non vede ssd,,,,,,
Come installare slackware 14.2 in dual boot ssd in dell 5770??
Non-english posts will not be answered. Also from the looks of your text your questions are pretty generic, it’s got nothing to do with my blog posts. Please ask your questions on a Linux online forum.
Hey Alien, thanks for the article.
After adding the ISO to windows boot manager via easyBCD and upon rebooting the machine I am presented with ‘grub4dos’, and seemingly no references to slackware, with no apparent ability to edit the commandline; only a basic cli. It certainly doesn’t boot into slackware if you give it 30 seconds, and pressing ‘e’ merely tells me that ‘e’ is not a valid command.
I have the issue on two separate machines. Unless I am missing something blindingly obvious, which is entirely possible as I am new to linux, easyBCD doesn’t seem to have fully extracted the contents of the iso file? I can’t think what else would be causing the issue.
Nick, if I search “easybcd grub4dos” I find several articles and a video claiming that the behaviour you experience is a bug. What version of EasyBCD are you using?
Check https://neosmart.net/forums/threads/grub4dos-regressions-in-easybcd-2-3.14280/ or https://www.youtube.com/watch?v=4eQLOjM7-kA
Thanks for the response Alien,
It seems my googling skills leave much to be desired…
I am running EasyBCD v 2.4.0.237
Video instructions do not solve the problem, despite shortening the name
of the iso and placing it to the root of the partition.
Another video suggested \’root (hd\’ etc, to manually select the boot
file, within grub4dos, however this command gives me error 17 \’cannot
mount selected partition\’, referencing me to grub4dos.chenall.net/e/17,
which is a 404 with some chinese script.
The forum seems to suggest installing BCD version 2.2, however the file
on the forum is \’access denied\’ and my (albeit evidently incompetent)
googling doesn\’t seem to present me with any 2.2 download link. I have posted on the aforementioned thread to ask for a file of version 2.2.
Have you seen this error before? It seems that if it is a bug in the software many must have had it?
Thanks again for your help.
Nick, I have not seen that error myself. Also, no one mentioned it before. There’s not much I can add to that, I am afraid.
Could you possibly suggest an alternative program? Assuming such a program exists. Thank you
Nick, no. Your best bet is to find support for your EasyBCD problem.
Hi Alien,
I tried both using dd command and iso2usb script on 8 giga usb flash drive, it seems to me that using dd command is much faster than using the iso2usb drive, anyone have tried this ?
Hi Bachir.
In your case, there is one relevant difference between a version of Slackware Live which was copied to USB stick using ‘dd’ or the one created with ‘iso2usb.sh’.
The Live OS on the stick that was created with ‘dd’ does not write to the stick. Everything that gets changed in the Live OS is not written to the physical USB stick but to a RAM-disk. That makes the OS much more responsive than the one you get when using the ‘iso2usb.sh’ script.
However, that RAM-disk is destroyed when you reboot, and when the Live OS reboots again, it will look 100% like the previous time.
The Live OS on a USB stick that was created with ‘iso2usb.sh’ saves every change on the USB stick. Your data is still available after you reboot. This is called ‘persistence’.
You can configure a Slackware Live stick to write all these changes to an encrypted area on the USB stick so that if you lose it, nobody can access your data if they find the stick.
So, the trade-off is speed versus persistence.
Hi Alien
Thanks much , this is clear to me now.
i also tried as you said and the changes were saved into the usb.
well if i want both the speed and the persistence by creating a free space on the dd USB , can this be done ?
A big hello and THANKS from Central America. I normally follow and read your scripts and shell code to improve my skills. This live slack is a gem as I wanted to test it long time before. Some comments and suggestions:
1) This blog entry regarding Grub2 to use live slack from disk is very important, please include this info in docs.slackware.com/slackware:liveslak I found this for accident.
2) My Dell XPS13 is 4K and I will need to investigate how to customize the environment.
3) is it possible to have a persistent option using and booting iso image from one of my partitions?
4) It could be nice to have your advice, after having live slack operational, what to test and explorer for a newcomer like me. This is impotant to “feel” and “taste” Slackware.
Again Thanks for your effort and contribution to slackware. I really appreciate all what you publish, I follow a good teacher!. Regards.
Hi Francisco, glad to read that you like my scripting style. I do not know if you are using Slackware, or Linux at all. I guess another distro? If you boot a Slackware Live OS, it’s just Slackware that you’ll see. So if you already know Slackware, everything will be familiar. If you do not use Slackware, then if I were you I would just try working with it for a while just like wirh your regular OS and try to see if it allows you to do everything you expect from a Linux distro. There’s not something more specific that I can suggest to you.
Thanks for your reply Alienbob, Yes I have been using Linux debian (kanotix) as my regular distro. I downloaded and used slack live KDE Plasma and it is working very good. I have been reading: “slackbook.org” book reference. Installing and managing app install seems not familiar to me, but I will continue reading and investigating. Congratulations for this live slack iso. It is worth it to test slackware. In fact, I have for 2 days this live slack plasma working. As Hibernation and Suspend are working ok, seems there is no necessity to reboot!!!. Very Stable so far…!
Hi Eric. Now I am interested in using KDE plasma liveslak with persistence +encription in a microsd card. I have an available microsd card reader slot for it in my Dell XPS13-9370.
My experience:
1. Trying to generate this install using iso2usb.sh script from another distro (debian buster) after supplying some depends, at the end of the script gptmbr.bin was not found so I had to supply:
cat /usr/lib/SYSLINUX/gptmbr.bin > ${TARGET}
to make it work, but USB/SD cards does not boot after grub screen (black screen). No more testing this way.
2. Following advice from this page, I got better results making the process from a liveslak iso directly run from a HD partition. mounted a USB with liveslak ISO file at /mnt/hd and the microsd card in the card slot reader as destination. I used script with -C %35 -c %65 -w 15 parameters.
I got grub screen and booting process start but I got a RESCUE MODE SHELL.
SLACKWARELIVE: no live media found… trouble ahead.
I repeated boot process with rootdelay=20 as adviced, same results.
It is weird: I tried same microsd card but now I put it inside a USB reader and booted ok!, same result in another Laptop with a SD reader (I put microsd card in a SD enclosure). live media was found at /dev/sda3, /dev/sdb3, but in that rescue mode I have no idea what /dev/xxx to mount at /mnt/media.
I left my testing process at this point last night. Any hint or advice?
liveslak with iso file directly booted from HD partition works very well. Is it possible to have the 2 files (luks encrypted) persistence and home in a HD partition to be used by a liveslak booted this way (as a parameter), any link to know how to prepare those files? or can it be transfered from microsd card?
Thanks for your help in advance Eric. I like and enjoy liveslak. Reading scripts on how the system manage packages has been a very good source to understand slackware. Best Regard.
Francisco, a SD card presents itself to the system as a “non-removable medium” thanks to I guess UDEV rules. I have several checks on the “removable” property of the medium that is supposed to have the Live OS on it so I cannot tell you if it will ever work what you are trying. Love to hear when you solve it though. Perhaps it needs a hack in the udev rules file that announces a sd card to the system.
I do not support having all kinds of files on a harddisk partition and then sowing all that together to boot a Live OS, sorry.
Note – curiosity “dirty flag”
If we do a dump of the contents of the iso in a liveslak folder on the hard drive
Let’s adjust the sislinux or grub menu entries with the appropriate path to the liveslak folder.
The live starts without problem with two problems the first establishes the medium in read mode, and at the end marks the disk for repair.
If we create a persistence image it is read only if we delete dirty flag
I am aware that scrits establish reading mode on hard drives to avoid damage in live mode.
Hi Eric.
Just to let you know about my progress using slackware:
1) I used liveslak with encrypted persist, and updated several times my USB with your new releases.. All went perfectly.
2) Today I explored liveslak install to disk (setup2hd script) in my laptop. I prepared a Partition to host slackware and shared my /home partition used with my other linux distro. I was very happy and surprised after half hour install process, my other distro detected slackware by “update-grub2” and booted ok. Only huge kernel booted ok not the generic one (kernal panic).
I see this slackware HD install is very solid and with lots of ready to use packages. Installing original slackware needs compile and install each package… big advantage. I am surprised It works very fast compared with my other debian and mate installs (lower kde versions).
Some questions Eric,
1) How may I keep updated my HD install when you release a new slaklive install? Repeat setup2hd?.
2) It seems there is no a similar debian apt service to keep security fixes for slakware. As I have read, I should upgrade available packages..
3) Any advice (reference link) to encrypt my HD install?.
4) May I use rsync to keep my home laptop dir and usb persist synchronized?
Thanks Eric for all this huge effort and excelent and outstanding work.
Best Regards, francisco
Hi!
I’m not Eric but I may have some answers 🙂
1) and 2) probably have the same answer, slackpkg is the standard Slacware install/upgrade tool, more info:
https://docs.slackware.com/slackware:slackpkg
3) I’m using LVM+LUKS on my machine (also installed from liveslack), you should check this:
https://mirrors.slackware.com/slackware/slackware64-current/README_CRYPT.TXT
4) I guess so but I never used the persistent USB 🙂
BTW, the kernel panic you got from the generic kernel is probably because you don’t have an initrd file:
https://mirrors.slackware.com/slackware/slackware64-current/README.initrd
Cheers!
As an addendum to my slackpkg response, you should also try slackpkg+ to manage third party repos, like Eric’s:
http://www.slakfinder.org/slackpkg+.html
https://alien.slackbook.org/blog/introducing-slackpkg-an-extension-to-slackpkg-for-3rd-party-repositories/?utm_source=rss&utm_medium=rss&utm_campaign=introducing-slackpkg-an-extension-to-slackpkg-for-3rd-party-repositories
I believe liveslack already provides it.
Many thanks Ricardo for your kind response and help to explore slackware world.
I will read and study those links for my needs.
Thanks again.
Francisco.
Hi Ricardo / Eric
One month using liveslak HD install. updates with slackpkg+ went smooth and all fine.
Maybe one config change for some updated package prevented me from having sddm login screen and only slackware init 3 level login prompt.
I have been trying to understand and fix this, /etc/rc.4 is executable but it is not run diring boot process. As a workaround, I logged in with my user name and run: startx from shell.
I appreciate any hint or links to continue investigating.
I am learning a lot, and I installed some pakages… I like how responsive is my laptop is with this liveslak.
Regards, Francisco
Francisco, the boot runlevel of a Slackware computer is determined in the file /etc/inittab .
On 30 August, there was an update in Slackware-current for the “sysvinit-scripts” package. This package provides the file /etc/inittab. I guess that you allowed slackpkg to overwrite your /etc/inittab with the new version.
And since the Slackware default is to boot into runlevel 3, this is what you are now experiencing.
Simple fix: edit /etc/inittab and change “id:3:initdefault:” to “id:4:initdefault:”.
By the way, once you have installed a Liveslak distro variant to your harddisk using setup2hd, it is no longer “liveslak” but a regular Slackware. All the add-ons that make liveslak into the Live distro are not copied onto your harddisk.
Thanks Eric. Fixed!.
I looked first into Slackware about 2 or 3 years ago, and read something then That gave me the idea that installing it would sort of like installing Arch Linux or Gentoo, which still are a bit above my experience level. Then I found Absolute Linux, but the support information I found was not the best for me, I once nuked the 6 OSs I had in one of my older machines when trying to install it.
But I liked the layout of Absolute and kept looking at it and even trying it eventually a few more times.
But i never was able to install it successfully along my other Linus distributions.
When I found Extons ExGentoo i succeeded in creating liveUSB that functions exceptionally, and then oone day I noticed SlackEX and was about to try it, but then readon that the last version was 2017 because LiveSlack was so good. So i began looking att Live Slak and I am really amazed at the clarity and friendliness of is design and of the instructions and answers you provide. I haven’t started yet – well I have already made an USB via dd, but got some problems – but that was before reading your instructions, so i may have done too many misstakes. I wil read a little more and go back-. But I felt you deserved my recognition for your work. thank you.
Well thanks for your story, Wan. I hope liveslak turns out to be a nice introduction to a real Slackware system installed on your hard drive.
I simply don’t have the patience to make a persistent usb. I just want to use slackware and not spend hours figuring out and trying shit because I will destroy my computer when things aren’t working and that costs me too much money, can’t I buy a USB stick with persistent slackware somewhere?
Go play in someone else’s garden. Close the gate on your way out.
Hi AlienBob,
I just tried to create a persistent USB stick, but got stuck when trying to mount the host HD with “mount /dev/sda1 /mnt/hd”. It failed reporting that “either /dev/sda1 is already mounted or /mnt/hd is busy”.
I am running Debian 10.
How can I get around this?
FWIW, my first intro to Linux was with A Slackware Book and included CD back in the 90s and what I learnt then has stood me very well since. Kudos to the ongoing efforts to maintain this distro.
Hi Vincent,
I have never used Debian and will probably never try it either. So I must ask you to check the specifics of what is happening there. I am assuming you know how to work on the Linux commandline if you use Debian.
You did follow the steps to download a Live ISO and boot from it before attempting to mount your hard drive partition to /mnt/hd ?
Have you tried creating another directory (i.e. not /mnt/hd) and continue with that? Is /dev/sda1 actually the correct hard drive partition where the downloaded ISO is stored? And is /dev/sda1 not already mounted, and was it formatted with a filesystem which is actually supported in Slackware?
What does the “dmesg” command tell you about possible incompatibilities? Have you checked /var/log/messages and /var/log/syslog for possible causes of that error message?
Thanks for taking the time to respond.
I followed the steps and successfully booted from the LIVE ISO. sda1 is correct, is an EXT4 partition and mount does not report it as being mounted. I did create another mount directory and sda1 also failed to mount giving the same error. The only references I saw of it in the dmesg output is as follows:
[ 12.142794] EXT4-fs (sda1): mounted filesystem with ordered data mode. Opts: (null)
[ 12.256885] EXT4-fs (sda1): mounted filesystem with ordered data mode. Opts: (null)
Any other pointers?
Vincent
Is that partition part of a logical volume (LVM)? If so you must initialize LVM first.
With the liveslak ISOs you can use “localhd” as additional boot parameter and that will initialize any RAID and/or LVM configurations on the local computer during Live boot-up.
Spent a few hours trying to get slackware-live on a usb stick from windows. rufus and etcher not working. porteus linux has a really simply way to do this. would be a great service if there was a way to craft a slackware live usb that didnt involve modifying boot menu on windows.
Yeah this is not Porteus who create Windows executables to assist you. That’s a bridge too far for me,
What’s the issue with Rufus or Etcher?