 During the past weeks I have been working on my “liveslak” scripts for the Slackware Live Edition. Check out my previous articles about Beta1 Beta2 and Beta3 releases for these scripts, they contain a lot of background about the reasons for creating yet another Slackware Live, as well as instructions on the use of the Live ISO images and their boot parameters.
I will be numbering the releases with ‘normal’ version numbers from now on, so the 4th beta release translates to “0.4.0”. The 1.0 release will contain everything I consider essential for my Slackware Live Edition. I think I am rapidly working toward that final milestone..
Update 06-jan-2016: please continue reading and commenting in my follow-up article on “Beta 5“.
What’s new in 0.4.0?
As with these previous public releases, this Beta4 marks a new milestone in the functionality of the Live OS. So what’s new? A feature I consider crucial for a persistent Live OS on a USB stick that you carry around with you in your jacket pocket… data protection! Persistence of the Live OS means, the things you change or add (or delete) are stored on the USB medium and will survive a reboot. As opposed to the raw ISO image (burnt to a DVD or ‘dd’-ed to a USB stick) which is a pure Live OS where all your modifications are written to RAM and gone when you reboot.
Data protection. How do you protect the stuff you are accumulating in your live user’s homedirectory, such as passwords, confidential documents, GPG and SSH keys etc? You lose the USB stick, someone else may steal it – your sensitive files will be compromised. Therefore the Slackware Live Edition offers you the option to create a LUKS-encrypted container file in the Linux filesystem of the USB stick. The filesystem inside that encrypted container will then be mounted on the /home directory of the Live OS when it boots. The LUKS passphrase you entered when creating the container, will be prompted for during the boot-up of the Live OS. On shutdown, the container will be locked again and a potential thief of your USB stick will be unable to get to the files in the LUKS container.
But there’s more of course. Here are some other highlights:
- Better looking Grub boot menu (UEFI computers) by letting the “make_slackware_live.sh” script generate the used fonts.
- The X session now supports the Compose Key. Use the Right-Alt (aka Alt-Gr) key to generate composed characters (like ë, ï, é etcetera).
- When selecting a non-US keyboard, you can toggle between that and the US keyboard layout in your X session by pressing the Shift-Alt key repeatedly.
- On request of Pat, the SLACKWARE ISO no longer contains the Nvidia binary drivers. You’ll get a pure Slackware experience without any 3rd party software getting in the way.
- The ALSA softvol pre-amp is no longer applied when the pulseaudio package is installed.
- The “isohybrid” commandline in the “make_slackware_live.sh” script has been tuned so that the resulting hybrid ISO file should boot on a larger variety of computers.
Download the ISO images
I have created ISO images for the SLACKWARE, XFCE, PLASMA5 and MATE flavours using the latest Slackware64-current packages available today. That means, you can check out the recently added PulseAudio comfortably. For the PLASMA5 variant, I used the very latest KDE-5_16.01 packages available in my ‘ktown‘ repository. Willy Sudiarto Raharjo built a fresh set of Mate packages specifically for this Live release.
You can find the ISO images plus their MD5 checksum and GPG signature at any of the following locations – look in the “0.4.0” subdirectory for ISOs based on the liveslak-0.4.0 scripts:
- Primary location: http://taper.alienbase.nl/mirrors/slackware-live/ (rsync URI: rsync://taper.alienbase.nl/mirrors/slackware-live/)
- Willy’s mirror: http://repo.ukdw.ac.id/slackware-live/
- Ryan’s mirror: https://seattleslack.ryanpcmcquen.org/mirrors/slackware-live/
- Shasta’s mirror: http://ftp.slackware.pl/pub/slackware-live/ (rsync: rsync://ftp.slackware.pl/slackware-live/)
Please allow some time to synchronize these mirror servers.
The ISOs have two user accounts: root (with password ‘root’) and live (with password ‘live’). My advice: login as user live and use “su” or “sudo” to get root access (note: “su” and “sudo” will want the live password!).
The ISOs are able to boot both on BIOS-based computers (where syslinux takes care of the boot menu) and UEFI systems (where grub builds the boot menu, which looks quite similar to the syslinux menu):
How to create a persistent USB stick from the ISO?
The ISO can be burnt to a DVD or copied to USB stick using ‘dd’ or just plain ‘cp’, but that will give you a read-only medium because all changes to the Live OS are in fact written to your computer’s RAM.
Use the ‘iso2usb.sh‘ script to create a Live OS on the USB device with persistence. Changes you make while running Slackware Live will then be preserved across reboots because the OS will write all these changes to the directory “persistence” in the root of the USB device. The script requires an input and an output parameter at a minimum:
# ./iso2usb.sh -i ~/Download/slackware64-live-current.iso -o /dev/sdX
… where /dev/sdX is the device name of your USB stick which will get formatted – erasing all data currently stored on it. The iso2usb.sh script will pause to show you the characteristics of the target device and ask you once more if you really want to continue erasing it. You will not easily destroy your harddrive unless you are really not paying attention!
How to create the LUKS encrypted homedirectory container?
THe iso2usb.sh script has been extended with a new parameter “-c” which takes a size argument. If you want to create a 400 MB container file to hide your homedirectory in, then you need to specify “-c 400M”. If you want 2.5 GB for your homedirectory, use “-c 2.5G”. If you are not concerned so much with the exact size but want to allocate a percentage of the free space on the stick, then use “-c 40%” to create a LUKS container that uses 40% of the available free space.
Now to put that into an actual example commandline which will create a file (its name will be “slhome01.img” by default) using up 50% of the free space on the stick:
# ./iso2usb.sh -i slackware64-live-xfce-current.iso -o /dev/sdX -c 50%
When the script gets to the point where it creates the LUKS container file, it will prompt you for a passphrase which will be used for encrypting and decrypting the container’s data. Right after that, the script will prompt you to enter that passphrase again when the LUKS container is unlocked and the ISO’s /home content is copied into the container.
Booting the Live OS
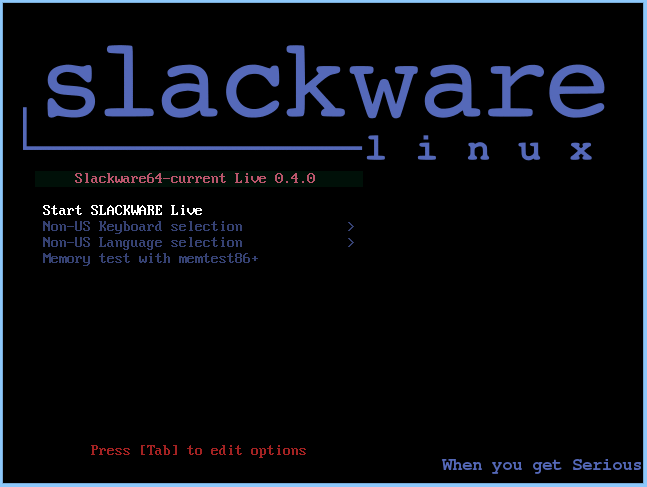
When you boot Slackware Live on a BIOS computer, Syslinux will handle the boot and show the following menu:
- Start (SLACKWARE | PLASMA5 | XFCE | MATE) Live (depending on which of the ISOs you boot)
- Non-US Keyboard selection
- Non-US Language selection
- Memory test with memtest86+
You can select a keyboard mapping that matches your computer’s. And/or boot Slackware in another language than US English. You will probably want to change the timezone; syslinux allows you to edit the boot commandline by pressing <TAB> because the syslinux bootmenu does not offer you a selection of timezones.
On UEFI computers, GRUB2 handles the boot and it will show a menu similar (and similarly themed) as the Syslinux menu:
- Start (SLACKWARE | PLASMA5 | XFCE | MATE) Live (depending on which of the ISOs you boot)
- Non-US Keyboard selection
- Non-US Language selection
- Non-US Timezone selection
- Memory test with memtest86+
Editing a Grub menu is possible by pressing the ‘e’ key. After making your changes to the boot commandline, press <F10> to boot.
Another difference between Syslinux and Grub menus: in Grub you select keyboard, language and/or timezone and you’ll return to the main menu every time. You still have to select “Start Slackware Live” to boot. In the Syslinux menu, only the keyboard selection menu will return you to (apparently bot not actually) the same main menu. The non-US language selection will boot you into Slackware Live immediately without returning to the main menu. A limitation of syslinux.
Caveats and tips
Remember that this is still a Beta! There are still some rough edges that I am aware of, and if you find others please let me know.
- Using the Nvidia binary drivers on a persistent USB stick – once you pass the argument “load=nvidia” and your USB stick is persistent, you have to keep loading the nvidia module or else your X serssion will no longer start. If you are always going to use the USB stick on computers with supported Nvidia cards, the simplest solution is to move the file “0060-nvidia-352.63_4.4.0-current-x86_64.sxz” from “liveslak/optional/” to the “liveslak/addons/” directory so that it is loaded by default, saving you from typing “load=nvidia” every time. The ugly solution is to remove the content of the “/persistence/” directory on the Linux partition.
- Booting a persistent USB stick with LUKS home to the “virgin condition” – suppose you screwed up somehow and the USB stick won’t work anymore. You can boot the original Live OS without all your accumulated persistent changes by adding the boot command parameter “nop” which stands for “no persistence”. That will still mount the LUKS container on the /home directory. If you want to ignore the LUKS container, and use the /home directory of the original Live OS, an additional parameter “luksvol=” must be added to the boot commandline. After logging in you can remount the Linux partition of your stick to make it writable:
# mount -o remount,rw /mnt/livemediaand proceed with pruning the persistence directory “/mnt/livemedia/persistence” and/or fixing the LUKS container file “/mnt/livemedia/slhome01.img“.
Happy hacking! Eric
The Nvidia issue is easy to fix as I had to do it with the the mklivecd scripts and the linux-live scripts for Slax. The easy fix is to add it to the grub loader or you can add a “load” question to ask whether you are using a Nvidia card and have the answer can load a script to insert the module. On my SuperGamer series I used a custom script to detect what card they had and then let the user install the drivers if they wished. That would be the proper approach but everyone has an opinion.
Thanks for the encryption option!
plasma5 iso work here in this moment 😉
Thanks for the new live edition (XFCE here). It allows me to see for myself what’s the fuss about pulseaudio and so far audio is working out of the box (audacious). One strange thing however: the pipe “|” and “@” characters are not working immediately. AltGr+6 gives me “~” in XFCE terminal instead of “|” (I selected the French keyboard and then the French language in the boot menu). When I switch to USA Keyboard and then back to French keyboard, it works!!
Hello Eric,
Thank you for your script, it helps me providing the “live” option to a tool I’m upgrading.
BTW, I couldn’t find any ‘reference” on your posts or in comments, sorry if I missed that, but I’m not able to mount overlay. I’m using stable Slack 14.1 (Kernel 3.10.* IIRC), so I guess it’s because kernel previous of the 4 series didn’t support overlay.
I tried an old syntax which was supposed to work “some times ago” (according to ‘google’). It used ‘overlayfs’ for the type and didn’t provide a workdir. But I had no chance with that either…
So I guess you build your LIVE iso from a -current tree with the 4.* kernels.
Is there a way to be able to do a mount overlay with a previous version ? Some ‘fuse’ or equivalent ? Or did you wait the 4.x kernel series to be able to do that kind of things ?
I know that -current will soon become 14.2, but “meanwhile” I still have to advance, and I’m reluctant to use a -current to work, even it’s is “almost stable” :).
So if there are tools that can unlock me that would be great, if there are no other options I’d upgrade to -current but I’d rather do it when release candidates are ‘out’.
(Note: I generate -current live system, but still have 14.2 on my workstation).
Thanks again,
Cheers,
Garry.
Hi Garry
It was no coincidence that I released my Slackware Live Edition at this moment in time. What I created is not possible with any stable release of Slackware (14.1 or older) because a 4.0 kernel or higher is a requirement. The overlayfs in older kernels simply does not have the ability to overlay multiple readonly filesystems.
So, for older Slackware release you will have to fall back on existing solutions like SLAX, SalixOS-Live or linux-live scripts that use aufs instead of overlayfs (and even aufs requires that you recompile your kernel).
With “reference” you probably meant documentation for my scripts? One of the items on my TODO for a 1.0 release is writing proper documentation. Until then, the comments in the “make_slackware_live.sh” are your only documentation.
Note that creating the ISO image also requires that you are running Slackware64-current because the 4.0 kernel’s overlayfs capabilities are used to create the Live filesystem. Likewise, the Slackware OS used *for* the Live OS can only be Slackware64-current because older is not supported (and 32bit has not been tested).
Hi Eric,
thanks for this new Live experience!
I was finally able to boot in Slackware Live in some PCs, while others still refuse to boot… but now I know that’s something due to the computer and not to your Slackware Live build.
Notes:
– in an HP Z230 workstation, Plasma 5 session doesn’t work and I have to use Plasma Failsafe session;
– in an HP Elitebook 8540w with Nvidia Quardo FX 880M I got repeated sddm segfaults, so X11 nevers starts (I used ‘load=nvidia’ option at boot).
Excuse my stupid question, but is there the option to create a single Slackware Live iso with all DE (Plasma, Mate, Cinnamon)?
Hi david,
If you do not load the Nvidia driver (the default option), does SDDM start normally in that case?
The script does not have an option to put all these 3rd party Desktop Environments together into a single ISO, but using the commandline parameters it is quite easy to achieve it anyway:
# ./make_slackware_live.sh -d PLASMA5 -m mate,cinnamon
That will configure the ISO to use the Plasma 5 configuration but add all the Mate and Cinnamon packages on top. In runlevel 4 (the default) the SDDM session dropdown should show Mate and Cinnamon. In runlevel 3 (started when you add “3” to the boot command) you can use “xwmconfig” to select the desired DE.
Hi Eric,
where can I find “make_slackware_live.sh” script and Mate/Cinnamon packages?
Have you not read anything?
Hi Eric, thanks for the answer, it seems it’s what I understood.
Well I was thinking about the unionFs alternative but as you said, it’s lacking of the ‘multi-layer’ feat.
No the ‘references’ I was talking about was the “limitation” to slackware 14.2 (-current). it’s seems implicit, and not explicit.
Actually I don’t use you script, I’m working on a old “custom slackware” tool of mine, which was used to generate “custom slackware installation ISO”. I used to “overload” the initrd to tweak the “live” part of the installer. Working on this tool I always thought that it could be use to make a Live Slackware CD without having time to develop it.
Your scripts was a good “surprise” as it gave me material to setup a “real” live CD (with the union/overlay and the squashfs). So I’m updating my tool, intergating part of the “Live setup” from your script…
Actually, the tool “may” (if you wish) be a framework for your own script (just an idea, not injuction 🙂 ).
I’m not yet ready for public release (I’m a bit “shy” and I like my tool to be “almost finished” before exposing it 🙂 ), but if you want and are interested I could share the private code meanwhile. You could focus of the “flavor” of the slackware you want to build and I’d focuse on the “plumb work” of the tool (it’s “full BASH”), which is (supposed to be) flexible and versatile.
Thanks you !
Cheers,
Garry.
Eric, mea culpa.
You gain a beer! 😉
Hi,
Is there any place where I can find the previous beta3 iso? TIA
I must say it’s really perfect work. I am working with slackware from 8.0 and your live is nice surprise, so big thanks.
Pi, the scripts used to generate those Beta3 ISO images are still available, at http://taper.alienbase.nl/cgit/liveslak/tree/?id=Beta3 but the ISO images themselves are gone and not preserved. They were built using a version of Slackware64-current that has been superseded by newer packages.
rass, glad you liked it.
david, beer is good, but I hope you found what you were looking for.
Garry, all that will be part of the documentation which does not yet exist and which is one of the milestones for a 1.0 release.
Having the previous isos would help with tracking regressions, now it’s impossible, and makes testing more difficult. Maybe someone have kept them and can share? I would be very grateful 🙂 I have Plasma5, I need kde4 version.
Hi Eric,
I found the section “Can I create an ISO myself?” in your previous post
http://alien.slackbook.org/blog/beta3-of-slackware-live-edition-is-available/
But I’ve not tried to follow your instructions…
I had yo give you another info: in my HP Elitebook 8540w tith graphic card Nvidia Quadro FX880M, if I don’t load Nvidia driver I see no SDDM segfaults, but in tty7 I get a black screen.
I have not found any useful information in the logs.
Pi, I have “slackware64-live-plasma5-current.iso” in my Trash. It’s dated 26/12/2015, so I think it’s Beta 3.
I can upload it, but you must be patient…
I am typing this message from the live usb with persistence and luks.
However, the system is running extremely slow. Everything is fine until I get to the log in screen. At that point it seems like everything is in slow motion. I tried with and without nvidia loaded.. same result.
Hardware: Alienware Mx14 laptop (fast system with lots of resources normally)
If I missed something in the comments or docs I apologize in advance 🙂
I have this Plasma5 iso, but thanks anyway david.
securekey, do you see a performance increase when skipping the use of the LUKS encrypted /home ? Add ” luksvol= ” to the syslinux or grub boot commandline so that the Live OS falls back to using the default /home on the ISO.
Similarly, you c an test if disabling persistence boosts your performance. In that case, add “nop” to the boot commandline.
The two can be combined onto the same commandline; i.e. add “nop luksvol=”.
I tried running with “luksvol=” first… I thought for sure this would fix it. However, same result.
I then tried “nop” … and the problem is gone. (luks was still enabled at this point)
I have all 4 of your betas so far but this is the first time with persistence. For testing purposes would you like me to re-run the script (make the usb gain) for persistence but without luks?
So your bad performance is resolved by not using persistence?
The most probable explanation is that you have a slow USB flash medium. Note that data is being written to your USB stick during operation. While a couple of directories are already mapped into RAM (like /tmp and /var/tmp) the OS will still be writing continuously to other directories. If you have a USB stick with low write speeds this will slow down your Live session to a crawl.
Your /home directory in a LUKS container is not being written to so much when you are running a XFCE session… however I expect that your performance would drop significantly if you tried a KDE4 or Plasma5 session instead.
I really hoped Pat decided to add some official support for video drivers in the latest edition of Slackware, but your latest revision comments makes that seem unlikely.
I do not understand why Slack would support proprietary drivers for a an HP printer that isn’t needed for operation of the OS, but not support basic video card functions to watch tear-free video, or play a game.
Here’s to hoping!
What proprietary HP drivers are you talking about?
The open source video drivers in Slackware are more than capable, and if you do need the proprietary drivers for gaming then it is not hard to use the scripts provided at http://slackbuilds.org/ to create a package for them.
Eric,
Yes, you make a very good point, and I’m sorry I used sloppy and incorrect language in my post. HPLIP is open source.
I love slackbuilds, and can’t thank you enough for Slackpg+.
I’ve also had the misfortune of having an update break my desktop when using fglrx drivers. My fault for not checking the update queue more closely, but still discouraging. The open source drivers have issues with screen tears with video, (at least on my system) and of course not generally suitable for gaming.
I was only giving a general plea (hopefully not too whiny) for proprietary video drivers to be detected and installed at setup as an option. I brought it up only because I noted you had said Pat had preferred they be removed from the Live Disk.
As the Open Source drivers mature, this may not even be an issue in the future.
Thanks so much for your work with Slackware, I didn’t expect you to respond at all, or so quickly. I’ve been using Slackware exclusively for about 3 1/2 years now, and no plans to use anything else.
Richard.
Richard Thompson thanks for clarifying.
About those Nvidia drivers: Slackware itself does not contain the proprietary drivers for either Nvidia or AMD. That will likely not change. Look at how for instance Chrome or Flash are handled: they have a SlackBuild script in the /extra directory so that you can create your own package after you downloaded the chrome or flash binary archives, but Slackware is not shipping packages itself.
SlackBuilds.org does a good job of providing build scripts for the plethora of software that is not present in the Slackware distribution itself.
About the Live ISO: since the full SLACKWARE live ISO is meant as a demo for the distro itself, we have agreed that that specific ISO should not contain any software that not part of Slackware distribution, in order to give people a fair view of what the distro is all about without creating false expectations when people install the real distro after having tried the Live Edition.
Richard,
> I didn’t expect you to respond at all, or so quickly.
I believe that anyone who posts here on the blog is entitled to a reply unless it is very obvious that a reply is not needed…
I believe you are correct. The usb stick I used is fairly old. Small 8gig that I got for free at a conference 😉
I may see if I can find a better stick and try again… persistence would be nice.
The entire process was pretty straight forward… thanks for the hard work.
hi
i try to mount slackware live 0.4.0 in usb device like this:
sh iso2usb.sh -i /mnt/sda3/slackware64-live-current.iso -o /dev/sdh
but i get this error,
— Required program(s) not found in root’s PATH!
— extlinux
— gdisk
— sgdisk
i try this from slackware 14.1
how i can fix please??
i need install syslinux in system??
i do the same with Beta3 with no problems
thanks for all
slacknewbie,
Creating the ISO image won’t work on Slackware 14.1. You need slackware-current.
However, using the iso2usb.sh script should work on Slackware 14.1, provided you install the required tools.
The script mentions a couple of missing programs. Gdisk, sgdisk and extlinux are part of core Slackware packages (the “a” series) and since I can not believe you did not install the syslinux or gptfdisk packages, there’s probably another reason.
These programs are located in the “/sbin” directory which is only in root’s path. Either you tried running “sh iso2usb.sh” as your own useraccount, or you became root in a non-perfect way.
To become root and get a proper root-environment, you must use either “sudo -i” or “su -“. A mere “su” is _not_ good enough.
I used the script on slackware 14.1 .. I forgot to mention I did have to install squashfs. Other than that everything else was present.
I did login as root from run level 3 (my normal boot)
BTW this was a full install of 14.1 with very little modification to packages.
thanks bob
I try to mount the iso like this from Slackware 14.1 without install the required tools and no problem, (at the moment)
dd if=’slackware64-live-current.iso’ of=/dev/sdh bs=16M && sync
all work well at the first atempt and kde start well too, very happy xD
maybe too much programs that make the iso may be too big,
why 5 music players??
thanks for all.
slacknewbie, I do not answer pointless questions. If you had read my articles you would know the point of the ’slackware64-live-current.iso’.
Did you come here from another distro or what?
I am used to another slacks live isos that cuts the iso for make more little is only this,
the next time i cut the iso myself and then remained quiet.
I do apologise for the inconvenience of my coment
This ISO is obviously not for you. Go back to SLAX please if you want a small Live distribution based on Slackware.
Dank!
Did a frugal install on usb stick. Booting with grub legacy.
Nice. very nice. Would like to be able to do a full install on hard disk.
Hi ikke
Yes, I presume that sometime in the future, I have the time to sit down and work on a patch for the Slackware installer and add a menu item “Install from Slackware Live”. I would hate to write a harddisk installer from scratch, it involves a lot of things that can wipe your hard drive’s data if you want to install to a new partition for instance. Better re-use existing and proven code.
Hi Alien,
Why not implement / realize ‘Persistence directory inside a loop-mounted ext4 file container, so that the persistent USB stickcan have a single partition (NTFS or FAT32).’
NTFS is the best rather than FAT32, FAT32 had limitations because it can only accommodate a file with a maximum size of 4GB.
Thanks.
SLAX is dead and you know it,
thanks for your job but bad advice men.
bye
Thank you.
Needless to say that I agree 100% with your comments.
Hi babam,
Actually… not public yet but look at this:
commit e46bc9de8531efdc8232a08286fcf6d3fe5de3a1

Author: Eric Hameleers

Date:   Fri Jan 29 12:16:29 2016 +0100

    Add support for persistence using a loop-mounted container file.

    This adds an option to store persistent data in a container file instead of

    a directory in the USB stick's Linux filesystem.
I had been waiting for this message to update liveslak and my ISO images:
Wed Feb 3 22:39:25 UTC 2016

Welcome to Slackware 14.2 beta 2. Getting closer. :-)
When I get home from work I will start creating new ISOs based on liveslak-0.5.0 and the new Slackware Beta 2.
slacknewbie, well of course SLAX is dead, but the message was: you are used to one of the Live derivatives of Slackware. My Live Edition is not the same as those. If you want a small ISO, with focus on adding/removing modules on the fly, don’t bother coming here. My goals are different.
Hello Eric,
I’m from Germany and I have to make some modifications to my live USB stick before and after booting:
1.) before booting:
a) kbd=de-latin1-nodeadkeys
b) locale=de_DE@euro
2.) after booting: in KDE system settings
a) disable all desktop effects! (IMO enabling them by
default is not a good idea)
b) keyboard layout “de-nodeadkeys”
c) compose key “scroll lock” instead of “Alt Gr” (very
important for German users!)
With these settings I have only problems with utf8 files in the terminal, e.g. in some man pages. But with LANG=de_DE.utf8 I have really huge issues also in the installed version of Slackware 14.2 beta on my Asus laptop from 2010.
I would be really happy if you could find a solution for the German localization of your awesome Slackware live project!
Hi hpg
I won’t make any changes to the way Slackware handles localization. Which means, the issues you have while running Slackware 14.2 Beta will also appear in the Live Edition based on that Slackware version.
I can however change the kbd, locale and xkb definitions to what you are proposing, but you don’t explain why that is needed.
I can not find any literature as to why I should change the compose key from AltGr to Scroll Lock either. Scroll Lock looks like a very awkward choice.
Hello Eric,
I’m happy that you’re able to change the kbd, locale and xkb definitions.
1.) I and (as far as I know) most people in Germany don’t need dead keys so that the setting “kbd=de-latin1-nodeadkeys” should be considered as standard in Germany.
2.) I already explained that I have a lot of weird issues with “LANG=de_DE.utf8” so that I think “LANG=de_DE@euro” should be a better choice for German localization.
3.) The “Alt Gr” key on the German keyboard is needed for supplying a lot of important chars, such as |,@,{,[,],},\,~ and some more.
Thank you for answering so fast!
5 music players (and a lot of things) is a waste of resources, space and charge time whichever way you look at it.
I had no asked for the 5 music player is only my job to remove it, you have quite a lot to work with.
I can add/remove programs from the original modules no problem for not work on the fly.
I believe your iso is the bests live from slackware at present, and the most updated of course, only need change in my own way and shut my mouth xD
Sorry again for my wrong past comments.
long live to your iso and you.
slacknewbie, this Slackware Live Edition is not about creating the smallest possible Slackware Live ISO with “one program for every task”, if you want that then Salix Live or Porteus will be better for you.
What I create is a complete Slackware experience, but then run from a live medium.
I totally disagree with everyone who complains that Slackware should get rid of all its choices of tools. If you think that an extra gigabyte of space is “waste of disk space” then you live in the computer stone age.
Resources? What resources are wasted? Slackware does not “activate” anything, so the extra programs just sit there on your hard drive, not consuming any of your resources.
If you want small, then there’s the XFCE ISO I created for that reason.
hpg I will address your requests in the next release. I am currently generating the ISOS for liveslak-0.5.1 which will not have your requested modifications.
Hello Eric,
thank you very much!
*slacknewbie* It is obvious that you should be name just “bignoob”. You have no clue on how a computer work, what are the different types of memories, what a file is, what a process is etc…
Starting with that, if you don’t want be a noob, simply ask questions instead of writing in an “absolute affirmation” stupids things…
A file doesn’t take anymore resource than it’s size on the Harddisk… You can have 100000000000000 players or any programs, they will JUST take some space on HDD…
It’s not “whichever way we look at it” it’s a fact.
I can’t understand why people obviously without knowledge propagate “fairy tales” in a “superior” way…
When I was a noob I’d NEVER assume I was right…
26 years later, I’d NEVER assume I am right on domain I don’t “masterizes”… (And even there we can do mistakes).
A lot of experimented people explain this “resource error” on the LQ forum, it’s been explained here to you, but you come again and tell false affirmations… You should have kept just the last part in your message. :).
Anyway, maybe you’re so happy that you don’t realize, so just: learn, ask, and avoid affirmation on something you don’t understand.
*AlienBob* BTW, Thanks, I was able to integrate the Live ISO creation, you save me quite some work. Thanks again.
Bests
Garry.
Porteus slackware is dead and i live in stone age xDD
Porteus now use arch linux not slackware,
and Phantom is retired from the scene now the boss of porteus is brokenman.
I love you men and i hate discuss with you,
is all my fault i know,
this is the end of discuss.
good luck, bye
Hey there! Slackware Live boots fine for me when i write the iso to the drive regularly, but I’ve been having some trouble with your iso2usb script. I get the error ‘/sbin/mount: no such file or directory’
Llemons – what distro are you using? Slackware? In that case, are you running the script as root? In which case, did you perhaps become root using the command “su”?
The plain “su” command will not add the directories “/sbin” and “/usr/sbin” to your root user’s $PATH. You have to use either “su -” or else “sudo -i” to add these directories to $PATH.
I had similar USB install as Llemons. Tried: ./iso2usb.sh -i slackware64-live-plasma5-current.iso -o /dev/sdb -c 30% -P
Got the following errors:
./iso2usb.sh: line 528: /sbin/mount: No such file or directory
./iso2usb.sh: line 566: /sbin/mount: No such file or directory
*** ./iso2usb.sh FAILED at line 566 ***
— Cleaning up the staging area…
./iso2usb.sh: line 566: /sbin/mount: No such file or directory
*** ./iso2usb.sh FAILED at line 566 ***
— Cleaning up the staging area…
I tried: su -l, no success. Root’s home directory was /root, so I even tried copying /sbin recursively to /root. No success.
I could really use the options provided such as persistence and using swap on hard drive.
Thanks in advance!
Michael – not using Slackware perhaps? I asked Llemons the same question but he did not bother to reply.
What is the full path to your mount binary?
Am running Xubuntu. I ran both the iso2usb.sh file and .iso file located in: /home//Desktop/ Tried both slackware64-live-14.2.iso and slackware64-live-plasma5-current.iso Am going to attempt to run the Live USB .sh script while in a Live USB session of slackware64-14.2: installed with UNetbootin and without persistence.
Thanks for looking into it. Will let you know if all goes well with a Live USB install via a Live USB.
I’m sorry for the incredibly late response, but to answer your question, I am running Linux Mint.
I managed to get it all working with two USB drives by booting off one without persistence and then writing to the other with your script. It seems pretty similar to what Michael is trying
I will have an updated version of iso2usb.sh which will not have hard-coded paths like “/sbin/mount” and will instead rely on a restricted custom PATH variable that contains just “/usr/sbin:/sbin:/usr/bin:/bin”. That should be a safe from hack attempts as using the hard-coded paths.
That should greatly help people on non-Slackware distributions with using the script.
alienbob: I agree. That should do the trick. I did do exactly what Llemon did and it worked fine, but it was a hassle. Thanks.
As of April 20 2017 there are the other varieties, but not xfce. Has that been dropped? (I realize beggars can’t be choosers, just curious.)
Look in another subdirectory please, http://bear.alienbase.nl/mirrors/slackware-live/1.1.6/
I do not always generate all ISO images again, too time-consuming.
hello
i use iso2usb.sh and now Live OS working perfect
i have Question
how install slackware on my laptop?
i didn’t find any setup option
Thanks
If you downloaded the XFCE ISO (700 MB) then there is no setup.
If you downloaded any of the other ISO images then the setup program is called “setup2hd”.
I suggest that you read the documentation for the liveslak project if you were not aware of this FAQ.