 During the past weeks I have been working on my “liveslak” scripts for the Slackware Live Edition. Check out my previous articles about Beta1 Beta2 and Beta3 releases for these scripts, they contain a lot of background about the reasons for creating yet another Slackware Live, as well as instructions on the use of the Live ISO images and their boot parameters.
I will be numbering the releases with ‘normal’ version numbers from now on, so the 4th beta release translates to “0.4.0”. The 1.0 release will contain everything I consider essential for my Slackware Live Edition. I think I am rapidly working toward that final milestone..
Update 06-jan-2016: please continue reading and commenting in my follow-up article on “Beta 5“.
What’s new in 0.4.0?
As with these previous public releases, this Beta4 marks a new milestone in the functionality of the Live OS. So what’s new? A feature I consider crucial for a persistent Live OS on a USB stick that you carry around with you in your jacket pocket… data protection! Persistence of the Live OS means, the things you change or add (or delete) are stored on the USB medium and will survive a reboot. As opposed to the raw ISO image (burnt to a DVD or ‘dd’-ed to a USB stick) which is a pure Live OS where all your modifications are written to RAM and gone when you reboot.
Data protection. How do you protect the stuff you are accumulating in your live user’s homedirectory, such as passwords, confidential documents, GPG and SSH keys etc? You lose the USB stick, someone else may steal it – your sensitive files will be compromised. Therefore the Slackware Live Edition offers you the option to create a LUKS-encrypted container file in the Linux filesystem of the USB stick. The filesystem inside that encrypted container will then be mounted on the /home directory of the Live OS when it boots. The LUKS passphrase you entered when creating the container, will be prompted for during the boot-up of the Live OS. On shutdown, the container will be locked again and a potential thief of your USB stick will be unable to get to the files in the LUKS container.
But there’s more of course. Here are some other highlights:
- Better looking Grub boot menu (UEFI computers) by letting the “make_slackware_live.sh” script generate the used fonts.
- The X session now supports the Compose Key. Use the Right-Alt (aka Alt-Gr) key to generate composed characters (like ë, ï, é etcetera).
- When selecting a non-US keyboard, you can toggle between that and the US keyboard layout in your X session by pressing the Shift-Alt key repeatedly.
- On request of Pat, the SLACKWARE ISO no longer contains the Nvidia binary drivers. You’ll get a pure Slackware experience without any 3rd party software getting in the way.
- The ALSA softvol pre-amp is no longer applied when the pulseaudio package is installed.
- The “isohybrid” commandline in the “make_slackware_live.sh” script has been tuned so that the resulting hybrid ISO file should boot on a larger variety of computers.
Download the ISO images
I have created ISO images for the SLACKWARE, XFCE, PLASMA5 and MATE flavours using the latest Slackware64-current packages available today. That means, you can check out the recently added PulseAudio comfortably. For the PLASMA5 variant, I used the very latest KDE-5_16.01 packages available in my ‘ktown‘ repository. Willy Sudiarto Raharjo built a fresh set of Mate packages specifically for this Live release.
You can find the ISO images plus their MD5 checksum and GPG signature at any of the following locations – look in the “0.4.0” subdirectory for ISOs based on the liveslak-0.4.0 scripts:
- Primary location: http://taper.alienbase.nl/mirrors/slackware-live/ (rsync URI: rsync://taper.alienbase.nl/mirrors/slackware-live/)
- Willy’s mirror: http://repo.ukdw.ac.id/slackware-live/
- Ryan’s mirror: https://seattleslack.ryanpcmcquen.org/mirrors/slackware-live/
- Shasta’s mirror: http://ftp.slackware.pl/pub/slackware-live/ (rsync: rsync://ftp.slackware.pl/slackware-live/)
Please allow some time to synchronize these mirror servers.
The ISOs have two user accounts: root (with password ‘root’) and live (with password ‘live’). My advice: login as user live and use “su” or “sudo” to get root access (note: “su” and “sudo” will want the live password!).
The ISOs are able to boot both on BIOS-based computers (where syslinux takes care of the boot menu) and UEFI systems (where grub builds the boot menu, which looks quite similar to the syslinux menu):
How to create a persistent USB stick from the ISO?
The ISO can be burnt to a DVD or copied to USB stick using ‘dd’ or just plain ‘cp’, but that will give you a read-only medium because all changes to the Live OS are in fact written to your computer’s RAM.
Use the ‘iso2usb.sh‘ script to create a Live OS on the USB device with persistence. Changes you make while running Slackware Live will then be preserved across reboots because the OS will write all these changes to the directory “persistence” in the root of the USB device. The script requires an input and an output parameter at a minimum:
# ./iso2usb.sh -i ~/Download/slackware64-live-current.iso -o /dev/sdX
… where /dev/sdX is the device name of your USB stick which will get formatted – erasing all data currently stored on it. The iso2usb.sh script will pause to show you the characteristics of the target device and ask you once more if you really want to continue erasing it. You will not easily destroy your harddrive unless you are really not paying attention!
How to create the LUKS encrypted homedirectory container?
THe iso2usb.sh script has been extended with a new parameter “-c” which takes a size argument. If you want to create a 400 MB container file to hide your homedirectory in, then you need to specify “-c 400M”. If you want 2.5 GB for your homedirectory, use “-c 2.5G”. If you are not concerned so much with the exact size but want to allocate a percentage of the free space on the stick, then use “-c 40%” to create a LUKS container that uses 40% of the available free space.
Now to put that into an actual example commandline which will create a file (its name will be “slhome01.img” by default) using up 50% of the free space on the stick:
# ./iso2usb.sh -i slackware64-live-xfce-current.iso -o /dev/sdX -c 50%
When the script gets to the point where it creates the LUKS container file, it will prompt you for a passphrase which will be used for encrypting and decrypting the container’s data. Right after that, the script will prompt you to enter that passphrase again when the LUKS container is unlocked and the ISO’s /home content is copied into the container.
Booting the Live OS
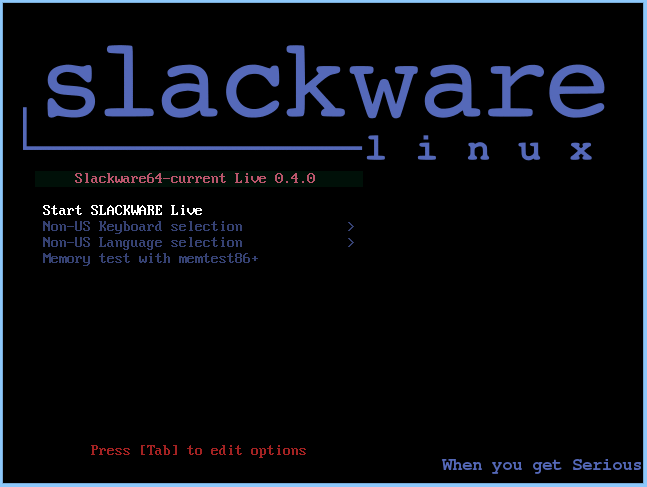
When you boot Slackware Live on a BIOS computer, Syslinux will handle the boot and show the following menu:
- Start (SLACKWARE | PLASMA5 | XFCE | MATE) Live (depending on which of the ISOs you boot)
- Non-US Keyboard selection
- Non-US Language selection
- Memory test with memtest86+
You can select a keyboard mapping that matches your computer’s. And/or boot Slackware in another language than US English. You will probably want to change the timezone; syslinux allows you to edit the boot commandline by pressing <TAB> because the syslinux bootmenu does not offer you a selection of timezones.
On UEFI computers, GRUB2 handles the boot and it will show a menu similar (and similarly themed) as the Syslinux menu:
- Start (SLACKWARE | PLASMA5 | XFCE | MATE) Live (depending on which of the ISOs you boot)
- Non-US Keyboard selection
- Non-US Language selection
- Non-US Timezone selection
- Memory test with memtest86+
Editing a Grub menu is possible by pressing the ‘e’ key. After making your changes to the boot commandline, press <F10> to boot.
Another difference between Syslinux and Grub menus: in Grub you select keyboard, language and/or timezone and you’ll return to the main menu every time. You still have to select “Start Slackware Live” to boot. In the Syslinux menu, only the keyboard selection menu will return you to (apparently bot not actually) the same main menu. The non-US language selection will boot you into Slackware Live immediately without returning to the main menu. A limitation of syslinux.
Caveats and tips
Remember that this is still a Beta! There are still some rough edges that I am aware of, and if you find others please let me know.
- Using the Nvidia binary drivers on a persistent USB stick – once you pass the argument “load=nvidia” and your USB stick is persistent, you have to keep loading the nvidia module or else your X serssion will no longer start. If you are always going to use the USB stick on computers with supported Nvidia cards, the simplest solution is to move the file “0060-nvidia-352.63_4.4.0-current-x86_64.sxz” from “liveslak/optional/” to the “liveslak/addons/” directory so that it is loaded by default, saving you from typing “load=nvidia” every time. The ugly solution is to remove the content of the “/persistence/” directory on the Linux partition.
- Booting a persistent USB stick with LUKS home to the “virgin condition” – suppose you screwed up somehow and the USB stick won’t work anymore. You can boot the original Live OS without all your accumulated persistent changes by adding the boot command parameter “nop” which stands for “no persistence”. That will still mount the LUKS container on the /home directory. If you want to ignore the LUKS container, and use the /home directory of the original Live OS, an additional parameter “luksvol=” must be added to the boot commandline. After logging in you can remount the Linux partition of your stick to make it writable:
# mount -o remount,rw /mnt/livemediaand proceed with pruning the persistence directory “/mnt/livemedia/persistence” and/or fixing the LUKS container file “/mnt/livemedia/slhome01.img“.
Happy hacking! Eric
Recent comments