My thoughts on Slackware, life and everything

Tag: liveslak (Page 1 of 10)

Liveslak 1.8.2 re-adds Secure Boot support

When Slackware-current upgraded the Grub package to 2.12,  liveslak lost the ability to boot on a computer with Secure Boot enabled.

Grub 2.12 is a lot stricter than the previous 2.06 release when it comes to trusting the files it loads and executes. The way it works now is as follows (step 1 and 2 are unchanged):

  1. The Secure Boot computer will only load the primary bootloader when that has been signed with a SSL certificate which is stored in NVRAM (the Database key). Unless you have deleted the original Db, the Dbx, the KEK and the Platform Key in order to install your own self-generated keys, this will be a Microsoft certificate.
    Linux distributions nowadays mostly use a UEFI bootloader called “shim” for Secure Boot. The bigger distros have one in their repository which has been signed by Microsoft. Because this Microsoft certificate is already stored in your computer’s NVRAM, the “shim” trusts it and proceeds with booting.
    Slackware does not have a “shim” which is signed by Microsoft, and nor do I. For liveslak I simply re-use one of the signed “shim” packages from either Fedora, OpenSuSE or else Debian.
  2. The “shim” bootloader will only load a secondary bootloader (Grub for example) if it recognizes and trusts the SSL certificate with which that one has been signed.
    The big distros have embedded their own certificate inside their Microsoft-signed “shim” and for that reason, the “shim” implicitly trusts the distro certificate. This “shim” will then accept and load any secondary bootloader which has been signed by that same distro certificate. It allows a distro to have a transparent boot process (Secure Boot or normal boot) without any specific user actions that need to be performed.
    In our case since I signed our Slackware Grub bootloader with my own SSL key and certificate, the “shim” must be taught to accept this certificate as trustworthy. We do this by enrolling the certificate into the MOK – another piece of storage space in the Secure Boot computer’s NVRAM. MOK stands for Machine Owner Key… and you are the Machine Owner. Since you have to be physically present at your computer when you tell the MOK-manager to enroll the liveslak SSL certificate, that makes the certificate trusted.
    How that is done? I wrote an article about that, three years ago: Secure Boot support landed in liveslak 1.5.0 and I invite you to re-read it.
    The “shim” will load our liveslak Grub bootloader after you enrolled the “liveslak.der” certificate in the MOK.
  3. Now it gets “interesting”. Grub 2.06 would happily continue loading the kernel, the initrd and then boot Slackware Live. But Grub 2.12 requires that every file it loads when Secure Boot is enabled, must be signed by a private GPG key for which Grub stores a copy of its public key. Ehh?

I called that new requirement for the boot process “interesting” but actually it was something to tear your hear out over. Debugging the boot of a computer before the stage where the Linux kernel takes over from the bootloader, is extremely difficult.
I had a good look at the Grub documentation and my liveslak sources back in July and August and actually did most of the changes that were needed during that time.

Most of the work back then went into a big rewrite of the iso2usb.sh script. When Grub needs to check a GPG signature for every file it loads from disk, the initrd must be GPG-signed as well. That means, iso2usb.sh is no longer allowed to un-pack, update and re-pack the initrd image file because that will invalidate the GPG signature.
What I did was: re-use the logic that was already implemented in isocomp.sh, a companion script to enable persistence for the Live ISO when that is used on a Ventoy USB disk.
From now on, all customizations of your Live USB stick are stored in the file ‘/liveslak/slackware_os.cfg‘ in the Linux partition. The initrd remains unchanged.

You need to use the latest version of iso2usb.sh though! Delete older versions please. They are incompatible with the new liveslak.

When that rewrite was finished, I needed to find out what the requirements were for the GPG signing process and I needed to find a way to actually use a GPG private key in my scripts without exposing Alien’s own GPG keys. I learned about ephemeral GPG keys: the liveslak ‘make_slackware_live.sh‘ script creates a GPG private/public key pair, does all the signing, stores copies of the GPG public key inside the Grub bootloader image and on the EFI partition, and then erases the private key (it will no longer be used).
Alas, even with all the requirements apparently having been satisfied I kept running into “security violation” messages on boot.

In August, I simply gave up trying to fix this, because it was so frustrating and also because real-life was too demanding.
But during the Christmas holiday, after I had completed much of my AFFiNE cloud server article, I decided to give it another shot. Actually, I had intended to work on a ‘reboot’ of the Live DAW project but the feedback I am getting on my recent blog post is luke-warm and it did not inspire the confidence that more than a few people would actually use a refreshed DAW environment. Not to worry – that DAW refresh is still on my TODO list.
Looking at the liveslak code with a fresh perspective was really helpful and I managed to deal with the missing pieces. The final hurdle was taken when I realized that I needed to update the SBAT file which gets embedded into the Grub boot image, precisely because I am now using a newer Grub version. As I said, hair-tearing.
With good results: the liveslak-1.8.2 is again supporting Secure Boot.

Note: Secure Boot is supported only on 64-bit computers and only after you transferred the ISO Live content to a USB stick using the iso2usb.sh script.

Anything else that’s new?

Most of what happened between releases 1.8.1 and 1.8.2 is small stuff, a lot of these small changes were necessitated by the evolution of Slackware-current and to keep the Live ISOs working.

One thing worth mentioning is this. The liveslak scripts changed a lot internally, but their usage is un-changed  with a single exception. The “-w” or “–wait” parameter to the “iso2usb.sh” script has been removed. It was meant for slow USB sticks where it takes more time for the USB subsystem to settle in the kernel. Using this parameter allowed you to increase the wait time for your USB stick to boot into the Operating System. But I solved that by using a loop in the live init, and the script parameter is no longer needed.

Download Slackware Live Edition

You can find a set of new ISOs based on liveslak on download.liveslak.org/latest/, the 64bit versions of them support Secure Boot.

It will probably work best if you use the ‘iso2usb.sh‘ script provided with liveslak to transfer the ISO content to a USB stick, it will give you a persistent environment with optional data encryption and this will allow it to boot on a lot more computers.
Alternatively, create a Ventoy disk and copy the un-changed ISO on it. You can then use liveslak’s ISO companion script ‘isocomp.sh‘ to add data persistence for that ISO on the Ventoy disk.

Get liveslak sources

The liveslak project is hosted in git. Its browsable cgit interface is here: https://git.liveslak.org/liveslak/

A set of the liveslak scripts can also be downloaded from http://www.slackware.com/~alien/liveslak/ or https://slackware.nl/people/alien/liveslak/

The liveslak public key (SSL certificate in DER encoding) that you need to enroll can be downloaded from https://download.liveslak.org/secureboot/liveslak.der

Let me know your experiences!
Cheers, Eric

Your input requested for DAW Live

It has been a long time since I had a serious look at my audio software set, and the Slackware DAW Live ISO image which is meant to showcase all of that software.

Life interfered and priorities shifted.

Now I am looking at 2025 and the Christmas holiday week which precedes it, and am pondering where to put my energy and time. Considering the lack of clarity about the next stable Slackware release (something which really annoyed me in the few years leading up to Slackware 15.0) and the relative certainty that KDE Plasma 6 is not going to be included in that next release, I am not looking forward to kickstarting my obsolete ktown repository for Plasma 6. It would eat up a lot of my time and I am a happy Plasma 5 user.
So, I decided it would be more productive and rewarding to revive the DAW and audio software project.

I will not focus on a refresher of my Slackware 15 based DAW Live Edition. I want to switch to Slackware -current, realizing full well that this may cause new frustrations along the way when stuff breaks as a result of a Slackware update, but I really want to experiment with Pipewire – for sure as a replacement for Pulseaudio but perhaps also as a replacement for the Jack Audio Toolkit. Who knows.

However, I have not been playing/experimenting with Slackware’s sound system since 2022, the whole Pipewire adventure has passed me by. If I want to rebuild & refresh that large set of software, I need to start with the basics and that is to get a low-latency ‘pro’ sound subsystem off the ground that I can understand and adapt to the needs of a Live Edition.

HELP!

Therefore a request to you, blog regulars, to help me understand how to get rid of Pulseaudo in Slackware and replace it with Pipewire. How does Jack still fit in this configuration? Should it remain the main sound server? Should Pipewire replace it, providing the binary API to Jack-enabled applications? Should the choice to have Pipewire or Jack as the main sound server be something you would want to make after login?

Anything you have already mastered and all the bugs and nasties that you have already eradicated, will save me some precious time and give me more motivation to restart the project during my Christmas break.  Use the comments section below to describe your challenges, your solutions and your resulting setup; or link to pages / pastebins that contain Slackware-specific information.

And somewhat related, since I am not a musician or audio technician: I want to understand better how to connect the audio software to audio hardware: how do you link up a DAW like Ardour to an external USB sound card, a MIDI controller keyboard, hardware synths, microphones etc.
Some synths present themselves as another external USB sound card as well – how do you deal with that when you already route your audio through your FocusRite Scarlett? It boggles the mind when you have to try and make sense of it when you do not have music-making friends in physical proximity.

Eventually I want to have a working studio in my attic and be able to create music, not just create a music production enviroment like Slackware DAW Live.

I would love to read all your feedback and hopefully it will be enough already next weekend to help me startup when my off-week starts 🙂

Cheers, Eric

How I setup cgit for a browsable liveslak repository

I received a request to document how I configured the backend for https://git.liveslak.org/ . This is where my git repository for liveslak is accessible and browseable using cgit as the engine.
Of course the server is also running an actual git repository service which people use to clone the liveslak files and for me to upload changes.
Setting up git is not hard, but it’s beyond the scope of this blog article. Also, setting up Let’s Encrypt to create a secure (https) web site is not in the scope of this article but you can read my Let’s Encrypt article of course.

I’ll explain the steps that are needed to create a cgit webserver in the text below.
First we build and install cgit as well as its dependencies; then we create the cgit configuration and add some customization. Lastly we configure Apache httpd so that it knows what to serve.

Let’s start with building the required packages in order. In case you are running Slackware -current (i.e. newer than 15.0) then the lua package is already included in the core distro, so you can skip compiling it now:

  • lua
  • luacrypto
  • lua-md5
  • highlight
  • cgit

You can find build scripts for all of them on the SlackBuilds.org (SBo) web site.
The lua* and highlight packages are needed for syntax highlighting, and lua is also needed for gravatar support.
The cgit package has customization added by the SBo admins which we are going to use, notably support for displaying the committers’ gravatar images.

Once you have built and installed the above packages, create a new directory to hold our custom cgit stuff:

# mkdir -p /home/www/cgit

Create some symlinks to the files that were installed by the Slackware cgit package:

# ln -s /var/www/cgi-bin/cgit.cgi /home/www/cgit/
# ln -s /var/www/cgi-bin/cgit.js /home/www/cgit/
# ln -s /var/www/cgi-bin/cgit.png /home/www/cgit/

But make a copy, not a symlink, of the CSS file:

# cp -ia /var/www/cgi-bin/cgit.css /home/www/cgit/

Some additional CSS code needs to be added to cgit.css to make the committer avatars hover properly. Here’s the lines to append to the file copy we just made (you will find this same code in the file /usr/doc/cgit-*/email-gravatar-sbo-additions.css which is part of the Slackware cgit package):

div#cgit span.gravatar img.onhover {
    display: none;
    border: 1px solid gray;
    padding: 0px;
    -webkit-border-radius: 4px;
    -moz-border-radius: 4px;
    border-radius: 4px;
    width: 128px;
    height: 128px;
}
div#cgit span.gravatar img.inline {
    -webkit-border-radius: 3px;
    -moz-border-radius: 3px;
    border-radius: 3px;
    width: 13px;
    height: 13px;
    margin-right: 0.2em;
    opacity: 0.8;
}
div#cgit span.gravatar:hover > img.onhover {
    display: block;
    position: absolute;
    margin-left: 1.5em;
    background-color: #eeeeee;
    box-shadow: 5px 5px 3px #bbb;
}

We also need to tweak the syntax-highlighting.sh script (part of the cgit package) a bit so it works better for us Slackers.
Make a copy of it, removing all comments:

# grep -Ev '(#$|^ *#)' /usr/share/cgit/filters/syntax-highlighting.sh > /home/www/cgit/syntax-highlighting.sh
# chmod +x /home/www/cgit/syntax-highlighting.sh

And then add these lines right before the final ‘exec’ line of the script:

# map SlackBuild to .sh
[ "$EXTENSION" == "SlackBuild" ] && EXTENSION=sh

To make the git.liveslak.org website stand out from others, I substituted my own frontpage image and a custom favicon image. These are created as /home/www/cgit/eric_hameleers.png (link) and /home/www/cgit/erichameleers_favicon.ico (link) and both filenames are referenced further down in the cgit configuration.
By default, cgit will look for a file called “/etc/cgitrc” to read its configuration, but I am running multiple sites on a single Slackware host (git.slackware.nl for instance), therefore I create a separate cgit configuration file for each site. For liveslak, it is called “/etc/cgitrc.git.liveslak.org” and then I instruct Apache httpd to look for that particular filename.

/etc/cgitrc.git.liveslak.org

# For more options, see cgitrc.5.txt in the docs folder
root-title=Alien BOB's
root-desc=Web interface to liveslak git repository
virtual-root=/
snapshots=tar.gz tar.xz

summary-branches=10
summary-log=10
summary-tags=10

repository-sort=date
commit-sort=date
branch-sort=age

enable-blame=1
enable-index-links=1
enable-commit-graph=1
enable-follow-links=1
enable-log-filecount=1
enable-log-linecount=1
max-stats=quarter

mimetype-file=/etc/httpd/mime.types
mimetype.rss=application/rss+xml
enable-html-serving=1

css=/cgit.css
logo=/eric_hameleers.png
favicon=/erichameleers_favicon.ico

about-filter=/usr/share/cgit/filters/about-formatting.sh

# for this to work you have to build cgit against lua
# and install luacrypto too
email-filter=lua:/usr/share/cgit/filters/email-gravatar-sbo.lua

# For this to work, you need lua and highlight packages:
source-filter=/home/www/cgit/syntax-highlighting.sh

repo.url=liveslak
repo.path=/path/to/repositories/liveslak.git
repo.desc=Slackware Live Edition by AlienBOB
repo.owner=alien@slackware.com
repo.clone-url=git://liveslak.org/liveslak.git
repo.readme=:README.txt

The actual definition for the git repository is the lines at the end starting with “repo.“.

Lastly, the Apache web server needs to be configured to serve our cgit stuff whenever someone visits git.liveslak.org.
These are the files used to accomplish that:

/etc/httpd/extra/git.liveslak.org.conf

(just an example filename, you will know how and where to add the content for your specific Apache configuration):

<VirtualHost *:80>
    ServerName git.liveslak.org
    ServerAdmin alien@slackware.com

    CustomLog /var/log/httpd/git.liveslak.org_access_log combined
    ErrorLog /var/log/httpd/git.liveslak.org_error_log

    # Include Let's Encrypt configuration:
    Include /etc/httpd/extra/letsencrypt.conf

    # Include the site definition (AFTER Let's Encrypt configuration!!):
    Include /etc/httpd/extra/git.liveslak.org_content.conf
</VirtualHost>
<VirtualHost *:443>
    ServerName git.liveslak.org
    ServerAdmin alien@slackware.com

    CustomLog /var/log/httpd/git.liveslak.org-ssl_access_log combined
    ErrorLog /var/log/httpd/git.liveslak.org-ssl_error_log

    # Include Let's Encrypt configuration:
    Include /etc/httpd/extra/letsencrypt.conf

    # Include web server generic SSL configuration for vhosts:
    Include /etc/httpd/extra/ssl_vhost.conf

    # Include the site definition (AFTER Let's Encrypt configuration!!):
    Include /etc/httpd/extra/git.liveslak.org_content.conf
</VirtualHost>

The file “git.liveslak.org_content.conf” is included twice in the above VirtualHost definition file for Apache. Using these “Include” lines prevents some duplication of code.
Here is the content of that included file:

/etc/httpd/extra/git.liveslak.org_content.conf

DocumentRoot /home/www/cgit
Options FollowSymlinks

# Use a custom name for the configuration - default is /etc/cgitrc:
SetEnv CGIT_CONFIG /etc/cgitrc.git.liveslak.org

DirectoryIndex cgit.cgi
AllowOverride none
Require all granted

SetHandler cgi-script

Options ExecCGI
Require all granted

Alias /cgit.css /home/www/cgit/cgit.css
Alias /cgit.png /home/www/cgit/cgit.png
Alias /erichameleers_favicon.ico /home/www/cgit/erichameleers_favicon.ico
Alias /eric_hameleers.png /home/www/cgit/eric_hameleers.png
Alias /robots.txt /home/www/cgit/robots.txt
Alias / /home/www/cgit/cgit.cgi/

I hope that this story may help some of you with getting your own browseable git repository online.

Good luck, Eric

KTOWN Live ISO based on liveslak-1.8.1 and Plasma6 Beta2

My work on the new Plasma6 for Slackware finally reached a level that I am OK with. I have uploaded a new KTOWN Live ISO image based on liveslak-1.8.1 and it contains a fully functional KDE Plasma6 Beta2 release.
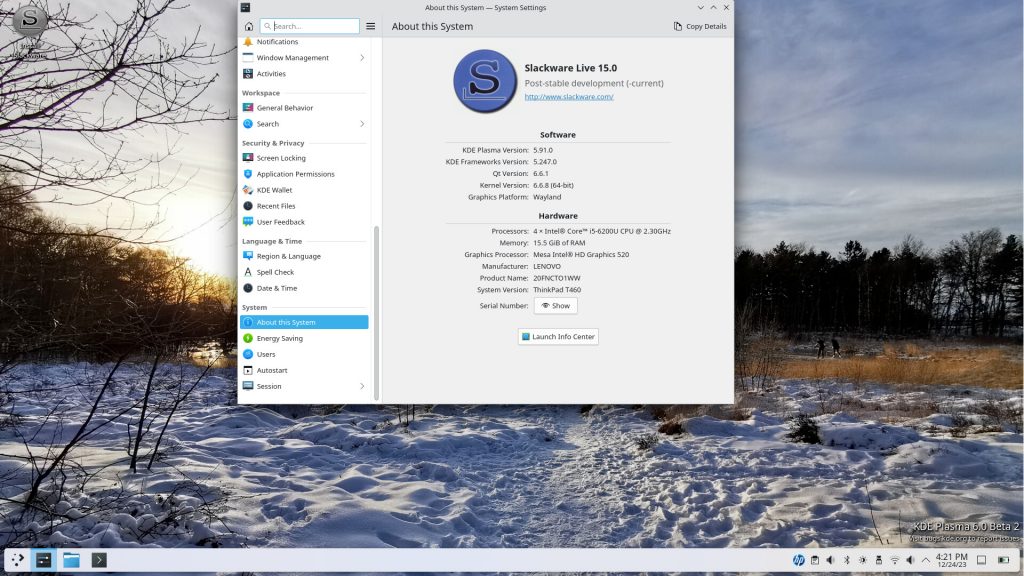
The ISO is 5.2 GB in size, it is huge. Slackware has come to a point (already a while ago) where the full release does not fit on a DVD medium anymore. It’s the new age of digital, it’s really easy to install the distro via a network mirror, and if you want to run it off physical media (like the Live environment) a USB stick is required. I can really recommend using a Ventoy USB thumb drive onto which you can simply copy the full un-modified ISO image and then boot from the stick.
Making the Live environment persistent when you boot from an ISO file is detailed in an update to the liveslak documentation.

Points of note:

  • Plasma6 Beta2 is based on Qt 6.6.1 and consists of: KDE Frameworks5 5.113.0, Frameworks 5.247.0, Plasma 5.91.0 and Applications 24.01.85; The Frameworks5 package-set is still needed to support KDE Plasma5 applications.
  • Pipewire is the default audio server, fully replacing Pulseaudio.
  • The default graphical session is still X11 based but Wayland is fully functional and stable and you can select it from the SDDM session dropdown list.
    When you boot to runlevel 3, the command “startkwayland” will also give you a full Wayland session.
  • I added xwaylandvideobridge to allow Wayland windows to be streamed to X11 applications. You’ll need this to share your screen in applications like Discord, Skype etc.
  • I will soon make available in the ktown repository, my sources and scripts as well as the ‘deps’ packages (such as the new qt6 package and several Slackware originals recompiled to add Qt6 support to them).
  • I also added a background to celebrate the festive season, taken here in Brabant during a COVID pandemic winter walk. The two ice-skaters in the background, that’s not us 🙂

Get the new ISO from one of the following locations (the ISO is accompanied by a MD5 checksum file and a GPG signature):

Tell me what you think of it and what issues you ran into that I might be able to fix in either the Slackware packages or else in liveslak. Don’t forget to report actual functional issues to the KDE bug tracker: https://bugs.kde.org/

Have fun! Eric

KDE Plasma6 Beta2 (but the Live ISO won’t work)

Hi folks.

I have a nice set of packages ready for KDE Plasma6 Beta2 which was just announced two days ago.
As you see from below screenshot, it runs nicely as a Wayland session, both logged in via the SDDM login manager and by running “startkwayland” from a console in runlevel 3.

A few issues that I see may be related to running this test in a QEMU virtual machine, connecting to its VNC server interface from inside another remote VNC session… maybe that’s overdoing the complexity, I don’t know. I can not logout from either the X11 or the Wayland session, the virtual display freezes and I have to login via ssh and reboot the VM or do a back-and-forth switch between runlevels 3 and 4.

Another problem I am facing is the fact that I cannot yet test this on real hardware. I intend to generate and release a KTOWN variant of liveslak, i.e. an ISO image containing this Plasma6 Beta2 release. Unfortunately, the ISO I generated refuses to start either X11 or Wayland sessions, complaining about Qt6 interfaces that are missing or corrupt. I compared the Plasma6-specific package list in the ISO to what I have installed in this QEMU VM, and they are identical.
I will continue my troubleshooting and hope to fix this before Christmas. If not, then this will have to be delayed until after the family visits.

Happy Christmas!
Eric

« Older posts

© 2025 Alien Pastures

Theme by Anders NorenUp ↑