My thoughts on Slackware, life and everything

Tag: live (Page 6 of 12)

How to create a Slackware Live USB stick if you are not using Slackware

This article describes how you transfer the content of a “Slackware Live EditionISO file onto a USB stick (aka pendrive) thereby making that USB drive bootable, and persistent. The guide is meant for people who are not already running Slackware but still want to try Slackware on a Live USB medium. Note that the parent article “Slackware Live Edition” describes in detail how Slackware users can create such a Live USB drive.
Basically, this divides the article’s audience into:

  1. Windows users (Windows 7 and higher) with its Boot Configuration Data (BCD) boot record, and
  2. Linux/BSD users who use GRUB as their boot manager.

I don’t think that LILO is used anywhere else than in Slackware. LILO does not support ISO images as boot selection, but it is still possible to make LILO boot Slackware Live. If you are not using Slackware but your OS is actually using LILO, let me know in the comments section and I will update this article with guidelines.

Why another guide if there’s a lot of documentation already?
It’s easy to use ‘dd’ or an equivalent Windows tool to copy the ISO file onto a USB stick, but then you end up with a read-only stick. The ISO9660 filesystem which is used for generating the ISO file, is read-only by nature and the ‘dd’ command copies everything, re-creating a read-only filesystem on the target.
People who want a Live USB stick with persistence, need to run the accompanying “iso2usb.sh” script which does some smart thngs to the USB stick to make it writable for the Live OS. However, using that script outside of Slackware seems to be an issue for some people.
Therefore this guide will show you how to:

  1. boot your computer to Slackware Live directly from a downloaded ISO.
  2. Subsequently write the ISO’s contents to your USB stick from within Slackware Live Edition. How? Because the “iso2usb.sh” script is contained inside that ISO and will be available to you in the Live OS.

Step 1: adding Slackware Live Edition to your computer’s boot menu

Windows 7 and newer:

Download and install  EasyBCD from Neosmart Technologies. This software is free for non-commercial use. EasyBCD will allow you to add a Linux OS partition to the Windows bootmenu (that is what I use it for on computers that need to keep the Windows bootloader instead of switching to LILO or GRUB). It is much more versatile than that: for our current purpose, it is also able to make the computer boot from an ISO image stored on the local harddisk.

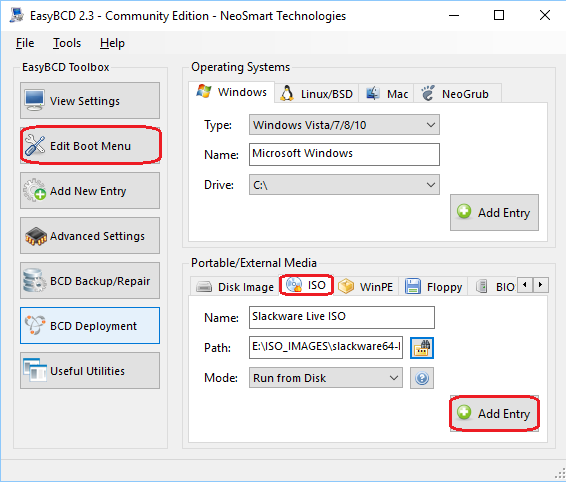
Start EasyBCD (it will ask for permission to run as an administrator) and add a new boot menu entry for the Slackware Live ISO:

  1. Click the “Add New Entry” button.
  2. In the “Portable/External Media” area click the “ISO” tab.
  3. Write the name you want to see in the boot menu, in the “Name” text entry field. For instance “Slackware Live ISO”.
  4. Leave the “Mode” to the default ‘Run from Disk‘ unless you want to wait a long time for the ISO to load into the computer’s RAM before booting (in which case you can select ‘Load from Memory‘).
  5. In the “Path” entry field you should select the full path to the ISO file of the Slackware Live Edition which you downloaded to your local hard drive.
  6. Click the “Add Entry” button.

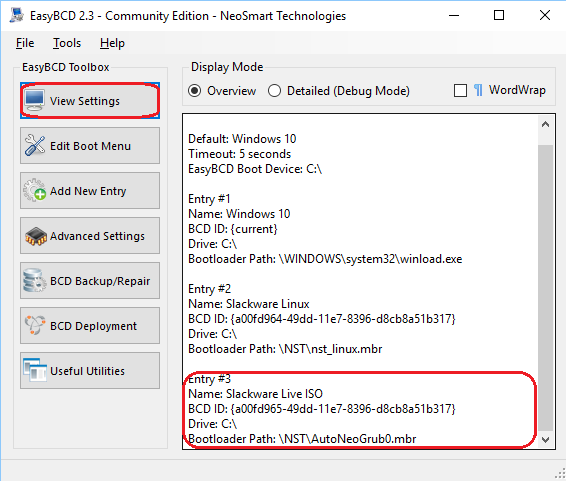
The “View Settings” will now show your new boot entry. You will notice that a new directory was created in the root of the Windows boot drvive (usually that is the C drive), called ‘NST’, which contains a single-purpose master boot record to boot the ISO image:

After rebooting your Windows computer you will see the new option “Slackware Live ISO” in the Windows Boot Manager screen. Select that option and watch your computer boot into Slackware Live. There are some remaining items to take care of before you can login:

  1. Don’t let the OS boot into the default settings. You have 30 seconds to do the following: in the syslinux or grub boot menu, you need to edit the boot commandline (in syslinux you need to press “TAB” and in grub you need to press “e” to edit the commandline).
  2. To the existing boot command parameters you have to add one more: “livemedia=/dev/sdX1:/path/to/slackware64-live-current.iso” or else liveslak will not be able to find its own media…
    You need to change “/path/to/slackware64-live-current.iso” to the actual full path and filename of the ISO you downloaded. Use Linux forward slashes “/” to separate the directories even though the filesystem is probably NTFS where you would want to use Windows backslashes “\” instead.
    The “/dev/sdX1” is your harddisk’s root partition.

    • Instead of the devicename of the partition (/dev/sdX1), you can also write the UUID or the Label of the partition’s filesystem.
    • If the partition containing the ISO file is not the first partition on the disk, you need to adjust the device numbering in the above example (the orange “1” occurrences).
    • If you know the filesystem path to the ISO but you do not know how your Windows partition translates to a Linux devicename, you can boot the ISO without the “livemedia” boot parameter but instead use the extra parameter “debug=4“. Then let the ISO boot – it will deliver you into a “debug shell” where you can use a command like “fdisk -l” or “gdisk -l /dev/sda” to inspect the partition layout of your harddisk(s). When you are ready, press the computer’s “RESET” button to reboot and try again.
    • In liveslak 1.1.9 and newer, you will not have to worry about the ‘/dev/sdXX’ partition name and you can specify “scandev” instead. The syntax “livemedia=scandev:/path/to/isoimagefile” has been implemented to let liveslak search for the partition itself – you still have to specify the full path to the Live ISO file though.

GRUB version 2 and higher

I do not know about Grub 1.x (Grub Legacy)… probably no one uses this version anymore, but at least GRUB2 is able to loop-mount an ISO file and then access the kernel plus initrd inside the ISO image – and boot from these.

Pre-requisite is that you downloaded the Slackware Live ISO to your local harddisk – let’s assume that it is located in /home/alien/slackware64-live-current.iso .

  1. Open the grub local customization file in an ASCII editor (as root!): “/etc/grub.d/40_custom”. We will add our custom entry here, and afterwards we run “grub-update” to update the GRUB2 bootmenu.
  2. To the bottom of that file, add these lines (mind the backslashes – you should remove them, they are only added for better readability on this blog page):
    menuentry “Slackware Live ISO” {
    set isofile=”/home/alien/slackware64-live-current.iso”
    loopback loop (hd0,1)${isofile}
    linux (loop)/boot/generic livemedia=scandev:${isofile} \
        load_ramdisk=1 prompt_ramdisk=0 rw printk.time=0 \
        kbd=us tz=localtime locale=us_EN.utf8
    initrd (loop)/boot/initrd.img
    }

    …where “/dev/sdX1” is the Linux naming convention and “(hd0,1)” the grub naming convention for your harddisk’s root partition.
    In liveslak 1.1.9 and newer, you will not have to worry about the ‘/dev/sdXX’ partition name, because the syntax “livemedia=scandev:${isofile}” has been implemented to let liveslak search for the partition itself.

  3. In case you are stuck with a pre-1.1.9 release of liveslak and can not use “scandev”, then instead of the devicename of the partition (/dev/sdX1), you can also use the ‘UUID’ or the ‘Label’ of the partition’s filesystem.
    If the partition containing the ISO file is not the first partition on the disk, you need to adjust the device numbering in the above example (the orange “1” occurrences).
    If you know the filesystem path to the ISO but you do not know how your Windows partition translates to a Linux devicename, you can boot the ISO without the “livemedia” boot parameter but instead use the extra parameter “debug=4”. Then let the ISO boot – it will deliver you into a “debug shell” where you can use a command like “fdisk -l” or “gdisk -l /dev/sda” to inspect the partition layout of your harddisk(s). When you are ready press the computer’s “RESET” button to reboot and try again.
    NOTE:
    In the “menuentry” example above I have used backslashes ( \ ) to split a long line (the one starting with “linux”) into 3 lines. This was done for readability! When you copy the above example into your “/etc/grub.d/40_custom” file, you must remove the two backslashes ( \ ) and join the three broken-up lines back into one single line that starts with “linux” and ends with “utf8“.
  4.  Run “update-grub” to re-generate the Grub master configuration.
    If you get a “update-grub: command not found” error, that is easily fixed. In some distro’s the “update-grub” script was added, and some others like Slackware do not have it. The content of that “update-grub” script is:

    #!/bin/sh
    set -e
    exec grub-mkconfig -o /boot/grub/grub.cfg "$@"

    You can easily create a new file “/sbin/update-grub” as root, copy the above lines into it, and after saving this file you run “chmod +x /sbin/update-grub” to make the script executable.
    Note that there may be distributions that rename “grub-mkconfig” to “grub2-mkconfig”. In that case, adjust the contents of your new “update-grub” script accordingly.

After rebooting your Linux computer you will see “Slackware Live ISO” as a new selectable option in your GRUB boot menu. Select that, and watch your computer boot into Slackware Live Edition.

Step 2: transferring the content of the ISO to your USB stick

This is the easy part, as it has been documented extensively in earlier blog articles. Also see the official documentation on Slack Docs for this transferal process. I will repeat it here for completeness’ sake:

After completing Step 1 from this guide, you are now running Slackware Live Edition on your computer, booted straight from the ISO file which is located somewhere on the computer’s harddisk.

Let’s login and mount that harddisk partition’s filesystem into the Live OS:

  1. Login to the graphical session manager which you see on screen. Use the account “live” with the password “live”.
  2. You will end up in a graphical desktop session (KDE, XFCE, MATE, PLASMA5 depending on the ISO variant you downloaded. Start a terminal emulator like “konsole” in KDE  or a more basic choice like “xterm”. Any terminal will do.
  3. In the terminal, switch user to become root. The password you need to type for the ‘su’ (and also for ‘sudo’) command is again “live”:
    $ su -
  4. Now that you are root, mount the harddisk partition to the Live OS directory “/mnt/hd” so you can access the ISO file there later:
    # mount /dev/sdX1 /mnt/hd

    Like with Step 1, you must substitute the example “/dev/sdX1” with the actual partition name on the harddisk, to where you downloaded the ISO. Use the command ‘fdisk -l’ to see what partitions are available if you are unsure about which one you need.

  5. Plug in your USB stick. Make sure it does not get mounted. If it gets mounted automatically, you need to un-mount it again, manually.
  6. A script is available which allows you to transfer the ISO content to a USB stick, making some modifications depending on the script’s parameters. The USB stick will be erased and re-formatted when running this script! Before inflicting any irreversible damage, the script will show you a prompt at which point you can evaluate whether it is safe to continue.

This script, called ‘iso2usb.sh‘, accepts the following parameters:

-c|--crypt size|%        Add a LUKS encrypted /home ; the parameter
                         is the requested size of the container in
                         kB, MB, GB,or as percentage of free space.
                         Examples: '-c 125M', '-c 1.3G', '-c 20%'.
 -f|--force              Ignore most warnings (except the back-out).
 -h|--help               This help.
 -i|--infile             Full path to the ISO image file.
 -o|--outdev             The device name of your USB drive.
 -p|--persistence        Custom name of the 'persistence' directory/file.
 -r|--refresh            Refresh the USB stick with the ISO content.
                         No formatting, do not touch user content.
 -u|--unattended         Do not ask any questions.
 -v|--verbose            Show verbose messages.
 -w|--wait               Add X seconds wait time to initialize USB.
 -C|--cryptpers size|%   Use a LUKS-encrypted 'persistence' file instead
                         of a directory (for use on FAT filesystem).
 -P|--persistfile        Use an unencrypted 'persistence' file instead
                         of a directory (for use on FAT filesystem).

Examples:
Note1 -the “#” at the beginning of these examples is an indication that you need to run the command as root. The “#” is not part of the command!
Note2 – the value for the output parameter is the device name of the stick and not one of its partitions!

  • Create a USB version of Slackware Live, where the USB stick is known to the system as ‘/dev/sdX.
    # iso2usb.sh -i /mnt/hd/home/alien/slackware64-live-current.iso -o /dev/sdX
  • Create a USB Live like above, but this time adding an encrypted /home filesystem with 750 MB of space, and at the same time increase the wait time on boot to 15 seconds (useful for slow USB media that fail to start the Live OS otherwise):
    # iso2usb.sh -i /mnt/hd/home/alien/slackware64-live-current.iso -o /dev/sdX -c 750M -w 15
  • Create a USB Live with an encrypted /home (allocating 30% of the stick’s free space for /home) and where the persistent data will be stored in a container file instead of a directory:
    # iso2usb.sh -i /mnt/hd/home/alien/slackware64-live-current.iso -o /dev/sdX -c 30% -P
  • Create a USB Live with both the /home and the persistent data encrypted (the persistence filesystem will be 300 MB in size):
    # iso2usb.sh -i /mnt/hd/home/alien/slackware64-live-current.iso -o /dev/sdX -c 30% -C 300M

You might have noticed that the “-P” parameter does not accept a size parameter. This is because the un-encrypted container file is created as a ‘sparse’ file that starts at zero size and is allowed to grow dynamically to a maximum of 90% of the initial free space on the Linux partition of the USB stick.

Good luck! Eric

PS: if you took the time to scroll all the way down, and if you would rather want to use the “iso2usb.sh” on your non-Slackware distro instead of going through all the hassle of this guide, please give me feedback about the errors and issues you find when running the script in your distro.
I absolutely wish that the script works perfectly on any distro, not just Slackware. If you have suggestions or patches, those are very welcome!

July 17 updates – Plasma 5, Live ISOS and more

Slackware turned 24 today, 17 July.
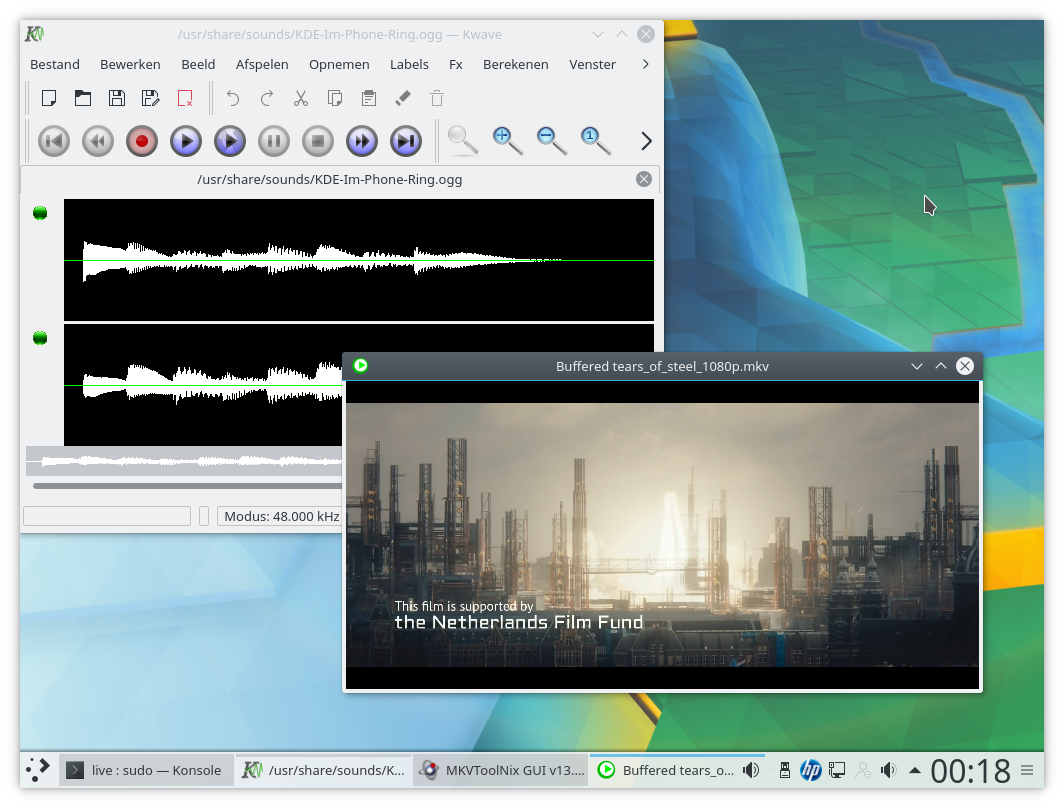
To celebrate I have created some goodies for you. Nothing you can eat or drink…

First, Plasma 5 updates.

I have uploaded the July ’17 set of Plasma 5 packages for Slackware 14.2 and -current to the ‘ktown’ repository. KDE 5_17.07 contains: KDE Frameworks 5.36.0, Plasma 5.10.3 and Applications 17.04.3. All based on Qt 5.9.0 for Slackware-current and Qt 5.7.1 for Slackware 14.2.
NOTE: I will no longer be releasing Plasma 5 packages for 32bit Slackware 14.2.

What’s new this time

Apart from the usual upgrades to the Frameworks, Plasma and Applications subsets, there is only one interesting piece of news: I added ‘kile’ to the applications-extra directory. Kile is a LaTex editor and the port to the KDE Frameworks 5 is well underway. I based the package on a git snapshot of its repository. One more KF5 application in “applications-extra”.
The goal of the KDE community is that the Applications 17.12 release (i.e. end of this year) will not have any application that is still kdelibs4 based. Everything in Plasma 5 Desktop should then finally be based on KF5.

Installing or upgrading Frameworks 5, Plasma 5 and Applications

As always, the accompanying README file contains full installation & upgrade instructions.

Recommended reading material

There have been several posts now about KDE 5 for Slackware-current. All of them contain useful information, tips and gotchas. If you want to read them, here they are: http://alien.slackbook.org/blog/tag/kde5/

Where to get the new packages for Plasma 5

Package download locations are listed below (you will find the sources in ./source/5/ and packages in /current/5/ and  /14.2/5/ subdirectories). If you are interested in the development of KDE 5 for Slackware, you can peek at my git repository too.

Live ISO of PLASMA5

A Plasma5 Live ISO image will follow shortly on http://bear.alienbase.nl/mirrors/slackware-live/latest/ in case you want to try it out first (check the timestamp of the ISO on the web page). I am currently testing it, looks fine. Here is a screenshot showing the QtAv player (a proper QT5 and QML based video player so that you can forget about kplayer or gmplayer):

What else is in stock

The PLASMA5 Live ISO is crammed with all my relevant big packages (libreoffice, vlc and friends) and I refreshed a few of these packages:

  1. A package is available for the latest MKVToolnix 13.0.0 – Slackware 14.2 and -current.
  2.  I built the latest Calibre 3.4.0 for Slackware 14.2 and -current, adding several internal modules which I omitted in my first Calibre 3 release. As a consequence, Calibre now also depends on unrar for which I also compiled the latest release (5.5.6) into a Slackware package.
  3. Podofo is another dependency for Calibre that received a long overdue update, and my repository now contains version 0.9.5.

And I am also preparing Live ISO images for the variants SLACKWARE (64bit and 32bit), XFCE (64bit and 32bit) and MATE. They should go online at the same time as the PLASMA5 ISO.

Have fun! Eric

New ISO for Slackware Live PLASMA5, with Stack Clash proof kernel and Plasma 5.10.2

blueSW-64pxAfter I released KDE 5_17.06 (June edition of my Plasma 5 package set) for Slackware 14.2 and -current a few days ago, I have now also uploaded an ISO image for the Slackware Live PLASMA5 Edition based on liveslak 1.1.8.1 and Slackware-current dated “Mon Jun 26 20:36:18 UTC 2017“. It will be the only Live variant this time,

If you already use a Slackware Live PLASMA5 USB stick that you do not want to re-format, you should use the “-r” parameter to the “iso2usb.sh” script. The “-r” or refresh parameter allows you to refresh the liveslak files on your USB stick without touching your custom content. I used the script just now on my own PLASMA5 USB stick and updated that from liveslak 1.1.8 to 1.1.8.1 in no time at all.

New in the ISO

The new ISO is based on the latest slackware64-current with Linux kernel 4.9.34, gcc 7.1.0 and glibc 2.25. This is a kernel which has been patched against the Stack Clash vulnerability.

And of course it contains the latest Plasma 5 release “KDE-5_17.06” as found in my ktown repository. You will find Plasma 5.10.2 based on Qt 5.9.0, accompanied by the latest versions of Digikam, Calligra and Krita. Additionally you will find several packages from my regular repository: chromium (with flash and widevine plugins), calibre, vlc, ffmpeg, libreoffice, palemoon, qbittorrent, openjdk and more. There’s also support for Cisco AnyConnect VPN and OpenVPN connections.
The PLASMA5 ISO does not only contain the Plasma 5 Desktop Environments. As usual, it contains the LXQT and Lumina Desktop Environments as well. Both have been recompiled against Qt 5.9.

The ISO is big (4.3 GB) but there’s not much you can not do with it.

Download the ISO image

The ISO image (with MD5 checksum and GPG signature) has been uploaded to the master server (bear) and should be available on the mirror servers within the next 24 hours.

Read more about liveslak

This blog has quite some posts about the Slackware Live Edition. Check them out: http://alien.slackbook.org/blog/tag/live/ – they contain lots of insight and helpful tips.
And this was the original post (which has been edited later on so it could become a proper landing page for curious visitors): http://alien.slackbook.org/blog/slackware-live-edition/

Download liveslak sources

The liveslak project can be found in my git repository: http://bear.alienbase.nl/cgit/liveslak/ . That’s all you need to create a Slackware Live ISO from scratch. Documentation for end users and for Live OS developers is available in the Slack Docs Wiki.

Have fun! Eric

liveslak 1.1.8 and new ISO images

blueSW-64pxNot much news of late about my ‘liveslak‘ scripts. I occasionally tweak them but the modifications these days are fairly minor. I stamped a new version on the repository this week: liveslak 1.1.8 on the occasion that I wanted to generate and upload a fresh series of Slackware-current based Live ISO images. After all, liveslak is meant to be a showcase of what Slackware-current is all about, and with the recent updates to kernel, gcc, glibc and more, a refresh was more than welcome.

The Slackware Live Edition ISOs are based on liveslak 1.1.8 and Slackware-current dated “Tue May  9 23:33:37 UTC 2017“.

If you already use a Slackware Live USB stick that you do not want to re-format, you should use the “-r” parameter to the “iso2usb.sh” script. The “-r” or refresh parameter allows you to refresh the liveslak files on your USB stick without touching your custom content.

New in the ISOs

The new ISOs are based on the latest slackware-current with Linux kernel 4.9.27, gcc 7.1.0 and glibc 2.25.

The SLACKWARE variant contains exactly that: the latest slackware-current and nothing else. Ideal for testing and for checking out the status of its development.

The XFCE variant contains a stripped down Slackware with a minimalized package set but still quite functional. The small size is also accomplished by excluding all documentation and man pages, and the localizations for the languages that are not supported in the boot menu. This ISO is small enough that you can burn it to a ’80 minutes’ CDROM (700 MB).

The MATE variant (a Slackware OS with KDE 4 replaced by Mate) contains packages from the repository at http://slackware.uk/msb/current/ which is Mate 1.18.

The PLASMA5 variant (Slackware with KDE 4 replaced by Plasma 5) comes with the latest Plasma 5 release “KDE-5_17.05” as found in my ktown repository. Additionally you will find several packages from my regular repository: chromium (with flash and widevine plugins), vlc, ffmpeg, libreoffice, palemoon, qbittorrent, openjdk and more. This ISO also contains the LXQT and Lumina Desktop Environments. Both are light-weight DE’s based on Qt5 so they look nice & shiny.

The liveslak scripts support three more variants out of the box: CINNAMON, DLACKWARE and STUDIOWARE. There’s no ISO image for the Cinnamon and Dlackware variants this time. The Studioware variant is new, and you will find the download location for an ISO further down (in the “Download the ISO images” section).

What happened between liveslak 1.1.6 and 1.1.8

  • A boot-time tweak ‘nsh’ was added so that you can disable freetype’s new sub-pixel hinting if you are no fan of how the fonts look in slackware-current by default now.
  • I ensured that the XFCE ISO will again fit on a CDROM medium. Apparently the recent updates in Slackware cause packages to swell up. This reduction in ISO size required the sacrifice of quite a few packages (many X bitmap fonts, the TTF Sazanami font, the XFCE weather plugin, and GhostScript).
  • Studioware was added as a supported Live variant. From their web site: “Studioware is a project aimed at providing build scripts and packages of the best open source audio, video and photo editing software available for Slackware Linux.
  • The liveslak scripts will now download everything they need, including a local copy of the Slackware package tree if that’s missing.

Download the ISO images

This time, the ISO variants I uploaded for Slackware Live Edition are: SLACKWARE (64bit & 32bit), XFCE (64bit & 32bit), PLASMA5, MATE. These ISO images (with MD5 checksum and GPG signature) have been uploaded to the master server (bear) and should be available on the mirror servers within the next 24 hours.

There is another Slackware Live ISO, but it is not hosted by me – I simply do not have the free space for it. It’s the STUDIOWARE Live ISO and you can find it at http://studioware.org/iso.php . It’s filled with many audio, video and photography manipulation applications and you should definitely give it a try!

Read more about liveslak

This blog has quite some posts about the Slackware Live Edition. Check them out: http://alien.slackbook.org/blog/tag/live/ – they contain lots of insight and helpful tips.
And this was the original post (which has been edited later on so it could become a proper landing page for curious visitors): http://alien.slackbook.org/blog/slackware-live-edition/

Download liveslak sources

The liveslak project can be found in my git repository: http://bear.alienbase.nl/cgit/liveslak/ . That’s all you need to create a Slackware Live ISO from scratch. Documentation for end users and for Live OS developers is available in the Slack Docs Wiki.

Have fun! Eric

May updates for Plasma 5 (Slackware)

The May 2017 updates for my ‘ktown’ repository are fairly minimal, but anyway here it is: KDE 5_17.05.
This new release contains: KDE Frameworks 5.33.0, Plasma 5.9.5 and Applications 17.04.0. All of this is still built on top of Qt 5.7.1.

NOTE: I will no longer be releasing Plasma 5 packages for 32bit Slackware 14.2.

What’s new in KDE 5_17.05?

  • The ‘deps’ section has two updated packages: json-glib and sip.
  • Plasma 5.9.5 is the final bugfix release of the 5.9 series before 5.10. The oxygen theme package is now extended with Qt4 support so that KDE4 applications can blend in with the Plasma 5 applications if you use the
    Oxygen theme. See https://www.kde.org/announcements/plasma-5.9.5.php .
  • In applications-extra I updated krita and krusader, and rebuilt calligra.
  • In kde4-extragear I added a patched oxygen-gtk2 package which should fix crashes in firefox-derived browsers such as Pale Moon.

This upgrade should be relatively straightforward if you already have Plasma 5 installed. See below for install/upgrade instructions. For users who are running slackware-current, the most crucial part is making sure that you end up with Slackware’s packages for ‘libinput‘ and ‘libwacom‘. I had those two packages in the ‘current’ section of my repository for a while (they are still part of the ‘14.2’ section) but Slackware added them to the core OS. Failing to install the correct (i.e. Slackware) packages, may render your input devices (mouse and keyboard) inoperative in X.Org.

Non-ktown packages you probably want anyway

There are a couple of *runtime* dependencies that I did not add to the ‘ktown’ repository, but you may want to consider installing them yourself because they enable functionality in Plasma 5 that you would otherwise miss:

  • vlc: will give phonon another backend to select from.
  • freerdp: access RDP servers through krdc.

All of the above can be found in my regular package repository.

In order for kdenlive to reach its full potential, you might want to consider replacing Slackware’s ‘ffmpeg‘ package by my version with extended functionality: more supported codecs including AAC, MP3 and H.264 encoders.

Multilib considerations

If you install a 32bit program on a 64bit Slackware computer with multilib and that program needs legacy system tray support (think of Skype for instance), you will have to grab the 32-bit version of Slackware’s ‘libdbusmenu-qt’ and my ktown-deps package ‘sni-qt’, and run the ‘convertpkg-compat32 -i‘ command on them to create ‘compat32’ versions of these packages. Then install both ‘libdbusmenu-qt-compat32‘ and ‘sni-qt-compat32‘.
Those two are mandatory addons for displaying system tray icons of 32bit binaries in 64bit multilib Plasma5.

Installing or upgrading Frameworks 5, Plasma 5 and Applications

You can skip the remainder of the article if you already have my Plasma 5 installed and are familiar with the upgrade process. Otherwise, stay with me and read the rest.

As always, the accompanying README file contains full installation & upgrade instructions. Note that the packages are available in several subdirectories below “kde”, instead of directly in “kde”. This makes it easier for me to do partial updates of packages. The subdirectories are “kde4“, “kde4-extragear“, “frameworks“, “kdepim“, “plasma“, “plasma-extra“, “applications“, “applications-extra” and “telepathy“.

Upgrading to this KDE 5 is not difficult, especially if you already are running KDE 5_17.04. You will have to remove old KDE 4 packages manually. If you do not have KDE 4 installed at all, you will have to install some of Slackware’s own KDE 4 packages manually. Luckily, KDE 5 is mature enough that there’s almost nothing left from old KDE 4 that you would really want.

What I usually do is: download all the ‘ktown’ packages for the new release to a local disk. Then run “upgrade –install-new” on all these packages. Then I check the status of my Slackware-current, upgrading the stock packages where needed. The slackpkg tool is invaluable during this process of syncing the package installation status to the releases.

Note:

If you are using slackpkg+, have already moved to KDE 5_17.04 and are adventurous, you can try upgrading using the following set of commands. This should “mostly” work but you still need to check the package lists displayed by slackpkg to verify that you are upgrading all the right packages. Feel free to send me improved instructions if needed. In below example I am assuming that you tagged my KDE 5 repository with the name “ktown” in the configuration file “/etc/slackpkg/slackpkgplus.conf“):
# slackpkg update
# slackpkg install ktown (to get the newly added packages from my repo)
# slackpkg install-new (to get the new official Slackware packages that were part of my deps previously)
# slackpkg upgrade ktown (upgrade all existing packages to their latest versions)
# slackpkg upgrade-all (upgrade the remaining dependencies that were part of my repo previously)

And doublecheck that you have not inadvertently blacklisted my packages in “/etc/slackpkg/blacklist“! Check for the existence of a line in that blacklist file that looks like “[0-9]+alien” and remove it if you find it!

Recommended reading material

There have been several posts now about KDE 5 for Slackware-current. All of them contain useful information, tips and gotchas. If you want to read them, here they are: http://alien.slackbook.org/blog/tag/kde5/

A note on Frameworks

The KDE Frameworks are extensions on top of Qt 5.x and their usability is not limited to the KDE Software Collection. There are other projects such as LXQT which rely (in part) on the KDE Frameworks, and if you are looking for a proper Frameworks repository which is compatible with Slackware package managers such as slackpkg+, then you can use these URL’s to assure yourself of the latest Frameworks packages for Slackware-current (indeed, this is a sub-tree of my KDE 5 repository):

The same goes for Frameworks for Slackware 14.2 (change ‘current’ to ‘14.2’ in the above URLs).

Where to get the new packages for Plasma 5

A Plasma5 Live ISO image will follow shortly on http://bear.alienbase.nl/mirrors/slackware-live/latest/ in case you want to try it out first (check the timestamp of the ISO on the web page).

Package download locations are listed below (you will find the sources in ./source/5/ and packages in /current/5/ and  /14.2/5/ subdirectories). If you are interested in the development of KDE 5 for Slackware, you can peek at my git repository too.

Using a mirror is preferred because you get more bandwidth from a mirror and it’s friendlier to the owners of the master server!

Have fun! Eric

« Older posts Newer posts »

© 2024 Alien Pastures

Theme by Anders NorenUp ↑