Hi all!
 This is the 6th episode in a series I am writing about using Slackware as your private/personal ‘cloud server’. It is an unscheduled break-out topic to discuss an Etherpad server specifically.
Check out the list below which shows past, present and future episodes in the series, if the article has already been written you’ll be able to click on the subject.
The first episode also contains an introduction with some more detail about what you can expect.
These articles are living documents, i.e. based on readers’ feedback I may add, update or modify their content.
- Episode 1: Managing your Docker Infrastructure
- Episode 2: Identity and Access management (IAM)
- Episode 3: Video Conferencing
- Episode 4: Productivity Platform
- Episode 5 : Collaborative document editing
- Episode 6 (this article): Etherpad with Whiteboard
- Preamble
- Configuring MariaDB
- Reconfiguring Docker-Jitsi-Meet
- Accessing the admin console
- Integration with Keycloak IAM
- Custom Etherpad Docker image
- Setting up WBO Whiteboard
- Using the custom Etherpad with Jitsi Meet
- Summarizing
- Running the custom Etherpad standalone
- Thanks
- Episode 7: Decentralized Social Media
- Episode 8: Media streaming platform
- Episode 9: Cloudsync for 2FA Authenticator
- Episode X: Docker Registry
Etherpad with Whiteboard
In Episode 3 (Video Conferencing) we setup a Jitsi Meet server in a Docker container stack which includes an Etherpad server for real-time document collaboration during a video meeting.
That Etherpad instance as configured by the Docker-Jitsi-Meet project is really only a demo setup. It uses a “dirtydb” JSON backend wich is not meant for anything else but testing. It really needs a proper SQL database like MariaDB to power it. And you can’t export your documents from this demo Etherpad in any meaningful format.
Furthermore, this Etherpad container is not using our Keycloak IAM for authentication; everyone who knows the public URL can create a document, invite others and start writing. Even shared documents created in Jitsi meetings are not secure and anyone who guesses the room name has access to the Etherpad document.
This article means to set things right and configure Etherpad correctly, adding Whiteboard functionality as we go. I will also discuss the differences between our Jitsi integrated Etherpad and a running a standalone Etherpad server in case you are not interested in Video meetings and only want the text collaboration.

Preamble
This article assumes you have already setup an Etherpad in a Docker container as part of a Dockerized Jitsi Meet server (see Episode 3 in this series), and this Etherpad is running at a publicly accessible URL:
- https://meet.darkstar.lan/pad/
We want to make it delegate user authentication to our OpenID Provider: Keycloak. That Keycloak service is available at:
- https://sso.darkstar.lan/auth
If you are not interested in Jitsi Meet and only want to know how to run an Etherpad server, this article still contains everything you need but keep in mind that my examples are all assuming the above URL for the Etherpad. Adapt that URL to your own real-life situation. You may still have to setup an Apache webserver first, which serves an empty page at “https://meet.darkstar.lan/” but I will leave that to you.
Configuring MariaDB
By default, Etherpad will use a ‘DirtyDB’ JSON file-based backend. It is straight-forward to make it switch to for instance a MariaDB database server backend, we only need to provide the connection details for a pre-existing database.
Like with the previous articles we are using the Slackware MariaDB database server which is running on the host. First, we will create a database (etherpad_db), a database user (etherpad) and grant this user sufficient access to the database. Then we will use these database configuration values when editing the Docker-Jitsi-Meet files in order to change the Etherpad container properties.
This is how we create the database and the user (using a secure password string for ‘EPPPASSWD‘ of course):
$ mysql -uroot -p
> CREATE DATABASE IF NOT EXISTS `etherpad_db` CHARACTER SET utf8 COLLATE utf8_unicode_ci;
> CREATE USER 'etherpad'@'localhost' identified by 'EPPASSWD';
> CREATE USER 'etherpad'@'%' identified by 'EPPPASSWD';
> GRANT CREATE,ALTER,SELECT,INSERT,UPDATE,DELETE on `etherpad_db`.* to 'etherpad'@'localhost';
> GRANT CREATE,ALTER,SELECT,INSERT,UPDATE,DELETE on `etherpad_db`.* to 'etherpad'@'%';
> FLUSH PRIVILEGES;
> exit;
Note from the above SQL statements that we are allowing the ‘etherpad‘ user remote access to the database. This is needed because Etherpad in the Docker container contacts MariaDB via the network, using the IP address of the Docker network bridge in the Jitsi Meet container stack.
Reconfiguring Docker-Jitsi-Meet
My advise is to start with briefly re-visiting Episode 3 of the series and read back how we customized the ‘docker-compose.yml‘ and ‘.env‘ files in order to startup the Docker-Jitsi-Meet stack properly. Because we are going to update these two files again.
This is what we need to change to make Etherpad connect to the external MariaDB database:
Relevant .env additions:
# MariaDB parameters for mysql DB instead of dirtydb

ETHERPAD_DB_TYPE=mysql

ETHERPAD_DB_HOST=172.20.0.1

ETHERPAD_DB_PORT=3306

ETHERPAD_DB_NAME=etherpad_db

ETHERPAD_DB_USER=etherpad

ETHERPAD_DB_PASS=EPPASSWD

ETHERPAD_DB_CHARSET=utf8
Relevant docker-compose additions:
In the ‘.env‘ file we defined the IP address for the database server (172.20.0.1). Etherpad is running inside a container, and its way out is through the default gateway of its Docker network. In order to have 172.20.0.1 as the gateway address, we need to configure the internal ‘meet.jitsi‘ network a deterministic IP range so that we always know its gateway address. if we are going to give that network the IP range “172.20.0.0/16“, the “networks” statement all the way at the bottom needs to be changed from:
# Custom network so all services can communicate using a FQDN
networks:
  meet.jitsi:
to:
# Custom network so all services can communicate using a FQDN
networks:
  meet.jitsi:
    ipam:
      config:
        - subnet: 172.20.0.0/16
Use the variables we added to ‘.env’ to create an updated Etherpad container definition. Right underneath this line:
- SKIN_VARIANTS=${ETHERPAD_SKIN_VARIANTS}
Add the following lines:
            - DB_TYPE=${ETHERPAD_DB_TYPE}
            - DB_HOST=${ETHERPAD_DB_HOST}
            - DB_PORT=${ETHERPAD_DB_PORT}
            - DB_NAME=${ETHERPAD_DB_NAME}
            - DB_USER=${ETHERPAD_DB_USER}
            - DB_PASS=${ETHERPAD_DB_PASS}
            - DB_CHARSET=${ETHERPAD_DB_CHARSET}
Accessing the admin console
Etherpad has an admin console where you can manage its plugin configuration and other things too. It will only be enabled if you configure an admin password. So let’s do that too.
This is what we need to change to enable the admin console for Etherpad:
Relevant .env additions:
# The password for Etherpad admin page

ETHERPAD_ADMIN_PASSWORD="my_secret_admin_pass"
Relevant docker-compose additions:
Right underneath this line:
- SKIN_VARIANTS=${ETHERPAD_SKIN_VARIANTS}
Add the following lines:
- ADMIN_PASSWORD=${ETHERPAD_ADMIN_PASSWORD}
Relevant Apache httpd additions:
If you would now access the URL for the admin console, https://meet.darkstar.lan/pad/admin/ you would only see the message “Unauthorized“. The Etherpad expects you to provide the Basic Authentication hook in front of that page which passes the admin credentials on to the backend. So, we will add a ‘AuthType Basic‘ block to our Apache httpd configuration to add Basic Authentication which will pop up a login dialog, and then add the admin user and its password “my_secret_admin_pass” to a htaccess file.
Remember, in Episode 4 we configured the Etherpad to be available at “https://meet.darkstar.lan/pad/” which means the admin console URL is “https://meet.darkstar.lan/pad/admin/”
This is the block to add to your VirtualHost configuration for the Etherpad:
<Location /pad/admin>
    AuthType Basic
    AuthBasicAuthoritative off
    AuthName "Welcome to the Etherpad"
    AuthUserFile /etc/httpd/passwords/htaccess.epl
    Require valid-user
    Order Deny,Allow
    Deny from all
    Satisfy Any
</Location>
And then we still need to create that htaccess file using the ‘htpasswd‘ tool, like this:
# mkdir /etc/httpd/passwords

# htpasswd -B -c /etc/httpd/passwords/htaccess.epl admin
The “-B” parameter enforces the use of bcrypt encryption for passwords. This is currently considered to be very secure.
The above command will prompt for the password, and there you enter that “my_secret_admin_pass” string. The content of that file will look like this:
# cat /etc/httpd/passwords/htaccess.epl

admin:$2y$05$JpvucTlKIQEJViCynem.JelENHpv/maJStsPM4iU9d/sg4cMU.UfW
The Docker Jitsi Meet container stack needs to be refreshed and restarted since we edited ‘.env’. I don’t want to repeat the detailed instructions here, so refer you to the section “Considerations about the “.env” file” in Episode 3 of this article series. Do that now, and when the updated container stack is up and running again, continue here.
And after also restarting the Apache httpd and refreshing the URL “https://meet.darkstar.lan/pad/admin/” you will be asked to enter your admin credentials and you will end up in the Etherpad admin console.
The screenshot below does not reflect the status of the barebones Etherpad by the way; you see a lot of installed plugins mentioned on the admin page. We will be installing those into the Etherpad image in one of the next sections:
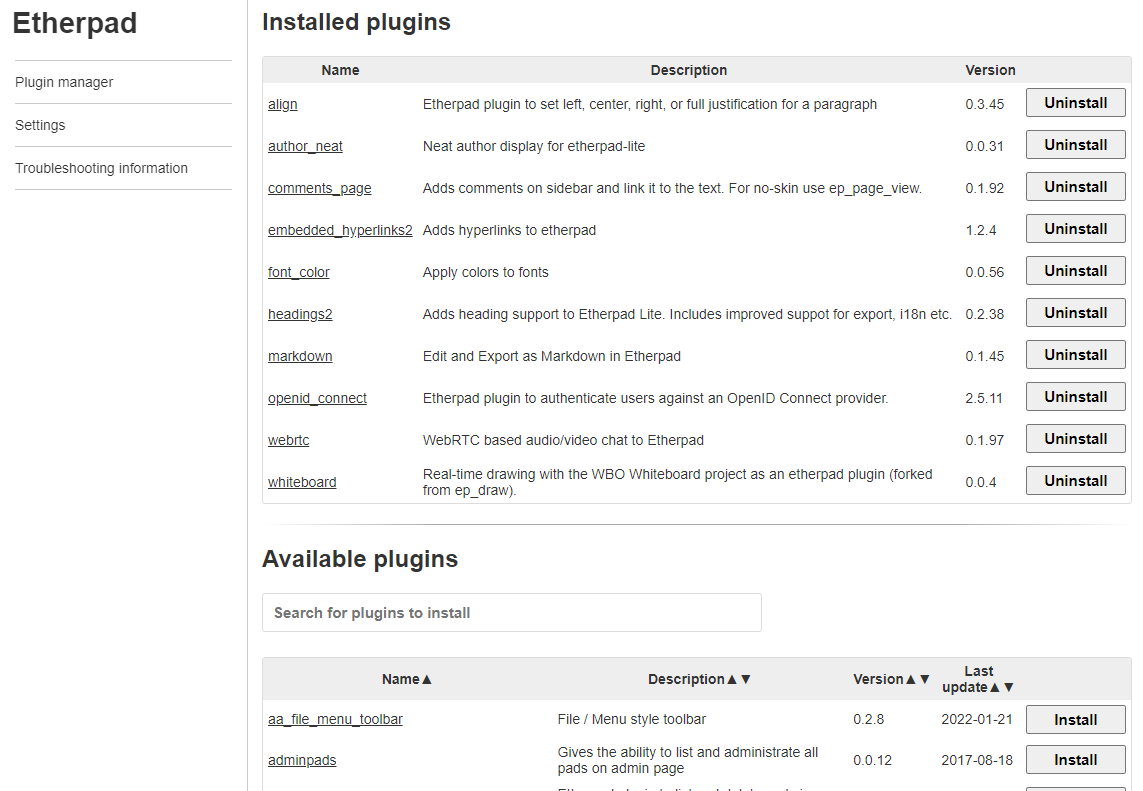
At this stage, we have accomplished a well-performing Etherpad installation with a SQL database back-end and an administrative web-interface. The next step is to add authentication through an OpenID provider like our Keycloak IAM server.
Integrating with Keycloak IAM
The out-of-the-box Etherpad Docker container is not very functional. The above sections already showed how to replace the “DirtyDB” with a proper SQL database server like MariaDB. But the default image misses a few useful plugins and a real desktop editor program which allows Etherpad users to export their collaborative work to a proper document format instead of pure HTML.
Whatever plugins we add, at the very least we need to add a plugin which allows us to let the Etherpad authenticate against our Keycloak IAM server. This plugin needs to be inside the Docker image, we cannot use it outside the running container. There’s no other option than to create a custom Docker image for Etherpad. We use this as an opportunity to add some more plugins, as well as Abiword (to enable document export in Etherpad).
I’ll show how to announce Etherpad to Keycloak (we create a Client profile in Keycloak); then I’ll share the required configuration to be added to the Etherpad Docker files; and then I’ll show how to create a custom Docker image enriched with additional plugins which we will use instead of the basic image from Docker Hub.
Keycloak
First of all, let’s create a Client profile for Etherpad in Keycloak.
- Login to the Keycloak Admin Console (https://sso.darkstar.lan/auth/admin/)
- Select our ‘Foundation‘ realm from the dropdown at the left.
- Under ‘Clients‘, create a new client:
‘Client ID’ = “etherpad”
‘Root URL’ = “https://meet.darkstar.lan/pad/ep_openid_connect/callback”
Note that for the Etherpad OIDC plugin ‘ep_openid_connect’ – see below – to work, the ‘Valid Redirect URIs’ (a.k.a. callback URL) must be the concatenation of the Etherpad base URL (https://meet.darkstar.lan/pad/) plus “/ep_openid_connect/callback“. When setting the ‘Root URL‘ to the above value, the ‘Redirect URIs‘ will automatically also be set correctly to “https://meet.darkstar.lan/pad/ep_openid_connect/callback/*“ - Save.
- In the ‘Settings‘ tab, change:
‘Access Type’ = “confidential” (default is “public”) - Save.
- Go to the ‘Credentials‘ tab
- Make sure that ‘Client Authenticator‘ is set to “
Client Id and Secret“ - Copy the value of the ‘Secret‘, which we will use later in the Etherpad connector; the Secret will look somewhat like this:
“2jnc8H6RH9jIYMXExUHA7XF7uD8YKIRs“.
Keycloak configuration being completed, we can turn our attention to the connector between Etherpad and Keycloak.
EP_openid_connect
We will use the Etherpad plugin ep_openid_connect which I already briefly mentioned earlier. This plugin provides the needed OpenID client functionality to Etherpad.
When we add this plugin to the Etherpad Docker image we need to be able to configure it via the ‘docker-compose.yml‘ and ‘.env‘ files of Docker-Jitsi-Meet. The existing configuration files in the repository for the docker-jitsi-meet stack are just meant to make the basic Etherpad work, so we need to add more parameters to configure our custom Etherpad properly.
I will show you what you need to add, and where.
The ‘ep_openid_connect’ plugin expects an ‘ep_openid_connect’ block in the ‘settings.json’ file (we will get to that file in the next section). Since that file is JSON-formatted, we arrive at the following structure:
"ep_openid_connect": {

"issuer": "https://sso.darkstar.lan/auth/realms/foundation",

"client_id": "etherpad",

"client_secret": "2jnc8H6RH9jIYMXExUHA7XF7uD8YKIRs",

"base_url": "https://meet.darkstar.lan/pad"

},
The text string values in green highlight are of course the relevant ones. What is the meaning of the parameters:
- issuer: this is the string you obtain through Keycloak’s OpenID Discovery URL. Make sure you have ‘jq‘ installed and then run this command to obtain the value for ‘issuer‘:
$ curl https://sso.darkstar.lan/auth/realms/foundation/.well-known/openid-configuration | jq .issuer
  % Total    % Received % Xferd  Average Speed   Time    Time     Time  Current
                                 Dload  Upload   Total   Spent    Left  Speed
100  5749  100  5749    0     0   6594      0 --:--:-- --:--:-- --:--:--  6600
"https://sso.darkstar.lan/auth/realms/foundation"
In this case, you could easily have guessed the ‘issuer’ value, but using the above ‘well-known’ query URL will always get you the correct value.
- client_id, client_secret: those are the same OAuth2 values obtained from Keycloak when creating the Etherpad Client profile as seen above.
- base_url: this is the URL where Etherpad is externally accessible (https://meet.darkstar.lan/pad/ – see Episode 3).
Additionally, since we are now enforcing login, Etherpad’s ‘requireAuthentication‘ setting must be set to “true”. Note that the default setting is “false”; this is how that setting is defined in the Etherpad configuration:
"requireAuthentication": "${REQUIRE_AUTHENTICATION:false}",
We’ll just have to define a “true” value for that variable later on.
Note: Each configuration parameter can also be set via an environment variable, using the syntax "${ENV_VAR}" or "${ENV_VAR:default_value}". This ability is what we will use when updating the Docker Compose file for Jitsi Meet. We will not use the literal JSON block above, instead we will fill it with variable names and use our Docker Compose files to provide values for these variables. That way I am able to create a generic Docker image that I can upload to the Docker Hub and share with other people.
The file ‘settings.json.template‘ in the Etherpad repository has lots of examples.
Hold on to that thought for a minute while we proceed with creating our custom Etherpad Docker image, since we have all the data available to do this now. Once we have that image, we will once again return to the re-configuration of Docker Jitsi Meet and integrate our Etherpad with the Jitsi container stack.
Custom Etherpad Docker image
How to create a custom Docker image?
- First we clone the “etherpad-lite” git repository. That contains a Dockerfile plus all the context that is needed by ‘docker build‘ to generate an image.
$ mkdir ~/docker-etherpad-slack

$ cd ~/docker-etherpad-slack

$ git clone https://github.com/ether/etherpad-lite . - There is one relevant configuration file in the root directory of the checked-out repository: ‘
settings.json.docker‘. This file will be copied into the Etherpad Docker image and renamed to ‘settings.json‘ when we run ‘docker build‘ command. Any plugin configuration we want to enable via environment variables needs to be present in this file.
Now the standard configurable parameters for the Etherpad are contained in that file, but our custom settings for the “ep_openid_connect” plugin are not. I already showed you how that block of configurable parameters looks in the previous section, and I promised to parametrize it. This is how the parameters look, and we will give them values in the next section where we update the Docker Jitsi Meet configuration. - Relevant ‘settings.json.docker’ additions:
- Support for OpenID Connect in Etherpad – add this JSON code:
"ep_openid_connect": {

"issuer": "${OIDC_ISSUER:undefined}",

"client_id": "${OIDC_CLIENT_ID:undefined}",

"client_secret": "${OIDC_CLIENT_SECRET:undefined}",

"base_url": "${OIDC_BASE_URL:undefined}"

}, - We also add a connector for the WBO Whiteboard server (its setup is described in the next section below) to the Docker image: the plugin is called ‘ep_whiteboard‘ and needs the following JSON configuration block to be added:
"ep_draw": {

"host": "${WBO_HOST:undefined}"

}, - Enable AbiWord in the configuration, since we are going to add it to the image. The full path to the ‘
abiword‘ binary needs to be configured in ‘settings.json.docker‘.
Look up this line in the file:
"abiword": "${ABIWORD:null}",
and change it to:
"abiword": "${ABIWORD:/usr/bin/abiword}",
- Support for OpenID Connect in Etherpad – add this JSON code:
- Then we build a new image, adding several useful (according to the developers) plugins, as well as the Abiword word processor.
I tag the resulting image as “liveslak/etherpad” so that I can upload (push) it to the Docker Hub later on:$ docker build \ --build-arg ETHERPAD_PLUGINS="ep_openid_connect ep_whiteboard ep_author_neat ep_headings2 ep_markdown ep_comments_page ep_align ep_font_color ep_webrtc ep_embedded_hyperlinks2" \ --build-arg INSTALL_ABIWORD="yes" \ --tag liveslak/etherpad .
This leads to the following output and results in an image which is quite a bit larger (786 MB uncompressed) as the standard Etherpad image (474 MB uncompressed) because of the added functionality:
Step 24/26 : HEALTHCHECK --interval=20s --timeout=3s CMD ["etherpad-healthcheck"]
---> Running in 2c241a795e46
Removing intermediate container 2c241a795e46
---> 5ca0246c1e61
Step 25/26 : EXPOSE 9001
---> Running in 21fcdf511d46
Removing intermediate container 21fcdf511d46
---> 1c288502f632
Step 26/26 : CMD ["etherpad"]
---> Running in 08a25b585280
Removing intermediate container 08a25b585280
---> 912c54fb6c0a
Successfully built 912c54fb6c0a
Successfully tagged liveslak/etherpad:latest
If you create the image on another computer and need to transfer it to your Slackware Cloud Server in order to use it there, you can save the image to a compressed tarball on the build machine, using docker commands:
$ docker save liveslak/etherpad | xz > etherpad-slack.tar.xz
You can use ‘rsync’ or ‘scp’ to transfer that tarball to your Cloud Server and then load it into the Docker environment there, also using docker commands so that you don’t need to know the intimate details on how Docker works with images:
$ cat etherpad-slack.tar.xz | docker load
I pushed this image to my own Docker repository https://hub.docker.com/repository/docker/liveslak/etherpad but I first added a tag to reflect the latest Etherpad release (1.8.16 at the moment):
$ docker login

$ docker tag liveslak/etherpad liveslak/etherpad:1.8.16

$ docker push liveslak/etherpad:1.8.16

$ docker push liveslak/etherpad:latest
This means that you can use the Hub version of ‘liveslak/etherpad’. But you can just as well use your own locally generated etherpad image in the ‘docker run‘ commands that launch your Etherpad container.
When you have a local image called “liveslak/etherpad”, then Docker will not check for an online image called “liveslak/etherpad”. If you did not generate your own image, Docker will look for (and find) my image at the Hub (or at the private Registry you may have configured), so it will download and use that.
Setting up WBO Whiteboard
Etherpad will be even more attractive if it offers users a collaborative Whiteboard and not just a collaborative text editor.
Enter WBO, which is an actual drawing board with infinite canvas and real-time refresh for all users.
Its boards are persistent; if you re-visit a board later on, all your content will still be there. Look at the WBO demo site… amazing.
We will run WBO in its own Docker container and re-configure our Etherpad webserver with a reverse proxy so that WBO can be integrated into Etherpad through the ‘ep_whiteboard’ connector.
It’s not so complex actually.
Docker container
First, launch a Docker container running WBO. We ensure that the data of the whiteboards you will be creating are going to be stored persistently outside of the container, so let’s create that data directory first and ensure that the internal WBO user is able to write there (you may have a different preference for directory location):
# mkdir -p /opt/dockerfiles/wbo-boards
# chown 1000:10 /opt/dockerfiles/wbo-boards
Then launch the container as a background process, and make it listen at port “5001” of your host’s loopback address:
$ docker run -d -p localhost:5001:80 -v "/opt/dockerfiles/wbo-boards:/opt/app/server-data" --restart unless-stopped --name whiteboard lovasoa/wbo:latest
Reverse proxy
We make WBO available behind an apache httpd reverse proxy which takes care of the encryption (https) using a Let’s Encrypt certificate.
Add the following block to your <VirtualHost></VirtualHost> definition of the server which also defines the reverse proxy for your Etherpad (which is https://meet.darkstar.lan/pad/ remember?):
# Reverse proxy for the WBO whiteboard Docker container:
<Location /whitepad/>
    ProxyPass http://127.0.0.1:5001/
    ProxyPassReverse http://127.0.0.1:5001/
</Location>
After restarting Apache httpd, your WBO whiteboard will be accessible via https://meet.darkstar.lan/whitepad/ . We will use that green highlighted text down below as the value for the ETHERPAD_WBO_HOST variable. Etherpad will prefix that text with “https://” and that prefix cannot be changed… hence the requirement for a reverse proxy that can handle the data encryption.
One caveat when you do this on your real-life internet-facing cloud server…
The Whiteboard server is accessible without authentication. It may be advisable to just come up with a different path component than “/whitepad/“, you can think of something like a UUID-like string: “/8cd77cbe-a694-4390-800a-638c7cc05f49/” as long as you use the same string in both places (reverse proxy and ETHERPAD_WBO_HOST definitions). Also, your board names are not visible anywhere unless you share their URLS with other people. So, a relatively safe environment.
Using the custom Etherpad with Jitsi Meet
If you followed Episode 3, you will have a directory “/usr/local/docker-jitsi-meet-stable-6826“, your version number may differ from my “6826“. Inside you will have your modified ‘docker-compose.yml‘ file.
We are going to edit two files: ‘.env‘ and ‘docker-compose.yml‘.
- Relevant ‘.env’ additions:
In the ‘.env‘ file we define correct values for the variables we introduced earlier. You can add the following lines basically anywhere, but it is of course most readable if you copy them immediately after the other ETHERPAD_* variables you added earlier on for the MySQL database backend:
ETHERPAD_OIDC_ISSUER="https://sso.darkstar.lan/auth/realms/foundation"

ETHERPAD_OIDC_BASE_URL="https://meet.darkstar.lan/pad/"

ETHERPAD_OIDC_CLIENT_ID="etherpad"

ETHERPAD_OIDC_CLIENT_SECRET="2jnc8H6RH9jIYMXExUHA7XF7uD8YKIRs"

ETHERPAD_REQUIRE_AUTHENTICATION="true"

ETHERPAD_WBO_HOST="meet.darkstar.lan/whitepad" - Relevant ‘docker-compose.yml’ additions:
Add the following lines to the “etherpad:” section immediately below the MySQL database variable definitions you added earlier on in this Episode. You notice the variable names we defined in the previous section when dealing with ‘ep_openid_connect‘:
- OIDC_ISSUER=${ETHERPAD_OIDC_ISSUER}

- OIDC_CLIENT_ID=${ETHERPAD_OIDC_CLIENT_ID}

- OIDC_CLIENT_SECRET=${ETHERPAD_OIDC_CLIENT_SECRET}

- OIDC_BASE_URL=${ETHERPAD_OIDC_BASE_URL}

- REQUIRE_AUTHENTICATION=${ETHERPAD_REQUIRE_AUTHENTICATION}

- WBO_HOST=${ETHERPAD_WBO_HOST}
- More ‘docker-compose.yml’ updates:
The “etherpad:” service definition in that YAML file contains the following reference to the Etherpad Docker image:
image: etherpad/etherpad:1.8.16
You need to change that line to:
image: liveslak/etherpad:1.8.16
…in order to use our custom Etherpad image instead of the default one.
The re-configuration is complete and since we modified the ‘.env‘ file again, we need to refresh and restart our Docker Jitsi Meet container stack again.
Note however, that at this point we have to perform this restart differently than mentioned earlier in this article. Since we are switching to a new Etherpad image, the container based on the old image needs to be removed also. For this scenario, please consult the detailed instructions in both sections “Considerations about the “.env” file” and “Upgrading Docker-Jitsi-Meet” in Episode 3 of this article series.
The complete set of steps to follow is a mix of both sections, and I share it with you for completeness’ sake:
# cd /usr/local/docker-jitsi-meet-stable-*
# docker-compose down
# rm -rf /usr/share/docker/data/jitsi-meet-cfg/
# mkdir -p /usr/share/docker/data/jitsi-meet-cfg/{web/letsencrypt,transcripts,prosody/config,prosody/prosody-plugins-custom,jicofo,jvb,jigasi,jibri}
# docker-compose pull
# docker-compose up -d
Don’t forget to remove the old, unused, Etherpad image because it is now wasting 474 MB uncompressed disk space.
Summarizing
Even though we set it up as part of the Jitsi stack, we now have a standalone Etherpad running which requires you to login when you visit “https://meet.darkstar.lan/pad/”.
On the other hand, you can also access Etherpad via Jitsi Meet. What’s different?
When you start a Jitsi meeting, via “https://meet.darkstar.lan/” and then click on “Open shared document“, you are already authenticated against Keycloak and the Etherpad document will open for you right away, no second login required.
After login, you will be met with a much more powerful editor than the basic one that comes with Docker Jitsi Meet. You’ll notice the extended document export capability thanks to Abiword and the small video widget at the top for face-to-face communication thanks to the WebRTC plugin.
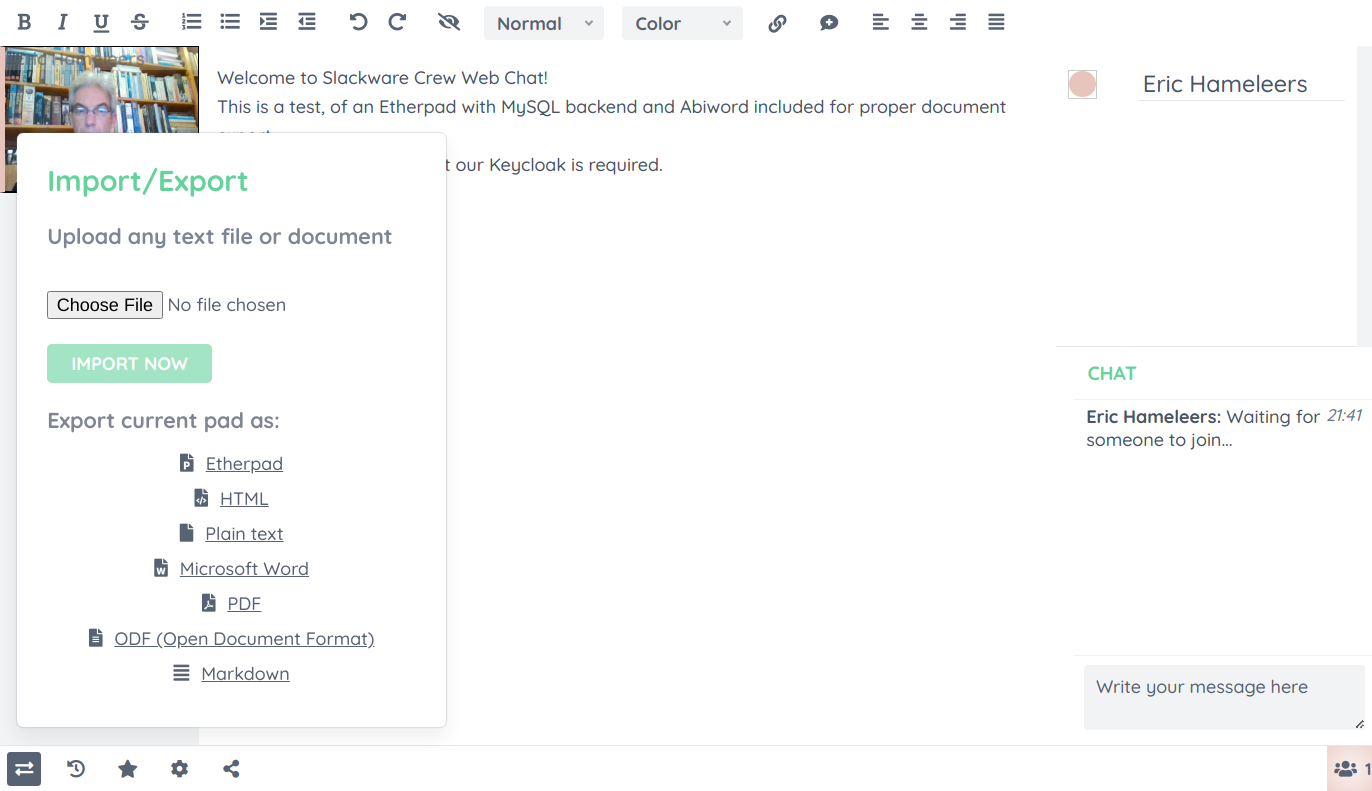
Happy collaborating!
Running the custom Etherpad standalone
If you are not interested in Jitsi Meet, this is the command to start the customized Etherpad container and make it listen at port 9001 of the loopback address:
# docker run -d -p 127.0.0.1:9001:9001 liveslak/etherpad
The Etherpad container is now accessible only on your computer by pointing your browser at http://localhost:9001/ . You still need to add an Apache reverse proxy definition to the VirtualHost site definition to make your Etherpad available for other users at https://meet.darkstar.lan/pad/ .
If you want to change the container’s behavior using the available variables as documented before, you can pass these to the ‘docker run‘ command using one or more “-e” parameters, like so (this example just enables the admin console):
# docker run -d -p 127.0.0.1:9001:9001 \
  -e ADMIN_PASSWORD="my_secret_admin_pass" \
  --name etherpad \
  liveslak/etherpad
With additional environment variables you can enable more of the latent functionality. See the earlier sections of this article for all the relevant variables: those that enable the MySQL database backend; the one that enables the Whiteboard; those that enable the Keycloak authentication, etc.
Thanks
Etherpad with integrated Whiteboard can be a compelling solution for some user groups. Even without Jitsi Meet, you can jointly write and draw, save your work to your local harddrive and you have voice & video in a small overlay if you need to discuss the proceedings.
I encourage you to try it out. With or without integration into Jitsi Meet or even without Keycloak authentication if you want to create this as a completely free and low-treshold service to your local community.
Let me know what you think of this Episode in the comments section below. The final Episode, how to setup your own private Docker image repository, will take some time to write… I have not yet started doing in-depth research on that topic. But the six available Episodes will hopefully keep you occupied for a while 🙂
Thanks for reading until the end.
Eric
Amazing, collaborative writing and video too. I’ll take some time this week to learn docker first.
Great series, Eric. As for suggestions, I came across organice today, an org-mode implementation that runs in the browser on both mobile and desktop. I’ve just skimmed through the documentation but it seems they have a Docker option. It might be a nice addition to your series, since org-mode is an excellent way of keeping TODOs, notes and a lot more organised, and organice allows people who are not fans of Emacs to do just that in the browser, on multiple platforms.
Thank you very much!
Great guide ! thanks a lot for your work
Out of curiosity, is Etherpad working for you when you open it from Jitsi embedded in NextCloud ?
It didn’t work for me unless I play with frame-ancestors settings in Keycloak & change sameSite parameter from “Lax” to “None” in the Etherpad container’s settings.json
Thanks !
Hi jdd272, thanks for the feedback.
I am not currently running some of these cloud services. I had implemented the complete stack as documented in this article series on slackware.nl, but the little barebones server could not handle the load. I implemented a subset (excluding Etherpad and some others) on my server at home.
Your comment will hopefully help others who come searching for answers in the future!