Hi all!
 This is the first installment of a series of articles I intend to write in early 2022. With Slackware 15.0 around the corner, I think it is a good time to show people that Slackware is as strong as ever a server platform. The core of this series is not about setting up a mail, print or web server – those are pretty well-documented already. I’m going to show what is possible with Slackware as your personal cloud platform.
A lot of the work that went into developing Slackware between the 14.2 and 15.0 releases was focusing on desktop usage. The distro is equipped with the latest and greatest KDE and XFCE desktops, a low-latency preemptive kernel, Pipewire multimedia framework supporting capture and playback of audio and video with minimal latency, et cetera. I have been enjoying Slackware-current as a desktop / laptop powerhouse for many years and built a Digital Audio Workstation and a persistent encrypted Live Distro with SecureBoot support out of it.
Slackware Cloud Server Series – Summary
The imminent release of Slackware 15.0 gives me fresh energy to look into ‘uncharted’ territory. And therefore I am going to write about setting up collaborative web-based services. Whether you will do this for the members of your family, your friends, your company or any group of people that you interact with a lot, this year you will hopefully learn how to become less dependent on the big ‘cloud’ players like Google, Microsoft, Zoom, Dropbox. What I will show you, is how to setup your own collaboration platform on a server or servers that you own and control. Think of file-sharing, video-conferencing, collaborative document editing, syncing files from your desktop and your phone to your cloud server. If the series is received well, I may additionally write about expanding your cloud server to a private platform for watching movies, listening to network audio, and so on.
I have a good notion of what I will write about, but I am sure that as this series grows and I tell you stories, you will get triggered about subjects that I may not have considered yet. So here’s a challenge for you, the reader: let me know what you think would be a good addition to the series. What makes Slackware great as a “personal cloud” platform to bind people together.
Topics you can expect in this series:
- Episode 1 (this article): Managing your Docker Infrastructure
Here I will show you how to setup and manage Docker containers on Slackware, considering graphical management and firewalling. This is the foundation for what we will be doing in subsequent episodes.- Docker architecture
- Examples
- Docker Compose
- Building a Docker image and running a container based on it
- Help on commands
- Obtain information about images and containers
- Stop and remove a container
- Refresh a container with the latest image from the vendor
- Managing containers, images, volumes, networks etc
- Difference between load/save and import/export
- Limiting the log size for your containers
- Graphical management tool
- Docker’s effect on iptables firewall
- Generic iptables
- UFW (Uncomplicated Firewall)
- Firewalld
- Alien’s Easy Firewall Generator (EFG)
- Thanks
- Attribution
- Docker architecture
- Episode 2: Identity and Access management (IAM)
Setting up Keycloak for Identity and Access Management (IAM) to provide people with a single user account for all the Slackware Server Services we will be creating. - Episode 3: Video Conferencing
Setting up Jitsi Meet . This makes us independent of cloud conferencing services like MS Teams, Zoom or Google Meet. The Jitsi login is again offloaded to our Keycloak IAM provider. - Episode 4: Productivity Platform
Setting up NextCloud as the productivity hub where you can store and read your documents, host your photo library, hold video meetings, manage your activities, read and send emails, keep track of where your smartphone went, chat with people and a lot more. I will also show how to integrate the Jitsi video conferencing solution which was the topic of the previous episode into our NextCloud platform.
NextCloud will be setup on your ‘bare metal’ server. User authentication to the platform will be handled by our Keycloak IAM server. - Episode 5: Collaborative document editing
Integrating Collabora Online Development Edition (CODE) with NextCloud and move from reading/displaying your documents to collaborative real-time document editing with friends, family or colleagues in your self-hosted LibreOffice Online server. - Episode 6: Etherpad with Whiteboard
Setting up an improved Etherpad real-time collaborative editor with more power than the out-of-the-box version which is used with Jitsi Meet, at the same time integrating it with Keycloak IAM for authentication. - Episode 7: Decentralized Social Media
Setting up Mastodon as an open source alternative to the Twitter social media platform. - Episode 8: Media streaming platform
Setting up the Jellyfin media platform. If you have a decent collection of digital or digitized media (audio, video, photos) your cloudserver will become your friends’ autonomous alternative to Netflix and the likes. Single Sign On is provided to your users via Keycloak IAM. - Episode 9: Cloudsync for 2FA Authenticator
Setting up an Ente backend server as a cloud sync location for the Ente Auth 2FA application (Android, iOS, web).
Stop worrying that you’ll lose access to secure web sites when you lose your smartphone and with it, the two-factor authentication codes that it supplies. You’ll be up and running with a new 2FA authenticator in no time when all your tokens are stored securely and end-to-end encrypted on a backend server that is fully under your own control. - Episode X: Docker Registry
Setting up a Docker Registry. A local index and registry of Docker images allows us to become independent of Docker’s commercially driven limitations on images you create and want to share with the world or use privately. I will for instance use the public Docker Hub for all the services that are discussed in this series of articles, and I will point out the limitations of doing so.
I am not decided on the actual implementation of the Registry. The Docker Hub is an implementation of the aforementioned Registry product and it is Open Source but it does not do authentication and it has no user interface. Docker (the company) adds a lot to this service that is not Open Source to make the Hub the popular platform that it became.
So perhaps I will combine this Registry with Portus, which is an Open Source authorization service and user interface for the Docker Registry. It is created/maintained by the OpenSuse team. It can use Keycloak as the OIDC (OpenID Connect) provider, and so our Keycloak IAM server will do the Single Sign On.
Or I will use Quay, which is Red Hat’s solution for self-hosted Docker Registry including a web-based user interface that looks a lot like the Docker Hub. Quay can also offload the authentication/authorization to an OIDC provider like Keycloak. In addition, it allows scanning your hosted images for known security vulnerabilities using Clair, another Red Hat product and part of Project Quay.
Managing your Docker Infrastructure
In a previous article, I have shared my Docker related packages with you for Slackware 14.2 and 15.0 (well, -current formally since we are still waiting for 15.0). I assume you are running the newest Slackware almost-at-version 15.0 and have already installed those four Docker packages (containerd, runc, docker and docker-compose), you have added your user account to the ‘docker‘ group and have at least once rebooted your computer or manually ran “/etc/rc.d/rc.docker start“.
I also assume that you have a basic understanding of containers and how they differ from Virtual Machines. A brief summary:
![]()
Containers run directly on the host kernel and the ‘bare metal’. The Docker engine hides the host operating system particulars from the applications that run in the containerized environment. Docker uses cgroups and Linux kernel capabilities to shield container processes from other containers and the host, but using a “ps” command on the host you can easily see all the container processes.
A Virtual Machine on the other hand, is a virtualized machine hardware environment created by a hypervisor program like QEMU, VMWare, VirtualBox etc. Inside that virtual machine you can run a full Operating System which thinks it is running on real hardware. It will be unaware that it is in fact running inside a VM on a host computer which probably runs a completely different OS.
From the host user perspective, nothing that goes on in the VM is actually visible; the user merely sees the hypervisor running.
And from a Docker container as well as VM user perspective, anything that happens outside that environment is invisible. The host OS can not be reached directly from within the guest.
What I am not going to discuss in the scope of this article is orchestration tools like Kubernetes (K8s) or Docker Swarm, that make it possible or at least a lot more convenient to manage a cluster of servers running Docker containers with multiple micro-services that are able to scale on-demand.
Docker architecture
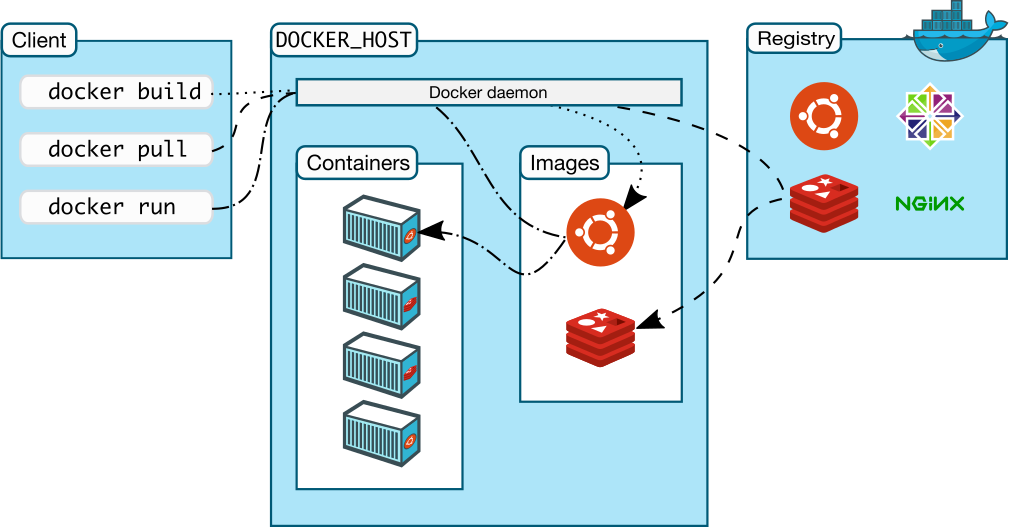
 You create and run a Docker container from (layers of) pre-existing images that inherit from each other, using the ‘docker run‘ command. You can save a container that you created, ‘flattening’ the layers the container consists of into one new image using ‘docker commit‘.
You start and run a container by referring the Docker image it should be based on, and if that image is not available locally then Docker will download it from a Docker Registry (by default hub.docker.com but it can also be a private Registry you run and control yourself). You can also manually download an image using the ‘docker pull‘ command in advance of the ‘docker run‘ command which is going to use that image so that you don’t have to wait for an image download at the moment suprême of starting your container.
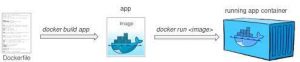
Building an image yourself using the ‘docker build‘ command is essentially ruled by a Dockerfile and a context (files on the local filesystem which are used in the creation of the image). The container which is based on that image typically runs an application or performs a task.
Examples
An example: running an application which is not provided by your Slackware OS. A container can run a Postgres database server which you then use on your host computer or in other containers. This Postgres container will typically be started on boot and keeps running until shutdown of the host computer. It’s as trivial as running:
$ docker run -d --restart unless-stopped --name slack-postgres -e POSTGRES_PASSWORD=**** postgresAnother example: building Slackware packages reliably and without introducing unwanted dependencies. In this case, you use a container based from a Slackware Docker image, to download and compile a Slackware package, and then export the resulting package from within the container to the host computer’s local filesystem. Such a Docker container based on a Slackware image will be able to offer the same OS with the same configuration, every time it starts and functions independently of the host. You could be compiling Slackware packages on a Debian host for instance.
Exercise left for the reader: you will have to create that Slackware Docker image yourself… it is not available online.
Docker Compose
Also created by the Docker company, docker-compose is a separate application which uses the capabilities of Docker. The 2.x release of Docker Compose which I offer in my repository is written in the Go language which makes it fully self-contained. The previous 1.x releases that you can obtain from SlackBuilds.org were heavily dependent on Python and for that version of docker-compose you had to install 13 dependent packages.
Docker Compose expands on the Docker concept of a single container with a single purpose. Compose is a tool for defining and running multi-container Docker applications. The individual Docker applications themselves are defined by a Dockerfile, which makes their deployment reproducible in any Docker environment.
You write a Compose file (typically called docker-compose.yml) which defines the container services that you want to run. This Compose file is written in YAML and according to the Compose file specification . The file describes an application service which is built out of multiple Docker containers as well as their shared resources and private communication channels. Docker-compose reads the yaml file and creates data volumes and internal networks, starts the defined containers and connects them to the just-created volumes and networks. There’s a lot more you can do in a Compose file, check out the reference.
The result of the ‘docker-compose up -d‘ command is the start-up of a complex service running multiple inter-dependent applications (you’ll see those referred to as micro-services) that usually have a single point of interaction with its users (an IP address/port or a https URL). Essentially a black-box where all the internal workings are hidden inside that collection of containers. As an administrator there’s little to nothing to configure and as an user you don’t have to know anything about that complexity.
And again you could be trivially running applications in Docker containers on your Slackware host that you would not be able to run on the bare host OS without a lot of weeping and gnashing of teeth .
Docker Compose offers a lot of versatility that regular Docker does not. Whether you use one or the other depends on the complexity of that what you want to achieve. In future episodes of this article series, I will give examples of both.
Building a Docker image and running a container based on it
The ‘docker build’ command has a lot of parameters but it accepts a single argument which is either a directory containing a Dockerfile and the required context (local files to be used in the image creation process), or a URL the content of which it will download and interpret as a Dockerfile. You can also use the “-f” switch to specify a filename if it’s not called “Dockerfile” literally, or pipe a Dockerfile content into the ‘docker build‘ command via STDIN. It’s good practice to ‘tag’ the resulting image so that you’ll understand its purpose later on. You can then upload or ‘push’ the image to a Docker Registry, either the public one or a private registry that you or your company control.
Let me give a comprehensive example. We will build a new Slackware image which is based on my Slackware ‘base‘ image on the public Docker Hub (docker pull liveslak/slackware:latest). The Dockerfile will add a couple of packages, create a user account called “alien” and start a login shell if needed.
Note that in this example I will write the Dockerfile on the fly using ‘cat‘ and a ‘here-document‘ to pipe it into the ‘docker build‘ command. I will tag the resulting image as ‘slacktest‘ using the “-t” switch of the ‘docker build‘ command:
$ cat <<'EOT' | docker build -t slacktest -
FROM liveslak/slackware:latest
MAINTAINER Eric Hameleers <alien@slackware.com>
ARG SL_UID="1000"
ARG SL_GID="users"
ARG SL_USER="alien"
# Install compiler toolchain and supporting tools.
RUN rm -f /etc/slackpkg/templates/compilertoolchain.template
RUN for PKG in \
ca-certificates \
curl \
cyrus-sasl \
gc \
gcc \
git \
glibc \
glibc-profile \
glibc-zoneinfo \
guile \
intltool \
kernel-headers \
libmpc \
libffi \
libtasn1 \
make \
mpfr \
nettle \
p11-kit \
perl \
; do echo $PKG >> /etc/slackpkg/templates/compilertoolchain.template ; done
RUN slackpkg -batch=on -default_answer=y update gpg
RUN slackpkg -batch=on -default_answer=y update
RUN slackpkg -batch=on -default_answer=y install-template compilertoolchain
# Refresh SSL certificates:
RUN /usr/sbin/update-ca-certificates -f
# Create the user to switch to:
RUN useradd -m -u "${SL_UID}" -g "${SL_GID}" -G wheel "${SL_USER}" && \
sed -ri 's/^# (%wheel.*NOPASSWD.*)$/\1/' /etc/sudoers
USER "${SL_USER}"
ENV HOME /home/"${SL_USER}"
WORKDIR /home/"${SL_USER}"
# Start a bash shell if the container user does not provide a command:
CMD bash -l
EOT
The output of this ‘docker build’ command shows that the process starts with downloading (pulling) the slackware base image:
Sending build context to Docker daemon  3.072kB
Step 1/16 : FROM liveslak/slackware:base_x64_14.2
base_x64_14.2: Pulling from liveslak/slackware
Digest: sha256:352219d8d91416519e2425a13938f94600b50cc9334fc45d56caa62f7a193748
Status: Downloaded newer image for liveslak/slackware:base_x64_14.2
---> 3a9e2b677e58
Step 2/16 : MAINTAINER Eric Hameleers <alien@slackware.com>
---> Running in d7e0e17f68e6
Removing intermediate container d7e0e17f68e6
---> 75b0ae363daf
...(lot of output snipped) ...
Successfully built e296afb023af
Successfully tagged slacktest:latest
$ docker images |grep slacktest
slacktest                latest          e296afb023af   2 minutes ago   387MB
Here you see how a Dockerfile uses ‘FROM’ to download a pre-existing image from the Hub and then RUNs several commands which it applies to the base image which was downloaded from Docker Hub, creating a new image and then naming it “slacktest” with a tag “latest” and an ID of “e296afb023af“. In that process, several intermediate layers are created, basically every command in the Dockerfile which you would normally execute on the command-line will create one. The end result is an image which consists of multiple layers. You can use the ‘history’ command so see how these were built:
$ docker history e296afb023af
IMAGE          CREATED          CREATED BY                                      SIZE      COMMENT
e296afb023af   49 minutes ago   /bin/sh -c #(nop)  CMD ["/bin/sh" "-c" "bash…   0B
e1224d15abac   49 minutes ago   /bin/sh -c #(nop) WORKDIR /home/alien           0B
4ce31fa86cca   49 minutes ago   /bin/sh -c #(nop)  ENV HOME=/home/alien         0B
365bffd67f07   49 minutes ago   /bin/sh -c #(nop)  USER alien                   0B
05d08fe94b47   49 minutes ago   |3 SL_GID=users SL_UID=1000 SL_USER=alien /bi…  336kB
3a300b93311f   49 minutes ago   |3 SL_GID=users SL_UID=1000 SL_USER=alien /bi…  218kB
7a14f55146dd   50 minutes ago   |3 SL_GID=users SL_UID=1000 SL_USER=alien /bi…  233MB
a556359ec6d3   51 minutes ago   |3 SL_GID=users SL_UID=1000 SL_USER=alien /bi…  6.21MB
da19c35bed72   52 minutes ago   |3 SL_GID=users SL_UID=1000 SL_USER=alien /bi…  2.13kB
604fece72366   52 minutes ago   |3 SL_GID=users SL_UID=1000 SL_USER=alien /bi…  161B
1c72e034ef06   52 minutes ago   |3 SL_GID=users SL_UID=1000 SL_USER=alien /bi…  0B
3f020d0c2024   52 minutes ago   /bin/sh -c #(nop)  ARG SL_USER=alien            0B
91a09ad8693a   52 minutes ago   /bin/sh -c #(nop)  ARG SL_GID=users             0B
96d433e0162d   52 minutes ago   /bin/sh -c #(nop)  ARG SL_UID=1000              0B
75b0ae363daf   52 minutes ago   /bin/sh -c #(nop)  MAINTAINER Eric Hameleers…   0B
3a9e2b677e58   11 days ago                                                      148MB     Imported from -
That last line shows the image “3a9e2b677e58” which is the slackware ‘base‘ image which I downloaded from Docker Hub already 11 days ago.
If we now use ‘docker run’ to create a container based on this image we would expect it to give us a bash prompt as user ‘alien’. Let’s try it and run an interactive container connecting it to a pseudo terminal using the “-ti” switch:
$ docker run -ti slacktest
alien@88081b465a98:~$ id
uid=1000(alien) gid=100(users) groups=100(users),10(wheel)
alien@88081b465a98:~$ exit
logout
$ docker ps -a | grep slacktest
88081b465a98   slacktest                   "/bin/sh -c 'bash -l'"   2 minutes ago   Exited (0) 16 seconds ago
$ docker rm 88081b465a98
88081b465a98
$
Indeed we ended up as user “alien” in a machine whose hostname is the ID of the container (88081b465a98). And with the final command, we could remove the container without first stopping it, because it was already stopped when we issued the “exit” command.
Help on commands
Working with Docker containers, it is good practice that you get familiar with the command-line client (aptly name ‘docker’). You’ll find a lot of command-line examples in this article which should really become part of your hands-on toolkit.
The ‘docker’ tool has some 30 sub-commands and all of them have built-in help. To get the full list of available docker commands run:
$ docker --help
The help per command can be found by suffixing it with “–help”. Many commands have sub-commands and these will also show help:
$ docker system --help
$ docker system prune --help
Obtain information about images and containers
The ‘docker’ command-line utility can give you a lot of information about your docker infrastructure. I will discuss a graphical management tool a bit further down, but here are some useful commands:
Get a listing of all images on your Docker host:
$ docker images
Get a listing of all running containers:
$ docker ps
Also list those containers that are in a stopped state:
$ docker ps -a
Show diskspace used by all your images, containers, data volumes and caches:
$ docker system df
Show the logs of a container:
$ docker logs CONTAINER_ID
Get the ID of a container or an image:
$ docker ps -aqf "name=containername"
The “containername” is interpreted as a regular expression. If you omit the “q” switch you will see the full info about the container, instead of only the container ID. Find an image ID using the following command (if you use a containername instead of an imagename you have a second way to get a container ID):
$ docker inspect --format="{{.Id}}" imagename
Note that in this case, “imagename” needs to be the exact string of the image (or container) as shown in the ‘docker ps‘ output, not a regular expression or part of the name.
Get the filesystem location of a data volume:
Data volumes are managed by Docker, on a Linux host the actual physical location of a Docker volume is somewhere below “/var/lib/docker/volumes/“. but on a Windows Docker host that will be something entirely different.
Using the ‘docker inspect‘ command you can find the actual filesystem location of a data volume by evaluating the “Mountpoint” value in the output. Example from my local server:
$ docker inspect volume portainer_data
[
  {
    "CreatedAt": "2021-08-01T12:44:24+02:00",
    "Driver": "local",
    "Labels": {},
    "Mountpoint": "/var/lib/docker/volumes/portainer_data/_data",
    "Name": "portainer_data",
    "Options": {},
    "Scope": "local"
  }
]
You could use this information to access data inside that volume directly, without using Docker tools.
More:
There’s a lot more but I leave it up to you to find other commands that are informational for you.
Stop and remove a container
Note that when you stop and remove a container, you do not delete the image(s) on which the container is based! So what is the usefulness of removing containers? Simple: sometimes a container crashes or gets corrupted. In such a case you simply stop the container, remove it and start it again using the exact same command which was used earlier to start it. The container will be rebuilt from scratch from the still existing images on your local file-system and the service it provides will start normally again.
As an example, create and run the ‘hello-world‘ container, then stop and remove it again:
$ docker run hello-world
Hello from Docker!
This message shows that your installation appears to be working correctly.
...
$ docker ps -a |grep hello-world
0369206ddf2d   hello-world                 "/hello"  ...
$ CONTAINER_ID=$(docker ps -a |grep hello-world | awk '{print $1}')
$ docker stop $CONTAINER_ID
$ docker rm $CONTAINER_ID
Refresh a container with the latest image from the vendor
Suppose you are running a Docker container for some complex piece of software. You can’t simply run “slackpkg upgrade-all” to upgrade that software to its latest version or to fix some security vulnerability. Instead, what you do with a container is to refresh the Docker image which underpins that container, then stop the container, remove the container layer, remove the old vendor image, and then start the container again. On startup of the container, it will now be based on the latest vendor image.
Configuration of a container happens either inside of data volumes that you maintain outside of the container and/or on the startup command-line of that container. Deleting the container or the image layers is not touching any of your configuration or your data.
This is the strong point of container life cycle management – it’s so easy to automate and scale up.
As an example, let’s refresh a container that I have running here at home (the Portainer container that’s discussed further down).
Download the latest Portainer Community Edition image from Docker Hub:
$ docker pull portainer/portainer-ceFind the ID (first comumn) of the portainer container that we currently have running:
$ docker ps -af "name=portainer"Stop and remove the container:
$ docker stop CONTAINER_ID
$ docker rm CONTAINER_ID
Find the ID of the portainer image which is oldest (look in the CREATED column) and remove it:
$ docker images | grep portainer
$ docker image rm OLDIMAGE_ID
Check the ID of the remaining image:
$ docker images | grep portainerStart the container using the same command you would have used before to start it:
$ docker run -d --restart unless-stopped -p 127.0.0.1:9000:9000 --name portainer -v /var/run/docker.sock:/var/run/docker.sock -v /usr/share/docker/data/portainer:/data portainer/portainer-ceAnd now we are running the same Portainer configuration, but with the latest available software version. A matter of seconds if you would script this.
Managing containers, images, volumes, networks etc
As time passes and you experiment with containers, you will inevitably end up with stuff on your host computer that is no longer being used. Think of images which you wanted to try out with ‘docker run‘ or downloaded using ‘docker pull‘. Or cached data resulting from image building. The ‘docker system df‘ command I showed you earlier will give you a scare perhaps if you run it… see here the output when I run it on my server:
TYPE TOTAL ACTIVE SIZE RECLAIMABLE
Images 11 10 3.424GB 390.3MB (11%)
Containers 10 3 531.8MB 32.01MB (6%)
Local Volumes 3 1 0B 0B
Build Cache 0 0 0B 0B
The “reclaimable” percentage is data which is no longer being used by any container that Docker knows about. You can safely delete that data. The following command will do that for you:
$ docker system prune
If you want to make sure that every un-used scrap of image data is deleted, not just the dangling symlinked images, run:
$ docker system prune -a
And if you want to remove un-used data volumes, you would run:
$ docker system prune --volumes
. . . of course you execute this command only after you have verified that the affected volumes do not contain data you still need.
Difference between load/save and import/export
Docker manages images, containers, data volumes etc in an OS independent way. Meaning you are able to transport data volumes, images and containers from one host to another, or even from one type of OS (Linux) to another (MS Windows) and preserve compatibility.
Import and export commands – used for migration of container filesystems
Docker command ‘docker export‘ allows you to create a (compressed) tar archive containing the bare file system of a container:
$ docker export my_container | xz > mycontainer.tar.xz
This filesystem tarball can again be imported into a new ‘filesystem image‘. Also look at my example of creating a Slackware base image using ‘docker import‘.
$ xz -cd mycontainer.tar.xz | docker import - my_newcontainer
The export and import commands don’t preserve the container’s configuration and underlying image information, you are dealing with just the filesystem. This makes these commands quite suited for creating Docker base images which you can then base your future containers and images on via the “FROM” keyword in a Dockerfile.
For actual Docker migrations to another host, the load and save commands are better suited. Read on:
Load and save commands – used for host migration of images
Docker command ‘docker save‘ allows you to create a (compressed) tar archive of a Docker image, containing all its layers, tags, history and configuration. The only thing that is not added to this tarball are the data volumes.
If you want to migrate a container, you first save (commit) its changes as a new Docker image using the ‘docker commit’ command.
$ docker commit CONTAINER_ID my_important_image… and then save that image in a OS-agnostic way into a tarball. The ‘save’ command does not compress the data so we use ‘xz’ for that:
$ docker save my_important_image | xz > my_important_image.tar.xz
This compressed tarball can be copied to another host (potentially with a different OS running on the host) and ‘docker load‘ allows you to load this image (even when compressed) with all its tag information and history into the new host’s Docker environment.
$ cat my_important_image.tar.xz | docker load
You can then use the ‘docker run‘ command as usual to start a new container based off that image.
And what to do with the data volumes? Docker manages its volumes in an OS agnostic way which means we can probably not just create a tarball from the volume directory on the host, since that may not be compatible with how a data volume is implemented on another host. If we use Docker commands to save a data volume and load it on another host, we should be covered. The Docker documentation on volumes has an example on how to migrate data volumes.
Saving a data volume to a tarball:
Suppose your ‘portainer‘ container uses a data volume called ‘portainer_data‘ which is mounted on the container’s “/data” directory, containing important data which you want to migrate to another host.
To generate a tarball of the data in this volume, you create a one-shot container based on some base image (I’ll use ‘alpine’) that does not do anything in itself, and give that container the command to create the backup of your ‘portainer_data‘ volume. The steps are:
- Launch a new container and mount the volume from the ‘portainer‘ container
- Mount a local host directory as /backup
- Pass a command that tars the contents of the ‘portainer_data‘ volume to a backup.tar file inside our /backup directory.
When the command completes and the container stops, we are left with a backup of our ‘portainer_data‘ volume; the file “backup.tar” in our current directory.
$ docker run --rm --volumes-from portainer -v $(pwd):/backup alpine tar cvf /backup/backup.tar /data
… and on a new host, load this tarball into the data volume of the ‘portainer’ container which you have already setup there but it’s still missing its data:
$ docker run --rm --volumes-from portainer -v $(pwd):/backup alpine bash -c "cd /data && tar xvf /backup/backup.tar --strip 1"
Voilà!
Limiting the log size for your containers
Docker captures the standard & error output (stdout/stderr) for all your containers and writes these to logfiles in JSON format. By default, Docker does not impose size restrictions on its log files.
These logfiles are shown when you run a ‘docker logs CONTAINER_ID‘ command.
This behavior could potentially fill up your hard drive if you run a container which generates an extensive amount of logging data. By modifying Docker’s “/etc/docker/daemon.json” configuration file we can limit the maximum size of the container log files. This is what you need to add to the Docker daemon configuration to limit the size of any log file to 50 MB and keep at most two backups after log rotation:
{
  "log-driver": "json-file",
    "log-opts": {
    "max-size": "50m",
    "max-file": "3"
    }
}
More details to be found at https://docs.docker.com/config/containers/logging/json-file/.
Graphical management tool
There’s a nice graphical web-based administration tool for your Docker infrastructure which itself runs in a container (you can also install it on bare metal as a self-contained executable), called portainer. Portainer will listen at a TCP port of your host and you can point your web browser at http://localhost:9000/ to access the GUI. The Community Edition (portainer-ce) is open source and free and this is what we’ll install and run as a Docker container.
The Portainer developers posted a tutorial and feature walk-through of their product on Youtube:
Some considerations before we start implementing this.
Data persistence:
Portainer wants to keep some data persistent across restarts. When it is run from within a container, you want to have that persistent data outside of your container, somewhere on the local filesystem. The Docker concept for persistent data management is called “volumes”. Docker volumes are created as directories within “/var/lib/docker/volumes/” on Linux. A volume is made available in the container using the “-v” switch to the ‘docker run‘ command, which maps a host volume to an internal container directory. Docker manages its volumes in an OS agnostic way, making it possible to transparently move your containers from Linux to Windows for instance.
We will not use a Docker volume in this example but instead create the “/usr/share/docker/data/portainer” directory and pass that as the external location for the container’s internal “/data” directory.
Network security:
We will expose the Portainer network listen port to only localhost and then use an Apache reverse proxy to let clients connect. Note that port 9000 exposes the Portainer UI without SSL encryption; we will use Apache reverse proxy to handle the encryption.
Application security:
Below you will see that I am mapping the Docker management socket “/var/run/docker.sock” into the container. Normally that would be very bad practice, but Portainer is going to be our Docker management tool and therefore it needs the access to this socket.
This batch of commands will get your Portainer-CE instance up and running and it will be restarted when Docker starts up (eg. after rebooting).
# mkdir -p /usr/share/docker/data/portainer
# docker run -d --restart unless-stopped -p 127.0.0.1:9000:9000 --name portainer -v /var/run/docker.sock:/var/run/docker.sock -v /usr/share/docker/data/portainer:/data portainer/portainer-ce
Two of the three network ports that Portainer opens up are not being exposed (mapped) to the outside world:
Port 8000 exposes a SSH tunnel server for Portainer Agents, but we will not use this. Portainer Agents are installed on Docker Swarm Clusters to allow central management of your Swarm from a single Portainer Server.
Also, the Portainer container generates a self-signed SSL certificate on first startup and uses it to offer https encrypted connections on port 9443 but our reverse proxy solution allows the use of a proper Let’s Encrypt certificate.
Now that the Portainer container is running, connect a browser on your host computer to http://localhost:9000/ to perform initial setup; basically defining the password for the Portainer admin user account.
The reverse proxy configuration including adding a Let’s Encrypt certificate is a bit beyond the scope of this article, but you can read this earlier blog post to learn about securing your webserver with SSL certificates.
I will share the block that you would have to add to your Apache configuration somehow. With this configuration and proper SSL setup your Portainer would be accessible via https://your_host_name/portainer/ instead of only at http://localhost:9000/ :
# Create a reverse proxy:
<Location /portainer>
    ProxyPass http://127.0.0.1:9000
    ProxyPassReverse http://127.0.0.1:9000
</Location>
Here is a screenshot of my Docker infrastructure at home as interpreted by Portainer:
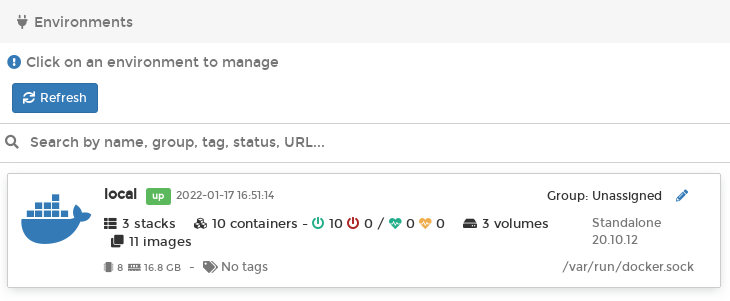
Have a look at Portainer to see if it adds something useful to your Docker management toolkit. For me the most useful feature is the real-time container logging display, which is a lot more convenient than trying to scroll back in a Linux screen session.
Docker’s effect on iptables firewall
Docker dynamically modifies your host’s iptables ruleset on Linux when it starts, in order to provide container isolation. See https://docs.docker.com/network/iptables/ for the rationale. This can sometimes interfere with pre-existing services, most prominently the Virtual Machines that you may also be running and whose virtual network has been bridged to your host’s network interface.
I use vde (virtual distributed ethernet) for instance to provide transparent bridged network connectivity for the QEMU VM’s that I use when building packages for Slackware.
With this bridged network setup, your host computer essentially acts as a router, forwarding network packets across the bridge.
When Docker starts, it will add two custom iptables chains named ‘DOCKER’ and ‘DOCKER-USER’, adds its own custom rules to the ‘DOCKER’ chain and then sets the default FORWARD policy to DROP. Thereby killing the network connectivity for the already bridged networks… Bad. But even though Docker has a configurable parameter to disable iptables, this only prevents the creation of these custom chains and rules when the Docker daemon starts. Docker confesses that there is no guarantee that later on when you start containers, your iptables rulesets will stay un-touched. So, disabling iptables management in Docker is not an option. I’ll tell you a bit on how to deal with this (all information gleaned from the Internet).
Generic iptables
Since Docker sets the policy for the FORWARD chain to DROP, for your bridged networks this will result loss of connectivity (packets are no longer forwarded across the bridge).
You can use the custom DOCKER-USER chain to ensure that this bridging is not disrupted. Docker inserts these custom chains in such a way that rules defined in the DOCKER-USER chain have precedence over rules in the DOCKER chain. You have to add an explicit ACCEPT rule to that DOCKER-USER chain:
# iptables -I DOCKER-USER -i br0 -j ACCEPT
Where ‘br0‘ is the name of your network bridge (adapt if needed).
UFW (Uncomplicated Firewall)
UFW is a tool created for Ubuntu but popular on all distros, which aims at simplifying iptables ruleset management by providing a higher-level commandline interface. There’s a package build script for it on SlackBuilds.org.
UFW allows to insert rules that are evaluated after all other chains have been traversed. This allows the user to nullify the unwanted behavior of Docker which kills bridged networks. See this github discussion for the full details.
Append the following at the end of /etc/ufw/after.rules (replace eth0 with your external facing interface):
# Put Docker behind UFW
*filter
:DOCKER-USER - [0:0]
:ufw-user-input - [0:0]

-A DOCKER-USER -m conntrack --ctstate RELATED,ESTABLISHED -j ACCEPT
-A DOCKER-USER -m conntrack --ctstate INVALID -j DROP
-A DOCKER-USER -i eth0 -j ufw-user-input
-A DOCKER-USER -i eth0 -j DROP
COMMIT
And undo any and all of:
- Remove “iptables”: “false” from /etc/docker/daemon.json
- Revert to DEFAULT_FORWARD_POLICY=”DROP” in /etc/default/ufw
- Remove any docker related changes to /etc/ufw/before.rules
Firewalld
Firewalld is a dynamically managed firewall which works with a ‘zones‘ concept and gets its triggers from a D-Bus interface. There’s a package build script available on SlackBuilds.org.
If you are running Docker version 20.10.0 or higher with firewalld on your system with and Docker has iptables support enabled, Docker automatically creates a firewalld zone called docker and inserts all the network interfaces it creates (for example, docker0) into the docker zone to allow seamless networking.
Consider running the following firewalld command to remove the docker interface from the ‘trusted‘ zone.
# Please substitute the appropriate zone and docker interface
$ firewall-cmd --zone=trusted --remove-interface=docker0 --permanent
$ firewall-cmd --reload
Restarting the docker daemon (/etc/rc.d/rc.docker restart) will then insert the interface into the docker zone.
Alien’s Easy Firewall Generator (EFG)
If you used my EFG to create a firewall configuration, you will be bitten by the fact that Docker and Docker Compose create new network devices . Permissive rules need to be be added to the INPUT and OUTPUT chains of your “rc.firewall” or else ‘dmesg’ will be full of ‘OUTPUT: packet died’.
The Docker network interface is called “docker0” and for each container, Docker creates an additional bridge interface, the name of which starts with “br-” and is followed by a hash value. Therefore, these lines need to be applied at the appropriate locations in the script:
DOCK_IFACE="docker0"

BR_IFACE="br-+"

$IPT -A INPUT -p ALL -i $DOCK_IFACE -j ACCEPT

$IPT -A INPUT -p ALL -i $BR_IFACE -j ACCEPT

$IPT -A OUTPUT -p ALL -o $DOCK_IFACE -j ACCEPT

$IPT -A OUTPUT -p ALL -o $BR_IFACE -j ACCEPT
Thanks
… for reading until the end! I hope you gained some knowledge. Feel free to leave constructive feedback in the comments section below.
Cheers, Eric
Attribution
Most of the firewall-related information comes from docker.com and github.com. Please inform me about errors.
All images in this article were taken from docs.docker.com website.
Thanks Eric!.
I am very happy you delelop these slackware cluod series. With your well written articles, I will learn a lot. I have a slackware (manually installed) in Linode, to test and improve my skills. I respectfully propose to develop a series of articles to “emulate” an openmediavault product from debian world. I mena, from a functionality perspective using docker.
As for an alternative to openmediavault, I would suggest looking at unraid. It is based on Slackware, however not 100% free like openmediavault.
I also really don’t see the advantage of building something on top of Slackware that’s basically a closed system focused on file serving. As already stated in the top of Episode 1: setting Slackware up as a fileserver is already well-documented since it uses well-known tools like Samba and NFS.
Or perhaps I fail to see the usefulness of openmediavault?
Thanks Eric for your comments.
From a practical point of view Openmediavault integrates, in a easy to install and manage product: 1) File server services (already present in slackware) and 2) Expanded services by means of docker containers managed with an integrated openmediavault user interface.
Docker containers “feeds” a set of files shared and served by openmediavault File Server services. This has benefits in terms of expanded functionality. In my case, for example, I use a tvheadend docker container to share on my home network, all my live TV recordings.
That’s why I respectfully l suggested as a future Eric’s article, how to “integrate” current slackware file server services, with containers “feeding” those files.
Thanks in advance for your comments.
Francisco.
Hi Francisco.
Perhaps an article about how to share your data at home needs its own future article.
Filesharing at home is a quite different topic than offering a service which is accessible all over the Internet (a ‘cloud’ service).
Similar to the guy in his comment on another article when he referred to Openfire (https://www.igniterealtime.org/projects/openfire/) which is essentially targeting a local network, not to be used as an Internet-facing service. I want to keep the scope of the series clear.
Hi Eric
All I can say is this is epic! You’ve obviously spent a LOT of time on this and please know that it is not unappreciated. I’ve been doing container stuff for work and personal for a couple of years now and there are still nuggets here of use. Of course the whole article is a fantastic view into containerisation …
It’s also a lot of fun writing this. The first three articles are ready but I will take my time releasing them. The Docker Registry is a project that I have not even touched except for the research. It will take time to experiment and find the right setup, and then I will be able to write about that too.
The Video Conferencing article will have screenshots of me in my Slackware hoodie in Alien’s Den configuring Jitsi Meet and opening a meeting 🙂
“If the series is received well,…”
Consider this series well-received. I would love to not use Amazon cloud.
AWS.amazon.com uses “buckets” as file storage; a “pipeline” to connect the bucket to a media processor that converts audio and video files into the streaming protocol all browsers can play, with a bucket for the small pieces the protocol feeds to browsers so the media plays instantly instead of waiting to download the media file, and a bucket for the thumbnails. Database applications, certificate for an https website, machine learning, quantum computing kets, etc. One thing you can’t do with Slackware is add computing units. The record holder for the number of digits of pi used aws.amazon.com to aggregate 40 compute units (cpus). I’ve used distcc to distribute compute cores among a couple of laptops for a render farm. I think that’s as close as we can get to that cloud service. Of course we can’t implement everything the Amazon cloud offers, but the more the merrier. Your article could become a chapter in a book, the subject has that much depth.
Heh. I was not planning on replicating Amazon’s AWS functionality on my server running in the attic…
I have added a new section “Limiting the log size for your containers” to the main article, a sub-topic which I forgot to include when writing the piece.
Fantastic, Eric. I have been thinking about a personal cloud server for a while, but my knowledge in this area is still limited. I will follow up your articles with very interest. Thank you for sharing this huge amount of work and information.
Great job!
Thanks!
Awesome!
Been using docker on Slackware for a while now, but it’s good to see the topic coming to spotlight! If I may suggest a subtopic that I think could be interesting, I would say something about docker load and docker save, and how containers can be moved from a server to another, or created on a host and then deployed to another host.
Anyway this is Great Work !
When you only have one computer, it is a bit difficult to move containers to another host. Docker clusters and multi-server installations are outside this article series’ scope. Maybe some future time when I am retired.
The difference between ‘docker load’ versus ‘docker import’ and their reverse companions save vs. export is something I might add to the article, since it improves the understanding of how Docker works.
I have added a new section “Difference between load/save and import/export” to the main article.
You execute:
RUN /usr/sbin/update-ca-certificates -f
which does not seem to be available in liveslak/slackware:latest
Correct, the slackware base image on Docker Hub is very basic and does not contain the ca-certificates package.
But if you look at the ‘docker build’ example carefully you will see that I build a container called “slacktest” which inherits from the base image (the “FROM liveslak/slackware” line), but then installs a series of extra packages. And ‘ca-certificates’ is one of those packages.
So by the time my “docker build” command wants to execute the “RUN /usr/sbin/update-ca-certificates -f” command, the binary is already installed into the container.
Thanks for pointing that out. Still the build fails on my box with the following errors: https://termbin.com/t03f
Figured out the first issue:
; do echo \$PKG >> /etc/slackpkg/templates/compilertoolchain.template ; done
Needs to be escaped here.
Now heading to the user part, where also variables are in use.
Good catch! I will update the main article, let me know if you find more issues.
(edit): I fixed this by quoting the ‘EOT’ terminator. That way, the complete content of the here-document can remain unchanged.
Hi Eric,
I rent a linode with Slackware 15.0 on it, and slowly trying to implement some of the things in your series. I got portainer up and running, but ran into a problem accessing it. The linode is command line only, so I can’t test portainer on localhost:9000. I was successful accessing it through linode’s (static) IP address by opening port 9000 (it also worked on port 9443), and also via my domain name that points to the IP address. I have Let’s Encrypt properly configured, too.
When trying to access portainer via reverse proxy (at port 9000), the page starts loading up, the portainer logo appears, but then a red banner on the upper right corner says: “Failure. Unable to obtain server settings and status”, and it never gets to the login window.
Anyway, it will not stop me going forward wth this project, and I can still access portainer by other means, it is just annoying that the reverse proxy did not quite work.
Thanks for the series. I have already set up Nextcloud and Jitsi on my other linode, but that is under ubuntu, and they are not all tied together as shown in your series. My plan is to migrate all that into slackware.
Cheers,
Karl
There’s several solutions around that problem.
First and easiest, you can tunnel port 9000 through your ssh session to the Linode server and then access your portainer instance in a browser on your own computer at home:
$ ssh -L 9000:127.0.0.1:9000 yourname@yourlinodehost.com. Then pointing your browser to “http://localhost:9000/” will connect it to the remote Portainer.You can make this stick by adding the following to a configuration block for your Linode in ~/.ssh.config: “
LocalForward 9000 127.0.0.1:9000”Alternatively you can run a VNC server session on your Linode, with your favorite desktop manager, and then tunnel that VNC session port through your ssh connection just like I showed for the Portainer, only the port number will be different. The first VNC session will listen on TCP Port 5901 so after
$ ssh -L 5901:127.0.0.1:5901 yourname@yourlinodehost.comyou can connect your local VNC viewer to the remote session with “vncviewer localhost:1”.Hi Eric,
Thanks for the tip, the ssh session worked like a charm. My Linode also serves as an openvpn server, so I have yet another way to access it through the vpn tunnel, like http://10.8.0.1:9000/
I continued with installing Keycloak, but I ran into a problem after staring it (docker run -d –restart always -p 8400:8080 –name keycloak … ). The container keeps restaring, and the log file shows this message:
“-Dkeycloak.profile.feature.docker=enabled
/opt/jboss/tools/docker-entrypoint.sh: line 20: /usr/share/docker/data/keycloak/keycloak.dbuser: No such file or directory”
First I though it was caused by a little typo I found in the instructions:
“$ echo ‘your_secret_password’ > keycloak.dbpassword” (instead of keycloak.passwd), but fixing it did not help. I verified that the keycloak.dbuser file indeed exists. Looking at docker inspect, the container configuration looks ok, as far as I can tell.
Any ideas?
Thanks,
Karl
> a little typo I found in the instructions:
> “$ echo ‘your_secret_password’ > keycloak.dbpassword” (instead of keycloak.passwd)
That is not a typo. The “keycloak.dbpassword” file contains the password of the MariaDB database user (created higher up using SQL statements) and the filename is passed as an environment argument to the Keycloak container so that the password is not visible in the process list when someone runs “ps ax”.
Look for typos in your docker commandline.
Thanks for the reply. Now I am confused. The docker command line uses ‘keycloak.passwd’:
…
-e DB_PASSWORD_FILE=$(pwd)/keycloak.dbpasswd \
…
@Karl: no, it doesn’t. Look closer 🙂
Are we looking at the same page?
https://alien.slackbook.org/blog/slackware-cloud-server-series-episode-2-identity-and-access-management-iam/
… or maybe I need to see an eye doctor?
@Karl: you just copy/pasted keycloak.dbpasswd:
…
-e DB_PASSWORD_FILE=$(pwd)/keycloak.dbpasswd
…
I searched https://alien.slackbook.org/blog/slackware-cloud-server-series-episode-2-identity-and-access-management-iam/ for “keycloak.passwd” but it’s not there.
Ricardo,
I am looking at it, I don’t understand how it is possible that we don’t see the same thing. I took a screen-shot, you can see it here:
https://nextcloud.krasso.com/index.php/s/5N8wKKYHsDFaQnn
Yes, I copied and pasted that row from the docker command line, from the site at the link you searched.
I don’t understand what you mean, it clearly says “keycloak.dbpasswd” and you say it’s a typo because it says “keycloak.passwd” but clearly it doesn’t say that anywhere in that page.
You stated that “keycloak.dbpasswd” must be a typo and used “keycloak.passwd” which is wrong:
‘First I though it was caused by a little typo I found in the instructions:
“$ echo ‘your_secret_password’ > keycloak.dbpassword” (instead of keycloak.passwd),’
It’s not a typo, you have to use “keycloak.dbpassword” both in the echo and in the docker commands.
Double confusion! 🙂
While I was commenting on a typo, I made a typo. My comment: ” (instead of keycloak.passwd)” contained a typo. It should have said ” (instead of keycloak.dbpasswd)” (The ‘db’ was missing)
Now that is out of the way. Below I cut-and-paste from the instructions, first the from the ‘echo’ line, then from the ‘docker’ line:
$ echo ‘your_secret_passwd’ > keycloak.dbpassword
-e DB_PASSWORD_FILE=$(pwd)/keycloak.dbpasswd \
They should match. Either both should contain ‘keycloak.dbpassword’ or ‘keycloak.dbpasswd’
Well, glasses for two then 🙂
Thank you Karl and Ricardo for your perseverance and the entertaining dialog, eventually finding the real typo.
I have updated the article and fixed that typo. Thanks again 🙂
You wrote that Kubernetes is out of scope for these articles. Nonetheless, when I read “cloud”, I thought of Kubernetes, Openshift and Rancher and Helm and all these things. Is there a recommendation on what to use on Slackware? I’ll also scan the article again for good Slackware docker base image recommendations and free docker replacements like podman, buildah etc.
Would be interesting for me to see more in this direction if possible.
You won’t see anything related to Kubernetes, Rancher, Podman and the likes in this blog. “Not in scope” – read “I am not interested”. This first article in my Slackware Cloud Server series is just setting the stage for the other articles which build on this Docker foundation.
Rancher and Podman are nice if you are reliant on something like Docker Desktop, but the Docker container infrastructure is just as open source as Rancher and Podman. I am also not interested in Docker Desktop, but that may already have been clear 😉