My thoughts on Slackware, life and everything

Category: Linux (Page 2 of 3)

Google muzzles all Chromium browsers on 15 March 2021

Ominous music

A word of caution: long rant ahead. I apologize in advance.
There was an impactful post on the Google Chromium blog, last friday.  I recommend you read it now: https://blog.chromium.org/2021/01/limiting-private-api-availability-in.html

The message to take away from that post is “We are limiting access to our private Chrome APIs starting on March 15, 2021“.

What is the relevance I hear you ask.
Well, I provide Chromium packages for Slackware, both 32bit and 64bit versions. These chromium packages are built on our native Slackware platform, as opposed to the official Google Chrome binaries which are compiled on an older Ubuntu probably, for maximum compatibility across Linux distros where these binaries are used. One unique quality of my Chromium packages for Slackware is that I provide them for 32bit Slackware. Google ceased providing official 32bit binaries long ago.

In my Slackware Chromium builds, I disable some of the more intrusive Google features. An example: listening all the time to someone saying “OK Google” and sending the follow-up voice clip to Google Search.

And I create a Chromium package which is actually usable enough that people prefer it over Google’s own Chrome binaries, The reason for this usefulness is the fact that I enable access to Google’s cloud sync platform through my personal so-called “Google API key“. In Chromium for Slackware, you can logon to your Google account, sync your preferences, bookmarks, history, passwords etc to and from your cloud storage on Google’s platform. Your Chromium browser on Slackware is able to use Google’s location services and offer localized content; it uses Google’s  translation engine, etcetera. All that is possible because I formally requested and was granted access to these Google services through their APIs within the context of providing them through a Chromium package for Slackware.

The API key, combined with my ID and passphrase that allow your Chromium browser to access all these Google services are embedded in the binary – they are added during compilation. They are my key, and they are distributed and used with written permission from the Chromium team.

These API keys are usually meant to be used by software developers when testing their programs which they base on Chromium code. Every time a Chromium browser I compiled talks to Google through their Cloud Service APIs, a counter increases on my API key. Usage of the API keys for developers is rate-limited,  which means if an API key is used too frequently, you hit a limit and you’ll get an error response instead of a search result. So I made a deal with the Google Chromium team to be recognized as a real product with real users and an increased API usage frequency. Because I get billed for every access to the APIs which exceeds my allotted quota and I am generous but not crazy.
I know that several derivative distributions re-use my Chromium binary packages (without giving credit) and hence tax the usage quota on my Google Cloud account, but I cover this through donations, thank you my friends, and no thanks to the leeches of those distros.

Now, what Google wants to do is limit the access to and usage of these Google services to only the software they themselves publish – i.e. Google Chrome. They are going to deny access to Google’s Cloud Services for all 3rd-party Chromium products (i.e. any binary software not distributed by Google).
Understand that there are many derivative browsers out there – based on the Open Source Chromium codebase – currently using a Google API key to access and use Google Cloud services. I am not talking about just the Chromium packages which you will find for most Linux distros and which are maintained by ‘distro packagers’. But also commercial and non-commercial products that offer browser-like features or interface and use an embedded version of Chromium to enable these capabilities. The whole Google Cloud ecosystem which is accessible using Google API Keys is built into the core of Chromium source code… all that these companies had to do was hack & compile the Chromium code, request their own API key and let the users of their (non-)commercial product store all their private data on Google’s Cloud.

Google does not like it that 3rd parties use their infrastructure to store user data Google cannot control. So they decided to deliver a blanket strike – not considering the differences in usage, simply killing everything that is not Google.
Their statement to us distro packagers is that our use of the API keys violates their Terms of Service. The fact is that in the past, several distros have actively worked with Google’s Chromium team to give their browser a wider audience through functional builds of the Open Source part of Chrome. I think that Google should be pleased with the increased profits associated with the multitude of Linux users using their services.
This is an excerpt from the formal acknowledgement email I received (dating back to 2013) with the approval to use my personal Google API key in a Chromium package for Slackware:

Hi Eric,

Note that the public Terms of Service do not allow distribution of the API
keys in any form. To make this work for you, on behalf of Google Chrome
Team I am providing you with:

    -
    Official permission to include Google API keys in your packages and to
    distribute these packages.  The remainder of the Terms of Service for each
    API applies, but at this time you are not bound by the requirement to only
    access the APIs for personal and development use, and
    -
    Additional quota for each API in an effort to adequately support your
    users.

I recommend providing keys at build time, by passing additional flags to
build/gyp_chromium. In your package spec file, please make an easy to see
and obvious warning that the keys are only to be used for Slackware. Here
is an example text you can use:

# Set up Google API keys, see
http://www.chromium.org/developers/how-tos/api-keys .
# Note: these are for ... use ONLY. For your own distribution,
# please get your own set of keys.

And indeed, my chromium.SlackBuild script contains this warning ever since:

# This package is built with Alien's Google API keys for Chromium.
# The keys are contained in the file "chromium_apikeys".
# If you want to rebuild this package, you can use my API keys, however:
# you are not allowed to re-distribute these keys!!
# You can also obtain your own, see:
# http://www.chromium.org/developers/how-tos/api-keys

It effectively means that I alone am entitled to distribute the binary Chromium packages that I create. All derivative distros that use/repackage my binaries in any form are in violation of this statement.

On March 15, 2021 access to Google’s Cloud services will be revoked from my API key (and that of all the other 3rd parties providing any sort of Chromium-related binaries). It means that my Chromium will revert to a simple browser which will allow you to login to your Google account and store your data (bookmarks/passwords/history) locally but will not sync that data to and from your Google Cloud account. Also, location and translation services and probably several other services will stop working in the browser. Effectively, Google will muzzle any Chromium browser, forcing people to use their closed Chrome binaries instead if they want cross-platform access to their data. For instance, using Chrome on Android and Chromium on Slackware.
Yes, Chrome is based on Chromium source code but there’s code added on top that we do not know of. Not everybody is comfortable with that. There was a good reason to start distributing a Chromium package for Slackware!

Now the one million dollar question:

Will you (users of my package) still use this muzzled version of Chromium? After all, Slackware-current (soon to become 15.0 stable) contains the Falkon browser as part of Plasma5, and Falkon is a Chromium browser core with a Qt5 graphical interface, and it does not use any Google API key either. Falkon will therefore offer the same or a similar feature set as a muzzled Chromium.
If you prefer not to use Chromium any longer after March 15, because this browser lost its value and unique distinguishing features for you, then I would like to know. Compiling Chromium is not trivial, it takes a lot of effort every major release to understand why it no longer compiles and then finding solutions for that, and then the compile time is horribly long as well. Any mistake or build failure sets me back a day easily. It means that I will stop providing Chromium packages in the event of diminishing interest. I have better things to do than fight with Google.

Please share your thoughts in the comments section below

FYI:

There are two threads on Google Groups where the discussion is captured; the Chromium Embedders group: https://groups.google.com/a/chromium.org/g/embedder-dev/c/NXm7GIKTNTE  – and most of it (but not all!) is duplicated in the Chromium Distro Packagers group: https://groups.google.com/a/chromium.org/g/chromium-packagers/c/SG6jnsP4pWM – I advise you to read the cases made by several distro packagers and especially take good care of how the Google representatives are answering our concerns. There’s more than a tad of arrogance and disrespect to be found there, so much that one poster pointed the Googlers that take part in the discussion (Director level mind you; not the friendly developers and community managers who have been assisting us all these years) to the Chromium Code of Conduct. I am so pissed with this attitude that I forwarded the discussion to Larry Page in a hissy fit… not that I expect him to read and answer, but it had to be done. Remember the original Google Code of Conduct mantra “Don’t be evil”?

MS Windows on Linux: wine and MinGW-w64


I came across two separate discussions on LinuxQuestions.org that had a common root cause; a lack of Windows VST support in Carla and missing PE binary support in Wine causing Windows games to fail on Slackware.
They made me think about how I could help fix the core issue, which is that both SlackBuilds.org and Slackware 3rd party repositories (like mine) do not offer MinGW packages or scripts. To address the issue I needed to create a MinGW-w64 package, which is what I did. More on that, further down.

Back to the issue at hand and their common root cause.

Starting with Wine 5.x, the developers added support for compiling wine’s Windows programs and DLLs into Microsoft PE (portable executable) format instead of building them as Linux ELF binaries. This has advantages, one of the more obvious ones adding compatibility with some copy protection schemes in Windows games.
However with wine-5.12 and newer, it appears that the PE binary format is now a requirement for some modern Windows-based games that you can play in Wine on Linux. Diablo III, World of Warcraft and others are mentioned in the relevant bug report.

This meant that I needed to do something if I ever wanted to update my own Slackware package for wine to a newer version than the 5.6 I had in my repository. Apparently to compile binaries into native MS Windows PE format, you need MinGW, the “Minimalist GNU for Windows“. In fact, I needed MinGW-w64 whichs is a fork made in 2007 of the original MinGW which adds 64bit Windows support and a lot of other enhancements, and is actively developed. Since this is not available for Slackware as a package or SlackBuild yet, I needed to come up with my own version.

The LQ thread mentions an OS-agnostic project from developer ‘Tk-Glitch’ called  “(Mostly) Portable GCC/MinGW” which people used successfully to obtain a working MinGW compiler on Slackware. Since I was completely clueless about MinGW I started with that script, and for me indeed it built a MinGW compiler suite with support tools. Alas, the script was only meant for 64bit OS-es and of course it was not a proper SlackBuild script. So I used the project as inspiration (like, I used the script’s flow and logic) to write a SlackBuild script that would also work on 32bit Slackware.
The result is that I now have MinGW-w64 packages in my repository for Slackware-current as well as 14.2 (32bit and 64bit). The package installs a profile script to “/etc/profile.d/” which adds the MinGW binaries to your $PATH environment variable. On 64bit Slackware you will get both the MinGW programs that create 64bit Windows PE binaries (x64_64-w64-ming32-*) and those that create 32bit Windows PE binaries (i686-w64-mingw32-*). While on 32bit Slackware you will get programs that create 32bit Windows PE binaries (i586-w64-mingw32-*).

Having a MinGW-w64 package finally enabled me to compile the newest wine (enhanced with the wine-staging patch set) properly.
Since the MinGW compilers are in the $PATH, the wine-build will automatically use those where needed, no change to the SlackBuild was required. The result is a wine-5.17wine-5.18 package which has grown considerably in size due to the addition of PE binaries. I hope this package will enable you gamers to play your favorite game again.
Note that I have added new dependencies to the wine package for Slackware-current. In order to improve DirectX sound support you need FAudio.  For Direct3D 12 support, wine additionally depends on vkd3d. You’ll have to install those from my repository as well.
Both FAudio and vkd3d fail to compile on Slackware 14.2, due to a lack of Vulkan library support and outdated other libraries such as Gstreamer, so the wine package for Slackware 14.2 was built without them (but it does need OpenAL as a dependency there. This got added to slackware-current as ‘openal-soft’).

And then there was Carla, the subject of that other LQ thread.
Carla is an audio plugin host; it is contained in my Slackware Live DAW project. It supports a lot of plugin formats, like LADSPA, DSSI, LV2, VST2, VST3 and more. It turned out that my Slackware package for Carla did not support Windows VST plugins. VST is mostly used on Windows, VST is a proprietary format from Steinberg which requires a licence from them to create or host a plugin. The VST3 source code is placed under a GPL3 license; however you still need written agreement from Steinberg if you want to distribute a plugin. Nevertheless, if you are a mucisian and purchased a VST plugin then Carla needs some additional work to use that Windows VST plugin.
Again, MinGW-w64 (and wine) were needed to expand the capabilities of my carla package. Luckily, a new version of Carla was released yesterday so I could apply my newfound knowledge immediately. The new carla-2.2.0 package supports Windows VST’s. Go get it.

For the techies:
Note the different architecture used in the names of the MinGW 32bit binary compilers: “i686” on Slackware64 and “i586” on Slackware. On 64bit Slackware I compile a new gcc, binutils and all the libraries they need first, and use them as a bootstrap for compiling MinGW-w64. That is why I could switch away from Slackware’s “i586” to a new “i686” architecture target, and in principle I can use a different version of GCC than the one shipped with Slackware. On the Slackware 32bit OS I was unable to compile this “bootstrap GCC” so I needed to stick to the version of GCC which is present on Slackware and use that to compile MinGW-w64.
If someone feels adventurous and has a lot of free time, the issue on 32bit Slackware is that after I compile various support libraries, then binutils and then gcc, I can not complete the gcc compilation because it ends prematurely with an error “/tmp/build/mingw_gcc_bootstrap/bin/ld: cannot find -lc“. Apparently the linker does not search /lib or /usr/lib for whatever reason. If I add symlinks for libc into “/tmp/build/mingw_gcc_bootstrap/lib/” then I get a little further in the process, but then the same happens for -lm”. Etcetera. I do not have this issue on 64bit Slackware where I use my multilib version of gcc packages… no idea whether that makes the difference. So in 32bit Slackware I just skip compiling my own GCC and move immediately to compiling MinGW. Suggestions are welcome and appreciated.

Have fun with this! Eric

Note: I used one of Dave Gauer’s logos for MinGW-w64 to decorate this blog page.

Configuring Slackware for use as a DAW

Welcome, music-making (Slackware) Linux-using friends. This article will be an interactive work and probably never finished. I am looking for the best possible setup of my Slackware system for making music without having to revert to a custom Linux Distro like the revered StudioWare.
Please supplement my writings with your expert opinions and point out the holes and/or suggest improvements/alternatives to my setup. Good suggestions in the comments section will be incorporated into the main article.
Your contributions and knowledge are welcomed!


What is a DAW?

In simple terms, a Digital Audio Workstation is a device where you create and manipulate digital audio.

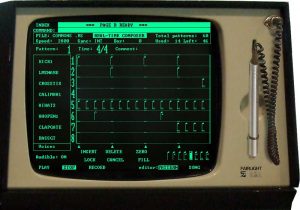
Before the era of personal computing, a DAW would be a complex piece of (expensive) hardware which was only within reach of music studios or artists of name and fame. A good example of an early DAW is the Fairlight CMI (Computer Musical Instrument), released in the late 70’s of the previous century. This Fairlight was also one of the first to offer a digital sampler. The picture at the left of this page is its monitor with a light-pen input.

These days, the name “DAW” is often used for the actual software used to produce music, like the free Ardour, LMMS, or the commercial Ableton Live, FL Studio, Cubase, Pro Tools, etcetera.
But “Digital Audio Workstation” also applies to the computer on which this software is running and whose software and hardware is tailored to the task of creating music. To make it easier for musicians who use Linux, you can find a number of custom distributions with a focus on making electronic music, such as StudioWare (Slackware based but studioware.org seems to be abandoned), AV Linux (Debian based), QStudio64 (Mint based), so that you do not have to spend a lot of time configuring your Operating System and toolkits.

A ready-to-use distro targeting the musician’s workflow is nice, but I am not the average user and want to know what’s going on under the hood. What’s new… And therefore, in the context of this article I am going to dive into the use of a regular Slackware Linux computer as a DAW.

I wrote an earlier article where I focused on the free programs that are available on a Linux platform and for which I created Slackware packages: Explorations into the world of electronic music production.
That article provided a lot of good info (and reader feedback!) about creating music. What lacked, was a good description of how to setup your computer as a capable platform to use all that software on. Slackware Linux out of the box is not setup as a real-time environment where you have low-latency connectivity between your musical hardware and the software. But these capabilities are essential if you want to produce electronic music by capturing the analog signals of physical instruments and converting them to digital audio, or if you want to add layers of CPU intensive post-processing to the soundscape in real-time.
Achieving that will be the topic of the article.


Typical hardware setup


The software you use to create, produce and mix your music… it runs on a computer of course. That computer will benefit from ample RAM and a fast SSD drive. It will have several peripherals connected to it that allow you to unleash your musical creativity:

  • a high-quality sound card or external audio interface with inputs for your physical music instruments and mics, sporting a good Analog to Digital Converter (DAC) and adding the least amount of latency.
  • an input device like a MIDI piano keyboard or controller, or simply a mouse and typing keyboard.
  • a means to listen to the final composite audio signal, i.e. a monitor with a flat frequency response.

In my case, this means:

  • USB Audio Interface: FocusRite Scarlett 2i4 2nd Gen
  • Voice and instrument recording mics connected to the USB audio interface:
    • Rode NT1-A studio microphone with a pop-filter, or
    • Behringer C-2 2 studio condenser microphones (matched pair)
  • MIDI Input: Novation Launchkey 25 MK2 MIDI keyboard
  • Monitor: I use Devine PRO 5000 studio headphones instead of actual studio monitors since i am just sitting in the attic with other people in the house…
  • And a computer running Slackware Linux and all the tools installed which are listed in my previous article.

Configuring Slackware OS


We will focus on tweaking OS parameters in such a way that the OS essentially stays ‘out of your way’ when you are working with digital audio streams. You do not want audio glitches, drop-outs or experience out-of-sync inputs. If you are adding real-time audio synthesis and effects, you do not want to see delays. You do not want your computer to start swapping out to disk and bogging down the system. And so on.

Note that for real-time behavior of your applications, you do not have to install a real-time (rt) kernel!


The ‘audio’ group

The first thing we’ll do is decide that we will tie all the required capabilities to the ‘audio’ group of the OS. If your user is going to use the computer as a DAW, you need to add the user account to the ‘audio’ group:

# gpasswd -a your_user audio

All regular users stay out of that ‘audio’ group as a precaution. The ‘audio’ members will be able to claim resources from the OS that can lock or freeze the computer if misused. Your spouse and kids will still be able to fully use the computer – just not wreck havoc.


The kernel

A Slackware kernel has ‘CONFIG_HZ_1000’ set to allow for a responsive desktop, and ‘CONFIG_PREEMPT_VOLUNTARY’ as a sensible trade-off between having good overall throughput (efficiency) of your system and providing low latency to applications that need it.

So you are probably going to be fine with the stock ‘generic’ kernel in Slackware. One tweak though is going to improve on low-latency. One important part of the ‘rt-kernel’ patch set was added to the Linux source code, and that is related to interrupt handling. Threaded IRQs are meant to minimize the time your system spends with all interrupts disabled. Enabling this feature in the kernel is done on the boot command-line, by adding the word ‘threadirqs’ there.

  • If you use lilo, open “/etc/lilo.conf” in an editor and add “threadirqs” to the value of the “append=” keyword, and re-run ‘lilo’.
  • If you use elilo, open /boot/efi/EFI/Slackware/elilo.conf and add “threadirqs” to the value of the “append = ” keyword
  • If you are using Grub, then open “/etc/default/grub” in an editor and add “threadirqs” to the (probably empty) value for “GRUB_CMDLINE_LINUX_DEFAULT”. Then re-generate your Grub configuration.

CPU Frequency scaling

Your Slackware computer is configured by default to use the “ondemand” CPU frequency scaling governor. The kernel will reduce the CPU clock frequency (modern CPU’s support this) if the system is not under high load, to conserve energy. However, much of the load in a real-time audio system is on the DSP, not on the CPU, and the scaling governor will not catch that. It could result in buffer underruns (also called XRUNs). Therefore, it is advised to switch to the “performance” governor instead which will always keep your CPU cores at max clock frequency. To achieve this, open the file “/etc/default/cpufreq” in an editor and add this line (make sure that all other lines are commented out with a ‘#” at the beginnning!):

SCALING_GOVERNOR=performance

After reboot, this modification will be effective.

Note: if you want to use your laptop as a DAW, you may want to re-consider this modification. You do not want to have your CPU’s running at full clockspeed all of the time, it eats your battery life. Make use of this “performance” feature only when you need it.


Real-time scheduling

Your DAW and the software you use to create electronic music, must always be able to carry out their task irrespective of other tasks your OS or your Desktop Environment want to slip in. This means, your audio applications must be able to request (and get) real-time scheduling capabilities from the kernel.

How you do this depends on whether your Slackware uses PAM, or not.

If PAM is installed, RT Scheduling and the ability to claim Locked Memory is configured by creating a file in the “/etc/security/limits.d/” directory – let’s name the file “/etc/security/limits.d/rt_audio.conf” (the name is not relevant, as long as it ends on ‘.conf’) and add the following lines.

# Real-Time Priority allowed for user in the 'audio' group:
# Use 'unlimited' with care,a misbehaving application can
# lock up your system. Try reserving half your physical memory:
#@audio - memlock 2097152
@audio - memlock unlimited
@audio - rtprio 95

If PAM is not part of your system, we use a feature which is not so widely known to achieve almost the same thing: initscript (man 5 initscript). When the shell script “/etc/initscript” is present and executable, the ‘init’ process will use it to execute the commands from inittab. This script can be used to set things like ulimit and umask default values for every process.
So, let’s create that file “/etc/initscript”, add the following block of code to it:

# Set umask to safe level:
umask 022
# Disable core dumps:
ulimit -c 0
# Allow unlimited size to be locked into memory:
ulimit -l unlimited
# Address issue of jackd failing to start with realtime scheduling:
ulimit -r 95
# Execute the program.
eval exec "$4"

And make it executable:

# chmod +x /etc/initscript

The ulimit and umask values that have been configured in this script will now apply to every program started by every user of your computer. Not just members of the ‘audio’ group. You are warned. Watch your kids.


Use sysctl tweaks to favor real-time behavior

The ‘sysctl’ program is used to modify kernel parameters at runtime. We need it in a moment, but first some preparations.
A DAW which relies on ALSA MIDI, benefits from access to the high precision event timer (HPET). We will allow the members of the ‘audio’ group to access the HPET and real-time clock (RTC) which by default are only accessible to root.
We achieve this by creating a new UDEV rule file “/etc/udev/rules.d/40-timer-permissions.rules”. Add the following lines to the file and then reboot to make your changes effective:

KERNEL=="rtc0", GROUP="audio"
KERNEL=="hpet", GROUP="audio"

With access to the HPET arranged, we can create a sysctl configuration file which the kernel will use on booting up. There are a number of audio related ‘sysctl‘ settings that allow for better real-time performance, and we add these settings to a new file “/etc/sysctl.d/daw.conf”. Add the following lines to it:

dev.hpet.max-user-freq = 3072
fs.inotify.max_user_watches = 524288
vm.swappiness = 10

The first line allows the user to access the timers at a higher frequency than the default ’64’. Note that the max possible value is 8192 but a sensible minimum for achieving lower latency is 1024. The second line is suggested by the ‘realtimeconfigquickscan‘ tool, and increases the maximum number of files that the kernel can track on behalf of the programs you are using (no proof that  this actually improves real-time behavior). And the third line will prevent your system from starting to swap too early (its default value is ’60’) which is a likely cause for XRUNs.


Disable scheduled tasks of the OS and your DE

The suggestions above are mostly kernel related, but your own OS and more specifically, the Desktop Environment you are using can get in the way of real-time behavior you want for your audio applications.

General advice:

  • Disable your desktop’s Compositor (KWin in KDE Desktop, Compiz on XFCE and Gnome Desktop). Compositing requires a good GPU supporting OpenGL hardware acceleration but still this will put a load on your CPU and in particular on the application windows.

Desktop-specific:

  • Plasma 5 Desktop
    • The most obvious candidate to mess with your music making process is Baloo, the file indexer. The first time Baloo is started on a new installation, it will seriously bog down your computer and eat most of its CPU cycles while it works its way through your files.
      If you really want to keep using Baloo (it allows for a comfortable file search in Plasma5) you could at least disable file content indexing and merely let it index the filenames (similar to console-based ‘locate’).
      Go to “System Settings > Workspace > Search > File search” and un-check “also index file content”
      If you want to completely disable Baloo so that you can not re-enable it anymore with any command or tool, do a manual edit of ${HOME}/.config/baloofilerc and make sure that the “[Basic Settings]” section contains the following line:
      Indexing-Enabled=false
    • In KDE, the Akonadi framework is responsible for providing applications with a centralized database to store, index and retrieve the user’s personal information including the user’s emails, contacts, calendars, events, journals, alarms, notes, etc. The alerts this framework generates can interfere with real-time audio recording, so you can disable Akonadi if you want by running “akonadictl stop” in a terminal, under your own user account. Then make sure that your desktop does not auto-start applications which use Akonadi, Also, open the configuration of your desktop Clock and uncheck “show events” to prevent a call into Akonadi.
      Read more on https://userbase.kde.org/Akonadi/nl#Disabling_the_Akonadi_subsystem
    • Compositing is another possible resource hog, especially when your computer is in the middle-or lower range. You can easily toggle (disable/re-enable) the desktop compositor by pressing the “Shift-Alt-F12” key combo.
      Note that if you use Latte-dock as your application starter, this will not like the absence of a Compositor. You’ll have to switch back to KDE Plasma’s standard menus to start your applications.


Selecting your audio interface

You may not always have your high-quality USB audio interface connected to your computer. When the computer boots, ALSA will decide for itself which device will be your default audio device and usually it will be your internal on-board sound card.

You can inspect your computer’s audio devices that ALSA knows about. For instance, my computer has onboard audio, then the HDMI connector on the Nvidia GPU provides audio-out; I have a FocusRite Scarlett 2i4, an old Philips Web Cam with an onboard microphone and I have loaded the audio loopback module. That makes 5 audio devices, numbered by the kernel from 0 to 4 with the lowest number being the default card:

$ cat /proc/asound/cards 
0 [NVidia_1    ]: HDA-Intel - HDA NVidia
                  HDA NVidia at 0xdeef4000 irq 22
1 [NVidia      ]: HDA-Intel - HDA NVidia
                  HDA NVidia at 0xdef7c000 irq 19
2 [USB         ]: USB-Audio - Scarlett 2i4 USB
                  Focusrite Scarlett 2i4 USB at usb-0000:00:02.1-2, high speed
3 [U0x4710x311 ]: USB-Audio - USB Device 0x471:0x311
                  USB Device 0x471:0x311 at usb-0000:00:02.0-3, full speed
4 [Loopback ]: Loopback - Loopback
               Loopback 1

Note that these cards can be identified when using ALSA commands and configurations, both by their hardware index (hw0, hw2) and by their ‘friendly name‘ (‘Nvidia_1’, ‘USB’).

Once you know which cards are present, you can inspect which kernel modules are loaded for these cards – The same indices as shown in the previous ‘cat /proc/asound/cards‘ command are also listed in the output of the next command:

$ cat /proc/asound/modules
0 snd_hda_intel
1 snd_hda_intel
2 snd_usb_audio
3 snd_usb_audio
4 snd_aloop

You’ll notice that some cards use the same kernel module. If you want to deterministically number your sound devices instead allowing the kernel to probe and enumerate your hardware, you’ll have to perform some wizardry in the /etc/modprobe.d/ directory.

Using pulseaudio you can change the default audio output device on the fly.
First you determine the naming of devices in pulseaudio (it’s quite different from what you saw in ALSA) with the following command which lists the available outputs (called sinks by pulseaudio):

$ pactl list short sinks
0 alsa_output.usb-Focusrite_Scarlett_2i4_USB-00.analog-surround-40 module-alsa-card.c s32le 4ch 48000Hz SUSPENDED
1 alsa_output.pci-0000_00_05.0.analog-stereo module-alsa-card.c s32le 2ch 48000Hz SUSPENDED
3 alsa_output.platform-snd_aloop.0.analog-stereo module-alsa-card.c s32le 2ch 48000Hz SUSPENDED
4 jack_out module-jack-sink.c float32le 2ch 48000Hz RUNNING
11 alsa_output.pci-0000_02_00.1.hdmi-stereo-extra1 module-alsa-card.c s32le 2ch 48000Hz SUSPENDED

You see which device is the default because that will be the only one that is in ‘RUNNING’ state and not ‘SUSPENDED’. Subsequently you can change the default output device, for instance to the FocusRite interface:

$ pactl set-default-sink alsa_output.usb-Focusrite_Scarlett_2i4_USB-00.analog-surround-40

You can use these commands to help you deciding which to use as your default device if you un-plug your USB audio interface, or if you want to let your system sounds be handled by an on-board card while you are working on a musical production using your high-quality USB audio interface – each device with their own set of speakers.


Connecting the dots: ALSA -> Pulseaudio -> Jack

The connecting element in all the software tools of your DAW is the Jack Audio Connection Kit, or Jack for short. Jack is a sound server – it provides the software infrastructure for audio applications to communicate with each other and with your audio hardware. All my DAW-related software packages have been compiled against the Jack libraries and thus can make use of the Jack infrastructure once Jack daemon is started.

Once Jack takes control, it talks directly to ALSA sound system.

Slackware uses the ALSA sound architecture since replacing the old OSS (open sound system) with it, many years ago. ALSA is the kernel-level interface to your audio hardware combined with a set of user-land libraries and binaries to allow your applications to use your audio hardware.
Pulseaudio is a software layer which was added to Slackware 14.2. Basically it is a sound server (similar to Jack) which interfaces between ALSA and your audio applications, providing mixing and re-sampling capabilities that expand on what ALSA already provides. It deals with dynamic adding and removing of audio hardware (like head-phones) and can transfer audio streams over the network to other Pulseaudio servers.
Musicians and audiophiles sometimes complain that Pulseaudio interferes with the quality of the audio. Mostly this is caused by the resampling that Pulseaudio may do when combining different audio streams but this can be avoided by configuring your system components to all use a single sample rate like 44,1 or 48 KHz. Also, in recent years the quality of the Pulseaudio software has improved quite a bit.

When Jack starts it will interface directly to ALSA, bypassing Pulseaudio entirely. What that means is that all your other applications that are not Jack-aware suddenly stop emitting sound because they still play via Pulseaudio. Luckily, we can fix that easily, and without using any custom scripting.

All it takes is the Jack module for Pulseaudio. The source code for this module is part of Pulseaudio but it is not compiled and installed in Slackware since Slackware does not contain Jack. So what I did is create a package which compiles just that Pulseaudio Jack module. You should install my “pulseaudio-jack” package from my repository. The module contains a library responsible for detecting when jack starts and then enables ‘source’ and ‘sink’ for Pulseaudio-aware applications to use.

The main pulseaudio configuration file “/etc/pulse/default.pa” already contains the necessary lines to support the pulseaudio-jack module:

### Automatically connect sink and source if JACK server is present
.ifexists module-jackdbus-detect.so
.nofail
load-module module-jackdbus-detect channels=2
.fail
.endif

The only thing you need to do is ensuring that jackdbus is started. If you use qjackctl to launch Jack, you need to check the “Enable D-Bus interface” and “Enable JACK D-Bus interface” boxes in “Setup -> Misc”. See next section for more details on using QJackCtl.

In 2020 this is all it takes to route all output from your ALSA and Pulseaudio applications through Jack.


Easy configuration of Jack through QJackCtl

The Jack daemon can be started and configured all from the commandline and through scripts. But when your graphical DAW software runs inside a modern Desktop Environment like XFCE or KDE Plasma5, why not take advantage of graphical utilities to control the Jack sound server?

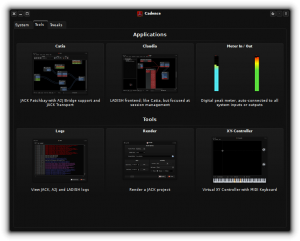
DAW-centric distros will typically ship with the Cadence Tools, which is a set of Qt5 based applications written for the KXStudio project (consisting of Cadence itself and also Catarina, Catia and Claudia) to manage your Jack audio configuration easily. Note that I have not created packages for Cadence Tools but if there’s enough demand I will certainly consider it, since this toolkit should work just fine in Slackware:

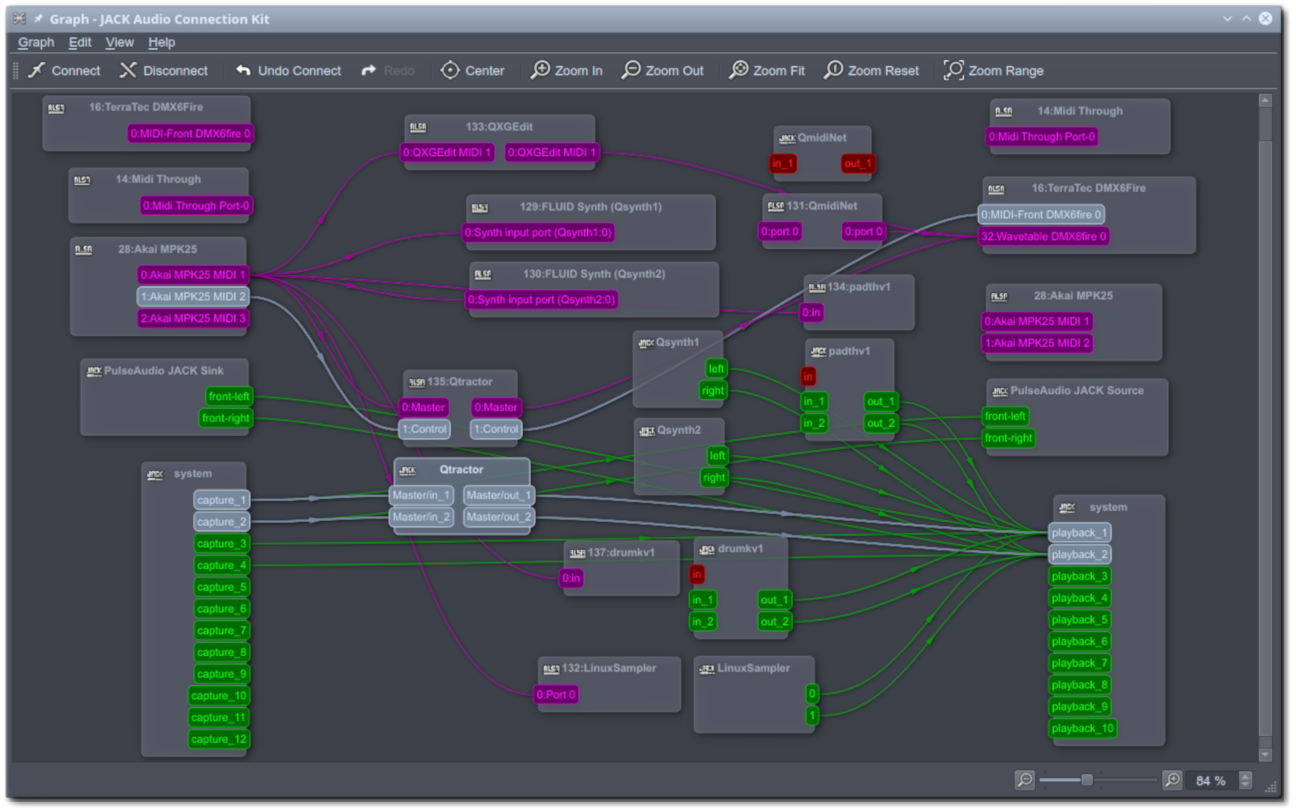
For a Qt5 based Desktop Environment like KDE Plasma5, a control application like QJackCtl will blend in just as well. While it’s more simplistic than Cadence, it does a real good job nevertheless. Its author offers several other very nice audio programs at https://www.rncbc.org/ like QSampler and the Vee One Suite of old-skool synths.

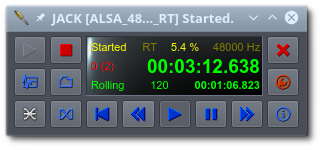
Like Cadence, QJackCtl offers a graphical user interface to connect your audio inputs and outputs, allowing you to create any setup you can imagine:

QJackCtl can be configured to run the Jack daemon on startup and enable Jack’s Dbus interface. Stuff like defining the samplerate, the audio device to use, the latency you allow, etcetera is also available. And if you tell the Desktop Session Manager to autostart qjackctl when you login, you will always have Jack ready and waiting for you.


Turning theory into practice

The reason for writing up this article was informational of course, since this kind of comprehensive detail is not readily available for Slackware. With all the directions shared above you should now be able to tune your computer to make it suited for some good music recording and production, and possibly live performances.

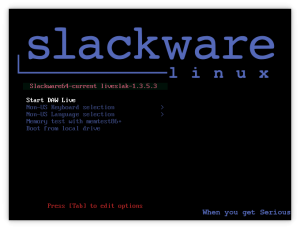
A secondary goal of the research into the article’s content was to gain a better understanding of how to put together my own Slackware based DAW Live OS. All of the above knowledge is being put into the liveslak scripts and Slackware Live Edition now has a new variant next to PLASMA5, SLACKWARE, XFCE, etc… it is “DAW“.
I am posting ISO images of this Slackware Live DAW Edition to https://martin.alienbase.nl/mirrors/slackware-live/pilot/ and hope some of you find it an interesting enough concept that you want to try it out.

Note that you’ll get a ~ 2.5 GB ISO which boots into a barebones KDE Plasma5 Desktop with all my DAW tools present and Jack configured, up and running. User accounts are the same as with any Slackware Live Edition: users ‘live‘ and ‘root‘ with passwords respectively ‘live‘ and ‘root‘.

Why KDE Plasma5 as the Desktop of choice? Isn’t this way too heavy on resources to provide a low-latency workflow with real-time behaviour?
Well actually… the resource usage and responsiveness of KDE Plasma5 is on par or even better than the light-weight XFCE. Which is the reason why an established distro like Ubuntu Studio is migrating from XFCE to KDE Plasma5 for their next release (based on Ubuntu 20.10) and KXStudio targets the KDE Plasma5 Desktop as well.

You can burn the ISO to a DVD and then use it as a real ‘live’ OS which is fresh and pristine on every boot, or use the ‘iso2usb.sh’ script which is part of liveslak to copy the content of the ISO to a USB stick – which adds persistency, application state saving and additional storage capability. The USB option also allows you to set new defaults for such things as language, keyboard layout, timezone etc so that you do not have to select those everytime through the bootmenus.

If your computer has sufficient RAM (say, 8 GB or more), you should consider loading the whole Live OS into RAM (using the ‘toram’ boot parameter) and have a lightning-fast DAW as a result. My tests with a USB stick with USB-3 interface was that it takes 2 to 3 minutes to load the 2.5 GB into RAM, which compares to nothing if your DAW session will be running for hours.


Shout out

A big help was the information in the Linux Audio Wiki, particularly this page: https://wiki.linuxaudio.org/wiki/system_configuration. In fact, I recommend that you absorb all of the information there.
On that page, you will also find a link to a Perl program “realtimeconfigquickscan” which can scan your system and report on the readiness of your computer for becoming a Digital Audio Workstation.

Good luck! Eric

New ISOs for Slackware Live (liveslak-1.3.4)

I have uploaded a set of fresh Slackware Live Edition ISO images. They are based on the liveslak scripts version 1.3.4. The ISOs are variants of Slackware-current “Tue Dec 24 18:54:52 UTC 2019“. The PLASMA5 variant comes with my december release of ‘ktown‘ aka  KDE-5_19.12 and boots a Linux 4.5.6 kernel.


Download these ISO files preferably via rsync://slackware.nl/mirrors/slackware-live/ because that allows easy resume if you cannot download the file in one go.

Liveslak sources are maintained in git. The 1.3.4 release brings some note-worthy changes to the Plasma5 ISO image.

PLease be aware of the following change in the Plasma5 Live Edition. The size of the ISO kept growing with each new release. Partly because KDE’s Plasma5 ecosystem keeps expanding, and in part because I kept adding more of my own packages that also grew bigger. I had to reduce the size of that ISO to below what fits on a DVD medium.
I achieved this by removing (almost) all of my non-Plasma5 packages from the ISO.
The packages that used to be part of the ISO (the ‘alien’ and ‘alien restricted’ packages such as vlc, libreoffice, qbittorrent, calibre etc) are now separate downloads.
You can find 0060-alien-current-x86_64.sxz and 0060-alienrest-current-x86_64.sxz in the “bonus” section of the slackware-live download area. They should now be used as “addons” to a persistent USB version of Slackware Live Edition.

Refreshing the persistent USB stick with the new Plasma5 ISO

If you – like me – have a persistent USB stick with Slackware Live Edition on it and you refresh that stick with every new ISO using “iso2usb.sh -r <more parameters>”, then with the new ISO of this month you’ll suddenly be without my add-on packages.
But if you download the two sxz modules I mentioned above, and put them in the directory “/liveslak/addons/” of your USB stick, the modules will be loaded automatically when Slackware Live Edition boots and you’ll have access to all my packages again.

What was Slackware Live Edition and liveslak again?

If you want to read about what the Slackware Live Edition can do for you, check out the official landing page for the project, https://alien.slackbook.org/blog/slackware-live-edition/ or any of the articles on this blog that were published later on.

Extensive documentation on how to use and develop Slackware Live Edition (you can achieve a significant level of customization without changing a single line of script code) can be found in the Slackware Documentation Project Wiki.

Have fun!

Remote access to your VNC server via modern browsers

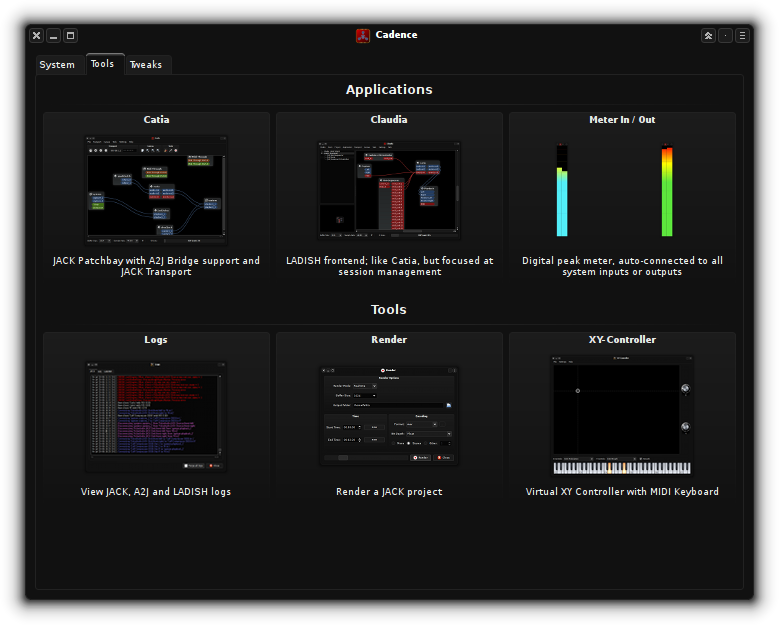
I think I am not the only one who runs a graphical Linux desktop environment somewhere on a server 24/7.
I hear you ask: why would anyone want that?

For me the answer is simple: I work for a company that runs Linux in its datacenters but offers only Windows 10 on its user desktops and workstations. Sometimes you need to test work related stuff on an Internet-connected Linux box. But even more importantly: when I travel, I may need access to my tools – for instance to fix issues with my repositories, my blog, my build server, or build a new package for you guys.

This article documents how I created and run such a 24/7 graphical desktop session and how I made it easily accessible from any location, without being restricted by firewalls or operating systems not under my control. For instance, my company’s firewall/proxy only allows access to HTTP(S) Internet locations; for me a browser-based access to my remote desktop is a must-have.

How to run & access a graphical Linux desktop 24/7 ?

Here’s how: we will use Apache, VNC and noVNC.

VNC or Virtual Network Computing is a way to remotely access another computer using the RFB (Remote Frame Buffer) protocol. The original VNC implementation is open source. In due time, lots of cross-platform clients and servers have been developed for most if not all operating systems. Slackware ships with an optimized implementation which makes it possible to work in a remote desktop even over low-bandwidth connections.

There’s  one thing you should know about VNC. It is a full-blown display server. Many people configure a VNC server to share their primary, physical desktop (your Linux Xserver based desktop or a MS Windows desktop) with remote VNC clients.
VNC is also how IT Help Desks sometimes offer remote assistance by taking control over your mouse, keyboard and screen.
But I want to run a VNC server ‘headless‘. This means, that my VNC server will not connect to a physical keyboard, mouse and monitor. Instead, it will offer virtual access to these peripherals. Quite similar to X.Org, which also provides what is essentially a network protocol for transmitting key-presses, mouse movements and graphics updates. VNC builds on top of X.Org and thus inherits these network protocol qualities.

Start your engines

Get a computer (or two)

First, you will have to have a spare desktop computer which does not consume too much power and which you can keep running all day without bothering the other members of your family (the cooling fans of a desktop computer in your bedroom will keep people awake).

Next, install Slackware Linux on it (any Linux distro will do; but I am biased of course). You can omit all of the KDE packages if you want. We will be running XFCE. Also install ‘tigervnc’ and ‘fltk’ packages from Slackware’s ‘extra’ directory. The tigervnc package installs both a VNC client and a VNC server.

Note that  the version of  TigerVNC server which ships in Slackware 15.0 and onwards behaves differently than described in this article (which focuses more on the NoVNC part).
I recommend reading my follow-up article “Challenges with TigerVNC in Slackware 15.0” before continuing with the remainder of this page, and follow the VNC server instructions as shown in that other article.

You can store this server somewhere in a cupboard or in the attic, or in the basement: you will not have a need to access the machine locally. It does not even have to have a keyboard/mouse/monitor attached after you have finished implementing all the instructions in this article.

You may of course want to use a second computer – this one would then act as the client computer from which you will access the server.

In my LAN, the server will be configured with the hostname “darkstar.example.net”. This hostname will be used a lot in the examples and instructions below. You can of course pick and choose any hostname you like when creating your own server.
I also use the Internet domain “lalalalala.org” in the example at the end where I show how to connect to your XFCE desktop from anywhere on the Internet. I do not own that domain, it’s used for demonstrative purposes only, so be gentle with it.

Run the XFCE desktop

Let’s start a VNC server and prepare to run a XFCE graphical desktop inside.

alien@darkstar:~$ vncserver -noxstartup

You will require a password to access your desktops.

Password:
Verify:
Would you like to enter a view-only password (y/n)? n

New 'darkstar.example.net:1 (alien)' desktop is darkstar.example.net:1

Creating default config /home/alien/.vnc/config
Log file is /home/alien/.vnc/darkstar.example.net:1.log

What we did here was to allow the VNC server to create the necessary directories and files but I prevented its default behavior to start a “Twm” graphical desktop. I do not want that pre-historic desktop, I want to run XFCE.

You can check that there’s a VNC server running now on “darkstar.example.net:1”, but still without a graphical desktop environment inside. Start a VNC client and connect it to the VNC server address (highlighted in red above):

alien@darkstar:~$ vncviewer darkstar.example.net:1 

TigerVNC Viewer 64-bit v1.10.1 
Built on: 2019-12-20 22:09 
Copyright (C) 1999-2019 TigerVNC Team and many others (see README.rst) 
See https://www.tigervnc.org for information on TigerVNC.
...

The connection of the VNC client to the server was successful, but all you will see is a black screen – nothing is running inside as expected. You can exit the VNC viewer application and then kill the VNC server like this:

alien@darkstar:~$ vncserver -kill :1

The value I passed to the parameter “-kill” is “:1”. This “:1” is a pointer to your active VNC session. It’s that same “:1” which you saw in the red highlighted “darkstar.example.net:1” above. It also corresponds to a socket file in ” /tmp/.X11-unix/”. For my VNC server instance with designation “:1” the corresponding socket file is “X1”. The “kill” command above will communicate with the VNC server through that socket file.

Some more background on VNC networking follows, because it will help you understand how to configure noVNC and Apache later on.
The “:1” number does not only correspond to a socket; it translates directly to a TCP port: just add 5900 to the value behind the colon and you get the TCP port number where your VNC server is listening for client connections.
In our case, “5900 + 1” means TCP port 5901. We will use this port number later on.

If you had configured VNC server to share your physical X.Org based desktop (using the ‘x11vnc’ extension), then a VNC server would be running on “:0” meaning TCP port 5900.
And if multiple users want to run a VNC server on your computer, that is entirely possible! Every new VNC server session will get a new TCP port assigned (by default the first un-assigned TCP port above 5900).
It’s also good to know that the VNC server binds to all network interfaces, including the loop-back address. So the commands “vncviewer darkstar.example.net:1” and “vncviewer localhost:1” give identical result when you start a VNC client on the machine which is also running the VNC server.

Enough with the theory, we need that XFCE session to run! When a VNC server starts, it looks for a script file called “~/.vnc/xstartup” and executes that. This script should start your graphical desktop.

So let’s create a ‘xstartup’ script for VNC, based on Slackware’s default XFCE init script:

alien@darkstar:~$ cp /etc/X11/xinit/xinitrc.xfce ~/.vnc/xstartup
alien@darkstar:~$ vi ~/.vnc/xstartup

Edit that ‘xstartup’ script and add the following lines. They should be the first lines to be executed, so add them directly before the section “Merge in defaults and keymaps“:

vncconfig -iconic &
unset SESSION_MANAGER
unset DBUS_SESSION_BUS_ADDRESS

Add the following lines immediately before the section “Start xfce Desktop Environment” to ensure that your desktop is locked from the start and no-one can hi-jack your unprotected VNC session before you have a chance to connect to it:

# Ensure that we start with a locked session:
xscreensaver -no-splash &
xscreensaver-command -lock &

In order for these commands to actually work, you may have to run “xscreensaver-demo” once, the first time you login to your desktop in VNC, and configure the screensaver properly.

Into the future

This ends the preparations. From now on, you will start your VNC server (hopefully once per reboot) with the following simple command without any parameters:

alien@darkstar:~$ vncserver

That’s it. You have a XFCE desktop running 24/7 or until you kill the VNC server. You can connect to that VNC server with a VNC client (on Slackware that’s the vncviewer program) just like I showed before, and configure your XFCE desktop to your heart’s content. You can close your VNC client at any time and reconnect to the VNC server at a later time – and in the meantime your XFCE desktop will happily keep on running undisturbed.
You can  connect to your VNC server from any computer as long as that computer has a VNC client installed and there’s a network connection between server and client.

How to make that graphical desktop available remotely ?

So now we have a VNC server running with a XFCE desktop environment inside it. You can connect to it from within the LAN using your distro’s VNC viewer application. And now we will take it to the next level: make this Linux XFCE desktop available remotely using a browser based VNC client.

We will require NoVNC software and a correctly configured Apache httpd server. Apache is part of Slackware, all we need to do is give it the proper config, but NoVNC is something we need to download and configure first.

noVNC

The noVNC software is a JavaScript based VNC client application which uses HTML5 WebSockets and Canvas elements. It requires a fairly modern browser like Chromium, Firefox, and also mobile browsers (Android and i/OS based) will work just fine.
With your browser, you connect to the noVNC client URL. Apache’s reverse proxy connects the noVNC client to a WebSocket and that WebSocket in turn connects to your VNC server port.

Some VNC servers like x11vnc and libvncserver contain the WebSockets support that noVNC needs, but our TigerVNC based server does not have WebSocket support. Therefore we will have to add a WebSockets-to-TCP proxy to our noVNC installation. Luckily, the noVNC site offers such an add-on.

Installing

Get the most recent noVNC ‘tar.gz’ archive (at the moment that is version 1.4.0) from here: https://github.com/novnc/noVNC/releases .
As root, extract the archive somewhere to your server’s hard disk, I suggest /usr/local/ :

# tar -C /usr/local -xvf noVNC-1.4.0.tar.gz
# ln -s noVNC-1.4.0 /usr/local/novnc

The symlink “/usr/local/novnc” allows you to create an Apache configuration which does not contain a version number, so that you can upgrade noVNC in future without having to reconfigure your Apache. See below for that Apache configuration.
We also need to download the WebSockets proxy implementation for noVNC:

# cd /usr/local/novnc/utils/
# git clone https://github.com/novnc/websockify websockify

Running

You will have to start the WebSockets software for noVNC as a non-root local account. That account can be your own user or a local account which you specifically use for noVNC. My suggestion is to start noVNC as your own user. That way, multiple users of your server would be able to start their own VNC session and noVNC acccess port.
I start the noVNC script in a ‘screen‘ session (the ‘screen’ application is a console analog of VNC) so that noVNC keeps running after I logoff.
Whether or not you use ‘screen‘, or ‘tmux‘, the actual commands to start noVNC are as follows (I added the output of these commands as well):

$ cd /usr/local/novnc/
$  ./utils/novnc_proxy --vnc localhost:5901

Warning: could not find self.pem
Using local websockify at /usr/local/novnc/utils/websockify/run
Starting webserver and WebSockets proxy on port 6080
websockify/websocket.py:30: UserWarning: no 'numpy' module, HyBi protocol will be slower
 warnings.warn("no 'numpy' module, HyBi protocol will be slower")
WebSocket server settings:
 - Listen on :6080
 - Web server. Web root: /usr/local/novnc
 - No SSL/TLS support (no cert file)
 - proxying from :6080 to localhost:5901

Navigate to this URL: 
   http://baxter.dyn.barrier.lan:6080/vnc.html?host=baxter.dyn.barrier.lan&port=6080
Press Ctrl-C to exit

I highlighted some of the output in red. It shows that I instruct noVNC (via the commandline argument “–vnc”) to connect to your VNC server which is running on localhost’s TCP port 5901 (remember that port number from earlier in the article when we started vncserver?) and the noVNC WebSockets proxy starts listening on port 6080 for client connection requests. We will use that port 6080 later on, in the Apache configuration.

From this moment on, you can already access your VNC session in a browser, using the URL provided in the command output. But this only works inside your LAN, and the connection is un-encrypted (using HTTP instead of HTTPS) and not secured (no way to control or limit access to the URL).
The next step is to configure Apache and provide the missing pieces.

Apache

Making your Apache work securely using HTTPS protocol (port 443) means you will have to get a SSL certificate for your server and configure ‘httpd’ to use that certificate. I wrote an article on this blog recently which explains how to obtain and configure a free SSL certificate for your Apache webserver. Go check that out first!

Once you have a local webserver running securely over HTTPS, let’s add a block to create a reverse proxy in Apache. If you are already running Apache and have VirtualHosts configured, then you should add the below block to any of your VirtualHost definitions. Otherwise, just add it to /etc/httpd/httpd.conf .

Alias /aliensdesktop /usr/local/novnc

# Route all HTTP traffic at /aliensdesktop to port 6080
ProxyRequests Off
ProxyVia on
ProxyAddHeaders On
ProxyPreserveHost On

<Proxy *>
    Require all granted
</Proxy>

# This will not work when you use encrypted web connections (https):
#<Location /websockify>
#     Require all granted
#     ProxyPass ws://localhost:6080/websockify
#     ProxyPassReverse ws://localhost:6080/websockify
#</Location>
# But this will:

# Enable the rewrite engine
# Requires modules: proxy rewrite proxy_http proxy_wstunnel
# In the rules/conditions, we use the following flags:
# [NC] == case-insensitve, [P] == proxy, [L] == stop rewriting
RewriteEngine On

# When websocket wants to initiate a WebSocket connection, it sends an
# "upgrade: websocket" request that should be transferred to ws://
RewriteCond %{HTTP:Connection} Upgrade [NC]
RewriteCond %{HTTP:Upgrade} =websocket [NC]
RewriteRule /(.*) ws://127.0.0.1:6080/$1 [P,L]

<Location /aliensdesktop/>
    Require all granted
    # Delivery of the web files
    ProxyPass http://localhost:6080/
    ProxyPassReverse http://localhost:6080/
</Location>

Again, I highlighted the bits in red which you can change to fit your local needs.

The “Alias” statement in the first line is needed to make our noVNC directory visible to web clients, since it is not inside the Apache DocumentRoot (which is “/srv/httpd/htdocs/” by default). I do not like having actual content inside the DocumentRoot directory tree (you never know when you accidentally create a hole and allow the bad guys access to your data) so using an Alias is a nice alternative approach.

You will probably already have noticed that Apache’s reverse proxy will connect to “localhost”. This means you can run a local firewall on the server which only exposes ports 80 and 443 for http(s) access. There is no need for direct remote access to port 6080 (novnc’s websocket) or 5901 (your vncserver).

Check your Apache configuration for syntax errors and restart the httpd if all is well:

# apachectl configtest
# /etc/rc.d/rc.httpd restart

Now if you connect a browser to https://darkstar.example.net/aliensdesktop/vnc.html and enter the following data into the connection box:

  • Host: darkstar.example.net
  • Port: 443
  • Password: the password string you defined for the VNC server
  • Token: leave empty

Then press “Connect”. You will get forwarded to your XFCE session running inside the VNC server. Probably the XFCE screen lock will be greeting you and if you enter your local account credentials, the desktop will unlock.

You can expand this Apache configuration with additional protection mechanisms. That is the power of hiding a simple application behind an Apache reverse proxy: the simple application does what it does best, and Apache takes care of all the rest, including data encryption and access control.
You could think of limiting access to the noVNC URL to certain IP addresses or domain names. or you can add a login dialog in front of the noVNC web page. Be creative.

Configure your ISP’s router

My assumption is that your LAN server is behind a DSL, fiber or other connection provided by a local Internet Service Provider (ISP). The ISP will have installed a modem/router in your home which connects your home’s internal network to the Internet.

So the final step is to ensure that the HTPS port (443) of your LAN server is accessible from the internet. For this, you will have to enable ‘port-forwarding’ on your Internet modem/router. The exact configuration will depend on your brand of router, but essentially you will have to forward port 443 on the router to port 443 on your LAN server’s IP address.

If you have been reading this far, I expect that you are serious about implementing noVNC. You should have control over an Internet domain and the Internet-facing interface of your ISP’s modem/router should be associated with a hostname in your domain. Let’s say, you own the domain “lalalalala.org” and the hostname “alien.lalalalala.org” points to the public IP address of your ISP’s modem. Then anyone outside of your home (and you too inside your home if the router is modern enough) can connect to: https://alien.lalalalala.org/aliensdesktop/vnc.html and enter the following data into the connection box in order to connect to your VNC session:

  • Host: alien.lalalalala.org
  • Port: 443
  • Password: the password string you defined for the VNC server
  • Token: leave empty

That’s it! I hope it was all clear. I love to hear your feedback. Also, if certain parts need clarification or are just not working for you, let me know in the comments section below.

Cheers, happy holidays, Eric

« Older posts Newer posts »

© 2025 Alien Pastures

Theme by Anders NorenUp ↑