Hi all!
 This is the second episode in a series of articles I am writing about using Slackware as your private/personal ‘cloud server’ while we are waiting for the release of Slackware 15.0.
Below is a list of past, present and future episodes in the series. If the article has already been written you’ll be able to access it by clicking on its subject.
The first episode also contains an introduction with some more detail about what you can expect from these articles.
- Episode 1: Managing your Docker Infrastructure
- Episode 2 (this article): Identity and Access management (IAM)
Setting up Keycloak for Identity and Access Management to provide people with a single user account for all the Slackware Server Services we will be creating.- Preamble
- Setting up Keycloak
- The MariaDB database
- Network defaults in Docker
- Private network for Keycloak
- MariaDB access from the network
- Keycloak container
- MariaDB considerations during Keycloak setup
- The admin user
- Reverse proxy setup for keycloak
- Initial configuration of Keycloak
- Considerations
- Keycloak discovery
- Done
- Thanks
- Attribution
- Episode 3: Video Conferencing
- Episode 4: Productivity Platform
- Episode 5: Collaborative document editing
- Episode 6: Etherpad with Whiteboard
- Episode 7: Decentralized Social Media
- Episode 8: Media streaming platform
- Episode 9: Cloudsync for 2FA Authenticator
- Episode X: Docker Registry
Identity and Access Management (IAM)
 When you run a server that offers all kinds of web-based services, and you want all these services to be protected with an authentication and authorization layer (i.e. people have to login first and then you decide what kind of stuff they can access) it makes sense to let people have only one identity (one set of credentials) that can be used everywhere. Not exactly ‘Single Sign On‘ because you may have to logon to the various parts separately but you would be using that single identity everywhere.
Slackware comes with Kerberos and OpenLDAP servers which can be used together with for instance Samba to create a Single Sign On environment on a local network. But since I am looking for something more infrastructure agnostic which works all across the Internet, I ended up with something I vaguely knew since it’s used in places in our own company to provide credential management: Keycloak.
Keycloak offers web-based Open Source Identity and Access Management (IAM). Using Keycloak, I will show you how to add authentication and authorization to the applications that I will be adding to my “Slackware Cloud Server”.
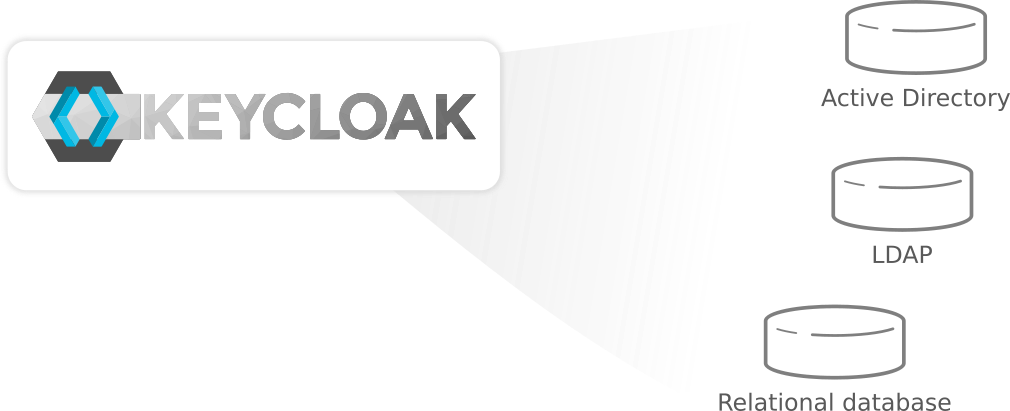
Keycloak can be used to manage your users, but if you already manage your users in an OpenLDAP server or in Active Directory, Keycloak can use these as its back-end instead of its own local SQL database.
The users of our Slackware server will authenticate with Keycloak rather than with the individual applications. Ideally, once your users have logged into Keycloak they won’t have to login again to access a different application. Likewise, Keycloak provides single-sign out, which means after a user logs out of Keycloak, that will apply to all the applications that use Keycloak.
Keycloak can also act as an Identity Broker for “social login” so that you are able to use social networks like Facebook, Google etc as Identity Providers. Our Slackware server applications that ask Keycloak to handle the user login and authorizations don’t know and don’t care about exactly how the authentication took place, as long as it’s a process the administrator trusts.
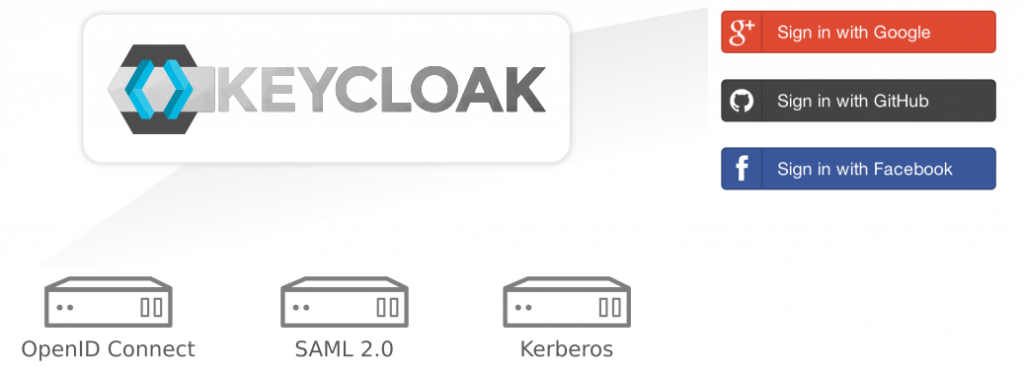
For the purposes of this article however, I will limit the use of Keycloak to authentication through OpenID Connect (OIDC) or SAML 2.0 Identity Providers. The applications I will discuss in the upcoming articles (NextCloud, Jitsi Meet, Quay, Docker Registry) all support the OIDC protocol for off-loading authentication / authorization so we’ve got that covered.
Keycloak does not only manage the identities that allow your users to login; Keycloak can also manage authorizations.
You may want to allow specific users a different level of access to your applications, or prevent access to some of them entirely. You can assign roles to users or add them to groups and then configure the access to your applications using the available roles or group memberships.
Preamble
For the sake of this instruction and for future articles in this series, “https://sso.darkstar.lan/auth” is the base URL that eventually the Keycloak application will be available at at.
Configuring the DNS for your own domain (will probably be something else than “darkstar.lan”…) with new hostnames and then setting up web servers for the hosts in that domain is an exercise left to the reader.
Before continuing, please ensure that your real-life equivalent for the following host has a web server running:
- sso.darkstar.lan
It doesn’t yet have to serve any content yet but its URL needs to be accessible to all applications and users that you want to give access to your Slackware Cloud Server. We will add some blocks of configuration to the VirtualHost definition during the steps outlined in the remainder of this article.
Using a Let’s Encrypt SSL certificate to provide encrypted connections (HTTPS) to your webserver is documented in an earlier blog article.
Setting up Keycloak
NOTE!
Starting with Keycloak 20 (released in November 2022), the WildFly based distribution is no longer supported. For the newer Quarkus distribution of Keycloak, check out the new documentation .
This article targets a pre-20 release Docker container. I will have to update the text to make it reflect the new Docker options.
Working with a Docker based server infrastructure is something I covered in the previous article of this series. I assume you have Docker up and running and are at least somewhat comfortable creating containers and managing their life-cycle.
Keycloak can be installed on a bare metal server but I have opted to go for their Docker-based install instead. The configuration will be stored in a MariaDB backend and an Apache reverse proxy will be the frontend which will handle the incoming connection requests and also enforces data encryption using a Let’s Encrypt SSL certificate.
The Keycloak github contains an example of a docker-compose solution with MariaDB and Keycloak in two separate containers (see https://github.com/keycloak/keycloak-containers/tree/master/docker-compose-examples) however the documentation states that this does not work currently because MariaDB does not start fast enough for Keycloak.
Also I think that having your database inside the container, or even mounting the host’s “/var/lib/mysql” directory into the container, will make backups difficult. So, our Keycloak application will connect to Slackware’s own included MariaDB database via the host’s IP address. There’s a paragraph further down where I share my considerations about this setup.
Here’s what we are going to do now: create the MariaDB database, create a private network for the Keycloak container so that it at least has some isolation from other containers, ensure that we have some kind of DNS service for the custom network (this example uses dnsmasq for that) and finally: start the Keycloak service as a single container, no Compose needed.
The MariaDB database
MariaDB in Slackware 15.0 is at version 10.5.13. Considering future upgrades: any security update in a stable Slackware release should not introduce breaking changes, but it’s always good to have read the MariaDB pages on database upgrades to avoid surprises. And always make backups that you have tested (are the backups useable).
Login to MariaDB as the administrator (commonly the user ‘root’):
$ mysql -uroot -p
Create the database:
> CREATE DATABASE IF NOT EXISTS keycloakdb CHARACTER SET utf8 COLLATE utf8_unicode_ci;
Create a database user for Keycloak:
> CREATE USER 'keycloakadm'@localhost IDENTIFIED BY 'your_secret_passwd';
Grant all privileges:
> GRANT ALL PRIVILEGES ON keycloakdb.* TO 'keycloakadm'@localhost;
Reload the grant tables (flush privileges) and quit the management interface:
> FLUSH PRIVILEGES;
> quit;
Network defaults in Docker
Docker claims a network range when it starts, in order to connect its containers to each other and to the real world. By default, the range is 172.17.0.0/255.255.0.0 and there is no reason to change that unless it collides with pre-existing network segments in your LAN. In that case, you would want to edit “/etc/docker/daemon.json” and add something like this to define a custom Bridge IP address and container IP range:
{
  "bip": "172.100.0.1/16",
  "fixed-cidr": "172.100.0.0/24",
}
If you would want your containers to be in yet another IP range, you could add something like:
{
  "default-address-pools": [
    {
      "base": "192.168.56.0/21",
      "size": 28
    }
  ]
}
Docker needs a restart to pick up the changes. Newly created networks will then be dynamically assigned a /28 subnet of the larger IP range “192.168.56.0/21” unless you manually specify other ranges (see below).
Private network for Keycloak
We create a Docker network “keycloak0.lan” just for Keycloak, and make it use a different IP range than Docker’s default. Otherwise it would share its network with the rest of the containers and we want to create some level of real containment, as well as the ability to assign the Keycloak container a fixed IP address.
We need a fixed IP address in order to assign a hostname on the host so that Sendmail allows emails to be sent from within the container. Otherwise we would get ‘Relaying denied: ip name lookup failed” error from Sendmail.
Summarizing: the “keycloak0.lan” network will have a range of 172.19.0.0/16; and the fixed IP address for the Keycloak service will be 172.19.0.2 (since 172.19.0.1 will be the IP address of the Docker bridge).
$ docker network create --driver=bridge --subnet=172.19.0.0/16 --ip-range=172.19.0.0/25 --gateway=172.19.0.1 keycloak0.lan
Add host and network to /etc/hosts and /etc/networks:
$ grep keycloak /etc/hosts

172.19.0.2 keycloak keycloak.keycloak0.lan

$ grep keycloak /etc/networks

keycloak0.lan 172.19
My assumption is that your host does not act as the LAN’s DNS server. We will use dnsmasq to serve our new entries from /etc/hosts and /etc/networks – dnsmasq will be our local nameserver. For this we use the default, unchanged “/etc/dnsmasq.conf” configuration file.
You will also have to add this single line at the top of “/etc/resolv.conf” first, so that all DNS queries will go to our local dnsmasq:
nameserver 127.0.0.1
If you have not yet done so, (as root) make “/etc/rc.d/rc.dnsmasq” executable and start dnsmasq manually (Slackware will take care of starting it on every subsequent reboot):
# chmod +x /etc/rc.d/rc.dnsmasq

# /etc/rc.d/rc.dnsmasq start
Make Sendmail aware that the Keycloak container is a known local host by adding a line to “/etc/mail/local-host-names” and restarting the sendmail daemon:
$ grep keycloak /etc/mail/local-host-names

keycloak.keycloak0.lan
If you use Postfix instead of Sendmail, perhaps this is not even an issue, but since I do not use Postfix I cannot tell you. Leave your comments below if I should update this part of the article.
MariaDB access from the network
Since our Keycloak container will connect to the MariaDB server over the network, we need to grant the Keycloak database account access to the database when it logs in from the network instead of via the localhost.
Login to ‘mysql’ as the admin (root) user and execute these commands that come on top of the ones that we already executed earlier:
> CREATE USER 'keycloakadm'@'%' IDENTIFIED BY 'your_secret_passwd';

> GRANT ALL PRIVILEGES ON keycloakdb.* TO 'keycloakadm'@'%';

> FLUSH PRIVILEGES;

> quit;
Keycloak container
We use a Docker container to run this IAM service. Remember that containers do not persist their data. In our case it means that the complete configuration which is needed by the Keycloak application inside that container in order to start up properly, has to be passed as command-line parameters to the ‘docker run‘ command.
This is how we start the Keycloak container, connecting it to the newly created network, assigning a static IP, using the ‘keycloak.lan‘ network gateway as the IP address for the MariaDB and passing it the required database properties.
By default, Keycloak listens at port “8080” but that is a portnumber which is (ab)used by many applications including proxy servers. Instead of accepting the default “8080” value we do a port-mapping and make Keycloak available at port “8400” instead by using the “-p” argument to ‘docker run‘.
We also pass the front-end URL which is going to be used by every application that wants to interact with the service (https://sso.darkstar.lan/auth). This URL is actually served by a Apache httpd reverse-proxy which we will put between the exposed port of the Keycloak container and the rest of the world:
$ mkdir -p /usr/share/docker/data/keycloak
$ cd /usr/share/docker/data/keycloak
$ echo 'keycloakadm' > keycloak.dbuser
$ echo 'your_secret_passwd' > keycloak.dbpassword
$ docker run -d --restart always -p 8400:8080 --name keycloak \
    --net keycloak0.lan \
    --network-alias keycloak.keycloak0.lan \
    --ip 172.19.0.2 \
    -e DB_VENDOR=mariadb \
    -e DB_ADDR=172.19.0.1 \
    -e DB_DATABASE=keycloakdb \
    -e DB_USER_FILE=$(pwd)/keycloak.dbuser \
    -e DB_PASSWORD_FILE=$(pwd)/keycloak.dbpassword \
    -e KEYCLOAK_FRONTEND_URL=https://sso.darkstar.lan/auth \
    -e PROXY_ADDRESS_FORWARDING=true \
    jboss/keycloak \
    -Dkeycloak.profile.feature.docker=enabled
That last argument ‘-Dkeycloak.profile.feature.docker=enabled‘ enables the “docker-v2” protocol in Keycloak for creating a Client in the realm. A Keycloak ‘Client ID‘ is what we need to connect an application to Keycloak as the login provider. This is a topic we will visit in future Episodes.
This ‘docker-v2‘ protocol is not fully compatible with the default OIDC protocol ‘openid-connect‘ and while not enabled in Keycloak by default, it is an officially supported Client Protocol.
We need ‘docker-v2‘ when we want the Docker Registry to be able to use Keycloak for authentication / authorization (the topic of Episode 6 in our Series).
A note about the Keycloak service URL (
https://sso.darkstar.lan/auth). In this example I use a hostname “sso.darkstar.lan” but you will have to pick a name which fits your own network. This hostname will be used a lot and visible everywhere, so if you are paranoid and want to avoid people realizing that your “sso.” host is the key to all user-credentials, you might want to chose a more inconspicuous name like “pasture.darkstar.lan“. YMMV.
Also, the path component “/auth” in the URL is fixed and immutable, unless you want to hurt yourself. I tried to change that path component to something that made more sense to me but that “/auth” is so ubiquitous as hard-coded strings throughout the code that I quickly gave up.
Remember that our Keycloak container listens at the non-default TCP port 8400 on the docker0 interface, which we will use for the reverse proxy setup later on.
MariaDB considerations during Keycloak setup
At first, I tried with mounting the host’s MariaDB server socket in the Keycloak container and accessing the database through it via the ‘localhost’ target like below:
-e DB_ADDR=localhost -v /var/run/mysql/mysql.sock:/var/run/mysql/mysql.sock
…but JBoss would not be able to connect for whatever reason, and the resulting error was ‘connection refused‘.
I have tried various locations for the UNIX socket inside the container:
/var/run/mysql/mysql.sock

/var/run/mysqld/mysql.sock

/var/run/mysqld/mysqld.sock

/tmp/mysql.sock
… but none of those worked either.
Eventually I had to make MariaDB listen on all interfaces and rely on my firewall to block external access, for instance using:
# iptables -A INPUT -s 172.19.0.2 -p tcp --destination-port 3306 -j ACCEPT
This is the relevant MariaDB configuration line:
$ grep bind-address /etc/my.cnf.d/server.cnf

bind-address=0.0.0.0
If you have a better solution let me know! Of course, the easy way out of this dilemma is to deploy Keycloak using Docker Compose and give it its own internal database, but we need to be 100% sure that the SQL database server is up & running before we start the Keycloak container as part of the Docker infrastructure in “/etc/rc.d/rc.local“.
Also, my goal was to have a single SQL server on my host that would be the backend database for every application that needs one. A lot easier to backup and restore.
The admin user
Create the admin user once the container is running or else you won’t be able to connect at all (use ‘docker ps’ to find the containerID), and restart the container after that, but WAIT AFTER THAT RESTART LONG ENOUGH FOR THE INITIAL CONFIGURATION TO FINISH… or you’ll end up with Keycloak trying to initialize MariaDB twice, resulting in errors and failure.
This is how you run the command to create the admin user on the host, to be executed inside the running container:
$ containerID=$(docker ps -qaf "name=^keycloak$")

$ docker exec <containerID> /opt/jboss/keycloak/bin/add-user-keycloak.sh -u admin -p your_secret_admin_pwd

$ docker restart <containerID>
Write that password down in a safe place and remove that command-line from your Bash history! It is the key to the Realm. Literally.
Reverse proxy setup for keycloak
In your Apache configuration for the “sso.darkstar.lan” host you need to add these lines to create a reverse proxy that connects the client users of your Keycloak service to the service endpoint:
SSLProxyEngine On
SSLProxyCheckPeerCN on
SSLProxyCheckPeerExpire on
RequestHeader set X-Forwarded-Proto: "https"
RequestHeader set X-Forwarded-Port: "443"
<LocationMatch /auth>
    AllowOverride None
    Require all granted
    Order allow,deny
    Allow from all
</LocationMatch>
ProxyPreserveHost On
ProxyRequests Off
ProxyVia on
ProxyAddHeaders On
ProxyPass        /auth http://127.0.0.1:8400/auth
ProxyPassReverse /auth http://127.0.0.1:8400/auth
Restart Apache httpd after making this change.
Initial configuration of Keycloak
Now that Keycloak is up and running behind a reverse proxy and interfaces with the world via the URL https://sso.darkstar.lan/auth , and has an admin account, we are going to create a “realm“. A realm is a space where the administrator manages identifiable objects, like users, applications, roles, and groups. A user belongs to only one realm and will always login to that realm.
Our realm will be named “foundation“. Here we go:
- Point your browser at https://sso.darkstar.lan/auth/
- Add a new Realm:
- Click to open Admin Console (https://sso.darkstar.lan/auth/admin).
- Logon with above configured ‘admin’ credentials.
- Hover the mouse over the ‘Master‘ dropdown in the top-left corner.
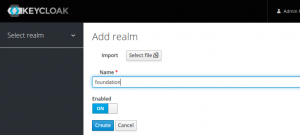
- Click ‘Add realm‘, enter Name: “
foundation“. - Click ‘Create‘, add a Display name “
My Cloud Foundation” (pick any name you like), click ‘Save‘.
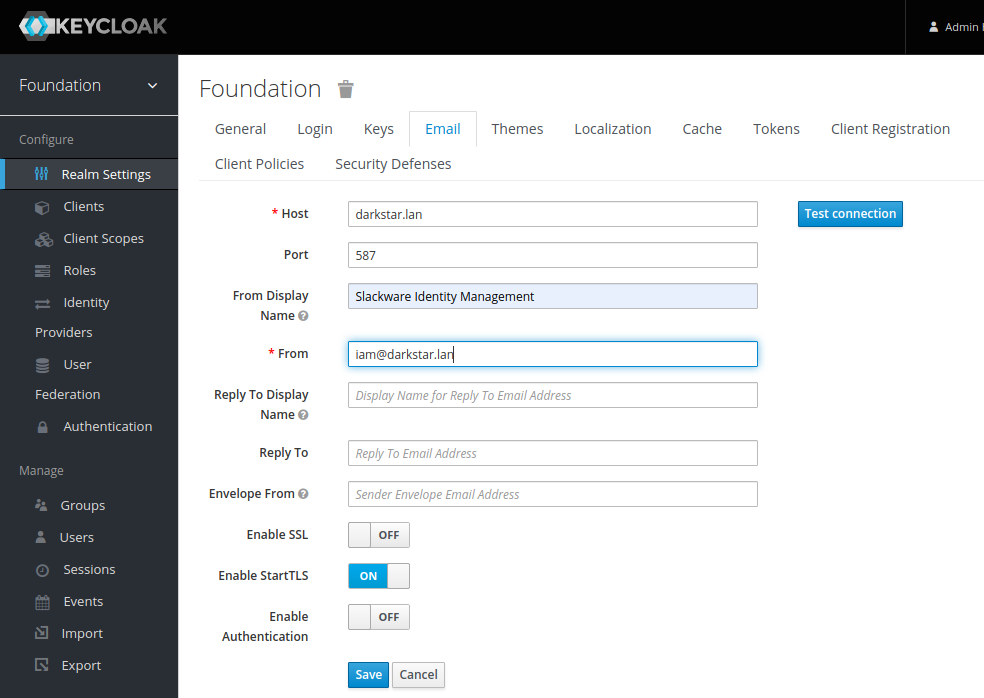
- (Optionally) configure email via SMTP:
- Click ‘Email‘ (top of the page).
- Enter your LAN’s SMTP server, the SMTP port (587 if you enable StartTLS at the bottom), and a reasonable ‘From‘ email address.
- (Optionally) configure other parameters specific to your setup.
- Click ‘Test Connection‘.
- If your Keycloak container could successfully connect to the SMTP server, click ‘Save‘ and now Keycloak will be able to send you relevant emails, provided that you configured a working email address for the admin user of course.

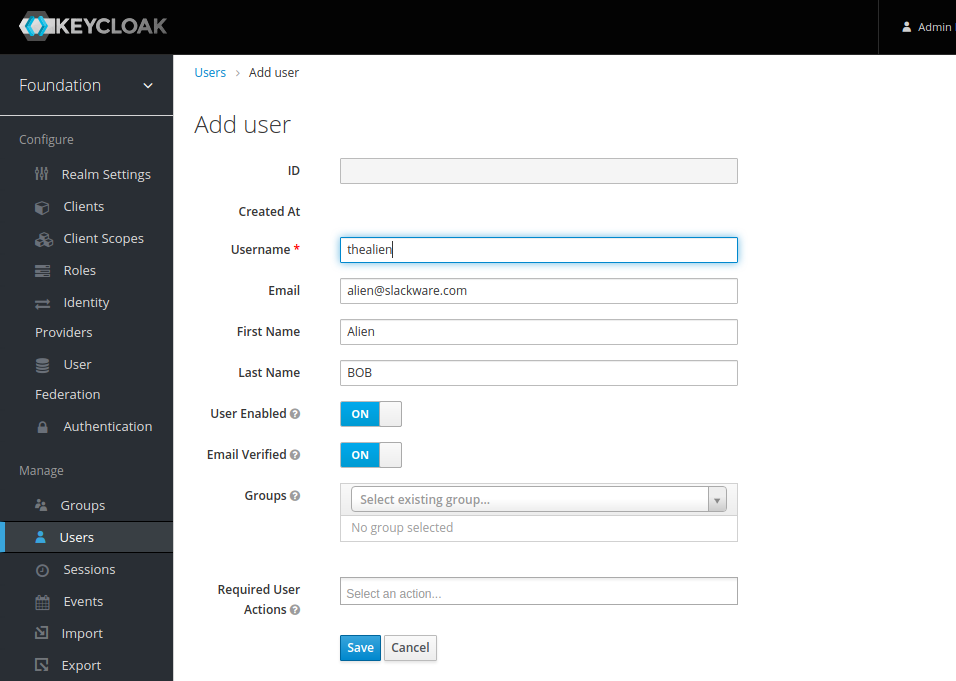
- Add a first user:
- Click ‘Users‘ (left-hand menu) > ‘Add user’ (top-right corner of table)
- Add user “
alien” with full-name “Alien BOB” (of course, use whatever makes sense for you).

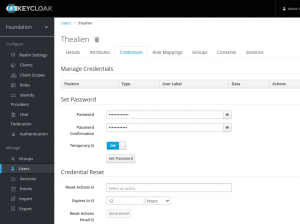
- Set initial password to be able to login:
- Click ‘Credentials‘ (top of the page).
- Fill in ‘Set Password‘ form with a password like “WelcomeBOB!”.
- (Optionally) click ‘ON‘ next to ‘Temporary‘ so that it toggles to ‘OFF‘. This removes the requirement for the user to update password on first login.
- Click ‘Set password‘.
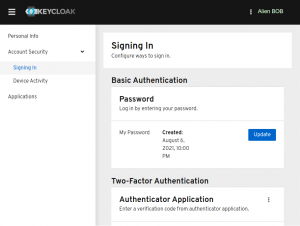
- Test the new user login in a different browser (or logoff the admin user first):
- Open User Console: https://sso.darkstar.lan/auth/realms/foundation/account
- Login as ‘
alien‘ and you’ll see the message: “You need to change your password to activate your account.“ - Set a new (permanent) password and explore the configurable user profile settings, for instance enabling 2-Factor Authentication (2FA) using an app like Authy or Google Authenticator.


Considerations
Your keycloak is now running at https://sso.darkstar.lan/auth and the user login-page for the “Foundation” realm is at https://sso.darkstar.lan/auth/realms/foundation/account . That URL is nowhere to be found easily, so if you don’t know it is there (or if you don’t know about Keycloak’s URL path template) then users may complain about not finding it.
On the one hand, this adds some “security through obscurity” if you’re the paranoid type.
Plus, Keycloak will redirect users to the correct login page anyway when an application asks for a credential check.
On the other hand, you want to give your server’s users a nice experience.
As a courtesy to your users, you could consider adding a HTML redirect to the root of that server. Assuming that https://sso.darkstar.lan/ just serves an empty page or spits out a “page not found” error, you could paste the following HTML snippet into an ‘index.html‘ file in the DocumentRoot directory, which will cause an immediate redirect from the URL root to the user login page for the “foundation” realm:
 <html>
  <head>
    <title>Slackware Cloud Server Logon</title>
    <meta http-equiv="refresh" content="0; URL="https://sso.darkstar.lan/auth/realms/foundation/account">
  </head>
  <body bgcolor="#ffffff"></body>
</html>
Keycloak discovery
In the previous section I mentioned that it is not trivial for users to discover the URL of their Keycloak profile page. But how do applications do this when they want to interact with Keycloak?
OpenID Connect Discovery is a layer on top of OAuth 2.0 protocol which allows a client application not only to authenticate a user but also to obtain certain user characteristics (called “claims” in OAuth2.0) like full name or email address. To obtain these claims, the client application connects to a well-known URL where it can find out which claims are supported.
Keycloak supports this OpenID Connect Discovery and provides a Discovery URL at “/auth/realms/<realm>/.well-known/openid-configuration”. For our Keycloak server, that will be:
https://sso.darkstar.lan/auth/realms/foundation/.well-known/openid-configuration
You can query this URL for instance via the ‘curl’ program and if you also have the ‘jq‘ program installed from my repository you can generate nicely formatted human-readable colorized output:
$ curl https://sso.darkstar.lan/auth/realms/foundation/.well-known/openid-configuration | jq
The output of that command is lengthy but it starts with:
 % Total    % Received % Xferd  Average Speed   Time    Time     Time  Current
                                Dload  Upload   Total   Spent    Left  Speed
100  5749  100  5749    0     0  41485      0 --:--:-- --:--:-- --:--:-- 41659
{
 "issuer": "https://sso.darkstar.lan/auth/realms/foundation",
 "authorization_endpoint": "https://sso.darkstar.lan/auth/realms/foundation/protocol/openid-connect/auth",
 "token_endpoint": "https://sso.darkstar.lan/auth/realms/foundation/protocol/openid-connect/token",
 "introspection_endpoint": "https://sso.darkstar.lan/auth/realms/foundation/protocol/openid-connect/token/introspect",
 "userinfo_endpoint": "https://sso.darkstar.lan/auth/realms/foundation/protocol/openid-connect/userinfo",
 "end_session_endpoint": "https://sso.darkstar.lan/auth/realms/foundation/protocol/openid-connect/logout",
 "frontchannel_logout_session_supported": true, foundation
 "frontchannel_logout_supported": true,
 "jwks_uri": "https://sso.darkstar.lan/auth/realms/foundation/protocol/openid-connect/certs",
 "check_session_iframe": "https://sso.darkstar.lan/auth/realms/foundation/protocol/openid-connect/login-status-iframe.html"
,
 "grant_types_supported": [
  ........
We will be able to use this Discovery protocol when setting up an Etherpad container in Episode 6.
Done
We are now ready to use Keycloak as IAM service for other applications that are waiting for us to install and configure. This setup is secure by default, but I do invite you to read more about the advanced configuration of Keycloak, they have extensive documentation at https://www.keycloak.org/documentation . For instance, do you want new users to be able to register themselves? Allow them to configure 2-Factor Authentication? Update their profile? Force password expiry? Custom password complexity configuration?
You may want to add groups to the realm and not just users, and limit the use of certain applications to specific groups (you may not want to let everyone use the Jitsi video conferencing platform for instance).
If your network already manages its users in an Identity provider like LDAP or Kerberos, Active Directory or eDirectory, or if you want to allow people to use their Google, Facebook etc identities to authenticate against your Keycloak, you should look into the functionality behind ‘Identity Providers’ in the left sidebar:
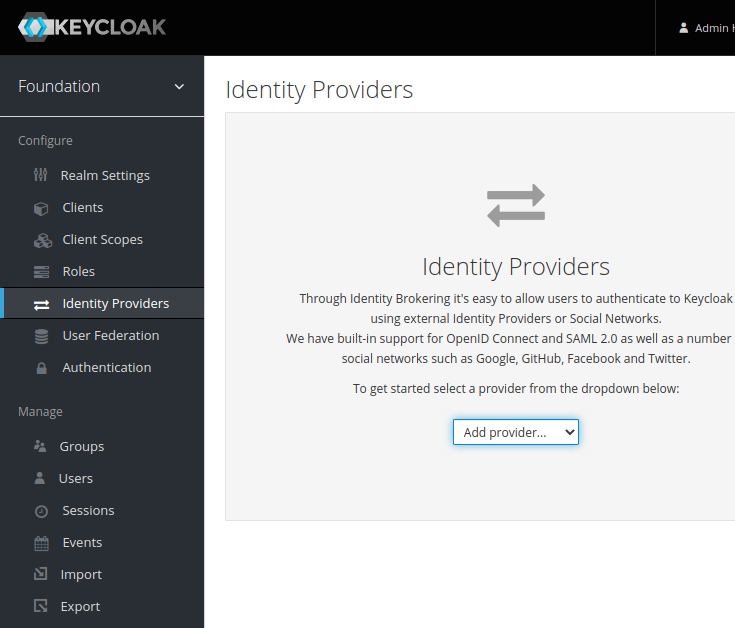
In that case, Keycloak will not store user identity information in its MariaDB database but instead use these Identity Providers as the remote backend.
Thanks
I hope you made it this far… and you liked it. Leave your comments, encouragements, fixes and general feedback in the section below.
Cheers, Eric
Attribution
Keycloak architecture images have been taken from the keycloak.org/documentation web site. The remainder are screenshots taken from my own Keycloak instance.
Recent comments