My thoughts on Slackware, life and everything

Month: November 2017 (Page 1 of 2)

Live ISOs for Slackware-current 20171122

blueSW-64pxI have released an update of the ‘liveslak‘ scripts. I needed the tag for a batch of new ISO images for the Slackware Live Edition. These are based on the latest Slackware-current dated “Wed Nov 22 05:27:06 UTC 2017“) i.e. yesterday and that means, the ISOs are going to boot into the new 4.14.1 kernel.

The new liveslak version 1.1.9.3 has a few updates. Most are not worth mentioning but these are:

  • CACert root certificates are added to the OS so that you can visit the upcoming blog.alienbase.nl securely without nasty warnings about untrusted certificates.
  • The PLASMA5 ISO image features Wayland support. You can login to a regular X.Org Plasma5 session but you can also choose the “Plasma – Wayland” session from the SDDM dropdown menu. In order to keep the ISO size below the DVD medium maximum size, I had to leave the optional ‘wine’ module out of the ISO. You can still download the wine module from the ‘bonus‘ location.
    FYI, this was the command to generate that PLASMA5 ISO:

    # ./make_slackware_live.sh -d PLASMA5 -m plasma5wayland -M -X

If you already use a Slackware Live USB stick that you do not want to re-format, you should use the “-r” parameter to the “iso2usb.sh” script. The “-r” or refresh parameter allows you to refresh the liveslak files on your USB stick without touching your custom content. If you want to modify other parameters of your USB stick, use the script “upslak.sh“. It’s main feature is that it can update the kernel on the USB stick, but it also can replace the Live init script. As with most (if not all) of my scripts, use the “-h” parameter to get help on its functionality.

More detail about the features of Slackware Live Edition can be found in previous posts here on the blog.

Have fun!

Slackware Plasma5 updates for November

I have uploaded my November ’17 set of Plasma 5 packages for Slackware 14.2 and -current. KDE 5_17.11 contains: KDE Frameworks 5.40.0, Plasma 5.11.3 and Applications 17.08.3. All based on Qt 5.9.2 for Slackware-current and Qt 5.7.1 for Slackware 14.2.
For Slackware -current there’s again a choice of ‘latest‘ and ‘testing‘ where the ‘testing’ repository contains 17 recompiled packages that provide a Wayland compositor stack. This means you have a working Plasma5 Wayland session if you use ‘testing‘ as opposed to ‘latest‘.
The ‘testing‘ repository is for… testing. Do not use those packages on a production environment unless you are familiar with Slackware, debugging graphical sessions and know your way around slackpkg/slackpkg+.
NOTE: I will no longer be releasing Plasma 5 packages for 32bit Slackware 14.2.

The Applications 17.08.3 release which is part of this November package set, will be the last that contains software based on the old kdelibs (aka KDE4). Any application which has not been ported to KDE Frameworks 5 (KF5) yet will be removed from the Applications collection. Starting with Applications 17.12.0 we should have a legacy-free Plasma5 desktop. If anything, this would be a nice moment to add Plasma5 to Slackware-current and say goodbye to KDE4. We’ll have to wait and see what Patrick thinks of this. Looking at recent updates in -current (the ‘etc‘ ‘network-scripts‘ and ‘pkgtools‘ package versions were changed from “14.2” to “15.0”) I would hazard a guess that we are past the mid-point of the current development cycle 😉
I am really looking forward to getting Plasma5 into Slackware proper. It will allow me to cut loose from the monthly time-consuming update cycles and concentrate on creating an add-on repository for Slackware’s Plasma5 – containing speech synthesis, Wayland of course, and all the esoteric stuff I added to Plasma5 over time which will be scrapped by Patrick (I am thinking of Digikam for instance).

What’s new in the November release

Nothing world-shaking this month. All KDE sofware updates are meant to improve stability and usability. I did add two packages to ‘kde/applications-extra‘ however: both kaudiocreator and kwebkitpart have KF5 ports that are about ready for production, so I thought it would be good to give them a spin on Slackware. Now there are only two packages left from Slackware’s old KDE4 that you may want to install: Amarok (for which a KF5 port is also in the works) and KPlayer (which seems dead in the water, but instead you can try QMLPlayer from the ‘qtav‘ package in my ‘ktown‘ repository).
I also updated PyQt5 in the ‘deps ‘ directory and it has picked up Python3 support (in the slackware-current package at least).

Installing or upgrading Frameworks 5, Plasma 5 and Applications

As always, the accompanying README file contains full installation & upgrade instructions. I have some further reading material in case you are interested in the Wayland functionality of the ‘testing’ repository: README.testing.

Recommended reading material

There have been several posts now about KDE 5 for Slackware-current. All of them contain useful information, tips and gotchas. If you want to read them, here they are: http://alien.slackbook.org/blog/tag/kde5/

Where to get the new packages for Plasma 5

Package download locations are listed below (you will find the sources in ./source/latest/ and packages in /current/latest/ ,  /14.2/latest/ and /current/testing/ subdirectories). Only “bear” has the packages for now, the mirrors should follow within 24 hours. If you are interested in the development of KDE 5 for Slackware, you can peek at my git repository too.

Live ISO of PLASMA5

A new Plasma5 Live ISO image will be uploaded to http://bear.alienbase.nl/mirrors/slackware-live/latest/ later this week, in case you want to try the new Plasma5 desktop out first in a non-destructive way.

Have fun! Eric

Alien Pastures is moving soon

The URL for my blog is going to change.

I need to have full control over my content. At this moment I do not own the server my blog is running on, and I do not own the domain.
To prevent running into weird situations down the road – for whatever reasons – the blog will move from its current location to https://blog.alienbase.nl/ soon.
I will of course configure an automatic redirect from the current to the new URL to ease the transition.

The current url (alien.slackbook.org/blog) may not be available forever after the migration, so it is best is if you already bookmark the new URL – a placeholder page is waiting there.

If your browser complains about not trusting the CaCert organization then follow the steps outlined in a previous article “adding CaCert root certificates to your Slackware” to silence these warnings.

Brabantse worstenbroodjes – take two

A year ago, I already wrote a lengthy article about Brabantse worstenbroodjes or dutch sausage rolls as you would call them in english. They are a regional delicacy in the area where I live, and have a unique flavor due to use of freshly ground nutmeg and a sizable amount of white pepper. You can read that older blog article with the recipe and the historical background here. So why am I re-visiting the subject of baking these Brabantse worstenbroodjes?

Brabantse worstenbroodjes

Brabantse worstenbroodjes

The biggest issue I had with then was that half of the bread rolls would inevitably tear in the oven and the meat juices would flow out, leaving a less pretty impression to the end product and causing the meat inside to dry out. So when I promised my team at work to return from holiday with a bunch of home-baked sausage rolls, I had to dive into online information about what causes this bread dough tearing in the oven.
And that resulted in a slightly altered recipe. In particular, the proofing stages for the dough are altered significantly. When following the below steps, the resulting bread rolls come out of the oven intact and with the meat nicely cooked in its own juices.

What are the basic premises for prevention of tearing the dough while baking in the oven?

  1. The dough should be supple by adding sufficient moist ingredients (water, butter): at least 60-65% of the flour content.
  2. Allow sufficient time between the creation of dough balls (which tightens the gluten framework) and flattening/rolling them out (for which the gluten should be in a relaxed state).
  3. Allow sufficient time for the second proofing stage (after the meat sausage has been rolled into the dough): at least 60 minutes. This again relaxes the gluten.
  4. Introduce steam into the oven while baking, at least for the first 5 minutes.

Keeping this in mind, the original recipe changed into this:

Ingredients:

Make and bake 30 sausage rolls of 70 grams each (35 gr dough and 35 gr sausage).

Dough:

  • 650 gr flour
  • 12 gr salt
  • 24 gr sugar
  • 185 gr water (lukewarm)
  • 185 gr milk (lukewarm)
  • 12 gr fast-action yeast (or 35 gr fresh yeast)
  • 55 gr butter (softened)

Saugages:

  • 1000 gr mincemeat (traditionally a mix of beef and pork but I use 100% beef)
  • 1 large egg
  • 25 gr breadcrumb
  • 25 gr spice mix

Spice mix (together will be ~ 25 gr):

  • 1 tsp salt
  • 2 tsp nutmeg powder (freshly ground from the nut gives the best flavour)
  • 2 tsp white pepper
  • 1 tsp paprika powder
  • 1 tsp onion powder
  • 1 tsp ginger powder
  • 1 tsp coriander powder
  • 1 tsp garlic powder
  • 1 tsp mustard powder

Instructies:

  • Combine the water and the milk and heat until lukewarm. Heat the butter until it is soft but not yet molten.
  • Mix the flour with the water and the milk. Don’t knead yet, combining the ingredients into a shaggy mix is sufficient. Leave the mix alone for 30 minutes to allow the flour to incorporate the moisture. This process is called autolyse.
  • While you wait for the autolyse, proceed with the meat. Mix the breadcrumb, spices and egg through the mincemeat. Divide into 30 portions of 35 grams. Roll each portion into a sausage of appr. 10 centimeters long. Coat the sausages lightly with flour by rolling them through a bit of flour you’ve spread on your work surface. This will prevent them from sticking together. Stack the sausages on a plate, cover with clingfilm and place them in your fridge to cool while you continue with the dough.
  • After the autolyse, add the remaining ingredients for the dough to the mix of flour and water/milk. Avoid direct contact between the yeast and the salt before you start mixing the ingredients: salt inhibits the yeast.
  • Knead for at least 10 minutes to achieve a supple dough.
  • Cover a baking tray with clingfilm. Divide the dough into 30 pieces of 35 grams and roll each into a tight ball. Place the balls on the baking tray and allow for some distance between them because they will increase in volume during the proofing stage. Cover with clingfilm and place them in a warm moist place for 20-30 minutes. I use my oven for that: heat the oven on its lowest setting for just 2 minutes, turn the heat off, place a shallow tray containing hot water on the oven floor, place the baking tray into the oven and close the door.
  • Take the proofed dough balls out of the oven. Spread some flour on your work area. Using a small rolling pin, flatten the pieces of dough into oval shapes with their long sides being about the same size as the sausages’ length. The bit of flour that covers the ovals will prevent them sticking together when you stack them.
  • Remove the clingfilm from the backing tray and cover it with parchment paper instead.
  • Now we can create the bread roll by combining dough and meat.
    Take an oval dough piece. Place a sausage roll on top. Fold the short ends of the oval over the ends of the sausage by stretching the dough a little. Grab one of the long sides of the oval and move it over the sausage so that it meets the other long side. Take care not to stretch the dough to much. Pinch the seam with your fingers. Take care to keep your fingers clean: the fat of the meat will prevent the seam to close properly so keep a small bowl of clean water nearby (for your fingers of course). Check this or this video for visual instructions.
  • Roll the sausage roll under your two flattened hands to make the seam disappear and seal the meat into the dough completely. Place the bread roll on the parchment paper with the seam on the bottom. This will prevent the bread to split open at the seam when you bake it.
  • Create the remainder of the bread rolls the same way. Keep some distance between the rolls on the baking tray because they will increase in volume while resting.
  • Cover the rolls with clingfilm to prevent the dough from drying out. Give the rolls a second proofing of at least 60 minutes in a warm moist place. Start the proofing in the oven like I described before. You will then have to find another place 30 minutes before you want to start baking (on top of your oven will be OK).
  • Heat your oven to 230° Celsius. Place the baking tray with the bread rolls just below the middle of the oven. Introduce some steam into the oven by spraying water into the oven or pouring some water in a metal tray on the oven floor. Optionally let the steam escape after 5 to 10 minutes of baking, by briefly opening the oven door. Caution! The steam is hot!
  • If the bread rolls are coloring too fast, you can reduce the oven temperature with 20 degrees. Total baking time is 12-15 minutes, depending on the oven and the thickness of the rolls. The meat inside must cook sufficiently long. The top of the bread rolls must be colored light-brown.
    Bigger bread rolls (70 gr dough, 70 gr meat) must bake for 20 minutes.

Let the worstenbroodjes cool for 30 minutes before eating them. They will still taste fine when completely cold but you can heat them again in the oven, at 170° Celsius for 8 minutes.

Optionally they can be frozen if you can’t eat them all at once. Heat frozen worstenbroodjes up again in an oven at 170° Celsius for 13 minutes.

LibreOffice 5.4.3 packages available

libreoffce_logoThe Document Foundation released the third update for LibreOffice 5.4 last week, as you can read on their blog where they write about the new LibreOffice 5.4.3 . My manic-depressive mood-swings are on the manic side at the moment so next to baking sausage rolls (brabantse worstenbroodjes for which I will publish an updated recipe on this blog soon) and a batch of sourdough bread, I finally had the energy to fix the admin interface for the SlackDocs mailing lists, wrestled myself through 14,000+ emails in my administrative mailboxes, wrote a plan to migrate my LAN services from the ageing server to the new server I bought this summer (which involves conversion of several large databases to InnoDB and loads of custom packages), plus I binge-watched almost 2 full seasons of Stranger Things in 3 days’ time. I know I will crash hard in a couple of days but I hope to have a new Plasma ‘ktown’ update before that happens.

Back to the topic: the LibreOffice 5.4 release notes contain full detail about its features:  https://wiki.documentfoundation.org/ReleaseNotes/5.4. Note that the developers state that “LibreOffice 5.4.3 continues to represent the bleeding edge in term of features, and as such is targeted at technology enthusiasts and early adopters” and I think that describes us Slackware users well enough 🙂
Their advice for more conservative users is to stick to the 5.3 releases but I am no longer compiling packages for that.


In any case, thanks to the 16 cores on my build server it did not take all that much time to generate packages for Slackware 14.2 and -current.
When I tried the new programs on my laptop (which is running Plasma5) I noticed that the default User Interface for LibreOffice causes rendering issues. Also, my Plasma5 destop is configured to move application menus out of the application window into a button in the window’s top bar. That setting is apparently not compatible with the default User Interface and it caused the loss of the LibreOffice menu.
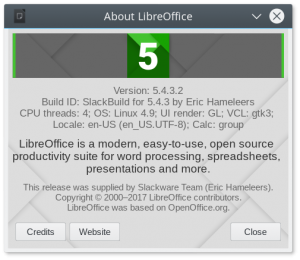
I could fix these issues by editing the profile script “/etc/profile.d/libreoffice.sh” and un-commenting the line “export SAL_USE_VCLPLUGIN=gtk3” to force LibreOffice to use GTK+3 as the widget set.

The libreoffice packages for Slackware can be downloaded from any mirror like this one: http://bear.alienbase.nl/mirrors/people/alien/slackbuilds/libreoffice/.

Have fun! Eric

« Older posts

© 2024 Alien Pastures

Theme by Anders NorenUp ↑