My thoughts on Slackware, life and everything

Month: November 2015 (Page 1 of 3)

Slackware Live Edition – Beta 2

blueSW-64pxThanks for all the valuable feedback on the first public beta of my Slackware Live Edition. It allowed me to fix quite a few bugs in the Live scripts (thanks again!), add new functionality (requested by you or from my own TODO) and I took the opportunity to fix the packages in my Plasma 5 repository so that its Live Edition should actually work now.

What is Slackware Live Edition?

If you’re new here: Slackware Live Edition is a “live OS” meaning it does not have to be installed to a harddrive and can run straight off a CDROM or DVD medium, or off a USB stick. Slackware Live Edition is meant to showcase the development of Slackware. Therefore it will boot slackware-current and no other OS. It is meant as an ideal opportunity for people who are curious what two years of Slackware development have resulted in. You do not have to erase your current OS, just copy the ISO to a suitable medium, boot from the medium and check it out. The previous article I wrote explains in more detail why I wanted to write my own Live scripts instead of just using one of the available solutions.

What’s with these three ISO’s?

Slackware Live Edition comes in three flavors (for now). There’s a 700 MB slimmed-down XFCE version with XDM as the graphical login manager; then there is the actual complete Slackware-current with KDE4 and using KDM as the graphical login manager (2.6 GB in size); and finally you can download a 3.0 GB ISO image of Slackware-current with Plasma 5 and the SDDM graphical login manager. The Plasma 5 edition has some cool extras like vlc, libreoffice, calibre, qbittorrent ffmpeg, chromium, openjdk, veracrypt… and more from my own repository.

slackwarelive_syslinux_beta2

How do I use the ISO?

The ISO can be burnt to a DVD (XFCE version will fit on CDROM even) or copied to USB stick. Since the ISOs are ‘hybrid’ just copying to the USB device using ‘dd’ or ‘cp’ will get you a fully functional bootable medium, albeit without persistence (it’s still technically a read-only CDROM filesystem that you’ve copied to the USB stick). The OS will not be bothered by this, because it thinks it can write to the filesystem. That is the trick of a Live OS – all these write operations are done to a RAM based filesystem. The changes are gone once you reboot.

But when using the ‘iso2usb.sh‘ script you can create a real Live OS on the USB device with persistence, meaning that the things you change will be preserved across reboots. All your modifications will be stored in the directory “persistency” in the root of the USB device. Therefore you are actually able to use the USB stick as your pocket-OS on the go:

# ./iso2usb.sh -i ~/Download/slackware64-live-current.iso -o /dev/sdX

… where /dev/sdX is the device name of your USB stick. Don’t worry about accidentally overwriting the content of your hard drive – the script will first show you details about the sdX device and wants your confirmation that this is actually the device you want to reformat.

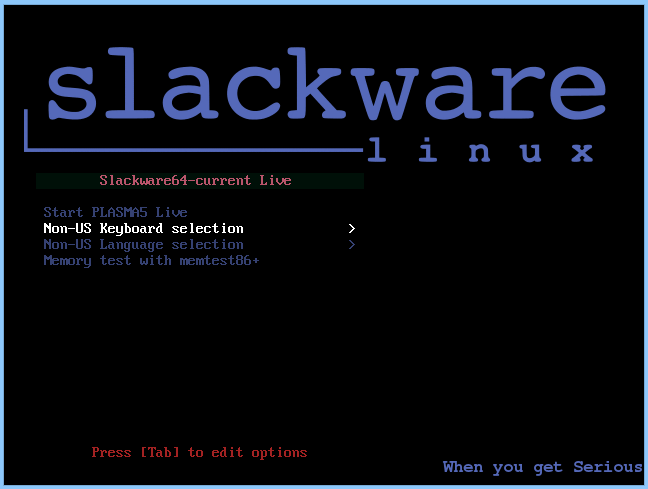
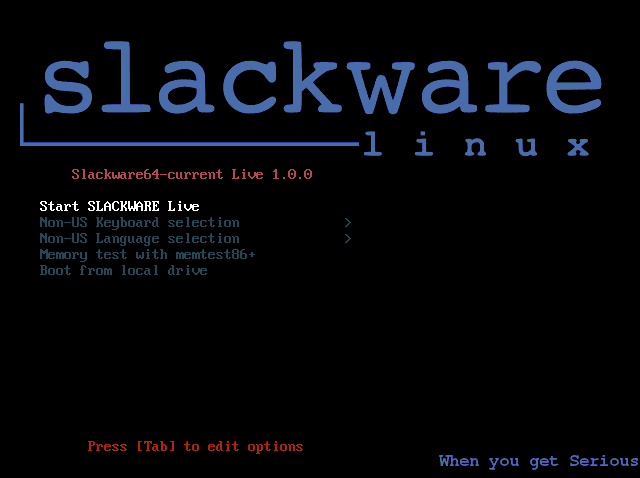
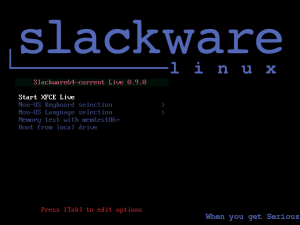
When you boot Slackware Live you will be presented with a Syslinux boot menu:

  • Start (SLACKWARE | PLASMA5 | XFCE) Live (depending on which of the three ISOs you boot)
  • Non-US Keyboard selection
  • Non-US Language selection
  • Memory test with memtest86+

The first entry boots you straight into the Live OS, using US keyboard mapping and a “en_US.utf8” locale. If you have a non-US keyboard layout and/or want your Linux to show itself in a non-US Language, you can use the second and third menu entries to configure one of the languages I selected ( I picked what I thought were the most commonly used). If your language or keyboard is not listed, just hit the <TAB> key and change the values for the “kbd” and “locale” parameters. Likewise for the timezone parameter which by default is associated with your choice of language.

The memtest option was copied from the Slackware installer – it allows you to test your RAM sticks for hardware errors very thoroughly.

More parameters

The syslinux boot menu allows you to modify the boot command line. Press <TAB> to edit the command line. You will see several parameters you can edit but you can also add more. The <F2> key will show a couple of those.

  • 0|1|2|3|4|5|6|S|s|single (Select another runlevel to start with; the default is  4 for graphical login)
  • lang=nl_NL kbd=nl tz=Europe/Amsterdam (Example of language, keyboard and/or timezone customization)
  • nop (No persistence, i.e. boot the virgin installation)
  • nomodeset (Boot with kernel mode setting for graphics — needed with some machines)
  • load=nvidia (Load and configure binary Nvidia drivers that are present in the ISO)
  • rootdelay=10 (Add 10 second delay to allow proper USB initialization)

But there are some others, and some of these have been added after readers of this blog suggested them:

  • hostname=aliens (Change the hostname for the OS; default hostname is “darkstar“)
  • livepw=”somestring” (Change the password for the ‘live’ user)
  • rootpw=”somestring” (Change the password for the ‘root’ user)
  • load=mod1[,mod2[…]] (load one or more squashfs modules that are present in the directory “/liveslack/optional”; by default none of the modules in the “optional” directory are loaded)
  • noload=mod1[,mod2[…]] (prevent loading of one or more squashfs modules that are present in the directory “/liveslack/addons”; by default all of the modules in the “addons” directory are loaded on boot)
  • rescue (After initialization, you will be dropped in a rescue shell where you can perform lowlevel maintenance; the same happens anyway if the OS fails to boot)
  • swap (Allow the Live OS to activate all swap partitions it finds on the local hardware; by default, the hard drive will not be touched at all)

I get errors and booting fails

Booting an OS off a USB medium is tricky. Linux kernel initializes the storage and the usb subsystems in parallel. If you have a fast computer and slow USB medium or you use a USB-1 / USB-2 port, the probability is pretty high that the USB stick is not yet ready when the OS starts its mount attempts. There’s a parameter you can add to the boot command line to give the USB device some extra time to settle – try adding “rootdelay=10” or even “rootdelay=20” which will add 10 (or 20) seconds pause to the boot process. The iso2usb.sh script configures a default delay of 5 seconds which should be sufficient for most computers.

Instead of “rootdelay” you can use the parameter “waitforroot” with identical result.

Slackware Live does not log me on automatically!

Correct. This is a demonstration environment, with the purpose of getting you acquainted with Slackware, remember?

You already saw all these intimidating kernel messages scrolling across the screen while booting the OS, and now you have two choices for login:

  • user ‘root’ with the password ‘root’ (at least that is the default – you can change it using a boot parameter if you want)
  • user ‘live’ with the password ‘live’ (idem about the default value).

I would suggest using the ‘live’ user account to logon to the Live OS, because KDE 4 and Plasma 5 will not appreciate it when you login as root directly. If you need root access, then just run “sudo -i” or “su -” (both commands will request you to enter the password of user ‘live’, not the root password!).

What’s still on the TODO?

There are a couple of items that I did not get to but they should really be looked into to bring this out of Beta:

  • UEFI boot needs to work (must have)
  • Better documentation about how the scripts work (must have)
  • Documentation on all the boot parameters (must have)
  • Slackware installer as part of the ISO, perhaps even Didier’s polyglot installer (nice to have, only in the Plasma5 version)
  • A ‘copy2ram‘ function to run the OS entirely in RAM (nice to have)
  • Persistence directory inside a loop-mounted ext4 container file, so that the persistent USB stick can have a single FAT partition (nice to have)
  • Homedirectory of a persistent Live OS inside a loop-mounted LUKS-encrypted container file, to protect your private data (nice to have)
  • … tell me more! Or post patches!

Download the ISO images

Show me the source!

Git repository for the scripts can be found here: http://taper.alienbase.nl/cgit/liveslak/

A checkout of the repository can be found in http://www.slackware.com/~alien/liveslak/ and http://taper.alienbase.nl/mirrors/people/alien/liveslak/

Hopefully soon, I will write a proper README which takes you through the inner workings of the scripts. If you are curious you can of course check out the sources – they are full of comments. But there are some design decisions at the core which you need to be aware of before you start on these scripts.

Happy hacking! Eric

Update 25-dec-2015: please continue reading the follow-up article on “Beta 3“.

Update 24-jan-2016: please continue reading and commenting in my follow-up article “Beta 4″.


(Hopefully) final recompilations for KDE 5_15.11

plasma5_startup There was still some work to do about my Plasma 5 package repository. The recent updates in slackware-current broke several packages that were still linking to older (and no longer present) libraries which were part of the icu4c and udev packages.

So finally I had the time to cure this situation. I rebuilt kdelibs, kde-workspace and all the telepathy dependencies, updated all the KDE Telepathy packages, and also compiled a git snapshot for the kio-mtp package after some people complained about the Unicode character in its ‘slack-desc’ file which caused breakage in pkgtools.

Hopefully, everything works again this time. Even Telepathy. Tell me your experiences with Amarok and the Plasmashell which were crashing for some people. And especially Plasmashell crashing leaves you with no desktop at all.

Have fun! Eric

Updated multilib packages for -current

blueSW-64px
The recent update of packages in slackware-current demanded a similar update in the set of “compat32” packages for those who are running a 64bit Slackware multilib computer.
On request, I have added two new packages: libaio-compat32 and lzo-compat32. Both packages cover a missing dependency, one for mariadb and the other for cairo. The massconvert32.sh script will now also create or update these two new packages.

Remember, if you want to check (without actually creating anything) if the massconvert32.sh script will update any of your compat32 packages or add new ones, just run the script as follows in the directory where you already have your “a-compat32”, “ap-compat32”, …, “xap-compat32” subdirectories (this example uses a local mirror of 32-bit Slackware-current):

# massconvert32.sh -n -q -i /local/path/to/mirror/of/slackware-current/slackware/

The output could be something like this:

libaio: new package will be converted
lzo: new package will be converted

Official download locations:

Have fun! Eric

Cleanups from the -current update fallout

blueSW-64pxI think I have managed to fix most of the important breakage in my packages, after Slackware-current updated its icu4c package a couple of days ago.

Recompiled packages are now available for -current:

  • Regular packages: LibreOffice 5.0.3
  • KDE 5_15.11 packages: qt5 (which was bumped to 5.5.1 at the same time), step, akonadi4, akonadi, akonadi-search, akonadi-calendar and kdepimlibs. Here at home, Plasma 5 works again on latest slackware-current.
  • Multilib: fixed convertpkg-compat32 script so that it will properly handle the new eudev; and also updated the “compat32” package directory with a new eudev-compat32 package.

If there are other packages in my -current repository that require recompilation, please let me know!

Eric

Slackware Live Edition

I thought it would be a cool idea to celebrate the “farewell to udev”. With the abandoned ConsoleKit replaced by ConsoleKit2 which is actively maintained by the Slackware-friendly XFCE crew, and Gentoo’s eudev taking the place of udev, we are well equipped to keep systemd out of our distro for a while. Basically eudev contains the udev code as found in the systemd sources, but then stripped from all standards-violating systemd crap and with a sane build system. Hooray, we’re back in business and eudev gained some more traction. Win-win.

How to celebrate the occasion? Easy! By releasing the Slackware Live Edition.

liveslak-1.0.0

Please also check out the original announcement text (moved to a different page) and the follow-up articles on “liveslak” which explain how this project grew from its humble beginnings.

First teasing screenshots of my (then still called) “Project X” were revealed in a blog post in November 2015. I wrote the original annoucement a week later, also in November, on this exact blog page. However, the original text talked about being beta, incomplete and in need of testing. In the meantime, this page’s URL is being linked to from everywhere and I get many questions about “when will it be ready” so I decided to re-write this text into a proper reference page and moved the original text to a different location for posterity.

Note for clueless newbies

The Slackware Live Edition comes with two user accounts: user ‘root’ (with password ‘root’) and user ‘live’ (with password ‘live’). My advice is to login as user live and use “su” or “sudo” to get root access.

Note: the “su” and “sudo” commands will ask for the ‘live’ user’s password!

What is Slackware Live Edition, and what is liveslak?

Slackware Live Edition:
It is a version of Slackware (14.2 and newer)  that can be booted and run directly from a DVD or a USB stick. It is distributed as an ISO image and meant to be a showcase of what Slackware is about. You get the default install, no customizations, but with all the power. You do not have to install Slackware to your harddisk first to experience it first-hand.

Liveslak:
The combination of scripts, bitmaps and configurations to generate the ISO images are called project “liveslak“.

Let me state the reasons I had for starting this “liveslak” project (apart from sheer curiosity):

  1. Provide a Live version of Slackware proper – i.e. show Slackware as it is, but without having to install it. No hiding of kernel messages scrolling across the screen at boot – no custom wallpapers, etcetera. Meant for education and demonstration purposes.
  2. The target should be slackware-current – the bleeding edge. Many people want to know what that looks like but are hesitant to install slackware-current for fear that it breaks stuff and causes productivity loss.
  3. Provide a way to generate a Live ISO with just Slackware packages as the source – fully scripted and deterministic.
  4. Still be able to customize its content – for instance provide stripped-down or minimalist versions of Slackware but also allow for the inclusion of 3rd party packages.
  5. Option to create a bootable USB stick running Slackware Live (which is different from ‘dd’-ing the hybrid ISO to a USB stick!)
  6. Keep It Simple Stupid!

… but I had not anticipated the expansion of scope that can be attributed to the people who have been testing all my Beta versions. They came up with real-life use-cases, worthwhile additions and fixes. My thanks go out to all of you! The “liveslak” is so much more now then I initially conceived. Instead of being just a simple demo-toy it is now usable as a full-blown Live work environment in its own right. I carry a USB stick with a secured Slackware Live on my key chain all the time.

Highlights of Slackware Live Edition

Properly documented

The Slackware Documentation Project contains extensive documentation about “liveslak“, both for users of the Live OS and for people who want to know “how it works”  and want to develop a custom Live OS.
Check it out please, in particular all the boot options for the Live OS.

Good hardware support

The Live OS boots on “good old” BIOS computers but also on modern UEFI hardware (disable secure boot first). The kernel and userland software in the OS is fully up to date and supports modern and older hardware. If your computer does not support a 64bit Operating System then you can just download the 32bit version of Slackware Live Edition.

Persistence

Slackware Live Edition is persistent if you install its ISO to a USB stick using the “iso2usb.sh” script. Persistence of a Live OS means, the things you change or add (or delete) are stored on the USB medium and will survive a reboot. As opposed to the raw ISO image (burnt to a DVD or ‘dd’-ed to a USB stick) which is a pure Live OS where all your modifications are written to a RAM disk and gone when you reboot.

A feature I consider crucial for a persistent Live OS on a USB stick that you carry around with you in your jacket pocket is… data protection!

Data encryption

How do you protect the stuff you are accumulating in your live user’s homedirectory, such as passwords, confidential documents, GPG and SSH keys etc? You lose the USB stick, someone else may steal it – your sensitive files will be compromised. Therefore the Slackware Live Edition allows you to apply strong, unbreakable encryption to your precious data. You have the option to create a LUKS-encrypted container file in the Linux filesystem of the USB stick. The filesystem inside that encrypted container will then be mounted on the /home directory of the Live OS when it boots.
When creating the LUKS container you must enter a passphrase which will be used to encrypt all your data. During the boot-up of the Live OS, you will be prompted to enter this exact passphrase again which will then unlock the container and make your data available. On shutdown, the container will be locked again and a potential thief of your USB stick will be unable to get to the files  (i.e. your homedirectory) which reside in the encrypted LUKS container.

Multiple OS variants or flavors

The “liveslak” scripts are able to generate a variety of Slackware Live ISO flavors: SLACKWARE, XFCE, PLASMA5, MATE, CINNAMON, CUSTOM. The locations where you can download these ISO files are shown in the next paragraph.

  1. By default, “liveslak” creates a 3 GB large ISO from scratch that will give you a complete 64bit Slackware-current Live Edition.
  2. The scripts can also create a 700 MB slimmed-down XFCE version with XDM as the graphical login manager which fits on a CDROM medium or a 1 GB USB stick.
  3. A 4 GB ISO image of Slackware64-current containing Plasma 5 instead of KDE 4 is also an option. The PLASMA5 variant is spiced up with several other packages I maintain: vlc, libreoffice, calibre, qbittorrent, ffmpeg, chromium, openjdk, veracrypt.
  4. The option to generate a 2 GB ISO containing either the Mate or the Cinnamon desktop instead of Slackware’s own KDE 4 could be added courtesy of Willy Sudiarto Raharjo’s repositories.
  5. The “liveslak” scripts allow a large degree of customization so that you can create “your own” variant of a Slackware based Live OS. One example of what’s possible is the Live Edition of Cinelerra CV.

 No custom kernel or 3rd party tools needed

The main script “make_slackware_live.sh” creates an ISO from scratch. The script installs Slackware packages or package sets into compressed “squashfs” modules, configures and optimizes the target filesystem to be run as a Live environment, and then generates an initial ramdisk that will assemble the Live environment when you boot. All that is put into a bootable ISO image file. Thanks to Linux kernel 4.x and the squashfs-tools package added to Slackware 14.2, the process requires no compilation nor does it need non-standard packages to create a Slackware Live Edition (of course, the Plasma, Mate and Cinnamon flavours do require 3rd party packages). The downside is that the ISO has to be created on Slackware 14.2 (older versions of Slackware do not have the proper tools or kernels). It follows that the only Slackware release which is supported as a Live Edition is 14.2 and the “-current” development tree. All future releases will be supported too of course.

Install the Live OS to your hard drive easily

The included program “setup2hd” (all ISOs except the small XFCE variant) is a modified Slackware installer which will guide you through the familiar setup menus and install the content of the Slackware Live Edition to your hard disk. The “setup2hd” program can be run from your X session so that you can keep interacting with the Internet while Slackware installs itself.

setup2hd

Start the builtin PXE server and let the whole LAN run Slackware Live

Load the Live OS into RAM using the “toram” boot parameter and then start “pxeserver” from an X terminal. All computers in your LAN will be able to boot Slackware Live Edition from the network now. Ideal for a hackfest.

pxeserver

Download the ISO images

As stated above, you can choose between several variants of Slackware Live Edition. ISO images for the SLACKWARE, XFCE, PLASMA5 and MATE flavours using the latest Slackware-current packages are available.

The ISO images (with MD5 checksum and GPG signature) are available on the master (bear) and its mirror servers. A symlink called “latest” will always point to the latest set of ISO images.

And if you love the bleeding edge, an ISO file for slackware64-current is automatically (re-)generated every time there is an update to the ChangeLog.txt of Slackware-current. You can find this ISO image here:

Download the source

Git repository for the scripts can be found here:

A checkout of the repository can be found here:

Transfer the ISO content to a medium

  • You can burn the ISO file to a CDROM medium (only the XFCE Edition fits on a CD) or to a DVD,using your favorite burning program like k3b (KDE), xfburn (XFCE), xcdroast (plain X-Window) or brasero (GNOME)… or a Windows burning program if you want.
    Make sure you inform the application that this is a bootable ISO, i.e. do not simply burn the contents of the ISO to a disk.
  • Or, you use the program ‘dd’ or else ‘cp’ to transfer the ISO to a USB stick (aka flash drive). Any of the following two commandlines will do the job, provided your USB stick is known by your Linux computer as “/dev/sdX“. Note that sdX means the whole disk, not a partition on the disk!

    $ dd if=slackware-live-14.2.iso of=/dev/sdX
    $ cp slackware-live-14.2.iso /dev/sdX

    This creates a read-only bootable USB medium containing Slackware Live. Readonly means that you will not get persistence this way. This method is similar to using a DVD medium. If you want a writable USB stick instead, read the next option.

  • You can use the ‘iso2usb.sh’ script to transfer the content of the ISO to a USB stick, thereby adding persistence to the Live OS on the stick. The stick will remain writable and you can add new modules later on if you want.
    You can find extensive documentation on the usage of that script on the Slackware Documentation Wiki.

Booting the Live OS

When you boot Slackware Live on a BIOS computer, Syslinux will handle the boot and show the following menu:

  • Start (SLACKWARE | PLASMA5 | XFCE | MATE) Live (depending on which of the ISOs you boot)
  • Non-US Keyboard selection
  • Non-US Language selection
  • Memory test with memtest86+

You can select a keyboard mapping that matches your computer’s. And/or boot Slackware in another language than US English. You will probably want to change the timezone; syslinux allows you to edit the boot commandline by pressing <TAB> because the syslinux bootmenu does not offer you a selection of timezones.

On UEFI computers, GRUB2 handles the boot and it will show a menu similar (and similarly themed) as the Syslinux menu:

  • Start (SLACKWARE | PLASMA5 | XFCE | MATE) Live (depending on which of the ISOs you boot)
  • Non-US Keyboard selection
  • Non-US Language selection
  • Non-US Timezone selection
  • Memory test with memtest86+

Editing a Grub menu is possible by pressing the ‘e’ key. After making your changes to the boot commandline, press <F10> to boot.

Another difference between Syslinux and Grub menus: in Grub you select keyboard, language and/or timezone and you’ll return to the main menu every time. You still have to select “Start Slackware Live” to boot. In the Syslinux menu, only the keyboard selection menu will return you to (apparently bot not actually) the same main menu. The non-US language selection will boot you into Slackware Live immediately without returning to the main menu. A limitation of syslinux.

liveslak-0.9.0-xfce


Things to remember when you boot the ISO

Slackware Live does not log you on automatically! This is a demonstration environment, with the purpose of getting you acquainted with Slackware, remember? Therefore you will first see all these intimidating kernel messages scrolling across the screen while booting the OS. Then you need to login manually.

Consult the documentation for assistance with the various boot parameters you can use to tailor the Live OS to your needs. The syslinux boot has help screens behind the F2, F3, F4 and F5 function keys and the grub boot screen has a “help on boot parameters” menu entry.

How to create a persistent USB stick from the ISO?

The ISO can be burnt to a DVD or copied to USB stick using ‘dd’ or just plain ‘cp’, but that will give you a read-only medium because all changes to the Live OS are in fact written to your computer’s RAM and lost when you reboot.

Use the ‘iso2usb.sh‘ script to create a Live OS on the USB device with persistence.

Note: The “iso2usb.sh” script can also be found in “/usr/local/sbin” when you boot Slackware Live Edition.

By default, the changes you make while running Slackware Live will then be preserved across reboots because the OS will write all these changes to the directory “persistence” in the root of the USB device. The script requires an input and an output parameter at a minimum:

# ./iso2usb.sh -i ~/Download/slackware64-live-14.2.iso -o /dev/sdX

… where /dev/sdX is the device name of your USB stick (the actual device, not a partition on the device).

Alternatively you can use a file “persistence.img” in the root of the USB device which will be loop-mounted by the Live OS and changes to the system will be written to the filesystem inside this container file. A feature which should be appreciated by people who want to use a USB stick with a VFAT partition instead of a Linux ext4 partition. The script requires an additional parameter “-P” in this case:

# ./iso2usb.sh -P -i ~/Download/slackware64-live-current.iso -o /dev/sdX

Note that your USB stick will get formatted by the script – erasing all data currently stored on it. The iso2usb.sh script will pause to show you the characteristics of the target device and ask you once more if you really want to continue erasing it. You will not easily destroy your hard drive unless you are really not paying attention!

How to create a LUKS encrypted homedirectory container?

The iso2usb.sh script has a parameter “-c” which takes a size argument. If you want to create a 400 MB encrypted container file to hide your homedirectory in, then you need to specify “-c 400M”. If you want 2.5 GB for your homedirectory, use “-c 2.5G”. If you are not concerned so much with the exact size but want to allocate a percentage of the free space on the stick, then use “-c 40%” to create a LUKS container that uses 40% of the available free space.

Now to put that into an actual example command line which will create a file (its name will be “slhome.img”) using up 50% of the free space on the stick:

# ./iso2usb.sh -i slackware64-live-xfce-current.iso -o /dev/sdX -c 50%

When the script gets to the point where it creates the LUKS container file, it will prompt you for a passphrase which will be used for encrypting and decrypting the container’s data. Right after that, the script will prompt you to enter that passphrase again when the LUKS container is unlocked and the ISO’s /home content is copied into the container.

Help, I messed up my persistent USB stick!

You can still boot a USB stick containing persistence and/or encrypted LUKS homedirectory to a “pristine condition”.

Suppose you screwed up somehow and the USB stick won’t work properly anymore or won’t even boot to the desktop. If this happens, you can still boot the original unmodified Live OS, discarding all your accumulated persistent changes. The unmodified OS should always boot unless your USB stick is physically damaged.

You have two options to solve the levels of brokenness:

  1. Start by adding the boot command parameter “nop” which stands for “no persistence”. The “nop” boot parameter will  cause Slackware Live to ignore your persistent data, as most probably the persistent data store will contain the cause of your issue. Even when passing “nop” to grub or syslinux, Slackware Live will still mount your encrypted LUKS container on the /home directory if you are using that. It is possible that your issue is somewhere in your homedirectory (for instance you might have an issue with configuration files in ~/.local ~/.config or ~/.kde).
  2. If you want to ignore any LUKS container as well as ignoring the persistent storage, and use the /home directory of the original Live OS, an additional parameter “luksvol=” must be added to the boot commandline. Note that there is nothing at the right side of that equal sign! The two parameters together look like “nop luksvol=“.

After logging in to a pristine Slackware Live you can then remount the Linux partition of your USB stick to make it writable:

# mount -o remount,rw /mnt/livemedia

Now that the USB stick’s partition is writable you can either prune the persistence directory “/mnt/livemedia/persistence” (i.e. delete all data in there) and/or fix the content of your LUKS container file “/mnt/livemedia/slhome.img“.

Have fun! Eric

Below, you will find all the comments made by visitors since the original announcement was posted here on the blog.

« Older posts

© 2024 Alien Pastures

Theme by Anders NorenUp ↑