My thoughts on Slackware, life and everything

Tag: tomato

Recipe: Spanish chicken

I cooked diner tonight and it was yummy… so I decided to write it down in the blog.

My son who was going to assist me in the kitchen asked to create “something with cheese” before I drove to the supermarket, so I complied and added cheese, but if you are going to cook this recipe, you will find that it works even better without the cheese.

This “spanish chicken with chorizo and potatoes” is a variation on a recipe originally published by Nigella Lawson in her book Kitchen and to which I added some of my own ideas. It will cost you a minimum of effort to prepare this meal, since most of your time will be spent sitting in front of the oven and watching the chicken crackle and pop.

The result tastes deliciously because the combination of the spicy chorizo and the orange peel does wonders. I used an oven-proof pyrex dish which makes for a nice presentation when you serve it at the diner table.

Don’t take the amounts too seriously… this dish can not fail you. If you want, just add more chorizo and onion, or try and leave the tomatoes out.

Ingredients (4 persons):

  • 8 chicken drumsticks
  • one onion, cut into rings
  • two table spoons of vegetable oil (olive or sunflower)
  • black pepper, paprika powder
  • 500 grams of chorizo sausages
  • 600 grams of potatoes
  • 300 grams of cherry tomatoes, cut in halves
  • one orange
  • grated young cheese
  • dried oregano

Preparation:

  • Pre-heat the oven to 220°C
  • Cook the potatoes for about 10 minutes. If you do not cook them before they go into the oven, they might not be fully cooked when it is time to serve the dish.
  • While you are waiting for the poratoes, you can continue with the preparations. Pour two table spoons of vegetable oil into a shallow roast pan or pyrex oven dish and mix in a generous sprinkle of paprika powder and ground black pepper.
  • Add the chicken drumsticks to the oily mixture and use your hands to rub the oil into the skin of the drumsticks. If you like to keep your hands clean, you can just as well put the oil, spices and drumsticks into a plastic bag and mix the ingredients thoroughly, then dump them into the roasting pan. Make sure that the skin side of the chicken is pointing upward.
  • Add the chorizo sausages in between the drumsticks. If you bought a large chorizo, chop it up into chunks of a centimeter first.
  • Use a grater or a vegetable peeler to scrape the outer skin off the orange. be sure not to cut into the white inner skin! That tastes foul. We only want the orange outer skin. You end up with orange peel, or zest. Keep the zest. If you want, you can squeeze the juice out of the orange and drink it, we won’t need the juice for this recipe.
  • By now the potatoes will have cooked long enough. Cut them into slices of half a centimetre and place them inbetween the drumsticks, preferable on the bottom of the roasting pan so that they will be fried in the oil (children will love that)
  • The onion rings and the halved cherry tomatoes are placed in between the other ingredients
  • Sprinkle the orange peel on top – the aromatic smell of the zest is enough to make my mouth water!
  • Sprinkle generously with dried oregano
  • Put the dish in the oven and let it cook for 40 minutes. Be sure to open the oven door from time to time and watch those chickens sizzle!
  • If you want to try this with cheese, you have to get the dish out of the oven after 30 minutes and spread grated young cheese on top, accompanied by another sprinkle of oregano.. The final 10 minutes of oven time will allow for a nice layer of molten cheese.

I served this with a green salad mixed with ground nuts, raspberries and spicy cheese (cut into small cubes) and a vinaigrette of raspberry-flavored balsamico (the salad was another idea from my son, which he executed while I was busy with the chicken).

Enjoy your meal!

Eric
Wireless Ethernet Bridge

This weekend, I setup a Wireless Ethernet Bridge.

What the heck, I hear you say! I’d better explain why I did this, and what it actually means.

I have a wireless network in the house that extends to a large part of the rooms. Unfortunately we have thick walls and ceilings with a lot of steel-reenforced concrete, and this causes less-than-ideal wireless reception in parts of the house. The thick concrete walls do not invite drilling a lot of holes for CAT5 cables. I had to think of something else that minimized the drilling of holes and still gave me a network that covers all of the house.

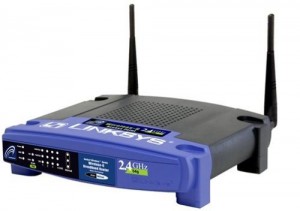
I have been using a WRT54GL (its selling point being that it can easily be flashed with alternative Linux based firmware) until now. This gave me a wireless speed of 54 Mbit/sec (802.11g) maximum. I have flashed this router with an alternative firmware, tomato, which really helped me getting my Internet router stable and feature-rich while at the same time I was able to raise the transmission power a bit… but not enough.

Linksys WRT54GL

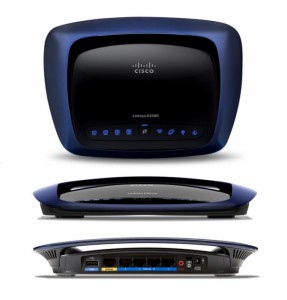
So what I did was to buy a new wireless dual-band router with 802.11n speeds (300 Mbit/sec) which gives the existing wireless LAN a boost. This new router had to be capable of running tomato firmware too (because I am fond of it) and the dual-band gave me a way to leverage the old WRT54GL without killing the speeds of the larger wireless LAN: a dual-band router basically has two wireless access points built-in. I found the Cisco/Linksys E3000EW at a very interesting price (it is being followed up by a new device, the E4200). It also has an USB port (for connecting a hard drive or a printer) and I found that the tomatousb firmware (a successful mod of the tomato firmware) fully supports this device.

Cisco/Linksys E3000-EW

The E3000EW was switched on and two minutes later, the poor bugger was running tomato firmware! A firmware upgrade through HTTP upload using the standard Linksys firmware worked flawlessly.

Now the first task was to copy the configuration of the old WRT54GL to the new E3000EW. That was not too hard. AlsoI setup the two internal access points with two different ESSIDS of course. Then I quickly swapped the two (after “cloning” the WAN MAC address so that I would not have to go through my ISP’s provisioning setup again) and I had freed the WRT54GL for re-configuration into a Wireless Ethernet Bridge.

What was my plan? To position the WRT54GL in the house, nearby the area where wireless signals were weak because of the steel and concrete. Its position would be where I do have a good wireless connectivity. From that point on, I would run CAT5 cable from the WRT54GL to the computers that needed to be connected. This would mean, much less cable and much less drilling.

Actually, that was the final plan, which I implemented. Originally I wanted to create a distributed wireless network using WDS, which is a technique (supported by the tomato firmware) to connect multiple wireless access points. However, when I started reading about these techniques, it turned out that WDS effectively cuts your wireless network speeds in half with every “hop” that you create in your network. And I was not prepared for lower speeds… even though the advantage would be that I did not have to run new CAT5 cables. Access points with WDS still accept client connections, so all I would have to do was put the second AP in a location where it gave good coverage to the computers that suffered from problematic wireless reception.

The thing with Wireless Ethernet Bridging (WET) is this: the second Access Point, deployed to connect to the “master” and create the bridge, dedicates its wireless link to that bridged connection. It will no longer accept connections from wireless clients. It means that the computers need to connect to it using conventional cable!

It was a matter of weighing the pros and the cons. I decided on creating the bridge and using cables, because that would keep the maximum network speed acceptible.

So the old WRT54GL was reconfigured (using a network cable of course, you can not do this wirelessly). And it works surprisingly well! I am writing this article while my laptop is connected to this device using a cable and the traffic is bridged across the air. So, whoopee!

There are a few gotcha’s that I ran into, before I finally found out what it takes to successfully create a wireless bridge.

  • The “master” router (the E3000EW in this case) needs to be configured as a Wireless Access Point – that is the default, so I could leave that one alone.
  • The secondary router (the WRT54GL) needs to be configured, not as a gateway but as a router (in the tomato’s Advanced > Routing menu) or else your traffic is not going to reach the “master” router at the other end of the bridge.
  • The wireless security must be set to “WPA Personal”, with AES encryption (in the tomato’s Basic > Network menu). I had left this setting to “WPA/WPA2 Personal” at first, using AES for ecryption (this was what I used when the WRT54GL was still my Internet router), and it would refuse to connect to the wireless master. If you look more closely to the dropdown menu for the security settings, you’ll see that the tomato warns that WPA is the only accepted choice…
  • The WRT54GL can function as a wireless bridge without having an IP address assigned to it. However, you lose the ability to make a HTTP connection to the administrative interface – and someday that will prove to be very inconvenient. So I gave the router an unused IP address from my LAN address range.

Remember, when you setup a bridge, you are extending your network transparently. A network bridge passes network packets back and forth without dividing the network in two segments. Computers in the LAN will be unaware of the bridged connection – it does not show up in a traceroute. There is another solution for my problem that I have not gone deeper into, and that is to setup the WRT54GL as a “wireless client”. This creates a new network segment though… which requires that you run a DHCP server on the WRT54GL for the wired client computers that you connect to the device.

And yet another option is to install the “dd-wrt” firmware and configure the WRT54GL as a Wireless Repeater which allows you to connect your computers wirelessly to the device… but dd-wrt is not nearly as userfriendly as tomato. Pick your choice.

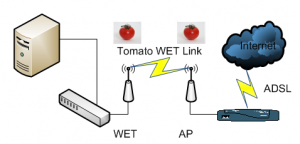
This is the network diagram I ended up with (courtesy of oldspeak where I also obtained the final piece of the puzzle):

Wireless Ethernet Bridge

And what about powerline / homeplug, you ask?

I have considered that, and sometime ago, when my wireless conneciton problems became aggravating, I even wanted to buy a set of 200 Mbit Devolo mini adapters. They would give me 100 Mbit effective network speeds, but I still would have to buy a second wireless access point if I wanted to extend my wireless LAN, or else I would have had to use conventional cable. That made me decide to pick the geeky solution.

Eric

© 2024 Alien Pastures

Theme by Anders NorenUp ↑