 The ‘liveslak‘ scripts used to create the ISO images for Slackware Live Edition have been stamped with a new version, 1.1.9. The updates are significant enough to warrant an ‘official’ update and new ISO images.
The latest set of Slackware Live Edition ISOs are based on liveslak 1.1.9 and Slackware-current dated “Tue Sep 19 20:49:07 UTC 2017“. Just in time (I was already creating ISOS based on -current “Mon Sep 18 19:15:03 UTC 2017“) I noticed that Patrick downgraded the freetype package in Slackware, and I re-generated all of the ISO images to incorporate the latest freetype package – because that one is working and the previous one had serious issues.
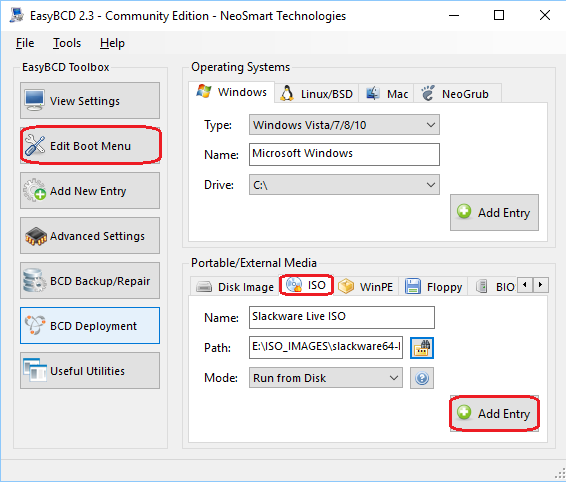
If you already use a Slackware Live USB stick that you do not want to re-format, you should use the “-r” parameter to the “iso2usb.sh” script. The “-r” or refresh parameter allows you to refresh the liveslak files on your USB stick without touching your custom content.
I should note (I always seem to forget mentioning this) that there’s also a “bonus” section where you can find a couple of Live squashfs modules that are included in the PLASMA5 Live ISO, and that will be just as useful to people who don’t want to run Plasma 5. These modules can be copied to the /liveslak/addons/ directory of your USB Live stick so that they are automatically loaded on every boot. The “bonus” section contains modules for:
- broadcom-sta (“wl” module for 4.9.50 kernel) for people whose BCM wireless card does not work out of the box
- multilib (gcc, glibc and the full set of compat32 packages)
- skypeforlinux
- wine (with OpenAL-compat32 already incorporated)
New in the ISOs
The new ISOs are based on the latest Slackware -current with Linux kernel 4.9.50, gcc 7.2.0, glibc 2.26 and X.Org 1.19.3.
The SLACKWARE variant contains the complete latest slackware-current distribution and nothing else. Ideal for testing and for checking out the progress of Slackware’s development.
The XFCE variant contains a stripped down Slackware with a minimalized package set but still quite functional. The small size is also accomplished by excluding all documentation and man pages, and the localizations for the languages that are not supported in the boot menu. This ISO is small enough that you can burn it to a ’80 minutes’ CDROM (700 MB). Ideal for hardware compatibility tests.
The MATE variant (a Slackware OS with KDE 4 replaced by Mate) contains packages from the repository at http://slackware.uk/msb/current/ which at this moment gives us Mate 1.18.
The PLASMA5 variant (Slackware with KDE 4 replaced by Plasma 5) is a showcase for the latest Plasma 5 release “KDE-5_17.09” as found in my ktown repository. Additionally you will find several packages from my regular repository: chromium (with flash and widevine plugins), vlc, ffmpeg, libreoffice, palemoon, calibre, qbittorrent, openjdk and more. This ISO also contains the LXQT and Lumina Desktop Environments. Both are light-weight DE’s based on Qt5 so they look nice & shiny.
The liveslak scripts support three more variants out of the box: CINNAMON (a Gnome3 fork), DLACKWARE (slackware with systemd) and STUDIOWARE (a toolbox for musicians). There’s no ISO image for the Cinnamon and Dlackware variants this time. The Studioware Live ISO can be downloaded from http://studioware.org/iso.php .
What happened between liveslak 1.1.8 and 1.1.9
For your information, a few ‘micro’releases were issued inbetween 1.1.8 and 1.1.9, to accompany the upload of ISO images for Plasma5. These micro-releases did not really add functionality.
- Support booting from a SD card.
- Allow syntax ‘livemedia=scandev:/path/to/live.iso’.
With the ‘scandev’ keyword, liveslak will search for the ISO on all local partitions. - Added two new option parameters to the ‘iso2usb.sh’ script: “-l” to list and “-d” to scan for the insertion of removable devices on the local computer.
- A new script has been added: ‘upslak.sh’.
This script is primarily meant to be run from within your Slackware Live environment, but with the exception of the “-p” option – see below – it works just as well on your harddisk installation of Linux and with the USB Live stick inserted into the computer. Upslak can tweak your Slackware Live USB stick in several ways:- Update the boot kernel & the kernel modules inside the initrd image using the “-k” and “-m” options.
You can provide Slackware packages as input to these option parameters, or else a single kernel file and a module-tree in /lib/modules/ are also accepted.
Note that this will leave alone the kernel and the modules inside the Slackware Live filesystem. You can update the kernel-generic and kernel-modules packages in the Slackware Live OS using the regular Slackware package tools if you wish… but the USB stick will not use those anyway.
Note: this kernel/modules replacement can be reverted if it turns out your new kernel is not working: using the “-r” option. Your previous kernel & modules are backed up by ‘upslak.sh’. - Replace the live init script using the “-i” option.
There are two reasons you would want this: (1) you re-wrote the init script and want to start using that, and (2) you saw that there is a newer version of the “liveinit.tpl” template and want to use that as your new Slackware Live init script. - Create an ‘addon’ squashfs module out of the persistent data store using the “-p” option.
Your persistent data grows over time, and a lot of that may be caused by packages that you install on top of Slackware Live. Using this option you can create a new squashfs module which will be placed in the /liveslak/addons/ directory so that it will be loaded on every boot of the Live OS. The content of the persistent store will be moved into that squashfs module and then the persistent store will be re-initialized (i.e. wiped clean).
You can repeat this ‘persistence-to-module’ activity as many times as you like. - Change the USB wait time on boot, quite similar to the “-w” option of ‘iso2usb.sh’.
- Add network modules to the initrd using the “-n” option.
This should normally not be needed, all ISO images of the Slackware Live Edition have network support included out of the box. But in case of a custom Live USB where network support was initially omitted, this could come in handy if you want to PXE-boot the Live OS.
- Update the boot kernel & the kernel modules inside the initrd image using the “-k” and “-m” options.
- And other small improvements/bugfixes to the scripts.
Download the ISO images
The available ISO variants for Slackware Live Edition are: SLACKWARE (64bit & 32bit), XFCE (64bit & 32bit), PLASMA5, MATE. These ISO images (with MD5 checksum and GPG signature) have been uploaded to the master server (bear) and should be available on the mirror servers within the next 24 hours.
- Primary location: http://bear.alienbase.nl/mirrors/slackware-live/ (rsync://bear.alienbase.nl/mirrors/slackware-live/)
- Darren’s mirror (also fast!): http://slackware.uk/people/alien-slacklive/ (rsync://slackware.uk/people/alien-slacklive/)
- Willy’s mirror: http://repo.ukdw.ac.id/slackware-live/
- Shasta’s mirror: http://ftp.slackware.pl/pub/slackware-live/ (rsync://ftp.slackware.pl/slackware-live/)
- Tonus’s mirror: http://ftp.lip6.fr/pub/linux/distributions/slackware/people/alien-slacklive/
Read more about liveslak
This blog has quite some posts about the Slackware Live Edition. Check them out: http://alien.slackbook.org/blog/tag/live/ – they contain lots of insight and helpful tips.
And this was the original post (which has been edited later on so it could become a proper landing page for curious visitors):
http://alien.slackbook.org/blog/slackware-live-edition/
Download liveslak sources
The liveslak project can be found in my git repository: http://bear.alienbase.nl/cgit/liveslak/ . That’s all you need to create a Slackware Live ISO from scratch. Documentation for end users and for Live OS developers is available in the Slack Docs Wiki.
Have fun! Eric
 Slackware turned 24 today, 17 July.
Recent comments