What would you do if you were stuck in one place,
and every day was exactly the same and nothing that you did mattered?
… or rather:
Welcome to Adventure!! Would you like instructions?
Wed Feb 2 22:22:22 UTC 2022
Slackware 15.0 x86_64 stable is released!

Another too-long development cycle is behind us after we bit off more than
we could chew and then had to shine it up to a high-gloss finish. Hopefully
we've managed to get the tricky parts out of the way so that we'll be able
to see a 15.1 incremental update after a far shorter development cycle.
I honestly kept my breath and have had some difficulty believing that this would eventually really happen, but yet here it is. Slackware 15.0 stable! Released yesterday and available on mirrors across the globe today.
I am fiercely proud of Patrick Volkerding who has again showed all of us that the oldest actively maintained Linux distribution is more than a rolling release for Linux enthusiasts.
The latest stable release 15.0 is packed with applications for both desktop and server usage. It is truly a modern Linux platform that power users can and should embrace as their daily driver.
I will share with you some of the highlights and particulars of the development process between the release of Slackware 14.2 (the previous stable) and the new 15.0.
With five years and seven months in the making, this has been the largest interval between stable releases.
We said ‘farewell’ to the Slackware Store and goodbye to printed DVD and CDROM sets.
A major reason for this dragged-out development cycle is the realization that for a long time, Pat and family have been deprived of substantial amounts of revenue which the people of The Store reaped through the sales of Slackware installation media, clothing and other paraphernalia. The truth was shared by Pat in a post on LinuxQuestions and resulted in a long-running thread discussing how the community could help with the funding: https://www.linuxquestions.org/questions/slackware-14/donating-to-slackware-4175634729/ .
Luckily a new means of securing an income for Pat was established through Patreon, which allows Pat to focus again on his Slackware distro. After all, Slackware is his only source of income; the rest of the coreteam have regular day jobs and we don’t get (nor want) any part of the revenue.
A ChangeLog.txt of roughly 40,000 lines makes the process of “slackpkg install-new” (churning through all that text) to find all those added packages a long and painful one.
The Slackware 15.0 core distribution consists of 1590 packages, a 19% increase from the 1332 packages in Slackware 14.2 core (i.e. everything not in ./extra or in ./testing).
A lot of packages have been removed (276), many of those belong to KDE4 and 82 of them are the old language packs. You won’t miss a thing there because language support in Plasma5 is now included in all the application packages.
If you look at the number of packages that have been added to the distro (i.e. did not exist in Slackware 14.2), that’s an impressive 534.
The compressed size of these packages went up from 2.4 GB to 3.0 GB. Uncompressed and installed onto your computer, the difference will be significantly larger. The recommended disk space needed for a full installation, increases from 9+ GB (Slackware 14.2) to 16+ GB.
So what about that exciting content you can find in the new 15.0 release?
Slackware 15.0 installs Linux kernel 5.15.19.
The kernels all have preemption enabled and you can configure your bootloader for full, dynamic or no preemption.
The installer properly supports installing to NVMe disks and has improved support for installing on UEFI platform.
Slackware still supports 32bit hardware platforms and is one of the few relevant Linux distros that do so today.
Both the 64bit and the 32bit distro are built from a single source tree.
Collaboration with smart people on the LinuxQuestions.org forum resulted in the ability for Slackware to be reliably built from scratch these days. Thanks in particular to worsel and nobodino. The latter maintains his efforts in a git repository from which Slackware has borrowed several patches. Slackware itself has a ‘master build script’ called make_world.sh and Patrick keeps a log of everything that “fails to build from source” aka the FTBFSlog files which you can find in the source-directory root of every package series. Nothing in the distro fails to build from source right now, which is awesome and a definite change from previous stable releases.
In ./source/installer you find the complete sources to easily rebuild the Slackware installer from scratch.
ConsoleKit2 was replaced with elogind as the session/seat manager. Elogind is a standalone version of the logind code in systemd and independently maintained at https://github.com/elogind/elogind .
FFmpeg and Lame have been added to the distro, yay! Also, it includes SDL2, speex, opus, fluidsynth.
A new command-line ISO creation tool to supplement cdrtools was added: xorriso.
Python3 was introduced but Python2 stuff remains available and is still the default python. Its most relevant modules have been bundled in a compatibility package.
Postfix has been added and Sendmail moved to ./extra where it still receives upgrades. Lucky me, I still prefer and use Sendmail on my boxes.
Dovecot is the powerful new IMAP and POP3 server, replacing the old imapd and ipop3d.
The Qt4 graphical toolkit has been removed and Qt5 came in its place.
KDE 4 (which was already abandoned at the release of Slackware 14.2) has been replaced with KDE Plasma5. More specifically, with Frameworks 5.90, Plasma 5.23.5 and Applications 21.12.1, meaning the very latest versions; all released this January 2022. This is topped with some cool additional Plasma5 applications like the Calligra office suite, Krita vector drawing program, Digikam photo management, KMymoney personal finance management, the Chromium- and Qt5-based webbrowser Falkon and Kyle LaTeX editor (and then some). And of course KDevelop.
The latest XFCE 4.16 is included and it’s a very nice step-up from the version of Slackware 14.2.
Wayland 1.20.0 is available as alternative to the venerable X.Org 1.20.14 which is still the default graphical display system.
The latest Mesa and Vulkan libraries are installed and GLvnd (the GL Vendor-Neutral Dispatch library) ensures that for instance NVIDIA’s binary driver is a breeze ti install and will not overwrite any system files.
Pulseaudio has competition from Pipewire which has been added to the distro and ships with a configuration that can mostly replace pulseaudio with this new low-latency audio server.
The whole build toolchain has seen a thorough refresher, with glibc 2.33, GCC 11.2.0 and LLVM 13.0.0 and the addition of Rust which is now at 1.58.1. Also essential tools that are part of modern-day software compilation like meson, ninja, scons and icecream are new in Slackware 15.0.
… and there’s a lot of other stuff that you have to find out for yourself.
Using Slackware
All in all, when you install Slackware 15.0 on your computer you will be able to work in graphical desktop environments and using tools that are on par with all the big distros. When looking for software that is not part of the core distro you can turn to slackbuilds.org (SBo) which is a curated platform for Slackware package build scripts. Tools like sbopkg, sbotools and slpkg will assist you in automating the build- and dependency resolving process when using these scripts from SBo.
Third-party package repositories are also available to quickly install binary packages if you do not trust yourself when compiling from source. You can think of my own alien and restricted packages but also Robby Workman’s package repository or the SlackOnly collection of packages that have been pre-compiled for you out of all the SBo scripts.
Slackware’s own slackpkg package manager which only deals with official Slackware packages can be extended with the plugin slackpkg+ if you want to be able to easily manage a mix of official and 3rd-party packages using a single tool.
Slackpkg with the slackpkg+ plugin also supports managing a multilib installation (i.e. a 64bit Slackware OS which is capable of running and compiling 32bit software). With multilib, running the Steam gaming platform is fully supported on your 64bit Slackware, and Steam applications run as fast on Slackware (or faster) than on Windows.
I hope you are all as excited about this new release of Slackware Linux as I am, and I hope you will have a lot of fun using it. Of course, those of you who have been running the ‘bleeding edge’ all the time, aka Slackware-current, can keep doing that. The Slackware-current tree is still there and it will now focus on post 15.0 development towards the next stable release.
Upgrading from 14.2
People upgrading from Slackware 14.2 have multiple options. You should definitely read the CHANGES_AND_HINTS file to get a good picture of the many package additions and removals. The UPGRADE.TXT file is an invaluable source if you want to perform a manual upgrade.
The Slackware Documentation Project contains an article called “upgrading Slackware to a new release“. It describes how to use the slackpkg tool (which is part of Slackware) to perform the upgrade with a large degree of automation.
Still, it is good to be aware that Slackware moved from ConsoleKit2 to elogind and one thing will be immediately obvious if you start an X session after upgrade and reboot:
With elogind as the session/seat manager instead of ConsoleKit2, if you run ‘startx’ or ‘startkwayland’ at the console, you won’t see a VT (virtual terminal) switch. In the past, your console TTY would usually be tty1 but your graphical session would start on tty7 and you would automatically be switched from tty1 to tty7. This is no longer true – the graphical session will re-use your console TTY.
You can read more details about the implications of the switch to elogind in my 2020 blog post here on Alien Pastures.
Get Slack
Download your official ISO images from any of the Slackware mirrors. We use mirrorbrain to ensure that a visit to mirrors.slackware.com will lead you to a server that is near to you.
Support Slackware
Please consider supporting Patrick and his family by visiting his Patreon Page, choosing a membership category and becoming a Patron. If you can spare a dollar or so per month, it will help keeping this unique distribution alive. All that money goes only to Pat.
If you are longing for the stuff that The Store used to sell, you can have a look at this CafePress URL which is Pat’s. Anything you buy there generates some money for him: so on you go to Patrick’s CafePress Shop.
Don’t fall for the fakes (several others on Cafepress sell clothing and gear with Slackware’s logo on them)!
Give Slackware a test-drive
Has the article made you curious or interested but you don’t yet feel comfortable installing Slackware on your computer?
We’ve got you covered!
There’s a Slackware Live Edition waiting for you. It is the same Slackware 15.0 but it will run entirely from a USB stick, won’t touch your harddisks and you don’t have to install anything.
Unlike Slackware itself, the Slackware Live Edition supports Secure Boot but you’ll have to enroll the liveslak certificate into your computer’s MOK first.
And if you do want to install Slackware after seeing the Live Edition, there’s a “Install Slackware” icon right there on the graphical desktop, which you can click (and use the password “live“!) to run through a slightly modified but still very familiar Slackware setup program (called ‘setup2hd‘ in the Live Edition).
The stable releases (14.2 and 15.0 being the most recent ones) which get regular security updates but no changes in functionality;
And the development release called ‘slackware-current’ which has a lot of activity with sometimes daily updates, new functionality and basically being there for all of us to test and find the bugs.
Note that the designation ‘-current‘ confuses some people who interpret “current” as “latest stable“. It is not!
Are you running ‘-current’ but want to switch to Slackware 15.0 and enjoy a stable experience with regular security updates but without the hassle of daily upgrades and occasional breakage? It’s as easy as opening the mirror list (/etc/slackpkg/mirrors) for your package manager slackpkg, and selecting a Slackware 15.0 mirror instead of a Slackware-current mirror.
To give an example: I myself would change the single un-commented line in that file “http://slackware.nl/slackware/slackware64-current/” to “http://slackware.nl/slackware/slackware64-15.0/“, and then run “slackpkg update ; slackpkg install-new ; slackpkg upgrade-all“. Now my computer is fully up-to-date with Slackware 15.0 and ready to receive future security upgrades.
Note that if you are not only interested in security updates but actually want to be able to run new software all the time, then the development release “Slackware-current” is still the better option for you; but you need to be able to fix the occasional breakage which is inherent to walking the bleeding edge. If you want to switch from a stable release to -current, the process is simular to the example above: change the mirror line in “/etc/slackpkg/mirrors” to the URL of a slackware-current repository and be sure to read the documentation.
Looking forward
Things I hope to see in that next release post 15.0:
Out-of-the-box support for SecureBoot
The switch from Elilo to Grub as the default bootloader for UEFI platforms
Getting rid of the huge kernel and automatically generate and use initrd.gz images with generic kernels in Lilo and Grub
Full integration of Pipewire as an audio/video server replacing Pulseaudio and making Jack2 superfluous
A basic firewall as part of the initial installation
Not all of that will probably be achievable, but we’ll see…
In memoriam
A long-standing member of the Slackware core team passed away during the development process towards Slackware 15.0. Erik Jan Tromp (alphageek) would have loved to have been able to witness the release of Slackware 15.0 but circumstances decided otherwise. We said goodbye to him in March 2020.
He will be remembered fondly.
Hi all! This is already the third episode in a series of articles I am writing about using Slackware as your private/personal ‘cloud server’. Time flies when you’re having fun.
We’re still waiting for Slackware 15.0 and in the meantime, I thought I’d speed up the release of my article on Video Conferencing. My initial plan was to release one article per week after Slackware 15 had been made available. The latter still did not happen (unstuck in time again?) but then I realized, an article about Docker and another about Keykloak still won’t give you something tangible and productive to run and use. So here is Episode 3, a couple of days earlier than planned, to spend your lazy sunday on: create your own video conferencing platform.
Episodes 4 and 5 won’t be far off, since I have already written those as well.
Check out the list below which shows past, present and future episodes in the series, if the article has already been written you’ll be able to click on the subject.
The first episode also contains an introduction with some more detail about what you can expect.
Episode 3 (this article): Video Conferencing Setting up Jitsi Meet – the Open Source video conferencing platform. This makes us independent of cloud conferencing services like MS Teams, Zoom or Google Meet. The Jitsi login is offloaded to our Keycloak IAM provider.
Jitsi Meet on Docker
Preamble
Initial Configuration
Adding Etherpad integration
Creating application directories
Starting Jitsi Meet
Considerations about the “.env” file
Upgrading Docker-Jitsi-Meet
Apache reverse proxy setup
Fixing Etherpad integration
Network troubleshooting
Creating internal Jitsi accounts
Connecting Jitsi and Keycloak
Adding jitsi-keycloak
Configuration of jitsi-keycloak in the Keycloak Admin console
Remaining configuration done in jitsi-keycloak
Configure docker-jitsi-meet for use of jitsi-keycloak
Actually, my original interest in Docker was raised in the beginning of 2020 when the Corona pandemic was new, everybody was afraid and people were sent home to continue work and school activities from there.
One of the major challenges for people was to stay connected. Zoom went from a fairly obscure program to a hugely popular video conferencing platform in no time at all (until severe security flaws made a fair-sized dent in its reputation); Microsoft positioned its Teams platform as the successor of Skype but targets mostly corporate users; Google Hangouts became Google Meet and is nowadays the video conferencing platform of choice for all corporations that have not yet been caught in the Microsoft vendor lock-in.
None of these conferencing platforms are open source and all of them are fully cloud-hosted and are inseparable from privacy concerns. In addition, un-paid use of these platforms imposes some levels of limitation to the size and quality of your meetings. As a user, you do not have control at all.
Enter Jitsi, whose Jitsi Meet platform is available for everybody to use online for free and without restrictions. Not just free, but Open Source, end-to-end encrypted communication and you can host the complete infrastructure on hardware that you own and control.
People do not even have to create an account in order to participate – the organizer can share a URL with everyone who (s)he wants to join a session.
Jitsi is not as widely known as Zoom, and that is a pity. Therefore this Episode in my Slackware Cloud Server series will focus on getting Jitsi Meet up and running on your server, and we will let login be handled by the Keycloak Identity and Access Management (IAM) tool which we have learnt to setup in the previous Episode.
In early 2020, when it became clear that our Slackware coreteam member Alphageek (Erik Jan Tromp) would not stay with us for long due to a terminal illness, I went looking for a private video conferencing platform for our Slackware team and found Jitsi Meet.
I had no success in getting it to work on my Slackware server unfortunately. Jitsi Meet is a complex product made of several independent pieces of software which need to be configured ‘just right‘ to make them work together properly. I failed. I was not able to make it work in time to let alphageek use it.
But I also noticed that Jitsi Meet was offered as a Docker-based solution. That was the start of a learning process full of blood sweat & tears which culminated in this article series.
With this article I hope to give you a jump-start in getting your personal video conferencing platform up and running. I will focus on the basic required functionality but I will leave some of the more advanced scenarios for you to investigate: session recording; automatic subtitling of spoken word; integrating VOIP telephony; to name a few.
Jitsi Meet on Docker
Docker-Jitsi-Meet is a Jitsi Github project which uses Docker Compose to create a fully integrated Jitsi application stack which works out of the box. All internal container-to-container configurations are pre-configured.
As you can see from the picture below, the only network ports that need to be accessible from the outside are the HTTPS port (TCP port 443) of your webserver, UDP port 10000 for the WebRTC (video) connections and optionally (not discussed in my article) UDP port range 20000 – 20050 for allowing VOIP telephones to take part in Jitsi meetings.
These ports need to be opened in your server firewall.
Installing docker-jitsi-meet is relatively straight-forward if you go the quick-start page and follow the instructions to the letter. Integrating Jitsi with Keycloak involves using a connector which is not part of either programs; I will show you how to connect them all.
You will be running all of this in Docker containers eventually, but there’s stuff to download, edit and create first. I did not say it was trivial…
Preamble
For the sake of this instruction, I will use the hostname “https://meet.darkstar.lan” as the URL where users will connect to their conferences; The server’s public IP address will be “10.10.10.10“.
Furthermore, “https://sso.meet.darkstar.lan” will be the URL for the connector between Jitsi and Keycloak and “https://sso.darkstar.lan/auth” is the Keycloak base URL (see Episode 2 for how we did the Keycloak setup).
Setting up your domain (which will hopefully be something else than “darkstar.lan”…) with new hostnames and then setting up web servers for the hostnames in that domain is an exercise left to the reader. Before continuing, please ensure that your equivalents for the following two hosts have a web server running. They don’t have to serve any content yet but we will add some blocks of configuration to their VirtualHost definitions during the steps outlined in the remainder of this article:
meet.darkstar.lan
sso.meet.darkstar.lan
I expect that your Keycloak application is already running at your own real-life equivalent of https://sso.darkstar.lan/auth .
Note that I am talking about webserver “hosts” but in fact, all of these are just virtual webservers running on the same machine, at the same IP address, served by the same Apache httpd program, but with different DNS entries. There is no need at all for multiple computers when setting up your Slackware Cloud server.
Initial Configuration
Download and extract the tarball of the latest stable release: https://github.com/jitsi/docker-jitsi-meet/releases/latest into the “/usr/local/” directory. Basically any directory will do but I am already backing up /usr/local so the Jitsi stuff will automatically be taken into backup with all the rest.
At the moment of writing, the latest stable version number is ‘6826‘. Which means, after extracting the tarball we do:
cd /usr/local/docker-jitsi-meet-stable-6826/
A Jitsi Meet container stack for Docker Compose is defined in the file “docker-compose.yml” which you find in this directory.
In addition to this YAML file, the ‘docker-compose‘ program parses a file named “.env” if it exists in the same directory. Its content is used to initialize the container environment. You can for instance store passwords and other secrets in “.env” but also all the configuration variables that define how your stack will function.
Docker-Jitsi-Meet ships an example environment file containing every configurable option, but mostly commented-out.
Configuration:
We start with creating a configuration file “.env” from the example file “env.example“:
$ cp -i env.example .env
And then edit the “.env” file to define our desired configuration.
First of all,
Change “CONFIG=~/.jitsi-meet-cfg” to “CONFIG=/usr/share/docker/data/jitsi-meet-cfg” because I do not want application data in my user’s or root’s homedirectory.
Then the ones that are easy to understand:
Change “HTTP_PORT=8000” to "HTTP_PORT=8440” because port 8000 is used by far too many applications. Port 8440 is what we will use again in the reverse proxy configuration.
Change “TZ=UTC” to “TZ=Europe/Amsterdam” or whatever timezone your server is in.
Change “#PUBLIC_URL=https://meet.example.com” to “PUBLIC_URL=https://meet.darkstar.lan/” i.e. change it to the URL where you want people to connect. The connections will be handled by your Apache httpd server who will manage the traffic back and forth between Jitsi container and the client.
Change “#DOCKER_HOST_ADDRESS=192.168.1.1” to “DOCKER_HOST_ADDRESS=10.10.10.10” where of course “10.10.10.10” needs to be replaced by your server’s actual public Internet IP address.
Other settings that I would explicitly enable but their commented-out values are the default values anyway (matter of taste, it avoids getting bitten by a future change in application default settings):
Change “#ENABLE_IPV6=1” to “ENABLE_IPV6=0” if your Docker installation has ipv6 disabled. This is a requirement if your host server would have ipv6 disabled.
You can find out whether ipv6 is disabled in Docker, because in that case the file “/etc/docker/daemon.json” will contain this statement:
{ "ipv6": false }
Connection encryption:
Change “#DISABLE_HTTPS=1” to “DISABLE_HTTPS=1“. We disable HTTPS in the container because we will again use Apache http reverse proxy to handle encryption.
Change “#ENABLE_LETSENCRYPT=1” to “ENABLE_LETSENCRYPT=0” because we do not want the container to handle automatic certificate renewals – it’s just too much of a hassle on a server where you already run a webserver on ports 80 and 443. Our Apache reverse proxy is equipped with a Let’s Encrypt SSL certificate and I want to handle SSL certificate renewals centrally – on the host.
Authentication:
The authentication will be offloaded to Keycloak using JSON Web Tokens aka ‘JWT‘ for the inter-process communication. The following variables in “.env” need to be changed:
“#ENABLE_AUTH=1” should become “ENABLE_AUTH=1“
“#ENABLE_GUESTS=1” should become “ENABLE_GUESTS=1“
“#AUTH_TYPE=internal” should become “AUTH_TYPE=jwt“
“TOKEN_AUTH_URL=https://auth.meet.example.com/{room}” should become “TOKEN_AUTH_URL=https://sso.meet.darkstar.lan/{room}“
“#JWT_APP_ID=my_jitsi_app_id” should become “JWT_APP_ID=jitsi“
“#JWT_APP_SECRET=my_jitsi_app_secret” should become “JWT_APP_SECRET=NmjPGpn+NjTe7oQUV9YqfaXiBULcsxYj“
Actually, to avoid confusion: my proposed value of “JWT_APP_SECRET" (the string “NmjPGpn+NjTe7oQUV9YqfaXiBULcsxYj”) is a value which you will be generating yourself a few sections further down. It is a string which is used by two applications to establish mutual trust in their intercommunication.
We will re-visit the meaning and values of JWT_APP_ID and JWT_APP_SECRET in a moment.
When our modifications to the “.env” file are complete, we run a script which will fill the values for all PASSWORD variables with random strings (this can be done at any time really):
$ ./gen-passwords.sh
Note that in later versions of docker-jitsi-meet, the env.example file has become a lot smaller. Docker Jitsi has implemented all variables with default values. Beware that these defaults might not be working for your case!
The full documentation on configurable parameters is found at: https://jitsi.github.io/handbook/docs/devops-guide/devops-guide-docker
Adding Etherpad integration
Etherpad is an online editor for real-time collaboration. The Docker version of Jitsi Meet is able to integrate Etherpad into your video conferences. I am going to show you how to run Etherpad on your Slackware Cloud server and integrate collaborative editing into your video meetings.
The git checkout of ‘docker-jitsi-meet‘ into /usr/local/docker-jitsi-meet-stable-6826/will have given you not only a docker-compose.yml file which starts Jitsi and its related containers, but also a file etherpad.yml. This is a Docker Compose file which starts an Etherpad container and connects it to the Jitsi Meet container stack.
FYI: you can use Docker Compose to process multiple YAML files in one command-line instead of implicitly processing only the ‘docker-compose.yml’ file (which happens if you do not explicitly mention the YAML filename in a “-f” parameter).
For instance if you wanted to start Jitsi and Etherpad together, you would use a command like this, using two “-f” parameters to specify the two YAML files:
# docker-compose -f docker-compose.yml -f etherpad.yml up -d
But I found out the hard way that this is risky.
Because sometime in the future you may want to bring that container stack down, for instance to upgrade Jitsi Meet to the latest version. If you forget that you had actually started two stacks (I consider the ‘etherpad.yml’ as the source for a second stack ) and you simply run “docker-compose down” in the directory… then only the Jitsi Meet stack will be brought down and Etherpad will happily keep running.
To protect myself from my future self, I have copied the content of ‘etherpad.yml‘ and added it to the bottom of ‘docker-compose.yml‘, so that I can simply run:
# docker-compose up -d
I leave it up to you to pick either scenario. Whatever works best for you.
Now on to the stuff that needs fixing because the standard configuration will not result in a working Etherpad integration.
First of all, add a “ports” configuration to expose the Etherpad port outside of the container. This is how that looks in the YAML file:
You will also have to edit the “.env” file a bit more. Look for the ETHERPAD related variables and set them like so:
# Set etherpad-lite URL in docker local network (uncomment to enable)
ETHERPAD_URL_BASE=http://etherpad.meet.jitsi:9001
# Set etherpad-lite public URL, including /p/ pad path fragment (uncomment to enable)
ETHERPAD_PUBLIC_URL=https://meet.darkstar.lan/pad/p/
# Name your etherpad instance!
ETHERPAD_TITLE=Slackware EtherPad Chat
# The default text of a pad
ETHERPAD_DEFAULT_PAD_TEXT="Welcome to Slackware Web Chat!\n\n"
The most important setting is highlighted in green: “https://meet.darkstar.lan/pad/p/” . This is the external URL where we will expose our Etherpad. Since the Docker container exposes Etherpad only at the localhost address “127.0.0.1:9001” we need to setup yet another Apache reverse proxy. See the section “Apache reverse proxy setup” below.
There is one potential snag and you have to consider the implications: in the above proposed setup we expose Etherpad in the “/pad/” subdirectory of our Jitsi Meet server. But the Jitsi conference rooms also are exposed as a subdirectory, but then without the trailing slash. Which means everything will work just fine as long as nobody decides to call her conference room “pad” – that can lead to unexpected side effects. You could remedy that by choosing a more complex string than “/pad/” for Etherpad, or else setup a separate web host (for instance “etherpad.darkstar.lan“) just for Etherpad.
In any case, with all the preliminaries taken care of, you can continue with the next sections of the article.
Note: After starting the containers, you will have to do one last edit in the configuration of Jitsi Meet to actually make Etherpad available in your videomeetings. See the section “Fixing Etherpad integration” below.
I am still investigating the integration of Keycloak authentication with Etherpad. Once I am sure I have a working setup, I will do a write-up on the subject in a future article in this series. In the meantime, you need to realize that your Etherpad is publicly accessible.
Creating application directories
The various Docker containers that make up Docker-Jitsi-Meet need to write data which should persist across reboots. The “CONFIG” variable in “.env” points to the root of that directory structure and we need to create the empty directory tree manually before firing up the containers.
Using one smart command which will be expanded by Bash to a lot of ‘mkdir‘ commands:
And that’s it. Our Jitsi Meet video conferencing platform is up and running.
But it is not yet accessible: we still need to connect the container stack to the outside world. This is achieved by adding an Apache httpd reverse proxy between our Docker stack and the users. See below!
Considerations about the “.env” file
Note that the “.env” file is only used the very first time ‘docker-compose‘ starts up your docker-jitsi-meet container stack, in order to populate /usr/share/docker/data/jitsi-meet-cfg/ and its subdirectories.
After that initial start of the docker-jitsi-meet container stack you can tweak your setup by editing files in the /usr/share/docker/data/jitsi-meet-cfg/ directory tree, since these directories are mounted inside the various containers that make up Docker-Jitsi-Meet.
But if you ever edit that “.env” file again… you need to remove and re-create the directories below /usr/share/docker/data/jitsi-meet-cfg/ and restart the container stack.
NOTE: ‘docker-compose stop‘ stops all containers in the stack which was originally created by the ‘docker-compose up -d‘ command. Using ‘down‘ instead of ‘stop‘ will additionally remove containers and networks as defined in the Compose file(s). After using ‘down‘ you would have to use ‘up -d‘ instead of ‘start‘ to bring the stack back online.
This is how you deal with “.env” configuration changes:
# cd /usr/local/docker-jitsi-meet-stable-*
# docker-compose stop
# vi .env
# ... make your changes
# rm -rf /usr/share/docker/data/jitsi-meet-cfg/
# mkdir -p /usr/share/docker/data/jitsi-meet-cfg/{web/letsencrypt,transcripts,prosody/config,prosody/prosody-plugins-custom,jicofo,jvb,jigasi,jibri}
# docker-compose start
Upgrading Docker-Jitsi-Meet
You don’t need to follow the above process if you want to upgrade Docker-Jitsi-Meet to the latest stable release as part of life cycle management, but with an un-changed “.env” file. In such a case, you simply execute:
# cd /usr/local/docker-jitsi-meet-stable-*

# docker-compose down

# docker-compose pull

# docker-compose up -d
Apache reverse proxy setup
We need to connect the users of our Jitsi and Etherpad services to the containers. Since these containers are exposed by Docker only at the loopback address (127.0.0.1 aka localhost) we use the Apache httpd’s ‘reverse proxy‘ feature.
These three blocks of text need to be added to the VirtualHost definition for your “meet.darkstar.lan” webserver so that it can act as a reverse proxy and connects your users to the Docker Jitsi Meet and Etherpad containers:
Generic block:
SSLProxyEngine on
RequestHeader set X-Forwarded-Proto "https"
ProxyTimeout 900
ProxyVia On
ProxyRequests Off
ProxyPreserveHost On
Options FollowSymLinks MultiViews
AllowOverride All
Order allow,deny
allow from all
Specific to Jitsi Meet:
<Location />
    ProxyPass http://127.0.0.1:8440/
    ProxyPassReverse http://127.0.0.1:8440/
</Location>
# Do not forget WebSocket proxy:
RewriteEngine on
RewriteCond %{HTTP:Connection} Upgrade [NC]
RewriteCond %{HTTP:Upgrade} websocket [NC]
RewriteRule ^/?(.*) "ws://127.0.0.1:8440/$1" [P,L]
And specific to Etherpad:
<Location /pad/>
    ProxyPass http://127.0.0.1:9001/ retry=0 timeout=30
    ProxyPassReverse http://127.0.0.1:9001/
    AddOutputFilterByType SUBSTITUTE text/html
    Substitute "s|meet.darkstar.lan/|meet.darkstar.lan/pad/|i"
</Location>
<Location pad/socket.io>
    # This is needed to handle websocket transport through the proxy, since
    # etherpad does not use a specific sub-folder, such as /ws/
    # to handle this kind of traffic.
    RewriteEngine On
    RewriteCond %{QUERY_STRING} transport=websocket [NC]
    RewriteRule /(.*) ws://127.0.0.1:9001/socket.io/$1 [P,L]
    ProxyPass http://127.0.0.1:9001/socket.io retry=0 timeout=30
    ProxyPassReverse http://127.0.0.1:9001/socket.io
    AddOutputFilterByType SUBSTITUTE text/html
    Substitute "s|meet.darkstar.lan/|meet.darkstar.lan/pad/|i"
</Location>
In “127.0.0.1:8440” you will recognize the TCP port 8440 which we configured for the Jitsi container in the “.env" file earlier. The “127.0.0.1:9001” corresponds to the port 9001 which we exposed explicitly in the ‘docker-compose.yml‘ file for the Etherpad service.
After adding this reverse proxy configuration and restarting Apache httpd. your video conference server will be publicly accessible at https://meet.darkstar.nl/ .
Fixing Etherpad integration
I told you earlier that you needed to make a final edit after the Jitsi Meet stack is up & running to fix the Etherpad integration.
Open the stack’s global config file “/opt/jitsi-meet-cfg/web/config.js” in your editor and look for this section of text:
// If set, add a "Open shared document" link to the bottom right menu that

// will open an etherpad document.

// etherpad_base: 'https://meet.darkstar.lan/pad/p/',
You need to un-comment the last line so that this section looks like:
// If set, add a "Open shared document" link to the bottom right menu that

// will open an etherpad document.

etherpad_base: 'https://meet.darkstar.lan/pad/p/',
It’s a long-standing bug apparently.
Note that in newer releases of docker-jitsi-meet, this manual edit in web/config.js is no longer needed for proper Etherpad integration, It’s automatically added there now as: config.etherpad_base = 'https://meet.darkstar.lan/pad/p/';
The ‘ports’ section still needs to be added to the etherpad definition in our docker-compose.yml file.
Now, when you join a Jitsi Meeting, the menu which opens when you click the three-dots “more actions” menu in the bar at the bottom of your screen, will contain an item “Open shared document“:
If you select this, your video will be replaced by an Etherpad “pad” with the name of your Jitsi meeting room.
Externally i.e. outside of the Jitsi videomeeting, your Etherpad ‘pad‘ will be available as “https://meet.darkstar.lan/pad/p/jitsiroom” where “jitsiroom” is the name you gave your Jitsi videomeeting aka ‘room‘. This means that people outside of your videomeeting can still collaborate with you in real-time.
Network troubleshooting
Docker’s own dynamic management of iptables chains and rulesets will be thwarted if you decide to restart your host firewall. The custom Docker chains disappear and the docker daemon gets confused. If you get these errors in logfiles when starting the Docker-Jitsi-Meet containers, simply restart the docker daemon itself (/etc/rc.d/rc.docker restart):
> driver failed programming external connectivity on endpoint docker-jitsi-meet

> iptables failed

> iptables: No chain/target/match by that name
Creating internal Jitsi accounts
Just for reference, in case you want to play with Jitsi before integrating it with Keycloak.
Internal Jitsi users must be created with the “prosodyctl” utility in the prosody container.
In order to run that command, you need to first start a shell in the corresponding container – and you need to do this from within the extracted tarball directory “/usr/local/docker-jitsi-meet-stable-*“:
# cd /usr/local/docker-jitsi-meet-stable-*

# docker-compose exec prosody /bin/bash
Once you are at the prompt of that shell in the container, run the following command to create a user:
Now user “alien” will be able to login to Jitsi Meet and start a video conference.
Connecting Jitsi and Keycloak
The goal is of course to move to a Single Sign On solution instead of using local accounts. Jitsi supports JWT Tokens which it should get from a OAuth/OpenID provider. We have Keycloak lined up for that, since it supports OAuth, OpenID, SAML and more.
Adding jitsi-keycloak
Using Keycloak as OAuth provider for Jitsi Meet is not directly possible, since unfortunately Keycloak’s JWT token is not 100% compatible with Jitsi. So a ‘middleware‘ is needed, and jitsi-keycloak fills that gap.
We will download the middleware from their git repository and setup a local directory below “/usr/share/docker/data” where we have been storing configurations for all our applications so far. All we are going to use from that repository checkout is the Docker Compose file you can find in there. The actual ‘jitsi-keycloak‘ middleware will eventually be running as yet another Docker container.
Edit our working copy ‘/usr/share/docker/data/jitsi-keycloak/docker-compose.yml‘ to provide the correct environment variables for our instances of our already running Jitsi and Keycloak containers:
The string value for the JITSI_SECRET variable needs to be the same string we used in the definition of the Jitsi container earlier, where the variable is called JWT_APP_SECRET.
Hint: in Bash you can create a random 32 character string like this:
Configuration of jitsi-keycloak in the Keycloak Admin console
Point your browser to the Keycloak Admin console https://sso.darkstar.lan/auth/admin/ to start the configuration process.
Add a public openid-connect client in the ‘foundation‘ Keycloak realm (the realm where you created your users in the previous Episode of this article series):
Select ‘foundation‘ realm; click on ‘Clients‘ and then click ‘Create‘ button.
‘Client ID‘ = “jitsi“
‘Client Protocol‘ = “openid-connect” (the default)
Save.
Also in ‘Settings‘, allow this app from Keycloak.
Our Jitsi-keycloak container is running on https://sso.meet.darkstar.lan . Therefore we add
Click ‘Download‘ which downloads a file “keycloak.json” with the below content:
On Keycloak >= 20.x,
Go to ‘Clients‘ tab
Select the ‘jitsi‘ client
Click the ‘Action‘ dropdown in the top right of the page
Select ‘Download adapter config‘ and keep the default format option ‘Keycloak OIDC JSON‘
Click ‘Download‘ or else copy/paste the JSON code which is displayed on-screen.
Remaining configuration done in jitsi-keycloak
Back at your server’s shell prompt again, do as follows:
Copy the downloaded “keycloak.json” file into the ‘/config‘ directory of jitsi-keycloak (the container’s /config is exposed in the host filesystem as /usr/share/docker/data/jitsi-keycloak/config).
Start the jitsi-keycloak container in the directory where we have our tailored ‘docker-compose.yml‘ file:
# cd /usr/share/docker/data/jitsi-keycloak

# docker-compose up -d
Once the container is running, we make jitsi-keycloak available at https://sso.meet.darkstar.lan/ using a reverse-proxy setup (jitsi-keycloak will not work in a sub-folder).
Add these reverse proxy lines to your VirtualHost definition of the “sso.meet.darkstar.lan” web site configuration and restart httpd:
# ---
# Reverse proxy to jitsi-keycloak Docker container:
SSLProxyEngine On
SSLProxyCheckPeerCN on
SSLProxyCheckPeerExpire on
RequestHeader set X-Forwarded-Proto: "https"
RequestHeader set X-Forwarded-Port: "443"

<Location />
    AllowOverride None
    Require all granted
    Order allow,deny
    Allow from all
</Location>

ProxyPreserveHost On
ProxyRequests Off
ProxyVia on
ProxyAddHeaders On
AllowEncodedSlashes NoDecode

# Jitsi-keycloak:
ProxyPass / http://127.0.0.1:3000/
ProxyPassReverse / http://127.0.0.1:3000/
# ---
Configure docker-jitsi-meet for use of jitsi-keycloak
Actually, you have already done all the correct changes which are needed in the ‘.env‘ file for Docker Compose!
The docker-jitsi-meet configurations that are relevant for jitsi-keycloak are as follows:
ENABLE_AUTH=1

AUTH_TYPE=jwt

JWT_APP_ID=jitsi

JWT_APP_SECRET=NmjPGpn+NjTe7oQUV9YqfaXiBULcsxYj

# To enable an automatic redirect from Jitsi to the Keycloak login page:

TOKEN_AUTH_URL=https://sso.meet.darkstar.lan/{room}
The values for ‘JWT_APP_SECRET‘ and ‘JITSI_SECRET‘ must be identical, and the value of ‘JWT_APP_ID‘ must be equal to “jitsi“.
Firing up the bbq
With all the prep work completed and the containers are running, we can enjoy the new online video conferencing platform we now operate for friends and family.
So, how does this actually look in practice? I’ll share a couple of screenshots from a Jitsi Meet session that I setup. Look at how cool it looks (and not just because of the screenshot of my den and the Slackware hoodie I am wearing…)
The Jitsi Meet welcome screen:
Device settings:
Joining a meeting:
Logging in via Keycloak SSO, you’ll notice that I have configured 2-Factor Authentication for my account:
After having logged in, I am back at the “join meeting screen” but now with my name written as Keycloak knows it (“Eric Hameleers” instead of “Alien BOB“) and I need to click one more time on the “Join” button.
Then I am participating in the meeting as the moderator.
You’ve probably noticed that I flipped my camera view here. I also added one ‘break-out room‘ to allow for separate discussions to take place outside of the main room:
And if you are not the moderator but a guest who received the link to this meeting, this is what you’ll see at first:
Cool, eh?
Thanks
… again for taking the time to read through another lengthy article. Share your feedback in the comments section below, if you actually implemented Jitsi Meet on your own server.
Attribution
The Docker-Jitsi-Meet architecture image was taken from Jitsi’s github site.
Hi all! This is the second episode in a series of articles I am writing about using Slackware as your private/personal ‘cloud server’ while we are waiting for the release of Slackware 15.0.
Below is a list of past, present and future episodes in the series. If the article has already been written you’ll be able to access it by clicking on its subject.
The first episode also contains an introduction with some more detail about what you can expect from these articles.
Episode 2 (this article): Identity and Access management (IAM)
Setting up Keycloak for Identity and Access Management to provide people with a single user account for all the Slackware Server Services we will be creating.
When you run a server that offers all kinds of web-based services, and you want all these services to be protected with an authentication and authorization layer (i.e. people have to login first and then you decide what kind of stuff they can access) it makes sense to let people have only one identity (one set of credentials) that can be used everywhere. Not exactly ‘Single Sign On‘ because you may have to logon to the various parts separately but you would be using that single identity everywhere.
Slackware comes with Kerberos and OpenLDAP servers which can be used together with for instance Samba to create a Single Sign On environment on a local network. But since I am looking for something more infrastructure agnostic which works all across the Internet, I ended up with something I vaguely knew since it’s used in places in our own company to provide credential management: Keycloak.
Keycloak offers web-based Open Source Identity and Access Management (IAM). Using Keycloak, I will show you how to add authentication and authorization to the applications that I will be adding to my “Slackware Cloud Server”.
Keycloak can be used to manage your users, but if you already manage your users in an OpenLDAP server or in Active Directory, Keycloak can use these as its back-end instead of its own local SQL database.
The users of our Slackware server will authenticate with Keycloak rather than with the individual applications. Ideally, once your users have logged into Keycloak they won’t have to login again to access a different application. Likewise, Keycloak provides single-sign out, which means after a user logs out of Keycloak, that will apply to all the applications that use Keycloak.
Keycloak can also act as an Identity Broker for “social login” so that you are able to use social networks like Facebook, Google etc as Identity Providers. Our Slackware server applications that ask Keycloak to handle the user login and authorizations don’t know and don’t care about exactly how the authentication took place, as long as it’s a process the administrator trusts.
For the purposes of this article however, I will limit the use of Keycloak to authentication through OpenID Connect (OIDC) or SAML 2.0 Identity Providers. The applications I will discuss in the upcoming articles (NextCloud, Jitsi Meet, Quay, Docker Registry) all support the OIDC protocol for off-loading authentication / authorization so we’ve got that covered.
Keycloak does not only manage the identities that allow your users to login; Keycloak can also manage authorizations.
You may want to allow specific users a different level of access to your applications, or prevent access to some of them entirely. You can assign roles to users or add them to groups and then configure the access to your applications using the available roles or group memberships.
Preamble
For the sake of this instruction and for future articles in this series, “https://sso.darkstar.lan/auth” is the base URL that eventually the Keycloak application will be available at at.
Configuring the DNS for your own domain (will probably be something else than “darkstar.lan”…) with new hostnames and then setting up web servers for the hosts in that domain is an exercise left to the reader.
Before continuing, please ensure that your real-life equivalent for the following host has a web server running:
sso.darkstar.lan
It doesn’t yet have to serve any content yet but its URL needs to be accessible to all applications and users that you want to give access to your Slackware Cloud Server. We will add some blocks of configuration to the VirtualHost definition during the steps outlined in the remainder of this article.
Starting with Keycloak 20 (released in November 2022), the WildFly based distribution is no longer supported. For the newer Quarkus distribution of Keycloak, check out the new documentation .
This article targets a pre-20 release Docker container. I will have to update the text to make it reflect the new Docker options.
Working with a Docker based server infrastructure is something I covered in the previous article of this series. I assume you have Docker up and running and are at least somewhat comfortable creating containers and managing their life-cycle.
Keycloak can be installed on a bare metal server but I have opted to go for their Docker-based install instead. The configuration will be stored in a MariaDB backend and an Apache reverse proxy will be the frontend which will handle the incoming connection requests and also enforces data encryption using a Let’s Encrypt SSL certificate.
The Keycloak github contains an example of a docker-compose solution with MariaDB and Keycloak in two separate containers (see https://github.com/keycloak/keycloak-containers/tree/master/docker-compose-examples) however the documentation states that this does not work currently because MariaDB does not start fast enough for Keycloak.
Also I think that having your database inside the container, or even mounting the host’s “/var/lib/mysql” directory into the container, will make backups difficult. So, our Keycloak application will connect to Slackware’s own included MariaDB database via the host’s IP address. There’s a paragraph further down where I share my considerations about this setup.
Here’s what we are going to do now: create the MariaDB database, create a private network for the Keycloak container so that it at least has some isolation from other containers, ensure that we have some kind of DNS service for the custom network (this example uses dnsmasq for that) and finally: start the Keycloak service as a single container, no Compose needed.
The MariaDB database
MariaDB in Slackware 15.0 is at version 10.5.13. Considering future upgrades: any security update in a stable Slackware release should not introduce breaking changes, but it’s always good to have read the MariaDB pages on database upgrades to avoid surprises. And always make backups that you have tested (are the backups useable).
Login to MariaDB as the administrator (commonly the user ‘root’):
$ mysql -uroot -p
Create the database:
> CREATE DATABASE IF NOT EXISTS keycloakdb CHARACTER SET utf8 COLLATE utf8_unicode_ci;
Create a database user for Keycloak:
> CREATE USER 'keycloakadm'@localhost IDENTIFIED BY 'your_secret_passwd';
Grant all privileges:
> GRANT ALL PRIVILEGES ON keycloakdb.* TO 'keycloakadm'@localhost;
Reload the grant tables (flush privileges) and quit the management interface:
> FLUSH PRIVILEGES;
> quit;
Network defaults in Docker
Docker claims a network range when it starts, in order to connect its containers to each other and to the real world. By default, the range is 172.17.0.0/255.255.0.0 and there is no reason to change that unless it collides with pre-existing network segments in your LAN. In that case, you would want to edit “/etc/docker/daemon.json” and add something like this to define a custom Bridge IP address and container IP range:
Docker needs a restart to pick up the changes. Newly created networks will then be dynamically assigned a /28 subnet of the larger IP range “192.168.56.0/21” unless you manually specify other ranges (see below).
Private network for Keycloak
We create a Docker network “keycloak0.lan” just for Keycloak, and make it use a different IP range than Docker’s default. Otherwise it would share its network with the rest of the containers and we want to create some level of real containment, as well as the ability to assign the Keycloak container a fixed IP address.
We need a fixed IP address in order to assign a hostname on the host so that Sendmail allows emails to be sent from within the container. Otherwise we would get ‘Relaying denied: ip name lookup failed” error from Sendmail.
Summarizing: the “keycloak0.lan” network will have a range of 172.19.0.0/16; and the fixed IP address for the Keycloak service will be 172.19.0.2 (since 172.19.0.1 will be the IP address of the Docker bridge).
My assumption is that your host does not act as the LAN’s DNS server. We will use dnsmasq to serve our new entries from /etc/hosts and /etc/networks – dnsmasq will be our local nameserver. For this we use the default, unchanged “/etc/dnsmasq.conf” configuration file.
You will also have to add this single line at the top of “/etc/resolv.conf” first, so that all DNS queries will go to our local dnsmasq:
nameserver 127.0.0.1
If you have not yet done so, (as root) make “/etc/rc.d/rc.dnsmasq” executable and start dnsmasq manually (Slackware will take care of starting it on every subsequent reboot):
Make Sendmail aware that the Keycloak container is a known local host by adding a line to “/etc/mail/local-host-names” and restarting the sendmail daemon:
If you use Postfix instead of Sendmail, perhaps this is not even an issue, but since I do not use Postfix I cannot tell you. Leave your comments below if I should update this part of the article.
MariaDB access from the network
Since our Keycloak container will connect to the MariaDB server over the network, we need to grant the Keycloak database account access to the database when it logs in from the network instead of via the localhost.
Login to ‘mysql’ as the admin (root) user and execute these commands that come on top of the ones that we already executed earlier:
> CREATE USER 'keycloakadm'@'%' IDENTIFIED BY 'your_secret_passwd';

> GRANT ALL PRIVILEGES ON keycloakdb.* TO 'keycloakadm'@'%';

> FLUSH PRIVILEGES;

> quit;
Keycloak container
We use a Docker container to run this IAM service. Remember that containers do not persist their data. In our case it means that the complete configuration which is needed by the Keycloak application inside that container in order to start up properly, has to be passed as command-line parameters to the ‘docker run‘ command.
This is how we start the Keycloak container, connecting it to the newly created network, assigning a static IP, using the ‘keycloak.lan‘ network gateway as the IP address for the MariaDB and passing it the required database properties.
By default, Keycloak listens at port “8080” but that is a portnumber which is (ab)used by many applications including proxy servers. Instead of accepting the default “8080” value we do a port-mapping and make Keycloak available at port “8400” instead by using the “-p” argument to ‘docker run‘.
We also pass the front-end URL which is going to be used by every application that wants to interact with the service (https://sso.darkstar.lan/auth). This URL is actually served by a Apache httpd reverse-proxy which we will put between the exposed port of the Keycloak container and the rest of the world:
That last argument ‘-Dkeycloak.profile.feature.docker=enabled‘ enables the “docker-v2” protocol in Keycloak for creating a Client in the realm. A Keycloak ‘Client ID‘ is what we need to connect an application to Keycloak as the login provider. This is a topic we will visit in future Episodes.
This ‘docker-v2‘ protocol is not fully compatible with the default OIDC protocol ‘openid-connect‘ and while not enabled in Keycloak by default, it is an officially supported Client Protocol.
We need ‘docker-v2‘ when we want the Docker Registry to be able to use Keycloak for authentication / authorization (the topic of Episode 6 in our Series).
A note about the Keycloak service URL (https://sso.darkstar.lan/auth). In this example I use a hostname “sso.darkstar.lan” but you will have to pick a name which fits your own network. This hostname will be used a lot and visible everywhere, so if you are paranoid and want to avoid people realizing that your “sso.” host is the key to all user-credentials, you might want to chose a more inconspicuous name like “pasture.darkstar.lan“. YMMV.
Also, the path component “/auth” in the URL is fixed and immutable, unless you want to hurt yourself. I tried to change that path component to something that made more sense to me but that “/auth” is so ubiquitous as hard-coded strings throughout the code that I quickly gave up.
Remember that our Keycloak container listens at the non-default TCP port 8400 on the docker0 interface, which we will use for the reverse proxy setup later on.
MariaDB considerations during Keycloak setup
At first, I tried with mounting the host’s MariaDB server socket in the Keycloak container and accessing the database through it via the ‘localhost’ target like below:
…but JBoss would not be able to connect for whatever reason, and the resulting error was ‘connection refused‘.
I have tried various locations for the UNIX socket inside the container:
… but none of those worked either.
Eventually I had to make MariaDB listen on all interfaces and rely on my firewall to block external access, for instance using:
If you have a better solution let me know! Of course, the easy way out of this dilemma is to deploy Keycloak using Docker Compose and give it its own internal database, but we need to be 100% sure that the SQL database server is up & running before we start the Keycloak container as part of the Docker infrastructure in “/etc/rc.d/rc.local“.
Also, my goal was to have a single SQL server on my host that would be the backend database for every application that needs one. A lot easier to backup and restore.
The admin user
Create the admin user once the container is running or else you won’t be able to connect at all (use ‘docker ps’ to find the containerID), and restart the container after that, but WAIT AFTER THAT RESTART LONG ENOUGH FOR THE INITIAL CONFIGURATION TO FINISH… or you’ll end up with Keycloak trying to initialize MariaDB twice, resulting in errors and failure.
This is how you run the command to create the admin user on the host, to be executed inside the running container:
Write that password down in a safe place and remove that command-line from your Bash history! It is the key to the Realm. Literally.
Reverse proxy setup for keycloak
In your Apache configuration for the “sso.darkstar.lan” host you need to add these lines to create a reverse proxy that connects the client users of your Keycloak service to the service endpoint:
SSLProxyEngine On
SSLProxyCheckPeerCN on
SSLProxyCheckPeerExpire on
RequestHeader set X-Forwarded-Proto: "https"
RequestHeader set X-Forwarded-Port: "443"
<LocationMatch /auth>
    AllowOverride None
    Require all granted
    Order allow,deny
    Allow from all
</LocationMatch>
ProxyPreserveHost On
ProxyRequests Off
ProxyVia on
ProxyAddHeaders On
ProxyPass        /auth http://127.0.0.1:8400/auth
ProxyPassReverse /auth http://127.0.0.1:8400/auth
Restart Apache httpd after making this change.
Initial configuration of Keycloak
Now that Keycloak is up and running behind a reverse proxy and interfaces with the world via the URL https://sso.darkstar.lan/auth , and has an admin account, we are going to create a “realm“. A realm is a space where the administrator manages identifiable objects, like users, applications, roles, and groups. A user belongs to only one realm and will always login to that realm.
Our realm will be named “foundation“. Here we go:
Point your browser at https://sso.darkstar.lan/auth/
Add a new Realm:
Click to open Admin Console (https://sso.darkstar.lan/auth/admin).
Logon with above configured ‘admin’ credentials.
Hover the mouse over the ‘Master‘ dropdown in the top-left corner.
Click ‘Add realm‘, enter Name: “foundation“.
Click ‘Create‘, add a Display name “My Cloud Foundation” (pick any name you like), click ‘Save‘.
(Optionally) configure email via SMTP:
Click ‘Email‘ (top of the page).
Enter your LAN’s SMTP server, the SMTP port (587 if you enable StartTLS at the bottom), and a reasonable ‘From‘ email address.
(Optionally) configure other parameters specific to your setup.
Click ‘Test Connection‘.
If your Keycloak container could successfully connect to the SMTP server, click ‘Save‘ and now Keycloak will be able to send you relevant emails, provided that you configured a working email address for the admin user of course.
Add user “alien” with full-name “Alien BOB” (of course, use whatever makes sense for you).
Set initial password to be able to login:
Click ‘Credentials‘ (top of the page).
Fill in ‘Set Password‘ form with a password like “WelcomeBOB!”.
(Optionally) click ‘ON‘ next to ‘Temporary‘ so that it toggles to ‘OFF‘. This removes the requirement for the user to update password on first login.
Click ‘Set password‘.
Test the new user login in a different browser (or logoff the admin user first):
Open User Console: https://sso.darkstar.lan/auth/realms/foundation/account
Login as ‘alien‘ and you’ll see the message: “You need to change your password to activate your account.“
Set a new (permanent) password and explore the configurable user profile settings, for instance enabling 2-Factor Authentication (2FA) using an app like Authy or Google Authenticator.
Considerations
Your keycloak is now running at https://sso.darkstar.lan/auth and the user login-page for the “Foundation” realm is at https://sso.darkstar.lan/auth/realms/foundation/account . That URL is nowhere to be found easily, so if you don’t know it is there (or if you don’t know about Keycloak’s URL path template) then users may complain about not finding it.
On the one hand, this adds some “security through obscurity” if you’re the paranoid type.
Plus, Keycloak will redirect users to the correct login page anyway when an application asks for a credential check.
On the other hand, you want to give your server’s users a nice experience.
As a courtesy to your users, you could consider adding a HTML redirect to the root of that server. Assuming that https://sso.darkstar.lan/ just serves an empty page or spits out a “page not found” error, you could paste the following HTML snippet into an ‘index.html‘ file in the DocumentRoot directory, which will cause an immediate redirect from the URL root to the user login page for the “foundation” realm:
In the previous section I mentioned that it is not trivial for users to discover the URL of their Keycloak profile page. But how do applications do this when they want to interact with Keycloak? OpenID Connect Discovery is a layer on top of OAuth 2.0 protocol which allows a client application not only to authenticate a user but also to obtain certain user characteristics (called “claims” in OAuth2.0) like full name or email address. To obtain these claims, the client application connects to a well-known URL where it can find out which claims are supported.
Keycloak supports this OpenID Connect Discovery and provides a Discovery URL at “/auth/realms/<realm>/.well-known/openid-configuration”. For our Keycloak server, that will be:
You can query this URL for instance via the ‘curl’ program and if you also have the ‘jq‘ program installed from my repository you can generate nicely formatted human-readable colorized output:
The output of that command is lengthy but it starts with:
 % Total    % Received % Xferd  Average Speed   Time    Time     Time  Current
                                Dload  Upload   Total   Spent    Left  Speed
100  5749  100  5749    0     0  41485      0 --:--:-- --:--:-- --:--:-- 41659
{
 "issuer": "https://sso.darkstar.lan/auth/realms/foundation",
 "authorization_endpoint": "https://sso.darkstar.lan/auth/realms/foundation/protocol/openid-connect/auth",
 "token_endpoint": "https://sso.darkstar.lan/auth/realms/foundation/protocol/openid-connect/token",
 "introspection_endpoint": "https://sso.darkstar.lan/auth/realms/foundation/protocol/openid-connect/token/introspect",
 "userinfo_endpoint": "https://sso.darkstar.lan/auth/realms/foundation/protocol/openid-connect/userinfo",
 "end_session_endpoint": "https://sso.darkstar.lan/auth/realms/foundation/protocol/openid-connect/logout",
 "frontchannel_logout_session_supported": true, foundation
 "frontchannel_logout_supported": true,
 "jwks_uri": "https://sso.darkstar.lan/auth/realms/foundation/protocol/openid-connect/certs",
 "check_session_iframe": "https://sso.darkstar.lan/auth/realms/foundation/protocol/openid-connect/login-status-iframe.html"
,
 "grant_types_supported": [
  ........
We will be able to use this Discovery protocol when setting up an Etherpad container in Episode 6.
Done
We are now ready to use Keycloak as IAM service for other applications that are waiting for us to install and configure. This setup is secure by default, but I do invite you to read more about the advanced configuration of Keycloak, they have extensive documentation at https://www.keycloak.org/documentation . For instance, do you want new users to be able to register themselves? Allow them to configure 2-Factor Authentication? Update their profile? Force password expiry? Custom password complexity configuration?
You may want to add groups to the realm and not just users, and limit the use of certain applications to specific groups (you may not want to let everyone use the Jitsi video conferencing platform for instance).
If your network already manages its users in an Identity provider like LDAP or Kerberos, Active Directory or eDirectory, or if you want to allow people to use their Google, Facebook etc identities to authenticate against your Keycloak, you should look into the functionality behind ‘Identity Providers’ in the left sidebar:
In that case, Keycloak will not store user identity information in its MariaDB database but instead use these Identity Providers as the remote backend.
Thanks
I hope you made it this far… and you liked it. Leave your comments, encouragements, fixes and general feedback in the section below.
Cheers, Eric
Attribution
Keycloak architecture images have been taken from the keycloak.org/documentation web site. The remainder are screenshots taken from my own Keycloak instance.
Two reminders about security related package updates in my repositories.
Google released an update to its chromium sources last week and I built packages for Slackware (14.2 and -current). You may already have seen them appear if you follow the ChangeLog.txt for my repository.
Get Chromium 97.0.4692.99 now, because it addresses one critical vulnerability (CVE-2022-0289): https://slackware.nl/people/alien/slackbuilds/chromium/
The GNU C Library (glibc) package for Slackware was rebuilt and hence also my multilib packages for glibc needed an update, after two security vulnerabilities were fixed (CVE-2021-3998 and CVE-2021-3999).
The multilib glibc packages (release 2.33, build ‘5alien’) can be found at http://www.slackware.com/~alien/multilib/current/ .
Hi all! This is the first installment of a series of articles I intend to write in early 2022. With Slackware 15.0 around the corner, I think it is a good time to show people that Slackware is as strong as ever a server platform. The core of this series is not about setting up a mail, print or web server – those are pretty well-documented already. I’m going to show what is possible with Slackware as your personal cloud platform.
A lot of the work that went into developing Slackware between the 14.2 and 15.0 releases was focusing on desktop usage. The distro is equipped with the latest and greatest KDE and XFCE desktops, a low-latency preemptive kernel, Pipewire multimedia framework supporting capture and playback of audio and video with minimal latency, et cetera. I have been enjoying Slackware-current as a desktop / laptop powerhouse for many years and built a Digital Audio Workstation and a persistent encrypted Live Distro with SecureBoot support out of it.
Slackware Cloud Server Series – Summary
The imminent release of Slackware 15.0 gives me fresh energy to look into ‘uncharted’ territory. And therefore I am going to write about setting up collaborative web-based services. Whether you will do this for the members of your family, your friends, your company or any group of people that you interact with a lot, this year you will hopefully learn how to become less dependent on the big ‘cloud’ players like Google, Microsoft, Zoom, Dropbox. What I will show you, is how to setup your own collaboration platform on a server or servers that you own and control. Think of file-sharing, video-conferencing, collaborative document editing, syncing files from your desktop and your phone to your cloud server. If the series is received well, I may additionally write about expanding your cloud server to a private platform for watching movies, listening to network audio, and so on.
I have a good notion of what I will write about, but I am sure that as this series grows and I tell you stories, you will get triggered about subjects that I may not have considered yet. So here’s a challenge for you, the reader: let me know what you think would be a good addition to the series. What makes Slackware great as a “personal cloud” platform to bind people together.
Topics you can expect in this series:
Episode 1 (this article): Managing your Docker Infrastructure
Here I will show you how to setup and manage Docker containers on Slackware, considering graphical management and firewalling. This is the foundation for what we will be doing in subsequent episodes.
Docker architecture
Examples
Docker Compose
Building a Docker image and running a container based on it
Help on commands
Obtain information about images and containers
Stop and remove a container
Refresh a container with the latest image from the vendor
Episode 2: Identity and Access management (IAM)
Setting up Keycloak for Identity and Access Management (IAM) to provide people with a single user account for all the Slackware Server Services we will be creating.
Episode 3: Video Conferencing
Setting up Jitsi Meet . This makes us independent of cloud conferencing services like MS Teams, Zoom or Google Meet. The Jitsi login is again offloaded to our Keycloak IAM provider.
Episode 4: Productivity Platform
Setting up NextCloud as the productivity hub where you can store and read your documents, host your photo library, hold video meetings, manage your activities, read and send emails, keep track of where your smartphone went, chat with people and a lot more. I will also show how to integrate the Jitsi video conferencing solution which was the topic of the previous episode into our NextCloud platform.
NextCloud will be setup on your ‘bare metal’ server. User authentication to the platform will be handled by our Keycloak IAM server.
Episode 5: Collaborative document editing
Integrating Collabora Online Development Edition (CODE) with NextCloud and move from reading/displaying your documents to collaborative real-time document editing with friends, family or colleagues in your self-hosted LibreOffice Online server.
Episode 6: Etherpad with Whiteboard Setting up an improved Etherpad real-time collaborative editor with more power than the out-of-the-box version which is used with Jitsi Meet, at the same time integrating it with Keycloak IAM for authentication.
Episode 8: Media streaming platform Setting up the Jellyfin media platform. If you have a decent collection of digital or digitized media (audio, video, photos) your cloudserver will become your friends’ autonomous alternative to Netflix and the likes. Single Sign On is provided to your users via Keycloak IAM.
Episode 9: Cloudsync for 2FA Authenticator
Setting up an Ente backend server as a cloud sync location for the Ente Auth 2FA application (Android, iOS, web).
Stop worrying that you’ll lose access to secure web sites when you lose your smartphone and with it, the two-factor authentication codes that it supplies. You’ll be up and running with a new 2FA authenticator in no time when all your tokens are stored securely and end-to-end encrypted on a backend server that is fully under your own control.
Episode X: Docker Registry
Setting up a Docker Registry. A local index and registry of Docker images allows us to become independent of Docker’s commercially driven limitations on images you create and want to share with the world or use privately. I will for instance use the public Docker Hub for all the services that are discussed in this series of articles, and I will point out the limitations of doing so.
I am not decided on the actual implementation of the Registry. The Docker Hub is an implementation of the aforementioned Registry product and it is Open Source but it does not do authentication and it has no user interface. Docker (the company) adds a lot to this service that is not Open Source to make the Hub the popular platform that it became.
So perhaps I will combine this Registry with Portus, which is an Open Source authorization service and user interface for the Docker Registry. It is created/maintained by the OpenSuse team. It can use Keycloak as the OIDC (OpenID Connect) provider, and so our Keycloak IAM server will do the Single Sign On.
Or I will use Quay, which is Red Hat’s solution for self-hosted Docker Registry including a web-based user interface that looks a lot like the Docker Hub. Quay can also offload the authentication/authorization to an OIDC provider like Keycloak. In addition, it allows scanning your hosted images for known security vulnerabilities using Clair, another Red Hat product and part of Project Quay.
Managing your Docker Infrastructure
In a previous article, I have shared my Docker related packages with you for Slackware 14.2 and 15.0 (well, -current formally since we are still waiting for 15.0). I assume you are running the newest Slackware almost-at-version 15.0 and have already installed those four Docker packages (containerd, runc, docker and docker-compose), you have added your user account to the ‘docker‘ group and have at least once rebooted your computer or manually ran “/etc/rc.d/rc.docker start“.
I also assume that you have a basic understanding of containers and how they differ from Virtual Machines. A brief summary:
Containers run directly on the host kernel and the ‘bare metal’. The Docker engine hides the host operating system particulars from the applications that run in the containerized environment. Docker uses cgroups and Linux kernel capabilities to shield container processes from other containers and the host, but using a “ps” command on the host you can easily see all the container processes.
A Virtual Machine on the other hand, is a virtualized machine hardware environment created by a hypervisor program like QEMU, VMWare, VirtualBox etc. Inside that virtual machine you can run a full Operating System which thinks it is running on real hardware. It will be unaware that it is in fact running inside a VM on a host computer which probably runs a completely different OS.
From the host user perspective, nothing that goes on in the VM is actually visible; the user merely sees the hypervisor running.
And from a Docker container as well as VM user perspective, anything that happens outside that environment is invisible. The host OS can not be reached directly from within the guest.
What I am not going to discuss in the scope of this article is orchestration tools like Kubernetes (K8s) or Docker Swarm, that make it possible or at least a lot more convenient to manage a cluster of servers running Docker containers with multiple micro-services that are able to scale on-demand.
Docker architecture
You create and run a Docker container from (layers of) pre-existing images that inherit from each other, using the ‘docker run‘ command. You can save a container that you created, ‘flattening’ the layers the container consists of into one new image using ‘docker commit‘.
You start and run a container by referring the Docker image it should be based on, and if that image is not available locally then Docker will download it from a Docker Registry (by default hub.docker.com but it can also be a private Registry you run and control yourself). You can also manually download an image using the ‘docker pull‘ command in advance of the ‘docker run‘ command which is going to use that image so that you don’t have to wait for an image download at the moment suprême of starting your container.
Building an image yourself using the ‘docker build‘ command is essentially ruled by a Dockerfile and a context (files on the local filesystem which are used in the creation of the image). The container which is based on that image typically runs an application or performs a task.
Examples
An example: running an application which is not provided by your Slackware OS. A container can run a Postgres database server which you then use on your host computer or in other containers. This Postgres container will typically be started on boot and keeps running until shutdown of the host computer. It’s as trivial as running:
Another example: building Slackware packages reliably and without introducing unwanted dependencies. In this case, you use a container based from a Slackware Docker image, to download and compile a Slackware package, and then export the resulting package from within the container to the host computer’s local filesystem. Such a Docker container based on a Slackware image will be able to offer the same OS with the same configuration, every time it starts and functions independently of the host. You could be compiling Slackware packages on a Debian host for instance. Exercise left for the reader: you will have to create that Slackware Docker image yourself… it is not available online.
Docker Compose
Also created by the Docker company, docker-compose is a separate application which uses the capabilities of Docker. The 2.x release of Docker Compose which I offer in my repository is written in the Go language which makes it fully self-contained. The previous 1.x releases that you can obtain from SlackBuilds.org were heavily dependent on Python and for that version of docker-compose you had to install 13 dependent packages.
Docker Compose expands on the Docker concept of a single container with a single purpose. Compose is a tool for defining and running multi-container Docker applications. The individual Docker applications themselves are defined by a Dockerfile, which makes their deployment reproducible in any Docker environment.
You write a Compose file (typically called docker-compose.yml) which defines the container services that you want to run. This Compose file is written in YAML and according to the Compose file specification . The file describes an application service which is built out of multiple Docker containers as well as their shared resources and private communication channels. Docker-compose reads the yaml file and creates data volumes and internal networks, starts the defined containers and connects them to the just-created volumes and networks. There’s a lot more you can do in a Compose file, check out the reference.
The result of the ‘docker-compose up -d‘ command is the start-up of a complex service running multiple inter-dependent applications (you’ll see those referred to as micro-services) that usually have a single point of interaction with its users (an IP address/port or a https URL). Essentially a black-box where all the internal workings are hidden inside that collection of containers. As an administrator there’s little to nothing to configure and as an user you don’t have to know anything about that complexity.
And again you could be trivially running applications in Docker containers on your Slackware host that you would not be able to run on the bare host OS without a lot of weeping and gnashing of teeth .
Docker Compose offers a lot of versatility that regular Docker does not. Whether you use one or the other depends on the complexity of that what you want to achieve. In future episodes of this article series, I will give examples of both.
Building a Docker image and running a container based on it
The ‘docker build’ command has a lot of parameters but it accepts a single argument which is either a directory containing a Dockerfile and the required context (local files to be used in the image creation process), or a URL the content of which it will download and interpret as a Dockerfile. You can also use the “-f” switch to specify a filename if it’s not called “Dockerfile” literally, or pipe a Dockerfile content into the ‘docker build‘ command via STDIN. It’s good practice to ‘tag’ the resulting image so that you’ll understand its purpose later on. You can then upload or ‘push’ the image to a Docker Registry, either the public one or a private registry that you or your company control.
Let me give a comprehensive example. We will build a new Slackware image which is based on my Slackware ‘base‘ image on the public Docker Hub (docker pull liveslak/slackware:latest). The Dockerfile will add a couple of packages, create a user account called “alien” and start a login shell if needed.
Note that in this example I will write the Dockerfile on the fly using ‘cat‘ and a ‘here-document‘ to pipe it into the ‘docker build‘ command. I will tag the resulting image as ‘slacktest‘ using the “-t” switch of the ‘docker build‘ command:
$ cat <<'EOT' | docker build -t slacktest -
FROM liveslak/slackware:latest
MAINTAINER Eric Hameleers <alien@slackware.com>
ARG SL_UID="1000"
ARG SL_GID="users"
ARG SL_USER="alien"
# Install compiler toolchain and supporting tools.
RUN rm -f /etc/slackpkg/templates/compilertoolchain.template
RUN for PKG in \
ca-certificates \
curl \
cyrus-sasl \
gc \
gcc \
git \
glibc \
glibc-profile \
glibc-zoneinfo \
guile \
intltool \
kernel-headers \
libmpc \
libffi \
libtasn1 \
make \
mpfr \
nettle \
p11-kit \
perl \
; do echo $PKG >> /etc/slackpkg/templates/compilertoolchain.template ; done
RUN slackpkg -batch=on -default_answer=y update gpg
RUN slackpkg -batch=on -default_answer=y update
RUN slackpkg -batch=on -default_answer=y install-template compilertoolchain
# Refresh SSL certificates:
RUN /usr/sbin/update-ca-certificates -f
# Create the user to switch to:
RUN useradd -m -u "${SL_UID}" -g "${SL_GID}" -G wheel "${SL_USER}" && \
sed -ri 's/^# (%wheel.*NOPASSWD.*)$/\1/' /etc/sudoers
USER "${SL_USER}"
ENV HOME /home/"${SL_USER}"
WORKDIR /home/"${SL_USER}"
# Start a bash shell if the container user does not provide a command:
CMD bash -l
EOT
The output of this ‘docker build’ command shows that the process starts with downloading (pulling) the slackware base image:
Sending build context to Docker daemon  3.072kB
Step 1/16 : FROM liveslak/slackware:base_x64_14.2
base_x64_14.2: Pulling from liveslak/slackware
Digest: sha256:352219d8d91416519e2425a13938f94600b50cc9334fc45d56caa62f7a193748
Status: Downloaded newer image for liveslak/slackware:base_x64_14.2
---> 3a9e2b677e58
Step 2/16 : MAINTAINER Eric Hameleers <alien@slackware.com>
---> Running in d7e0e17f68e6
Removing intermediate container d7e0e17f68e6
---> 75b0ae363daf
...(lot of output snipped) ...
Successfully built e296afb023af
Successfully tagged slacktest:latest
$ docker images |grep slacktest
slacktest                latest          e296afb023af   2 minutes ago   387MB
Here you see how a Dockerfile uses ‘FROM’ to download a pre-existing image from the Hub and then RUNs several commands which it applies to the base image which was downloaded from Docker Hub, creating a new image and then naming it “slacktest” with a tag “latest” and an ID of “e296afb023af“. In that process, several intermediate layers are created, basically every command in the Dockerfile which you would normally execute on the command-line will create one. The end result is an image which consists of multiple layers. You can use the ‘history’ command so see how these were built:
$ docker history e296afb023af
IMAGE          CREATED          CREATED BY                                      SIZE      COMMENT
e296afb023af   49 minutes ago   /bin/sh -c #(nop)  CMD ["/bin/sh" "-c" "bash…   0B
e1224d15abac   49 minutes ago   /bin/sh -c #(nop) WORKDIR /home/alien           0B
4ce31fa86cca   49 minutes ago   /bin/sh -c #(nop)  ENV HOME=/home/alien         0B
365bffd67f07   49 minutes ago   /bin/sh -c #(nop)  USER alien                   0B
05d08fe94b47   49 minutes ago   |3 SL_GID=users SL_UID=1000 SL_USER=alien /bi…  336kB
3a300b93311f   49 minutes ago   |3 SL_GID=users SL_UID=1000 SL_USER=alien /bi…  218kB
7a14f55146dd   50 minutes ago   |3 SL_GID=users SL_UID=1000 SL_USER=alien /bi…  233MB
a556359ec6d3   51 minutes ago   |3 SL_GID=users SL_UID=1000 SL_USER=alien /bi…  6.21MB
da19c35bed72   52 minutes ago   |3 SL_GID=users SL_UID=1000 SL_USER=alien /bi…  2.13kB
604fece72366   52 minutes ago   |3 SL_GID=users SL_UID=1000 SL_USER=alien /bi…  161B
1c72e034ef06   52 minutes ago   |3 SL_GID=users SL_UID=1000 SL_USER=alien /bi…  0B
3f020d0c2024   52 minutes ago   /bin/sh -c #(nop)  ARG SL_USER=alien            0B
91a09ad8693a   52 minutes ago   /bin/sh -c #(nop)  ARG SL_GID=users             0B
96d433e0162d   52 minutes ago   /bin/sh -c #(nop)  ARG SL_UID=1000              0B
75b0ae363daf   52 minutes ago   /bin/sh -c #(nop)  MAINTAINER Eric Hameleers…   0B
3a9e2b677e58   11 days ago                                                      148MB     Imported from -
That last line shows the image “3a9e2b677e58” which is the slackware ‘base‘ image which I downloaded from Docker Hub already 11 days ago.
If we now use ‘docker run’ to create a container based on this image we would expect it to give us a bash prompt as user ‘alien’. Let’s try it and run an interactive container connecting it to a pseudo terminal using the “-ti” switch:
$ docker run -ti slacktest
alien@88081b465a98:~$ id
uid=1000(alien) gid=100(users) groups=100(users),10(wheel)
alien@88081b465a98:~$ exit
logout
$ docker ps -a | grep slacktest
88081b465a98   slacktest                   "/bin/sh -c 'bash -l'"   2 minutes ago   Exited (0) 16 seconds ago
$ docker rm 88081b465a98
88081b465a98
$
Indeed we ended up as user “alien” in a machine whose hostname is the ID of the container (88081b465a98). And with the final command, we could remove the container without first stopping it, because it was already stopped when we issued the “exit” command.
Help on commands
Working with Docker containers, it is good practice that you get familiar with the command-line client (aptly name ‘docker’). You’ll find a lot of command-line examples in this article which should really become part of your hands-on toolkit.
The ‘docker’ tool has some 30 sub-commands and all of them have built-in help. To get the full list of available docker commands run:
$ docker --help
The help per command can be found by suffixing it with “–help”. Many commands have sub-commands and these will also show help:
$ docker system --help
$ docker system prune --help
Obtain information about images and containers
The ‘docker’ command-line utility can give you a lot of information about your docker infrastructure. I will discuss a graphical management tool a bit further down, but here are some useful commands:
Get a listing of all images on your Docker host:
$ docker images
Get a listing of all running containers:
$ docker ps
Also list those containers that are in a stopped state:
$ docker ps -a
Show diskspace used by all your images, containers, data volumes and caches:
$ docker system df
Show the logs of a container:
$ docker logs CONTAINER_ID
Get the ID of a container or an image:
$ docker ps -aqf "name=containername"
The “containername” is interpreted as a regular expression. If you omit the “q” switch you will see the full info about the container, instead of only the container ID. Find an image ID using the following command (if you use a containername instead of an imagename you have a second way to get a container ID):
$ docker inspect --format="{{.Id}}" imagename
Note that in this case, “imagename” needs to be the exact string of the image (or container) as shown in the ‘docker ps‘ output, not a regular expression or part of the name.
Get the filesystem location of a data volume:
Data volumes are managed by Docker, on a Linux host the actual physical location of a Docker volume is somewhere below “/var/lib/docker/volumes/“. but on a Windows Docker host that will be something entirely different.
Using the ‘docker inspect‘ command you can find the actual filesystem location of a data volume by evaluating the “Mountpoint” value in the output. Example from my local server:
You could use this information to access data inside that volume directly, without using Docker tools.
More:
There’s a lot more but I leave it up to you to find other commands that are informational for you.
Stop and remove a container
Note that when you stop and remove a container, you do not delete the image(s) on which the container is based! So what is the usefulness of removing containers? Simple: sometimes a container crashes or gets corrupted. In such a case you simply stop the container, remove it and start it again using the exact same command which was used earlier to start it. The container will be rebuilt from scratch from the still existing images on your local file-system and the service it provides will start normally again.
As an example, create and run the ‘hello-world‘ container, then stop and remove it again:
$ docker run hello-world
Hello from Docker!
This message shows that your installation appears to be working correctly.
...
$ docker ps -a |grep hello-world
0369206ddf2d   hello-world                 "/hello"  ...
$ CONTAINER_ID=$(docker ps -a |grep hello-world | awk '{print $1}')
$ docker stop $CONTAINER_ID
$ docker rm $CONTAINER_ID
Refresh a container with the latest image from the vendor
Suppose you are running a Docker container for some complex piece of software. You can’t simply run “slackpkg upgrade-all” to upgrade that software to its latest version or to fix some security vulnerability. Instead, what you do with a container is to refresh the Docker image which underpins that container, then stop the container, remove the container layer, remove the old vendor image, and then start the container again. On startup of the container, it will now be based on the latest vendor image.
Configuration of a container happens either inside of data volumes that you maintain outside of the container and/or on the startup command-line of that container. Deleting the container or the image layers is not touching any of your configuration or your data.
This is the strong point of container life cycle management – it’s so easy to automate and scale up.
As an example, let’s refresh a container that I have running here at home (the Portainer container that’s discussed further down).
Download the latest Portainer Community Edition image from Docker Hub:
$ docker pull portainer/portainer-ce
Find the ID (first comumn) of the portainer container that we currently have running:
As time passes and you experiment with containers, you will inevitably end up with stuff on your host computer that is no longer being used. Think of images which you wanted to try out with ‘docker run‘ or downloaded using ‘docker pull‘. Or cached data resulting from image building. The ‘docker system df‘ command I showed you earlier will give you a scare perhaps if you run it… see here the output when I run it on my server:
TYPE TOTAL ACTIVE SIZE RECLAIMABLE
Images 11 10 3.424GB 390.3MB (11%)
Containers 10 3 531.8MB 32.01MB (6%)
Local Volumes 3 1 0B 0B
Build Cache 0 0 0B 0B
The “reclaimable” percentage is data which is no longer being used by any container that Docker knows about. You can safely delete that data. The following command will do that for you:
$ docker system prune
If you want to make sure that every un-used scrap of image data is deleted, not just the dangling symlinked images, run:
$ docker system prune -a
And if you want to remove un-used data volumes, you would run:
$ docker system prune --volumes
. . . of course you execute this command only after you have verified that the affected volumes do not contain data you still need.
Difference between load/save and import/export
Docker manages images, containers, data volumes etc in an OS independent way. Meaning you are able to transport data volumes, images and containers from one host to another, or even from one type of OS (Linux) to another (MS Windows) and preserve compatibility.
Import and export commands – used for migration of container filesystems
Docker command ‘docker export‘ allows you to create a (compressed) tar archive containing the bare file system of a container:
This filesystem tarball can again be imported into a new ‘filesystem image‘. Also look at my example of creating a Slackware base image using ‘docker import‘.
The export and import commands don’t preserve the container’s configuration and underlying image information, you are dealing with just the filesystem. This makes these commands quite suited for creating Docker base images which you can then base your future containers and images on via the “FROM” keyword in a Dockerfile.
For actual Docker migrations to another host, the load and save commands are better suited. Read on:
Load and save commands – used for host migration of images
Docker command ‘docker save‘ allows you to create a (compressed) tar archive of a Docker image, containing all its layers, tags, history and configuration. The only thing that is not added to this tarball are the data volumes.
If you want to migrate a container, you first save (commit) its changes as a new Docker image using the ‘docker commit’ command.
$ docker commit CONTAINER_ID my_important_image
… and then save that image in a OS-agnostic way into a tarball. The ‘save’ command does not compress the data so we use ‘xz’ for that:
$ docker save my_important_image | xz > my_important_image.tar.xz
This compressed tarball can be copied to another host (potentially with a different OS running on the host) and ‘docker load‘ allows you to load this image (even when compressed) with all its tag information and history into the new host’s Docker environment.
$ cat my_important_image.tar.xz | docker load
You can then use the ‘docker run‘ command as usual to start a new container based off that image.
And what to do with the data volumes? Docker manages its volumes in an OS agnostic way which means we can probably not just create a tarball from the volume directory on the host, since that may not be compatible with how a data volume is implemented on another host. If we use Docker commands to save a data volume and load it on another host, we should be covered. The Docker documentation on volumes has an example on how to migrate data volumes.
Saving a data volume to a tarball:
Suppose your ‘portainer‘ container uses a data volume called ‘portainer_data‘ which is mounted on the container’s “/data” directory, containing important data which you want to migrate to another host.
To generate a tarball of the data in this volume, you create a one-shot container based on some base image (I’ll use ‘alpine’) that does not do anything in itself, and give that container the command to create the backup of your ‘portainer_data‘ volume. The steps are:
Launch a new container and mount the volume from the ‘portainer‘ container
Mount a local host directory as /backup
Pass a command that tars the contents of the ‘portainer_data‘ volume to a backup.tar file inside our /backup directory.
When the command completes and the container stops, we are left with a backup of our ‘portainer_data‘ volume; the file “backup.tar” in our current directory.
$ docker run --rm --volumes-from portainer -v $(pwd):/backup alpine tar cvf /backup/backup.tar /data
… and on a new host, load this tarball into the data volume of the ‘portainer’ container which you have already setup there but it’s still missing its data:
$ docker run --rm --volumes-from portainer -v $(pwd):/backup alpine bash -c "cd /data && tar xvf /backup/backup.tar --strip 1"
Voilà!
Limiting the log size for your containers
Docker captures the standard & error output (stdout/stderr) for all your containers and writes these to logfiles in JSON format. By default, Docker does not impose size restrictions on its log files.
These logfiles are shown when you run a ‘docker logs CONTAINER_ID‘ command.
This behavior could potentially fill up your hard drive if you run a container which generates an extensive amount of logging data. By modifying Docker’s “/etc/docker/daemon.json” configuration file we can limit the maximum size of the container log files. This is what you need to add to the Docker daemon configuration to limit the size of any log file to 50 MB and keep at most two backups after log rotation:
There’s a nice graphical web-based administration tool for your Docker infrastructure which itself runs in a container (you can also install it on bare metal as a self-contained executable), called portainer. Portainer will listen at a TCP port of your host and you can point your web browser at http://localhost:9000/ to access the GUI. The Community Edition (portainer-ce) is open source and free and this is what we’ll install and run as a Docker container.
The Portainer developers posted a tutorial and feature walk-through of their product on Youtube:
Some considerations before we start implementing this.
Data persistence:
Portainer wants to keep some data persistent across restarts. When it is run from within a container, you want to have that persistent data outside of your container, somewhere on the local filesystem. The Docker concept for persistent data management is called “volumes”. Docker volumes are created as directories within “/var/lib/docker/volumes/” on Linux. A volume is made available in the container using the “-v” switch to the ‘docker run‘ command, which maps a host volume to an internal container directory. Docker manages its volumes in an OS agnostic way, making it possible to transparently move your containers from Linux to Windows for instance.
We will not use a Docker volume in this example but instead create the “/usr/share/docker/data/portainer” directory and pass that as the external location for the container’s internal “/data” directory.
Network security:
We will expose the Portainer network listen port to only localhost and then use an Apache reverse proxy to let clients connect. Note that port 9000 exposes the Portainer UI without SSL encryption; we will use Apache reverse proxy to handle the encryption.
Application security:
Below you will see that I am mapping the Docker management socket “/var/run/docker.sock” into the container. Normally that would be very bad practice, but Portainer is going to be our Docker management tool and therefore it needs the access to this socket.
This batch of commands will get your Portainer-CE instance up and running and it will be restarted when Docker starts up (eg. after rebooting).
Two of the three network ports that Portainer opens up are not being exposed (mapped) to the outside world:
Port 8000 exposes a SSH tunnel server for Portainer Agents, but we will not use this. Portainer Agents are installed on Docker Swarm Clusters to allow central management of your Swarm from a single Portainer Server.
Also, the Portainer container generates a self-signed SSL certificate on first startup and uses it to offer https encrypted connections on port 9443 but our reverse proxy solution allows the use of a proper Let’s Encrypt certificate.
Now that the Portainer container is running, connect a browser on your host computer to http://localhost:9000/ to perform initial setup; basically defining the password for the Portainer admin user account.
The reverse proxy configuration including adding a Let’s Encrypt certificate is a bit beyond the scope of this article, but you can read this earlier blog post to learn about securing your webserver with SSL certificates.
I will share the block that you would have to add to your Apache configuration somehow. With this configuration and proper SSL setup your Portainer would be accessible via https://your_host_name/portainer/ instead of only at http://localhost:9000/ :
Here is a screenshot of my Docker infrastructure at home as interpreted by Portainer:
Have a look at Portainer to see if it adds something useful to your Docker management toolkit. For me the most useful feature is the real-time container logging display, which is a lot more convenient than trying to scroll back in a Linux screen session.
Docker’s effect on iptables firewall
Docker dynamically modifies your host’s iptables ruleset on Linux when it starts, in order to provide container isolation. See https://docs.docker.com/network/iptables/ for the rationale. This can sometimes interfere with pre-existing services, most prominently the Virtual Machines that you may also be running and whose virtual network has been bridged to your host’s network interface.
I use vde (virtual distributed ethernet) for instance to provide transparent bridged network connectivity for the QEMU VM’s that I use when building packages for Slackware.
With this bridged network setup, your host computer essentially acts as a router, forwarding network packets across the bridge.
When Docker starts, it will add two custom iptables chains named ‘DOCKER’ and ‘DOCKER-USER’, adds its own custom rules to the ‘DOCKER’ chain and then sets the default FORWARD policy to DROP. Thereby killing the network connectivity for the already bridged networks… Bad. But even though Docker has a configurable parameter to disable iptables, this only prevents the creation of these custom chains and rules when the Docker daemon starts. Docker confesses that there is no guarantee that later on when you start containers, your iptables rulesets will stay un-touched. So, disabling iptables management in Docker is not an option. I’ll tell you a bit on how to deal with this (all information gleaned from the Internet).
Generic iptables
Since Docker sets the policy for the FORWARD chain to DROP, for your bridged networks this will result loss of connectivity (packets are no longer forwarded across the bridge).
You can use the custom DOCKER-USER chain to ensure that this bridging is not disrupted. Docker inserts these custom chains in such a way that rules defined in the DOCKER-USER chain have precedence over rules in the DOCKER chain. You have to add an explicit ACCEPT rule to that DOCKER-USER chain:
# iptables -I DOCKER-USER -i br0 -j ACCEPT
Where ‘br0‘ is the name of your network bridge (adapt if needed).
UFW (Uncomplicated Firewall)
UFW is a tool created for Ubuntu but popular on all distros, which aims at simplifying iptables ruleset management by providing a higher-level commandline interface. There’s a package build script for it on SlackBuilds.org.
UFW allows to insert rules that are evaluated after all other chains have been traversed. This allows the user to nullify the unwanted behavior of Docker which kills bridged networks. See this github discussion for the full details.
Append the following at the end of /etc/ufw/after.rules (replace eth0 with your external facing interface):
# Put Docker behind UFW
*filter
:DOCKER-USER - [0:0]
:ufw-user-input - [0:0]

-A DOCKER-USER -m conntrack --ctstate RELATED,ESTABLISHED -j ACCEPT
-A DOCKER-USER -m conntrack --ctstate INVALID -j DROP
-A DOCKER-USER -i eth0 -j ufw-user-input
-A DOCKER-USER -i eth0 -j DROP
COMMIT
And undo any and all of:
Remove “iptables”: “false” from /etc/docker/daemon.json
Revert to DEFAULT_FORWARD_POLICY=”DROP” in /etc/default/ufw
Remove any docker related changes to /etc/ufw/before.rules
Firewalld
Firewalld is a dynamically managed firewall which works with a ‘zones‘ concept and gets its triggers from a D-Bus interface. There’s a package build script available on SlackBuilds.org.
If you are running Docker version 20.10.0 or higher with firewalld on your system with and Docker has iptables support enabled, Docker automatically creates a firewalld zone called docker and inserts all the network interfaces it creates (for example, docker0) into the docker zone to allow seamless networking.
Consider running the following firewalld command to remove the docker interface from the ‘trusted‘ zone.
# Please substitute the appropriate zone and docker interface
$ firewall-cmd --zone=trusted --remove-interface=docker0 --permanent$ firewall-cmd --reload
Restarting the docker daemon (/etc/rc.d/rc.docker restart) will then insert the interface into the docker zone.
Alien’s Easy Firewall Generator (EFG)
If you used my EFG to create a firewall configuration, you will be bitten by the fact that Docker and Docker Compose create new network devices . Permissive rules need to be be added to the INPUT and OUTPUT chains of your “rc.firewall” or else ‘dmesg’ will be full of ‘OUTPUT: packet died’.
The Docker network interface is called “docker0” and for each container, Docker creates an additional bridge interface, the name of which starts with “br-” and is followed by a hash value. Therefore, these lines need to be applied at the appropriate locations in the script:
DOCK_IFACE="docker0"

BR_IFACE="br-+"

$IPT -A INPUT -p ALL -i $DOCK_IFACE -j ACCEPT

$IPT -A INPUT -p ALL -i $BR_IFACE -j ACCEPT

$IPT -A OUTPUT -p ALL -o $DOCK_IFACE -j ACCEPT

$IPT -A OUTPUT -p ALL -o $BR_IFACE -j ACCEPT
Thanks
… for reading until the end! I hope you gained some knowledge. Feel free to leave constructive feedback in the comments section below.
Cheers, Eric
Attribution
Most of the firewall-related information comes from docker.com and github.com. Please inform me about errors.
All images in this article were taken from docs.docker.com website.
Wed Feb 26 15:40:19 UTC 2025 chromium: updated 64bit to 133.0.6943.141 (Slackware 15.0 & onwards). Applied a patch that fixes the 'Aw, snap!' error messages on certain websites when running Chromium on Slackware-current. chromium-ungoogled: rebuilt 64bit 133.0.6943.126 with a patch that fixes the 'Aw, snap!' error messages on Slackware-current. --------------------------+ Thu Feb 20 12:26:38 UTC […]
academic/plus42: Updated for version 1.2.6 audio/flacon: Updated for version 12.0.0. audio/ncmpc/ncmpc: Updated for version 0.52. desktop/ClamAV-GUI: Updated for version 20250210_8762118 desktop/gopsuinfo: Updated for version 0.1.9. desktop/nwg-dock: Updated for version 0.4.3. desktop/nwg-look: Updated for version 1.0.2. desktop/nwg-menu: Updated for version 0.1.7. desktop/nwg-panel: Updated for version 0.9.62. desktop/nwg-readme-browser: Updated for version 0.1.6. desktop/nwg-shell-config: Updated for version 0.5.58. […]

 I honestly kept my breath and have had some difficulty believing that this would eventually really happen, but yet here it is. Slackware 15.0 stable! Released yesterday and available on mirrors across the globe today.
 This is already the third episode in a series of articles I am writing about using Slackware as your private/personal ‘cloud server’. Time flies when you’re having fun.
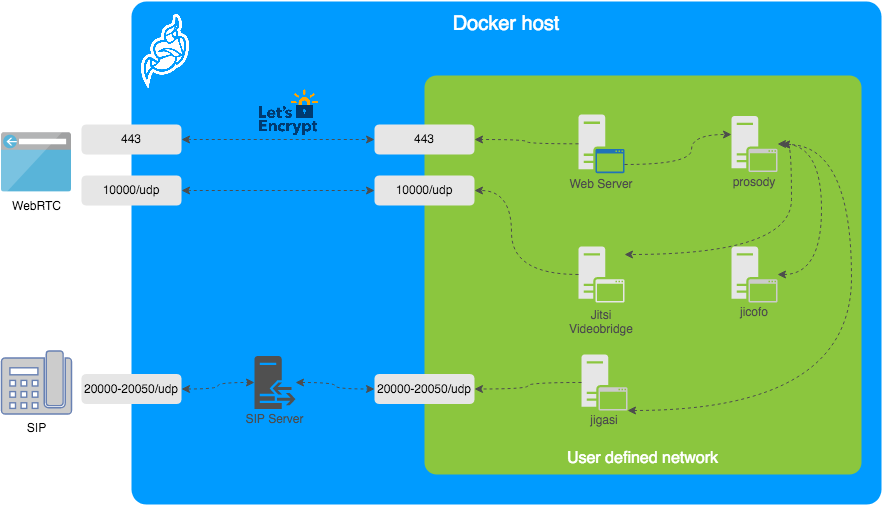
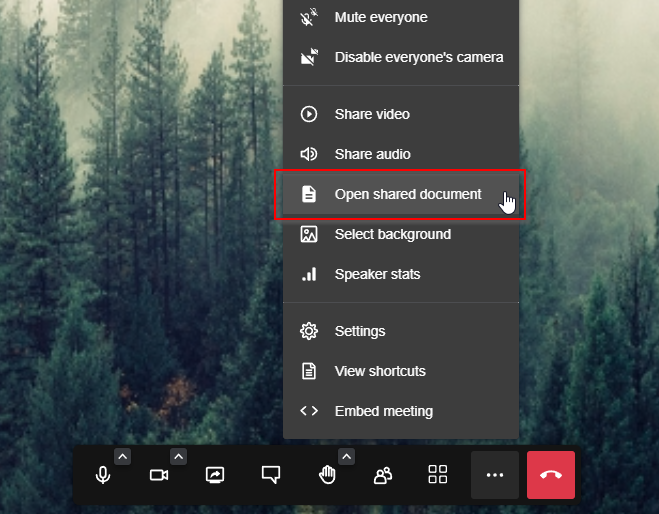

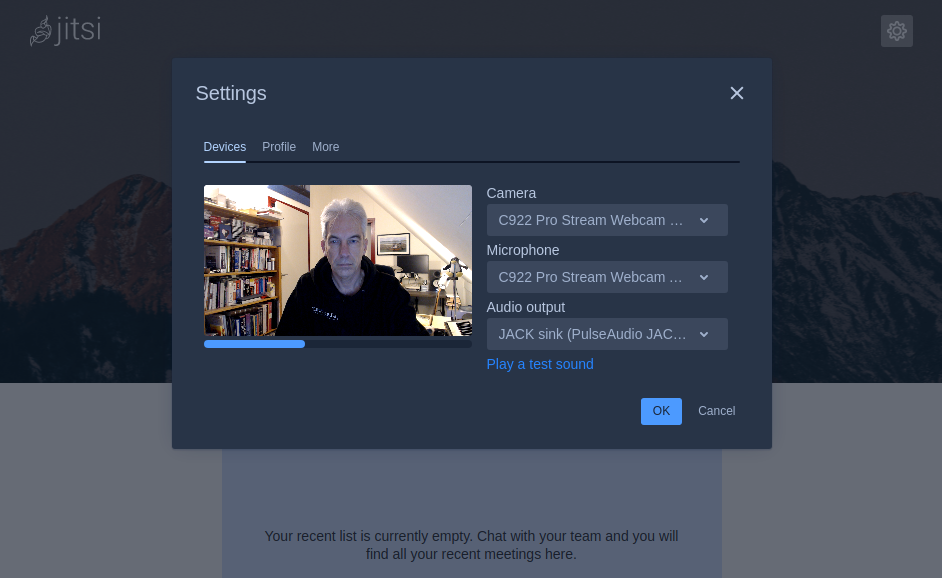
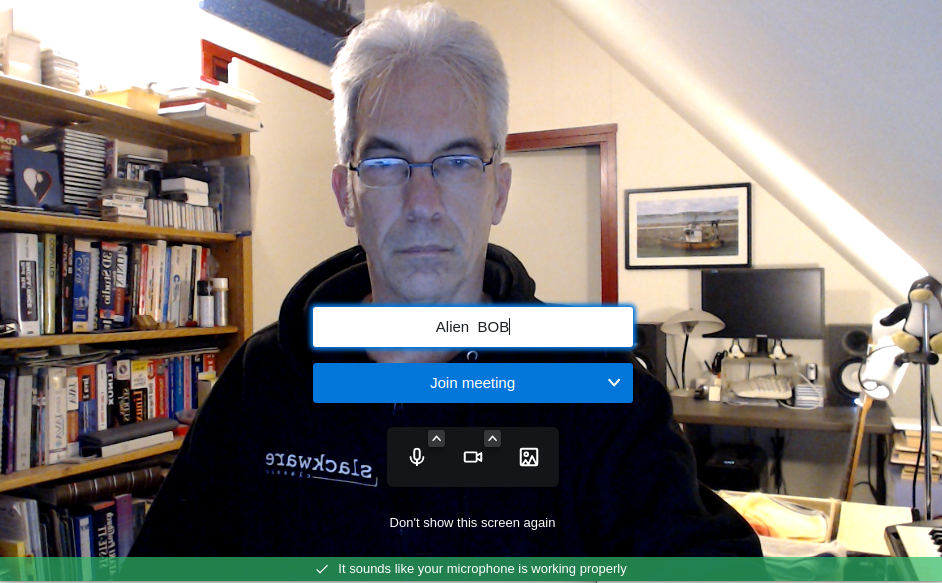
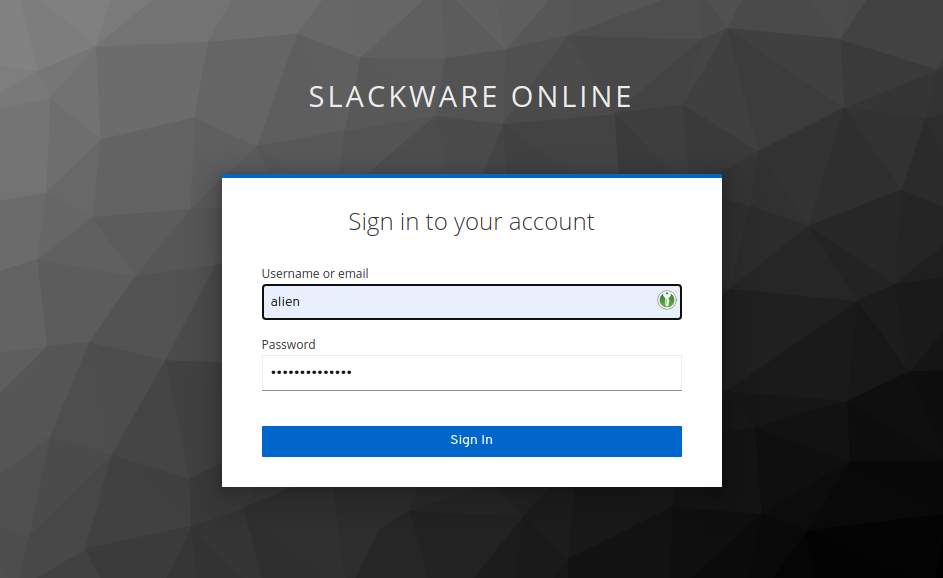
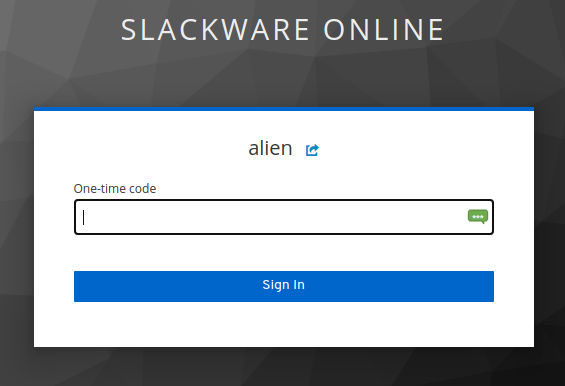
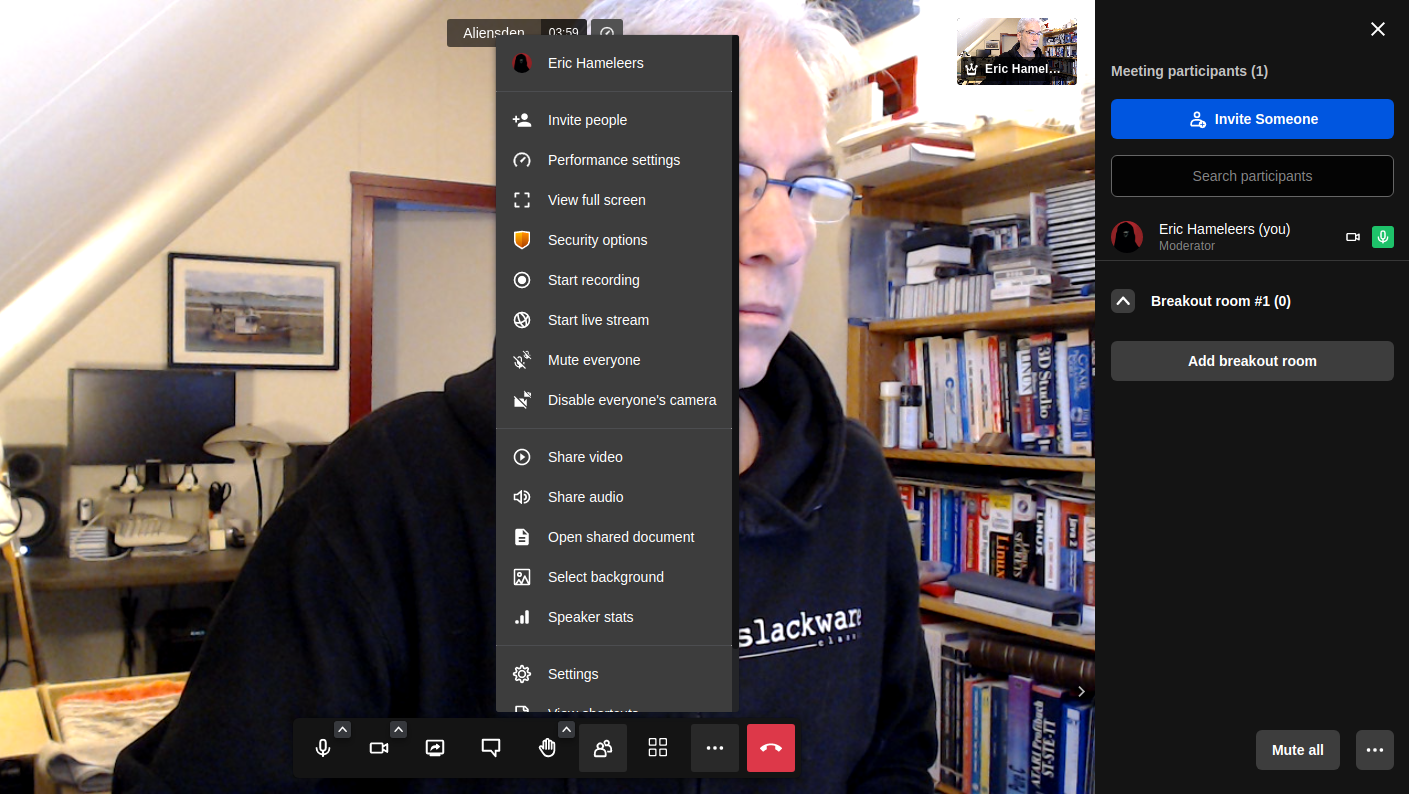

 When you run a server that offers all kinds of web-based services, and you want all these services to be protected with an
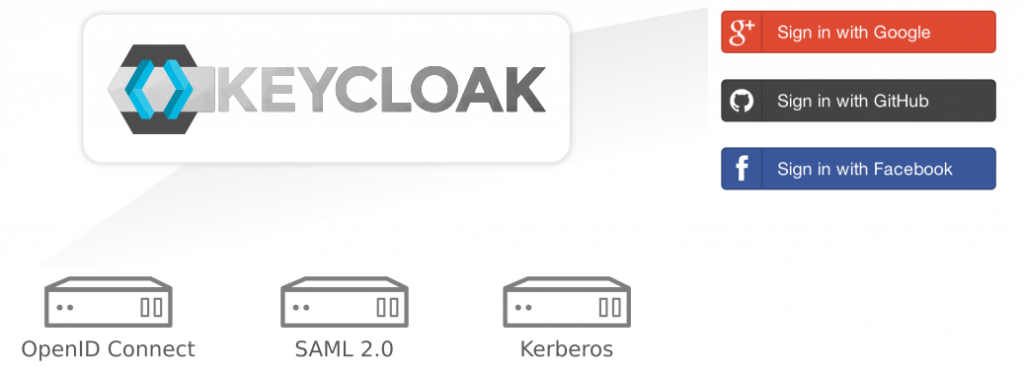
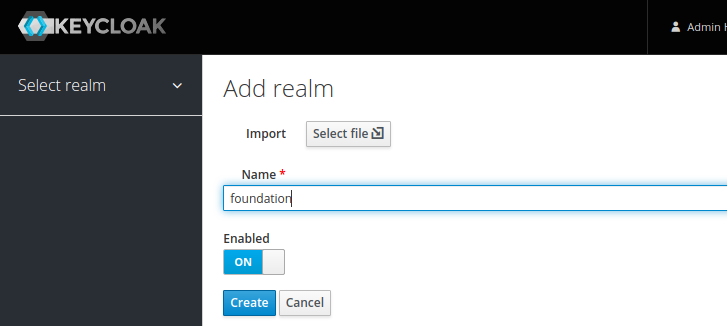
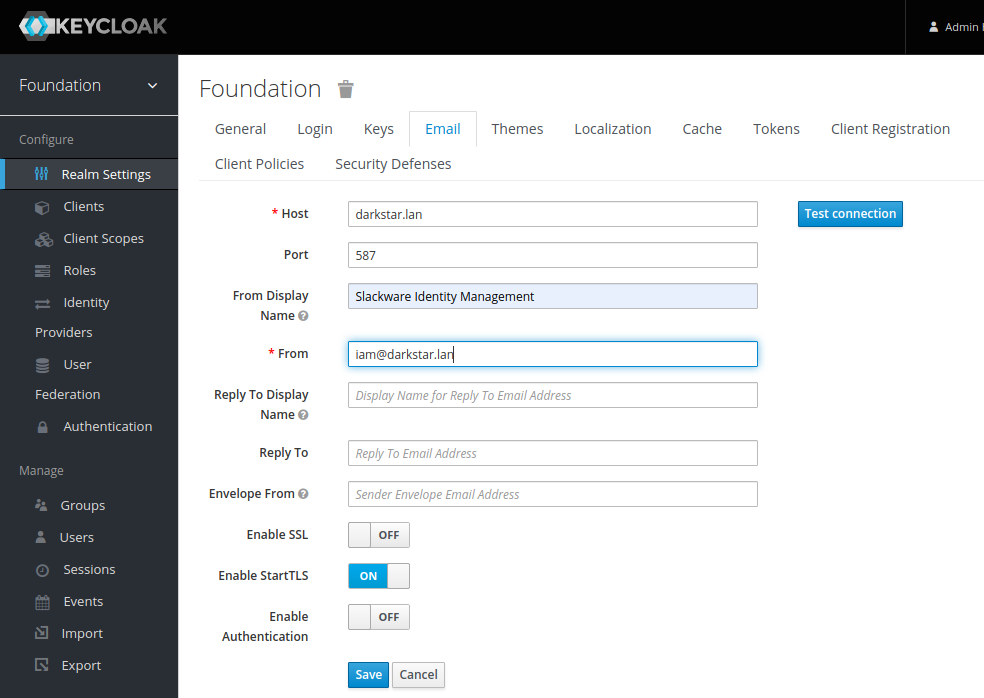
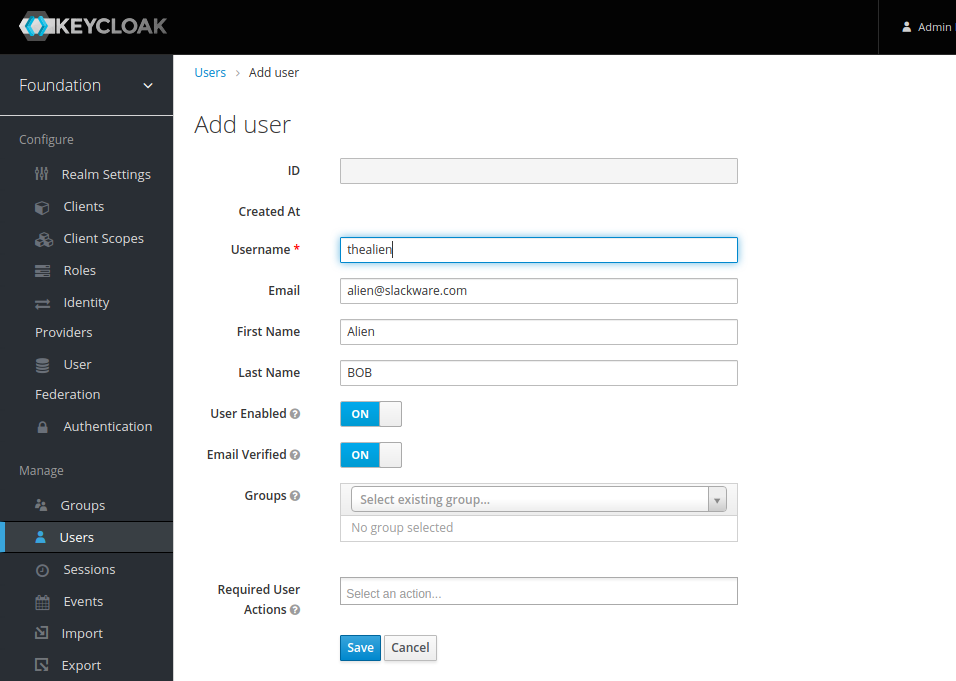

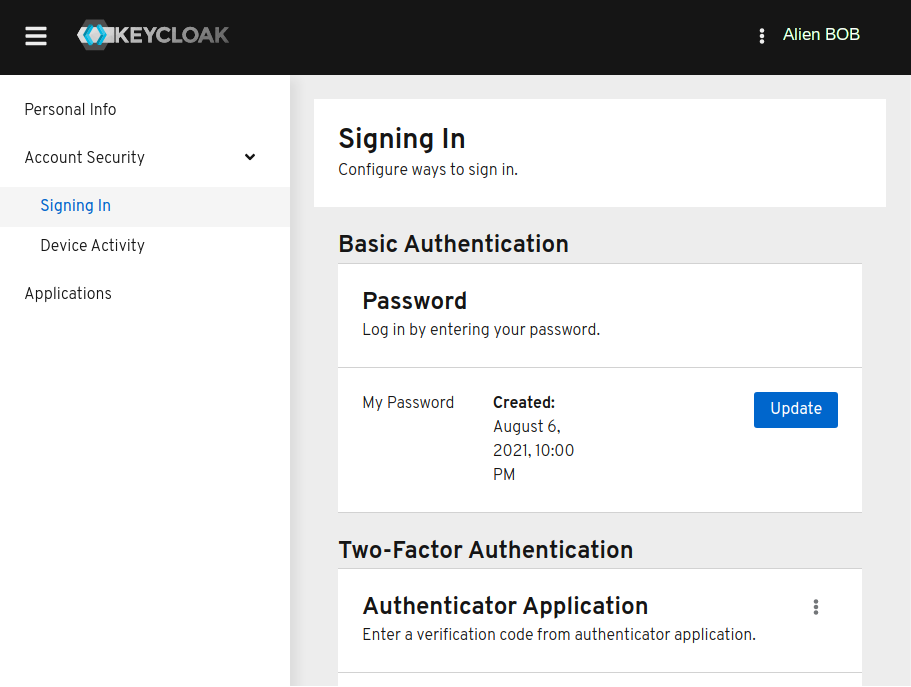
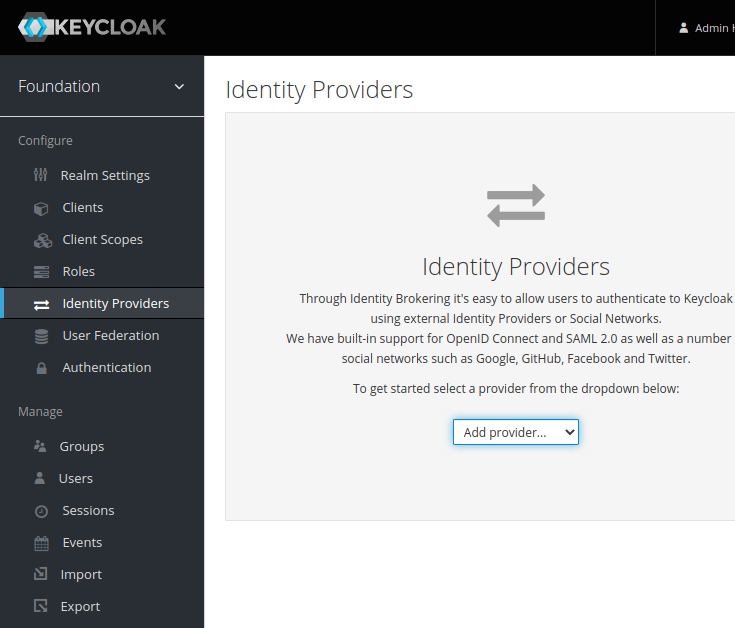

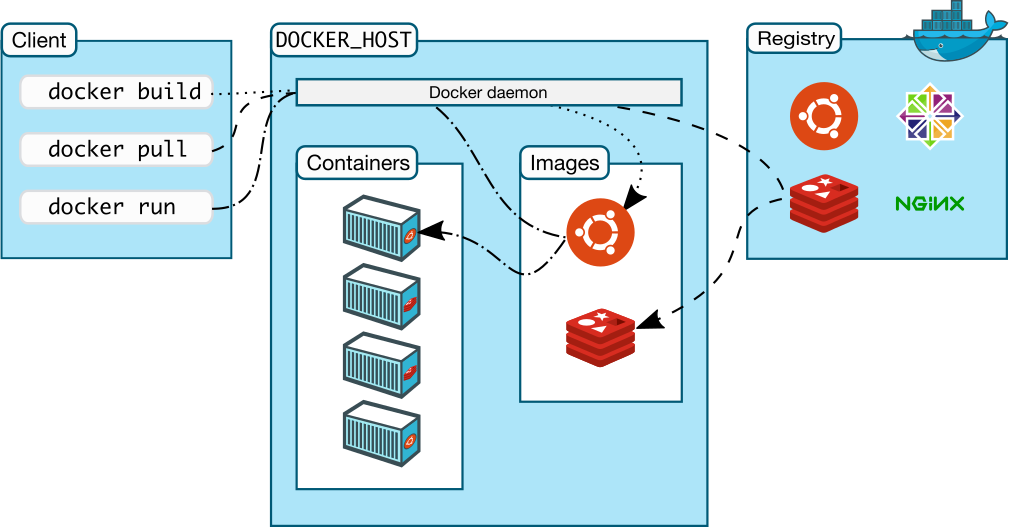
 You create and run a Docker container from (layers of) pre-existing images that inherit from each other, using the ‘docker run‘ command. You can save a container that you created, ‘flattening’ the layers the container consists of into one new image using ‘docker commit‘.
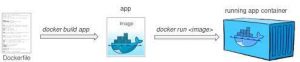
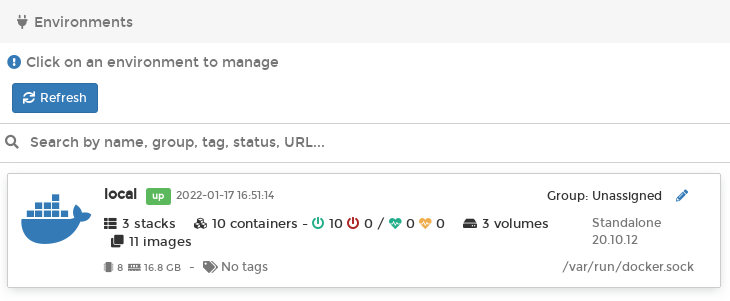
Recent comments