Hi all!
 It has been a while since I wrote an episode for my series about using Slackware as your private/personal ‘cloud server’. Time for something new!
Since a lot of people these days are looking for alternatives to Twitter and Mastodon is a popular choice, I thought it would be worthwhile to document the process of setting up your own Mastodon server. It can be a platform just for you, or you can invite friends and family, or open it up to the world. Your choice. The server you’ll learn to setup by reading this article uses the same Identity Provider (Keycloak) which is also used by all the other services I wrote about in the scope of this series. I.e. a private server using single sign-on for your own family/friends/community.
Check out the list below which shows past, present and future episodes in the series, if the article has already been written you’ll be able to click on the subject.
The first episode also contains an introduction with some more detail about what you can expect.
- Episode 1: Managing your Docker Infrastructure
- Episode 2: Identity and Access management (IAM)
- Episode 3 : Video Conferencing
- Episode 4: Productivity Platform
- Episode 5: Collaborative document editing
- Episode 6: Etherpad with Whiteboard
- Episode 7 (this article): Decentralized Social Media
Setting up Mastodon as an open source alternative to the Twitter social media platform.
- Introduction
- What is decentralized social media
- Preamble
- Mastodon server setup
- Prepare the Docker side
- Define your unique setup
- Configure your host for email delivery
- Download required Docker images
- Create a mastodon role in Postgres
- Mastodon initial setup
- Tuning and tweaking your new server
- Run-time configuration
- Command-line server management
- Data retention
- Full-text search
- Reconfiguration
- Growth
- Connect your Mastodon instance to the Fediverse
- Mastodon Single Sign On using Keycloak
- Adding Mastodon client to Keycloak
- Adding OIDC configuration to Mastodon’s Docker definition
- Food for thought
- Start Mastodon with SSO
- Apache reverse proxy configuration
- Attribution
- Appendix
- Episode 8: Media streaming platform
- Episode 9: Cloudsync for 2FA Authenticator
- Episode X: Docker Registry
Introduction
 Twitter alternatives seem to be in high demand these days. It’s time to provide the users of your Slackware Cloud services with an fully Open Source social media platform that allows for better local control and integrates with other servers around the globe. It’s time for Mastodon.
This article is not meant to educate you on how to migrate away from Twitter as a user. I wrote a separate blog about that. Here we are going to look at setting up a Mastodon server instance, connecting this server to the rest of the Mastodon federated network, and then invite the users of your server to hop on and start following and interacting with the people they may already know from Twitter.
Setting up Mastodon is not trivial. The server consists of several services that work together, sharing data safely using secrets. This is an ideal case for Docker Compose and in fact, Mastodon’s github already contains a “docker-compose.yml” file which is pretty usable as a starting point.
Our Mastodon server will run as a set of microservices: a Postgres database, a Redis cache, and three separate instances of Tootsuite (the Mastodon code) acting as the web front-end for serving the user interface, a streaming server to deliver updates to users in real-time, and a background processing service to which the web service offloads a lot of its requests in order to deliver a snappy user interface.
These services can be scaled up in case the number of users grows, but for the sake of this article, we are going to assume that your audience is several tens or hundreds of users max.
Mastodon documentation is high-quality and includes instructions on how to setup your own server. Those pages discuss the security measures you would have to take, such as disabling password login, activating a firewall, using fail2ban to monitor for break-ins and act timely on those attempts.
The hardware requirements for setting up your own Mastodon server from scratch are well-documented. Assume that your Mastodon instance will consume 2 to 4 GB of RAM and several 10’s of GB disk space to cache the media that is shown in your users’ news feed. You can configure the expiry time of cached data to keep the local storage need manageable. You can opt for S3 cloud storage if you have the money and don’t want to run the risk of running out of disk space.
What is decentralized social media
Let’s first have a look at its opposite: Twitter. The Twitter microblogging platform presents itself as a easy-to-use website where you can write short texts and with the press of a key, share your thoughts with all the other users of Twitter. Your posts (tweets) will be seen by people who follow you, and if those persons reply to you or like your post, their followers will see your post in their timeline.
I highlighted several bits of social media terminology in italics. It’s the glue that connects all users of the platform. But there is more. Twitter runs algorithms that analyze your tweeting and liking behavior. Based on on the behavioral profile they compile of you these algorithms will slowly start feeding other people’s posts into your timeline that have relevance to the subjects you showed your interest in. Historically this has been the cause of “social media bubbles” where you are unwittingly sucked into a downward spiral with increasingly narrow focus. People become less willing to accept other people’s views and eventually radicalize. Facebook is another social media platform with similar traps.
All this is not describing a place where I feel comfortable. So what are the alternatives?
You could of course just decide to quit social media completely, but you would miss out on a good amount of serious conversation. There’s a variety of open source implementations of distributed or federated networks. For instance Diaspora is a distributed social media platform that exists since 2010 and GNU Social since 2008 even. Pleroma is similar to Mastodon in that both use the ActivityPub W3C protocol and therefore are easily connected. But I’ll focus on Mastodon. The Mastodon network is federated, meaning that it consists of many independently hosted server instances that are all interconnected and share data with each other in real-time. Compare this to a distributed network which does not have any identifiable center (Bittorrent for instance).
The Mastodon project was created back in 2016 by a German developer because he was fed up with Twitter and thought he could do better. Mastodon started gaining real traction in April 2022 when Musk announced he wanted to buy Twitter. Since completing this deal, here has been a steady exodus of frustrated Twitter users. This resulted in a tremendous increase of new Mastodon users, its user base increasing with 50,000 per day on average.
As a Twitter migrant, the first thing you need to decide on is: on which Mastodon server should I create my account? See, that is perhaps the biggest conceptual difference with Twitter where you just have an account, period. On Mastodon, you have an account on a server. On Twitter I am @erichameleers. But on Mastodon I am @alien@fosstodon.org but I can just as well be @alien@mastodon.slackware.nl ! Same person, different accounts. Now this is not efficient of course, but it shows that you can move from one server to another server, and your ‘handle’ will change accordingly since the servername is part of it.
As a Mastodon user you essentially subscribe to three separate news feeds: your home timeline, showing posts of people you follow as well as other people’s posts that were boosted by people you follow. Then there’s the local timeline: public posts from people that have an account on the same Mastodon server instance where you created your account. And finally the federated timeline, showing all posts that your server knows about, which is mainly the posts from people being followed by all the other users of your server. Which means, if you run a small server in terms of users, your local and federated timelines will be relatively clean. But on bigger instances with thousands of users, you can easily get intimidated by the flood of messages. That’s why as a user you should subscribe to hashtags as well as follow users that you are interested in. Curating the home timeline like that will keep you sane. See my previous blog for more details.
As a Mastodon server administrator, you will have to think about the environment you want to provide to its future users. Will you define a set of house rules? Will you allow anyone to sign up or do you want to control who ‘lives’ in your server? Ideally you want people to pick your server, create an account, feel fine, and never move on to another server instance. But the strength of open source is also a weakness: when you become the server administrator, you assume responsibility for an unhampered user experience. You need to monitor your server health and monitor/moderate the content that is shared by its users. You need to keep it connected to the network of federated servers. You might have to pay for hosting, data traffic and storage. Are you prepared to do this for a long time? If so, will you be asking your users for monetary support (donations or otherwise)?
Think before you do.
And this is how you do it.
Preamble
This section describes the technical details of our setup, as well as the things which you should have prepared before trying to implement the instructions in this article.
For the sake of this instruction, I will use the hostname “https://mastodon.darkstar.lan” as the URL where users will connect to the Mastodon server.
Furthermore, “https://sso.darkstar.lan/auth” is the Keycloak base URL (see Episode 2 for how we did the Keycloak setup).
The Mastodon container stack (it uses multiple containers) uses a specific internal IP subnet and we will assign static IP addresses to one or more containers. That internal subnet will be “172.22.0.0/16“.
Note that Docker by default will use a single IP range for all its containers if you do not specify a range to be used. The default range is “172.17.0.0/16”
Setting up your domain (which will hopefully be something else than “darkstar.lan”…) with new hostnames and then setting up web servers for the hostnames in that domain is an exercise left to the reader. Before continuing, please ensure that your equivalent for the following host has a web server running. It doesn’t have to serve any content yet but we will add some blocks of configuration to the VirtualHost definition during the steps outlined in the remainder of this article:
I expect that your Keycloak application is already running at your own real-life equivalent of https://sso.darkstar.lan/auth .
Using a Let’s Encrypt SSL certificate to provide encrypted connections (HTTPS) to your webserver is documented in an earlier blog article.
Note that I am talking about webserver “hosts” but in fact, all of these are just virtual webservers running on the same machine, at the same IP address, served by the same Apache httpd program, but with different DNS entries. There is no need at all for multiple computers when setting up your Slackware Cloud server.
Mastodon server setup
Prepare the Docker side
Let’s start with creating the directories where our Mastodon server will save its user data and media caches:
# mkdir -p /opt/dockerfiles/mastodon/{postgresdata,redis,public/system,elasticsearch}
Then we only need two files from the Mastodon git repository. The ‘docker-compose.yml‘ file being the most important, so download that one first:
# mkdir /usr/local/docker-mastodon
# cd /usr/local/docker-mastodon
# wget https://github.com/mastodon/mastodon/raw/main/docker-compose.yml
Ownership for the “public” directory structure needs to be set to
user:group “991:991” because that’s the mastodon userID inside the container:
# chown -R 991:991 /opt/dockerfiles/mastodon/public/
This provides a good base for our container stack setup. Mastodon’s own ‘docker-compose.yml‘ implementation expects a file in the same directory called ‘.env.production‘ which contains all the variable/value pairs required to run the server. We will download a sample version of that .env file from the same Mastodon git repository in a moment.
We need a bit of prep-work on both these files before running our first “docker-compose” command. First the YAML file:
- Remove all the ‘build: .’ lines from the ‘
docker-compose.yml‘ file. We will not build local images from scratch; we will use the official Docker images found on Docker Hub.
- Pin the downloaded Docker images to specific versions; look them up on Docker Hub. Using ‘latest’ is not recommended for production.
For instance: change all “tootsuite/mastodon” to “tootsuite/mastodon:v4.0.2” where “v4.0.2” is the most recent stable version. If you omit the version in this statement,
by default “latest” will be assumed and then you won’t be certain of the actual version of Mastodon you are running.
- Give all containers a name using “container_name” statement, so that they are more easily recognizeable in “docker ps” output instead of just a container ID:
- container_name: mstdn_postgres
- container_name: mstdn_redis
- container_name: mstdn_es
- container_name: mstdn_web
- container_name: mstdn_streaming
- container_name: mstdn_sidekiq
- Modify the ‘volumes’ directives in ‘
docker-compose.yml‘ and define storage locations outside of the local directory.
By default, Docker Compose will create data directories in the current directory.
- ‘
./postgres14:/var/lib/postgresql/data‘ should become:
‘/opt/dockerfiles/mastodon/postgres:/var/lib/postgresql/data‘
- ‘
./redis:/data‘ should become:
‘/opt/dockerfiles/mastodon/redis:/data‘
- ‘
./elasticsearch:/data‘ should become:
‘/opt/dockerfiles/mastodon/elasticsearch:/data‘
- ‘
./public/system:/mastodon/public/system‘ should become:
‘/opt/dockerfiles/mastodon/public/system:/mastodon/public/system‘
- Change the default TCP ports (3000 for the ‘web’ service and 4000 for ‘streaming’ service) to respectively 3333 and 4444 (ports 3000 and 4000 may already be in use); note that there are multiple occurrences of these port numbers in the YML file, but only the ‘
ports‘ value needs to be changed:
'127.0.0.1:3000:3000' needs to become: '127.0.0.1:3333:3000''127.0.0.1:4000:4000' needs to become: '127.0.0.1:4444:4000'
- The Redis exposed port needs to be changed from the default “6379” to e.g. “6380” to prevent a clash with another already running Redis server on your host. Again, this only needs a modification in the ‘redis:’ section of ‘
docker-compose.yml‘ because internally, the container services can talk freely to the default port.
We add two lines in the ‘redis:’ section of ‘docker-compose.yml‘:
ports:

- '127.0.0.1:6380:6379'
- Give Mastodon its own internal IP range, because we need to assign the ‘web’ container its own fixed IP address. Then we can tell Sendmail that it is OK to relay emails from the web server (if you use Postfix instead of Sendmail, you can tell me what you needed to do instead and I will update this article… I only use Sendmail).
Make sure to pick a yet un-used subnet range. Check the output of “route -n” or “ip route show” to find which IP subnets are currently in use.
At the bottom of your ‘docker-compose.yml‘ file change the entire ‘networks:’ section so that it looks like this:
# ---
networks:
  external_network:
    ipam:
      config:
        - subnet: 172.22.0.0/16
  internal_network:
    internal: true
# --
For the ‘web’ container we change the ‘networks:’ definition to:
networks:
  internal_network:
  external_network:
    ipv4_address: 172.22.0.3
    aliases:
    - mstdn_web.external_network
Download the sample environment file from Mastodon’s git repository and use it to create a bootstrap ‘.env.production‘ file. It will contain variables with empty values, but without the existence of this file the initial setup of Mastodon’s docker stack will fail:
# cd /usr/local/docker-mastodon
# wget https://raw.githubusercontent.com/mastodon/mastodon/main/.env.production.sample
# cp .env.production.sample .env.production
This file is full of empty variables and some explanation about their purpose. The Mastodon setup process will eventually dump the full content for ‘.env.production‘ to standard output. You will copy this output into ‘.env.production‘ replacing the whatever was in there at first.
Define your unique setup
Your Mastodon server uses a Postgres database, Postgres will also need an admin password, you’ll need a database user/password combo, et cetera. All these parameters correspond with a variable value in ‘.env.production‘.
Here is the bare minimum configuration you should prepare in advance of starting the Mastodon setup process. With ‘prepare’ I mean, write down the values that you want to use for your server setup. Values in green are going to be unique for your own setup, this article uses example values of course.
# Our server hostname:

LOCAL_DOMAIN=mastodon.darkstar.lan

# Postgress bootstrap:

DB_NAME=mastodon

DB_USER=mastodon

DB_PASS=XBrhvXcm840p8w60L9xe2dnjzbiutmP6

# Optionally the server can send notification emails:

SMTP_SERVER=darkstar.lan

SMTP_PORT=587

SMTP_LOGIN=

SMTP_PASSWORD=

SMTP_AUTH_METHOD=plain

SMTP_OPENSSL_VERIFY_MODE=none

SMTP_ENABLE_STARTTLS=auto

SMTP_FROM_ADDRESS=notifications@mastodon.darkstar.lan
You will additionally need a password for the Postgres admin user when you initialize the database in one of the next sections. Just like for the ‘DB_PASS‘ variable above (which is the password for the database user account), you can generate a random password using this command:
# cat /dev/urandom | tr -dc 'a-zA-Z0-9' | fold -w 32 | head -n 1
ZsAMBvLi9JvowrSUYSC60muWAgIPwIoz
When you have written down everything, we can continue.
Configure your host for email delivery
Part of the Mastodon server setup is to allow it to send notification emails. Note that this is an optional choice. You can skip that part of the setup if you want.
If you want your server to be able to send email notifications, your host needs to relay those emails, and particularly Sendmail requires some information to allow this. The IP address of the Mastodon webserver needs to be trusted by Sendmail as an email origin.
First the DNS part: if you use dnsmasq to provide DNS to your host machine, add the following line to “/etc/hosts”:
172.22.0.3 mstdn_web mstdn_web.external_network
followed by a “killall -HUP dnsmasq” to let your DNS server pick up the update in the hosts file. If you use bind, you’ll know how to add an IP to hostname mapping.
Sendmail needs to be able to resolve the IP when Mastodon requests an email to be sent.
For the Sendmail part of the configuration, add the following to “/etc/mail/access” if it is not already there:
127.0.0  RELAY
172.17   RELAY
172.19   RELAY
172.22   RELAY
It tells Sendmail to recognize our Docker IP ranges as trustworthy.
Run “makemap hash /etc/mail/access.db < /etc/mail/access” to compile the “access” file into a Sendmail database and reload Sendmail:
# /etc/rc.d/rc.sendmail restart
Download required Docker images
To download (pull) the required images from Docker Hub, you run:
# cd /usr/local/docker-mastodon
# docker-compose build
This does not yet start the containers.
Create a mastodon role in Postgres
We need to create the Postgres role “mastodon” prior to starting the Mastodon server setup, because the setup will fail otherwise with “Database connection could not be established with this configuration, try again. FATAL: role “mastodon” does not exist“.
To accomplish this, we spin up a temporary Postgres container using the same Docker image and configuration as we will use for the Mastodon container stack, i.e. we copy most of the parameters out of our ‘docker-compose.yml‘ file:
# docker run --rm --name postgres-bootstrap \
    -v /opt/dockerfiles/mastodon/postgresdata:/var/lib/postgresql/data \
    -e POSTGRES_PASSWORD="ZsAMBvLi9JvowrSUYSC60muWAgIPwIoz" \
    -d postgres:14-alpine
The “run --rm” triggers the removal of the temporary containers after the configuration is complete.
When this container is running , we ‘exec’ into a psql shell:
# docker exec -it postgres-bootstrap psql -U postgres
The following SQL commands will initialize the database and create the “mastodon” role for us, and all of that will be stored in “/opt/dockerfiles/mastodon/postgresdata” which is the location we will also be using for our Mastodon container stack. The removal of the container afterwards will not affect our new database since that will be created outside of the container.
postgres-# CREATE USER mastodon WITH PASSWORD 'XBrhvXcm840p8w60L9xe2dnjzbiutmP6' CREATEDB; exit
postgres-# \q
We can then stop the Postgres container, and continue with the Mastodon setup:
# docker stop postgres-bootstrap
Mastodon server initial setup
Note below the use of “bundle exec rake” instead of just “rake” as used in the official documentation; this avoids the error: “Gem::LoadError: You have already activated rake 13.0.3, but your Gemfile requires rake 13.0.6. Prepending `bundle exec` to your command may solve this.“
Everything is in place to start the setup. We spin up a temporary web server using docker-compose. Using docker-compose ensures that the web server’s dependent containers are started in advance:
# docker-compose run --rm web bundle exec rake mastodon:setup
This command starts an interactive dialog allowing you to configure basic and mandatory options. It will also pre-compile JavaScript and CSS assets, and generate a new set of application secrets used for communication between the various containers.
The configurator will output a full server configuration to standard output at the end. You need to copy and paste that configuration into the ‘.env.production‘ file.
Use the information you compiled in the previous section “determine your unique setup” when answering these questions. After successful completion, this is what you should see:
Below is your configuration, save it to an .env.production file outside Docker:
# Generated with mastodon:setup on 2022-12-12 12:12:12 UTC
# Some variables in this file will be interpreted differently whether you are
# using docker-compose or not.
LOCAL_DOMAIN=mastodon.darkstar.lan
SINGLE_USER_MODE=false
SECRET_KEY_BASE=cf709f9ef70555d82dfb236e5010fff69af2c6d5528a0a0dfc423eba324c87116b031c6fa25b71176ec961018aa80e1f8f2c8c619783972805e698bd9b36cb39
OTP_SECRET=9e27360c39d87e0101c5b1bd24e2c8c306d6ee09da1cbac5f43e5587b223d4d5f240ec565aba92d91435a7bce49e83da2821269a47b0f8077781d73213ef1216
VAPID_PRIVATE_KEY=WvVnHQlzJEQXDuJqR8q1m7CHRGnWI1EiIdO75Di0oDA=
VAPID_PUBLIC_KEY=BLOn5R3ILCIgzQ0VY3cjXFe-IyHSBVtscIG-SaL3pcAOcEqRN4sZAkyAf0iRg6hZuFUVHuFhn1Dm7pZZbNoTF2g=
DB_HOST=db
DB_PORT=5432
DB_NAME=mastodon
DB_USER=mastodon
DB_PASS=XBrhvXcm840p8w60L9xe2dnjzbiutmP6
REDIS_HOST=redis
REDIS_PORT=6379
REDIS_PASSWORD=
SMTP_SERVER=darkstar.lan
SMTP_PORT=587
SMTP_LOGIN=
SMTP_PASSWORD=
SMTP_AUTH_METHOD=plain
SMTP_OPENSSL_VERIFY_MODE=none
SMTP_ENABLE_STARTTLS=auto
SMTP_FROM_ADDRESS=Mastodon <notifications@mastodon.darkstar.lan>
It is also saved within this container so you can proceed with this wizard.
The next step in the configuration initializes the Mastodon database. It is followed by a prompt to create the server’s admin user. The setup program will output an initial password for this admin user, which you can use to logon to the Mastodon Web interface. Be sure to change that password after logging in!
Now launch the Mastodon server using:
# docker-compose up -d
Note that if you run “docker-compose up” without the “-d” so that the process remains in the foreground, you’ll see the following warnings coming from the Redis server:
mstdn_redis | 1:M 12 Dec 2022 13:55:16.140 # You requested maxclients of 10000 requiring at least 10032 max file descriptors.
mstdn_redis | 1:M 12 Dec 2022 13:55:16.140 # Server can't set maximum open files to 10032 because of OS error: Operation not permitted.
mstdn_redis | 1:M 12 Dec 2022 13:55:16.140 # Current maximum open files is 4096. maxclients has been reduced to 4064 to compensate for low ulimit. If you need higher maxclients increase 'ulimit -n'.
I leave it up to you to look into increasing the max-open-files default of 4096.
Tuning and tweaking your new server
Run-time configuration
Now that your server is up and running, it is time to use the admin account for which you received an initial password during setup, to personalize it.
Mastodon has a documentation page on this process. The server admin has access to a set of menu items under “Settings > Administration“.
One menu item is “Relays“. This is where you would add one or more relays to speed up the process of Federation between your small instance and the rest of the Fediverse. See the section further down called “Connect your Mastodon instance to the Fediverse” for the details.
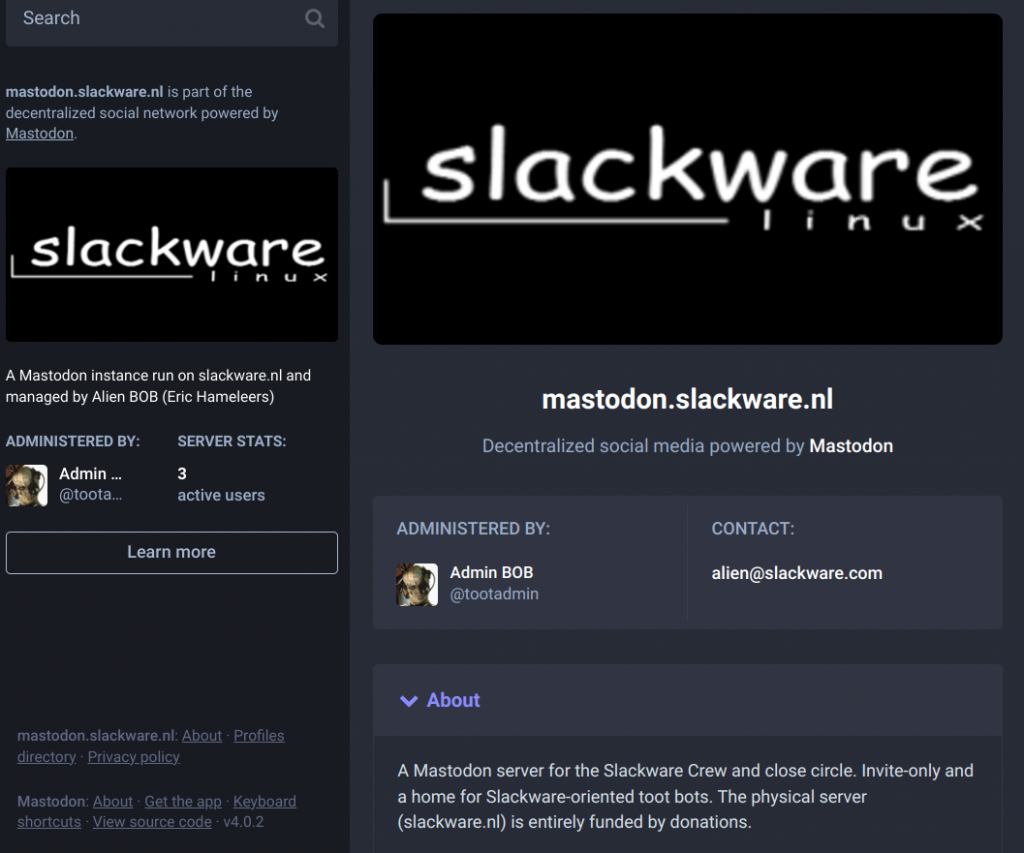
Spend some time in the “Server Settings” and “Server Rules” submenus and their tabs (such as “Branding“) to add information about your server that identifies it to visitors and users, and shows the “house rules” that clarify what you expect of people that want an account on your server.
Here is an example of how branding is used to present my site to visitors:
Command-line server management
The admin user has access to the “Admin CLI” which is the fancy name for the “tootctl” command in the mstdn_web container. You can find its man-page at https://docs.joinmastodon.org/admin/tootctl/ .
If you need to run the “tootctl” command, use “docker exec” to execute your command inside of the already running Web container which we gave the name ‘mstdn_web‘ in ‘docker-compose.yml‘:
# docker exec -it mstdn_web bin/tootctl <some_command_option>
Data retention
The tab “Content Retention” under “Server Settings” will be of importance to you, depending on the limitations of your storage capacity. It allows you to specify a max age of downloaded media after which those files get purged from the local cache. The amount of GB in use can increase rapidly as the number of local users grows. Alternatively you can run the following Docker commands on the host’s commandline to delete parts of the cache immediately instead of waiting for the container’s own scheduled maintenance. In my case, you’ll see that the server is quite inactive (single-user instance) and there’s nothing to be removed:
# docker exec -it mstdn_web bin/tootctl preview_cards remove
0/0 |===========================================================| Time: 00:00:00
Removed 0 preview cards (approx. 0 Bytes)
# docker exec -it mstdn_web bin/tootctl media remove
0/0 |===========================================================| Time: 00:00:00
Removed 0 media attachments (approx. 0 Bytes)
# docker exec -it mstdn_web bin/tootctl cache clear
OK
Full-text search
If you want to support full-text search of posts on your Mastodon server, you should un-comment the container definition for elasticsearch (the ‘es‘ service) in your ‘docker-compose.yml‘ file and run “docker-compose down ; docker-compose build ; docker-compose up -d” to pull the elasticsearch container from Docker Hub. Note that this will tax your host with additional RAM, CPU and storage demand.
Reconfiguration
In case of future re-configuration you may want to skip the full configuration if you only want to setup or migrate the database, in which case you can invoke the database setup directly:
# docker compose run --rm -v $(pwd)/.env.production:/opt/mastodon/.env.production web bundle exec rake db:setup
Growth
As your instance welcomes more users, you may have to scale up the service. The official Mastodon documentation has a page with considerations: https://docs.joinmastodon.org/admin/scaling/
Adding more concurrency is relatively easy. But when it comes to caching the data and media pulled in by your users’ activities, you may eventually run into the limits of your local server storage. If your server is that successful, consider setting up a support model using Patreon, PayPal or other means that will provide you with the funds to connect your Mastodon instance to Cloud-based storage. That way, storage needs won’t be limited by the dimensions of your local hardware but rather by the funds you collect from your users.
Remember, Mastodon is a federated network with a lot of server instances, but the Mastodon users will expect that their account is going to be available at all times. You will have to work out a model where you can give your users that kind of reassurance. Grow a team of server moderators and admins, promote your server, secure a means of funding which allows to operate your server for at least the next 3 to 6 months even when the flow of money stops. Create room for contingencies.
Mastodon does not show ads, and instead relies a lot on its users to keep the network afloat.
Connect your Mastodon instance to the Fediverse
A Mastodon server depends on its users to determine what information to pull from other servers in the Fediverse. If your users start following people on remote instances or subscribe to hashtags, your server instance will start federating, i.e. it will start retrieving this information, at the same time introducing your instance to remote instances.
If you are going to be running a small Mastodon instance with only a few users, getting connected to the wider Fediverse may be challenging. The start of your server’s federation may not be guaranteed. To accommodate this, the Mastodon network contains relay servers.
Adding one or more of these relays to your server configuration makes the relay push federated data to your server. A list of relay servers is available for instance here: https://techbriefly.com/2022/11/11/active-mastodon-relays/ and I am sure you can find more relays mentioned in other locations. Some relays require that their admin acknowledges and approves your request before the data push is activated.
Mastodon Single Sign On using Keycloak
Like with the other cloud services we have been deploying, our Mastodon server will be using our Keycloak-based Single Sign On solution using OpenID Connect. Only the admin user will have their own local account. Any Slackware Cloud Server user will have their account already setup in your Keycloak database. The first time they login to your Mastodon server, the account will be activated automatically.
It means that your server should disable the account registration page. You can configure that in “Server Settings > Registrations“.
Adding Mastodon Client ID in Keycloak
Point your browser to the Keycloak Admin console https://sso.darkstar.lan/auth/admin/ to start the configuration process.
Add a ‘confidential’ openid-connect client in the ‘foundation‘ Keycloak realm (the realm where you created your users in the previous Episodes of this article series):
- Select ‘foundation‘ realm; click on ‘Clients‘ and then click ‘Create‘ button.
- ‘Client ID‘ = “mastodon“
- ‘Client Protocol‘ = “openid-connect” (the default)
- ‘Access type‘ = “confidential”
- Save.
- Also in ‘Settings‘, allow this app from Keycloak.
Our Mastodon container is running on https://mastodon.darkstar.lan . We add
- ‘Valid Redirect URIs‘ = https://mastodon.slackware.nl/auth/auth/openid_connect/callback
- ‘Base URL‘ = https://mastodon.darkstar.lan/
- ‘Web Origins‘ = https://mastodon.darkstar.lan
- Save.
- To obtain the secret for the “mastodon” Client ID, go to “Credentials > Client authenticator > Client ID and Secret”
- Copy the Secret (Q5PZA2xQcpDcdvGpxqViQIVgI6slm7xO)
- Alternatively to retrieve the secret, go to ‘Installation‘ tab to download the ‘
keycloak.json‘ file for this new client:
- ‘Format Option‘ = “Keycloak OIDC JSON”
- Click ‘Download‘ which downloads a file “
keycloak.json” with the following content:
# ---
{
    "realm": "foundation",
    "auth-server-url": "https://sso.darkstar.lan/auth",
    "ssl-required": "external",
    "resource": "mastodon",
    "credentials": {
     "secret": "Q5PZA2xQcpDcdvGpxqViQIVgI6slm7xO"
    },
    "confidential-port": 0
}
# ---
This secret is an example string of course, yours will be different. I will be re-using this value below. You will use your own generated value.
Add OIDC configuration to Mastodon’s Docker definition
Bring the mastodon container stack down if it is currently running:
# cd /usr/share/docker/data/mastodon

# docker-compose down
Add the following set of definitions to the ‘.env.production‘ file:
# Enable OIDC:
OIDC_ENABLED=true
# Text to appear on the login button:
OIDC_DISPLAY_NAME=Keycloak SSO
# Where to find your Keycloak OIDC server:
OIDC_ISSUER=https://sso.darkstar.lan/auth/realms/foundation
# Use discovery to determine all OIDC endpoints:
OIDC_DISCOVERY=true
# Scope you want to obtain from OIDC server:
OIDC_SCOPE=openid,profile,email
# Field to be used for populating user's @alias:
OIDC_UID_FIELD=preferred_username
# Client ID you configured for Mastodon in Keycloak:
OIDC_CLIENT_ID=mastodon
# Secret of the Client ID you configured for Mastodon in Keycloak:
OIDC_CLIENT_SECRET=Q5PZA2xQcpDcdvGpxqViQIVgI6slm7xO
# Where OIDC server should come back after authentication:
OIDC_REDIRECT_URI=https://mastodon.darkstar.lan/auth/auth/openid_connect/callback
# Assume emails are verified by the OIDC server:
OIDC_SECURITY_ASSUME_EMAIL_IS_VERIFIED=true
Food for thought
Let’s dive into the meaning of this line which you just added:
> OIDC_UID_FIELD=preferred_username
This “preferred_username” field translates to the Username property of a Keycloak account. The translation is made in the OpenID ‘Client Scope‘.
The Docker Compose definition which we added to ‘.env.production‘ contains the line below, allowing any attribute in the scopes ‘openid‘, ‘profile‘ and ‘email‘ to be added to the ‘token claim‘ – which is the packet of data which is exchanged between Keycloak and its client, the Mastodon server.
> OIDC_SCOPE=openid,profile,email
To learn more about the available attributes, login to Keycloak as the admin user and select our “foundation” realm.
Via ‘Configure‘ > ‘Client Scopes‘ click on ‘profile‘ > ‘Mappers‘ > ‘username’ where you will see that the ‘username‘ property has a token claim name of ‘preferred_username‘. We use ‘preferred_username’ in the OIDC_UID_ID variable which means that the actual user will see his familiar account name being used in Mastodon just like in all the other Cloud services.
However, what if you don’t want to use regular user account names for your Mastodon? After all, Twitter usernames are your own choice, as a Mastodon server admin you may want to offer the same freedom to your users.
In that case, consider using one of the other available attributes. There is for instance ‘nickname‘ which is also a User Attribute and therefore acceptable. It will not be a trivial exercise however: in Keycloak you must create a customized user page which allows the user to change not just their email or password, but also their nickname. For this, you will have to add ‘nickname’ as a mapped attribute to your realm’s user accounts first. And you have to ensure somehow that the nickname values are going to be unique. I have not researched how this should (or even could) be achieved. If any of you readers actually succeeds in doing this, I would be interested to know, leave a comment below please!
Start Mastodon with SSO
Start the mastodon container stack in the directory where we have our tailored ‘docker-compose.yml‘ file:
# cd /usr/share/docker/data/mastodon

# docker-compose up -d
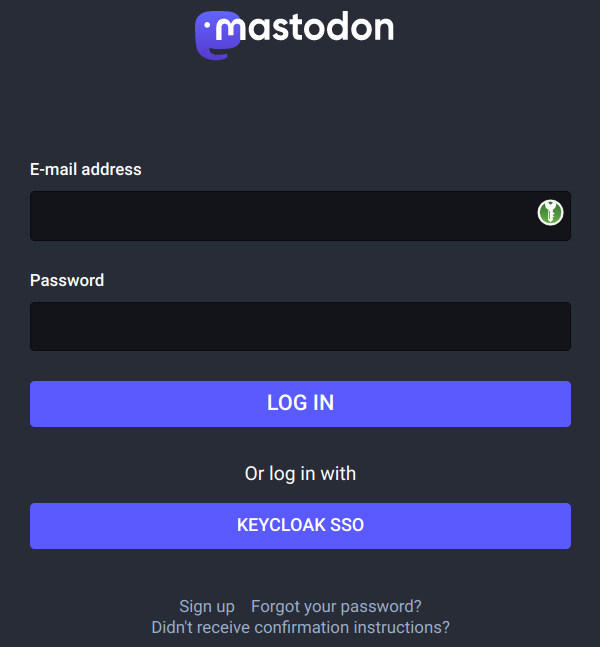
And voila! We have an additional button in our login page, allowing you to login with “Keycloak SSO“.
Apache reverse proxy configuration
To make Mastodon available at https://mastodon.darkstar.lan/ we are using a reverse-proxy setup. This step can be done after the container stack is already up and running, but I prefer to configure Apache in advance of the Mastodon server start. You choose.
Add the following reverse proxy lines to your VirtualHost definition of the “mastodon.darkstar.lan” web site configuration and restart httpd:
# ---
# Set some headers:
Header always set Referrer-Policy "strict-origin-when-cross-origin"
Header always set Strict-Transport-Security "max-age=31536000"
RequestHeader set X-Forwarded-Proto "https"

# Reverse proxy to Mastodon Docker container stack:
SSLProxyEngine on
ProxyTimeout 900
ProxyVia On
ProxyRequests Off
ProxyPreserveHost On

<Proxy *>
    Options FollowSymLinks MultiViews
    AllowOverride All
    Order allow,deny
    allow from all
</Proxy>

<Location />
    ProxyPass        http://127.0.0.1:3333/ retry=0 timeout=30
    ProxyPassReverse http://127.0.0.1:3333/
</Location>
<Location /api/v1/streaming>
    ProxyPass        ws://127.0.0.1:4444/ retry=0 timeout=30
    ProxyPassReverse ws://127.0.0.1:4444/
</Location>
# ---
Attribution
When setting up my own server, I was helped by reading these pages:
Continue reading
 Someone recently contacted me with the request to base Slackware Live DAW edition on a stable Slackware release like 15.0 instead of using Slackware -current. The rationale being that it would bring relative peace of mind not having to worry about daily updates and potential sudden breakage of your audio applications.
 It has been a while since I wrote an episode for my series about using Slackware as your private/personal ‘cloud server’. Time for something new!
 Twitter alternatives seem to be in high demand these days. It’s time to provide the users of your Slackware Cloud services with an fully Open Source social media platform that allows for better local control and integrates with other servers around the globe. It’s time for

 Chromium, regular and un-googled.


Recent comments