 For my Slackware Cloud Server series of articles, we are going to have a look at a system for workflow management, personal note taking and all kinds of other collaborative features.
When the COVID pandemic hit the world, me and my wife began a routine of regular walks in the open fields and forests near us, simply to escape the confines of the house and have a mental break from all the tension. We really enjoyed the quiet of those days, we rarely encountered other wanderers – but that’s an aside.
My wife started documenting our walks, our bicycle trips and eventually also our holidays in OneNote. It was a convenient note-taking tool which combines structured text with images and hyperlinks. Even though OneNote is a MS Windows program, it saves its data in the Cloud, allowing me to access the collection of our walking notes in a Slackware web browser.
Some of you may be using Miro at work, for your Agile workflows, for brainstorming and in general, as an online replacement for physical whiteboards. Online collaborative tools like Miro became immensely popular because of the COVID pandemic when coming to the office every day was no longer feasible.
The selling point of the above tools is that they are cloud-centered. Your data is stored with the tool provider and you can work – individually or in groups – on your projects online.
As always, there’s a catch. Miro is commercial and comes with a paid subscription. OneNote is free, Windows-only but with browser-based access to your data, yet has a 5 GB storage cap.
For individual usage, several free alternatives have risen in popularity; note-taking apps that provide an alternative to OneNote such as EverNote, Joplin, but also evolutions of the note-taking concept like Notion, Obsidian, LogSeq and more. While EverNote and Notion are not Open Source, they have a free plan for online storage. LogSeq and Obsidian are open source tools for off-line usage and single-user, but you can store their local database in a cloud storage like Dropbox, OneDrive, Google One or Nextcloud if you want. Joplin is open source, multi-user but not collaborative and stores its data on a backend server – either its own Joplin Cloud or else a WebDAV server like Nextcloud. I plan on writing an article about Joplin, too. It’s on my TODO.
This list is far from complete – there are many more alternatives and they all will try to cater to your specific needs.
I am not going to discuss the pros and cons of these tools, I have not tested them all. I like to make calculated choices based on available information and then stick to my choices. You can only become good at something if you really invest time. It’s also why I am not a distro-hopper and stuck with Slackware from day one.
My choice of personal workflow management tool is AFFiNE. The main reasons for finally picking it over the alternatives, is that the AFFiNE server backend is is open source software, it has desktop and mobile apps and a browser client, and it allows you to work offline or sync your project data to a cloud server. Its collaborative features allow a team to work jointly and simultaneously on a project.
Most importantly, it offers a self-hosting option using Docker Compose and the self-host version integrates with OpenID Connect (OIDC) Identity Providers (IDP) like Keycloak. Aka Single Sign-On (SSO).
A caveat upfront: This software is in active development. The developers are friendly and responsive to the questions from their community. But some of the features that you would like to see in the self-hosted version are not yet built, or not trivial to implement, or take ages to implement, or simply badly documented. That is exactly why I decided to write this article: to provide complete documentation to the online community about how to setup and configure your own AFFiNE server with SSO provided by Keycloak (or any other IDP than Keycloak which implements OIDC).
This article will evolve in parallel with AFFiNE’s development, and as features get added or bugs resolved, I will update the text here as well.
Actually, that is exactly what happened because while writing this text, AFFiNE devs pushed a Christmas upgrade and I had to adapt my descriptions in some places. Also, some of the screenshots I made will probably look slightly different on new releases.
Check out the list below which shows past, present and future episodes in my Slackware Cloud Server series. If the article has already been written you’ll be able to click on the subject.
The first episode also contains an introduction with some more detail about what you can expect.
Introduction

Let’s dive a bit deeper into AFFiNE.
AFFiNE is a privacy-first, open source “Write, Plan, Draw, All At Once” all-in-one workspace which is currently in a ‘Beta‘ stage (version 0.19.1), with a new release every 6 weeks. With each update, the changes and new features are impressive.
Everything in AFFiNE is made up of blocks. Blocks can be organized in Docs and these can be represented in different ways. Here is some terminology to help you get acquainted with the tool quickly:
-
: These are the atomic elements that comprise your Docs. They can contain text, images, embedded web pages etc.
-
: Your main canvas. It has ‘doc info’ associated for indexing and referencing. Your Doc has two views: Edgeless and Page Mode.
-
: Presents a set of blocks in the form of a linear document which always fits on your page.
-
Edgeless mode: Presents all content of your Doc in a edgeless (infinite) canvas.
-
: Also called ‘Info’, refers to all the attributes and fields contained within a Doc.
-
: A structured container to index, group, update or oversee blocks in different views.
-
: A smart folder where you can manually add pages or automatically add pages through rules.
-
: Your virtual space to capture, create and plan as just one person or together as a team.
-
: Collaborators of a Workspace. Members can have different roles.
-
: Your personal appearance and usage preferences allow you to tailor your Workspace to your needs.
When working in AFFiNE you get an edgeless (aka infinite) canvas where you engage in a variety of activities like documenting, creating mood-boards, brainstorming, project planning, creative drawing, mind-mapping, all using an intuitive block editor, and then connect all of your ideas via the relations you apply to the various blocks, simply dragging arrows across your canvas.
You can toggle the two main viewports: either you work in the block editor in an infinite canvas, or you fit the structured textual content into your browser page.
Functionally, AFFiNE offers a blend of how Miro and Notion work. The edgeless whiteboard canvas with many templates to choose from, is definitely inspired by Miro. The block editor is something which Notion and other alternatives are well-known for.
Concepts used in AFFiNE to create structure in your workflow are Frame, Group and Database.
Your data will be stored on your local disk or in your browser’s cache by default, but you have the option to login to a cloud server and sync your data to the server.
The company that develops AFFiNe (ToEverything aka Theory Of Everything) offers a free plan with 10 GB of online project storage and a maximum of three collaborators to invite to your projects. But we are more interested in the self-hosted version where we are in control of that data. There, we decide how much you and your friends can store and how big your team can become when you engage in collaborative work. The self-hosted version of AFFiNE Cloud can eliminate all those limitations of the free plan.
If you decided to switch from your current knowledge management solution, then it’s good to know that AFFiNE can import content from other tools, specifically it supports Notion export files, but also will import HTML and Markdown files.
Please note that ToEverything, the company behind AFFiNE, funds the software’s development from donations it receives and from the Pro subscriptions to their own AFFiNE Cloud offering. If you setup a self-hosted AFFiNE and really like it, and also use it as a collaboration platform with a group of friends/colleagues, you might want to consider setting up a donation to support a sustained development.
Preamble
This section describes the technical details of our setup, as well as the things which you should have prepared before trying to implement the instructions in this article.
Web Hosts
For the sake of this instruction, I will use the hostname “https://affine.darkstar.lan” as your landing page for AFFiNE.
Furthermore, “https://sso.darkstar.lan/auth” is the Keycloak base URL (see Episode 2 to read how we setup Keycloak as our identity provider).
In Keycloak, we have configured a realm called ‘foundation‘ which contains our user accounts and application client configurations.
Setting up your domain (which will hopefully be something else than “darkstar.lan”…) with new hostnames and then setting up web servers for the hostnames in that domain is an exercise left to the reader. Before continuing, please ensure that your equivalent for the following host has a web server running. It doesn’t have to serve any content yet but we will add some blocks of configuration to the VirtualHost definition during the steps outlined in the remainder of this article:
Using a Let’s Encrypt SSL certificate to provide encrypted connections (HTTPS) to your webserver is documented in an earlier blog article.
Note that I am talking about webserver “hosts” but in fact, all of these are just virtual webservers running on the same machine, at the same IP address, served by the same Apache httpd program, but with different DNS entries. There is no need at all for multiple computers when setting up your Slackware Cloud server.
Docker network
- We assign a Docker network segment to our AFFiNE containers: 172.22.0.0/16
- We assign a specific IPv4 address to the AFFiNE server itself (so that it is able to send emails): 172.22.0.5
File Locations
- The Docker configuration goes into: /usr/local/docker-affine/
- The data generated by the AFFiNE server goes into: /opt/dockerfiles/affine/
Secrets
The Docker stack we create for our AFFiNE server uses several secrets (credentials).
In this article, we will use example values for these secrets – be sure to generate and use your own strings here!
# Credentials for the Postgres database account:
AFFINE_DB_USERNAME=affine
AFFINE_DB_PASSWORD=0Igiu3PyijI4xbyJ87kTZuPQi4P9z4pd
# Credentials for the account that authenticates to the SMTP server for sending emails:
AFFINE_MAILER_USER=affinemailer
AFFINE_MAILER_PASSWORD=E9X46W3vz8h1nBVqBHgKCISxRufRsHlAXSEbcXER/58=
# Credentials for the OIDC client are shared between Keycloak and AFFiNE:
AFFINE_OIDC_CLIENT_ID=affine
AFFINE_OIDC_CLIENT_SECRET=TZ5PBCw66IhDtZJeBD4ctsS2Hrb253uY
Note that AFFiNE’s internal implementation chokes on a Postgress password containing special characters (at least up to version 0.19.1).
Apache reverse proxy configuration
We are going to run AFFiNE in a Docker container stack. The configuration will be such that the server will only listen for clients at one TCP port at the localhost address (127.0.0.1).
To make our AFFinE storage and database backend available to the users at the address https://affine.darkstar.lan/ we are using a reverse-proxy setup. The flow is as follows: the user connects to the reverse proxy using HTTPS (encrypted connection) and the reverse proxy connects to the AFFinE backend on the client’s behalf. Traffic between the reverse proxy (Apache httpd in our case) and the AFFiNE server’s Docker container is un-encrypted. That is not a problem, we give the AFFiNE server its own private network segment inside Docker.
A reverse proxy is capable of handling many simultaneous connections and can be configured to offer SSL-encrypted connections to the remote users even when the backend can only communicate over clear-text un-encrypted connections.
Add the following reverse proxy lines to your VirtualHost definition of the “https://affine.darkstar.lan” web site configuration and restart httpd:
# ---
# Required modules:
# mod_proxy, mod_ssl, proxy_wstunnel, http2, headers, remoteip

# No caching:
Header set Cache-Control "max-age=1, no-control"
ProxyRequests Off
ProxyVia on
ProxyAddHeaders On
ProxyPreserveHost On

<Proxy *>
  Options FollowSymLinks MultiViews
  Require all granted
</Proxy>

# Letsencrypt places a file in this folder when updating/verifying certs.
# This line will tell apache to not to use the proxy for this folder:
ProxyPass "/.well-known/" "!"

<IfModule mod_ssl.c>
  SSLProxyEngine on
  RequestHeader set X-Forwarded-Proto "https"
  RequestHeader set X-Forwarded-Port "443"
</IfModule>

# AFFiNE is hosted on https://affine.darkstar.lan/
<Location />
  ProxyPass "http://127.0.0.1:3010/"
  ProxyPassReverse "http://127.0.0.1:3010/"
</Location>

# WebSocket proxy:
RewriteEngine on
RewriteCond %{HTTP:Connection} Upgrade [NC]
RewriteCond %{HTTP:Upgrade} websocket [NC]
RewriteRule ^/?(.*) "ws://127.0.0.1:3010/$1" [P,L]
# ---
If you want to make your non-encrypted web address http://affine.darkstar.lan redirect automatically to the encrypted ‘https://‘ variant, be sure to add this block to its VirtualHost definition to ensure that Letsencrypt can still access your server’s challenge file via an un-encrypted connection:
<If "%{REQUEST_URI} !~ m#/\.well-known/acme-challenge/#">
    Redirect permanent / https://affine.darkstar.lan/
</If>
The hostname and TCP port numbers shown in bold green are defined elsewhere in this article, they should stay matching when you decide to use a different hostname and port numbers.
AFFiNE Server preparations
We will give the AFFiNE server its own internal Docker network. That way, the inter-container communication stays behind its gateway, this prevents snooping the network traffic.
Docker network
Create the network using the following command:
docker network create \
  --driver=bridge \
  --subnet=172.22.0.0/16 --ip-range=172.22.0.0/25 --gateway=172.22.0.1 \
  affine.lan
Docker’s gateway address in any network segment will always have the “1” number at the end.
Select a yet unused network range for this subnet. You can find out about the subnets which are already defined for Docker by running this command:
# ip route |grep -E '(docker|br-)'
The ‘affine.lan‘ network you created will be represented in the AFFiNE docker-compose.yml file with the following code block:
networks:
  affine.lan:
    external: true
Create directories
Create the directory for the docker-compose.yml and other startup files:
# mkdir -p /usr/local/docker-affine
Create the directories to store data:
# mkdir -p /opt/dockerfiles/affine/{config,postgres,storage}
Download the docker-compose and a sample .env file:
# cd /usr/local/docker-affine
# wget -O docker-compose.yml https://raw.githubusercontent.com/toeverything/AFFiNE/refs/heads/canary/.github/deployment/self-host/compose.yaml
# wget https://raw.githubusercontent.com/toeverything/AFFiNE/refs/heads/canary/.github/deployment/self-host/.env.example
# cp .env.example .env
It looks like with the release of 0.19 the developers are also posting versions of the docker-compose.yml and default.env.example files in the Assets section of the Releases page.
Considerations for the .env file
Docker Compose is able to read environment variables from an external file. By default, this file is called ‘.env‘ and must be located in the same directory as the ‘docker-compose.yml‘ file. In fact ‘.env‘ will be searched in the current working directory, but I always execute ‘docker-compose‘ in the directory containing its YAML file anyway and to make it really fool-proof the YAML file will define the ‘.env‘ file location explicitly.
In this environment file we are going to specify things like accounts, passwords, TCP ports and the like, so that they do not have to be referenced in the ‘docker-compose.yml‘ file or even in the process environment space. You can shield ‘.env‘ from prying eyes, thus making your setup more secure.
This is eventually the content of the ‘/usr/local/docker-affine/.env‘ file, excluding the OIDC configuration:
# ---
# Select a revision to deploy, available values: stable, beta, canary
AFFINE_REVISION=stable

# Our name:
AFFINE_SERVER_NAME=Alien's AFFiNE

# Set the port for the server container it will expose the server on
PORT=3010

# Set the host for the server for outgoing links
AFFINE_SERVER_HTTPS=true
AFFINE_SERVER_HOST=affine.darkstar.lan
AFFINE_SERVER_EXTERNAL_URL=https://affine.darkstar.lan

# Position of the database data to persist
DB_DATA_LOCATION=/opt/dockerfiles/affine/postgres
# Position of the upload data (images, files, etc.) to persist
UPLOAD_LOCATION=/opt/dockerfiles/affine/storage
# Position of the configuration files to persist
CONFIG_LOCATION=/opt/dockerfiles/affine/config

# Database credentials
AFFINE_DB_USERNAME=affine
AFFINE_DB_PASSWORD=0Igiu3PyijI4xbyJ87kTZuPQi4P9z4pd
AFFINE_DB_DATABASE=affinedb

# Mailer service for sending collaboration invites:
AFFINE_MAILER_HOST=affine.darkstar.lan
AFFINE_MAILER_PORT=587
AFFINE_MAILER_USER=affinemailer
AFFINE_MAILER_PASSWORD=E9X46W3vz8h1nBVqBHgKCISxRufRsHlAXSEbcXER/58=
AFFINE_MAILER_SENDER=affinemailer@darkstar.lan
AFFINE_MAILER_SECURE=false

# We hard-code the IP address for the server so that we can make it send emails:
AFFINE_IPV4_ADDRESS=172.22.0.5

# Here you will add OIDC credentials later
# ---
Note that I kept having issues with some environment variables not getting filled with values inside the containers. I found out that a variable in the ‘.env‘ file that had a dash ‘-‘ as part of the name would not be recognized inside a container, that is why now I only use capital letters and the underscore,
The Docker Compose configuration
The ‘docker-compose.yml‘ file we downloaded to/usr/local/docker-affine/ in one of the previous chapters will create multiple containers, one for AFFiNE itself, one for the Postgres database and one for the Redis memory cache. I made a few tweaks to the original, so eventually it looks like this (excluding the OIDC configuration:
# ---
name: affine
services:
  affine:
    image: ghcr.io/toeverything/affine-graphql:${AFFINE_REVISION:-stable}
    container_name: affine_server
    ports:
      - '127.0.0.1:${PORT:-3010}:3010'
    depends_on:
      redis:
        condition: service_healthy
      postgres:
        condition: service_healthy
      affine_migration:
        condition: service_completed_successfully
    volumes:
      # custom configurations
      - ${UPLOAD_LOCATION}:/root/.affine/storage
      - ${CONFIG_LOCATION}:/root/.affine/config
      # Here you will add a workaround for an OIDC bug later
    env_file:
      - path: ".env"
    environment:
      - ENABLE_TELEMETRY=false
      - REDIS_SERVER_HOST=redis
      - DATABASE_URL=postgresql://${AFFINE_DB_USERNAME}:${AFFINE_DB_PASSWORD}@postgres:5432/${AFFINE_DB_DATABASE:-affine}
      - MAILER_HOST=${AFFINE_MAILER_HOST}
      - MAILER_PORT=${AFFINE_MAILER_PORT}
      - MAILER_USER=${AFFINE_MAILER_USER}
      - MAILER_PASSWORD=${AFFINE_MAILER_PASSWORD}
      - MAILER_SENDER=${AFFINE_MAILER_SENDER}
      - MAILER_SECURE=${AFFINE_MAILER_SECURE}
      # Here you will add OIDC environment variables later
   networks:
      affine.lan:
        ipv4_address: ${AFFINE_IPV4_ADDRESS}
        aliases:
          - affine.affine.lan
    restart: unless-stopped

  affine_migration:
    image: ghcr.io/toeverything/affine-graphql:${AFFINE_REVISION:-stable}
    container_name: affine_migration_job
    volumes:
      # custom configurations
      - ${UPLOAD_LOCATION}:/root/.affine/storage
      - ${CONFIG_LOCATION}:/root/.affine/config
    command: ['sh', '-c', 'node ./scripts/self-host-predeploy.js']
    env_file:
      - path: ".env"
    environment:
       - REDIS_SERVER_HOST=redis
       - DATABASE_URL=postgresql://${AFFINE_DB_USERNAME}:${AFFINE_DB_PASSWORD}@postgres:5432/${AFFINE_DB_DATABASE:-affine}
    depends_on:
      redis:
       condition: service_healthy
      postgres:
        condition: service_healthy
    networks:
      - affine.lan

  redis:
    image: redis
    container_name: affine_redis
    healthcheck:
      test: ['CMD', 'redis-cli', '--raw', 'incr', 'ping']
      interval: 10s
      timeout: 5s
      retries: 5
    networks:
      - affine.lan
    restart: unless-stopped

  postgres:
    image: postgres:16
    container_name: affine_postgres
    volumes:
      - ${DB_DATA_LOCATION}:/var/lib/postgresql/data
    env_file:
      - path: ".env"
    environment:
      POSTGRES_USER: ${AFFINE_DB_USERNAME}
      POSTGRES_PASSWORD: ${AFFINE_DB_PASSWORD}
      POSTGRES_DB: ${AFFINE_DB_DATABASE:-affine}
      POSTGRES_INITDB_ARGS: '--data-checksums'
    healthcheck:
      test:
        ['CMD', 'pg_isready', '-U', "${AFFINE_DB_USERNAME}", '-d', "${AFFINE_DB_DATABASE:-affine}"]
      interval: 10s
      timeout: 5s
      retries: 5
    networks:
      - affine.lan
    restart: unless-stopped

networks:
  affine.lan:
    external: true
# ---
Initializing the Docker stack
The docker-compose.yml file in /usr/local/docker-affine defines the container stack, the .env file in that same directory contains credentials and other variables. If you hadn’t created the Docker network yet, do it now! See the “Docker network” section higher up.
Start the Docker container stack. There will be three containers eventually and a temporary ‘migration’ container performing the administrative tasks prior to starting the server:
# cd /usr/local/docker-affine

# docker-compose up -d && docker-compose logs -f
And monitor the logs if you think the startup is troublesome. The above command-line will show the detailed log of the startup after the containers have been instantiated and you can quit that log-tail using ‘Ctrl-C‘ without fear of killing your containers.
If you want to check the logs for the AFFiNE server using the name we gave its container (affine_server):
# docker logs affine_server
Or check the logs of the full Docker Compose stack using the ‘affine’ service name (the first line in the docker-compose.yml file):
# docker-compose logs affine
When this is the first time you start the Docker stack, the Postgres database will be initialized. This will take a few seconds extra. When the server is up and running, use a webbrowser to access your AFFiNE workspace at https://affine.darkstar.lan/. The next section “Setting up the server admin” has instructions on the steps you need to take to setup an admin account.
The server backend shows version information by pointing curl (or a web browser) at the URL https://affine.darkstar.lan/info – it will return a YAML string which looks like this:
{
  "compatibility": "0.19.1",
  "message": "AFFiNE 0.19.1 Server",
  "type": "selfhosted",
  "flavor": "allinone"
}
Setting up the server admin
The first time you connect to the self-hosted AFFiNE server, you are being asked to create an admin account. For that reason, you may want to connect directly to the container via http://localhost:3010 when logged-in to your Docker host.
If you are not the paranoid type, you can also connect to the external URL https://affine.darkstar.lan/ of course 🙂 Just make sure that you do that before some interested 3rd-party comes visiting.

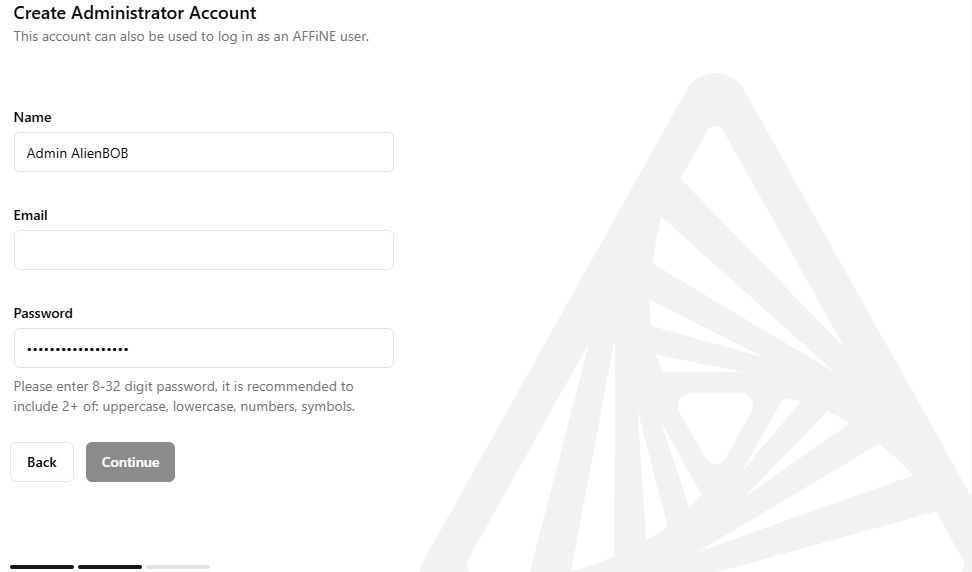
In a few steps, you will be taken through a setup procedure where you enter your name, email address and a password.

And voila! You are the admin of your new AFFiNE server.
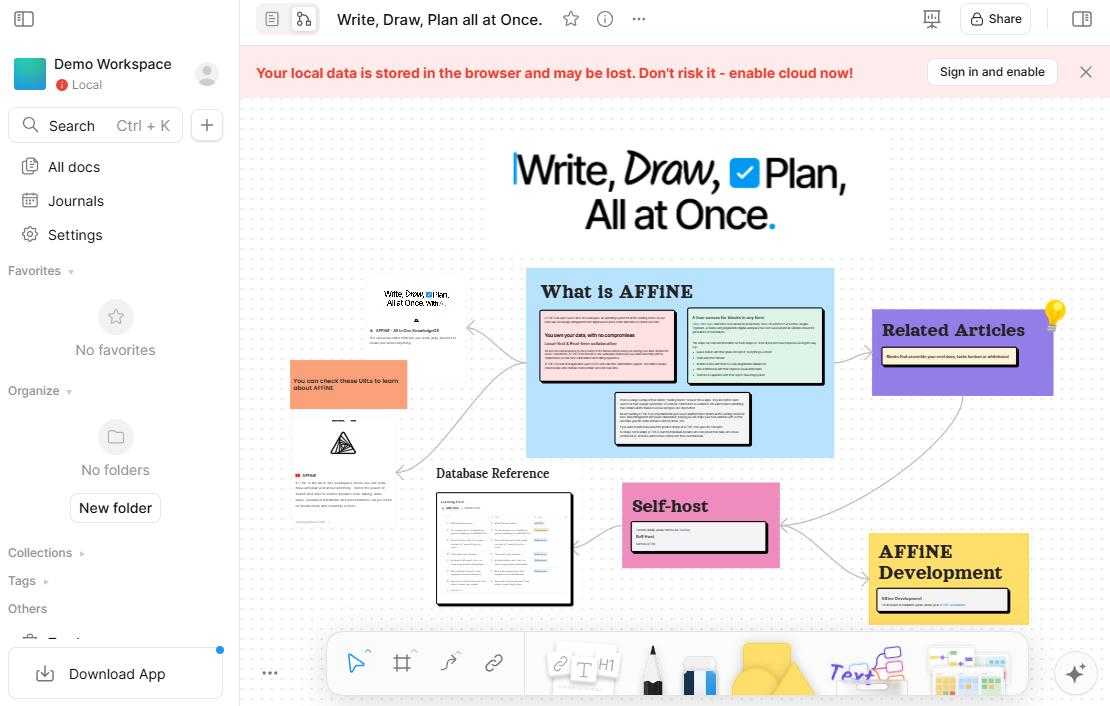
When you remove the “/admin/...” path from the resulting URL in your browser, that will take you to the default AFFiNE Workspace for your account, which will always be populated with a demo page:
You immediately see the red banner, informing you that your work will be kept in your browser cache and may be lost when the browser crashes, and that you should really enable a Cloud sync. Of course, the word “Cloud” in this context means nothing more than your own self-hosted server.
Note that the URL for administering your server is https://affine.darkstar.lan/admin/!
Administering the server
Creating and managing users
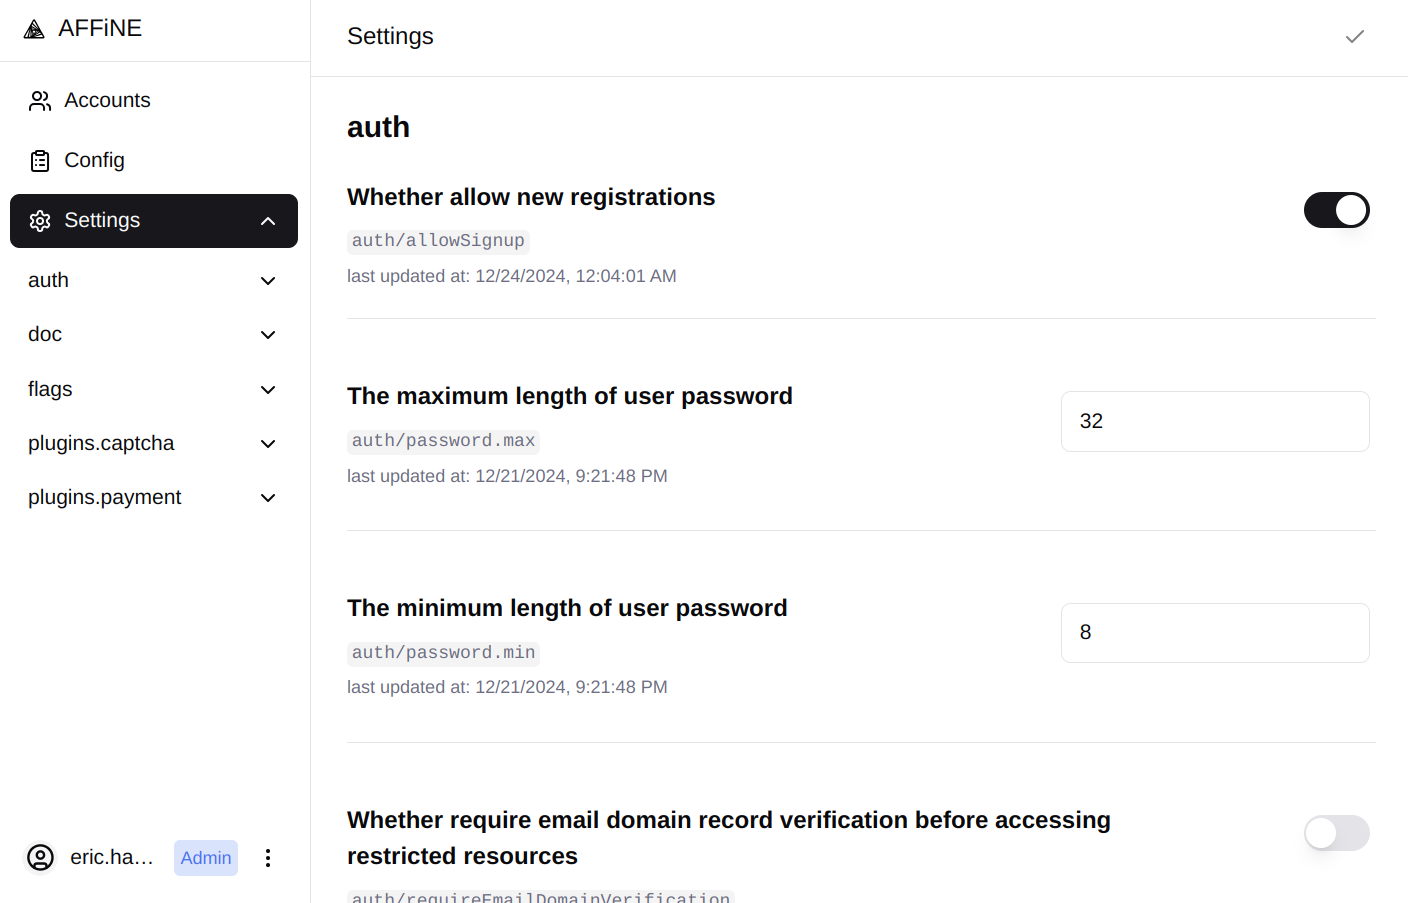
The first decision you need to make is whether you are going to open up your AFFiNE server to anyone interested. By default, new users can register themselves via email. AFFiNE will create an account for them and a “magic link” with a login token will be sent to them. If you go to https://affine.darkstar.lan/admin/settings you see that there is a slider which allows you to disable the self-registration feature:

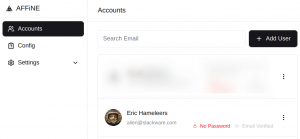
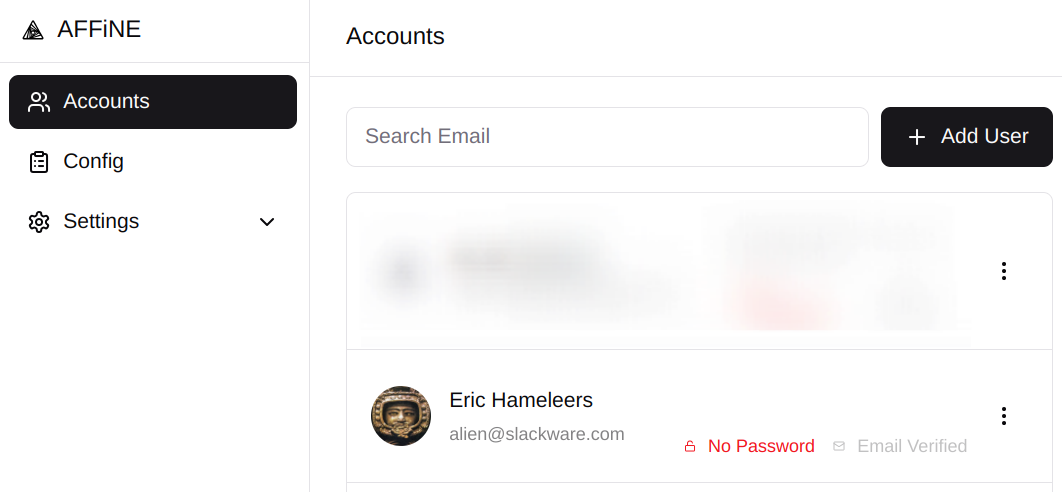
If you decide to disable the self-registration, you’ll have to create accounts for your users manually in https://affine.darkstar.lan/admin/accounts via the “+ Add User” button:
One big caveat for this way of creating user accounts is that you need to have configured the mail transport. AFFiNE needs to send emails to your users.
That requires a bit of configuration in the Docker stack (but that has already been taken care of in the above docker-compose.yml and .env files) and also on the Docker host. You will find the detailed instructions in the section further down named “Configuring the mail transport (Docker container & host)“.
If you implement Single Sign-On (SSO) via Keycloak then AFFiNE only needs to send emails if a user wants to invite another user in order to collaborate on a workspace.
Customizing the users’ abilities
The self-hosted AFFiNE server adds every user to the “Free Plan” just like when you would create an account on the company’s server https://app.affine.pro/ . However, the reason for self-hosting is to take control over our data as well as our own capabilities. The “Free Plan” comes with a maximum of 10 GB server storage, a 10 MB filesize upload limit, 7 days of file version history and a maximum of 3 members in your workspaces. The developers are apparently still considering what kind of capabilities are relevant for users of a self-hosted instance.
We are not going to wait. I’ll show how you stretch those limits so that they are no longer relevant.
A bit of familiarity with Postgres will help with that, since it involves directly modifying AFFiNE database records.
First, open a Postgres prompt to our affinedb database on the affine_postgres container:
# docker exec -it affine_postgres psql -U affine affinedb
The “affinedb=#” in the rest of this section depicts the Postgres command prompt. This is where you are going to type the SQL commands that show information from the database and will change some of the data in there. We will be examining the ‘users’, ‘features’ and ‘user_features’ tables and make our changes in the ‘user_features’ table when we assign a different Plan to your users’ accounts.
Execute some actual SQL
- Let’s see who the registered users are on our server. I limit the output of the command to just my own user who logged in via Single Sign-On:
affinedb=# select * from users;
                  id                  |      name       |           email           |                                             password                                              |         created_at         |       email_verified       |                                               avatar_url                                               | registered
--------------------------------------+-----------------+---------------------------+---------------------------------------------------------------------------------------------------+----------------------------+----------------------------+--------------------------------------------------------------------------------------------------------+------------
 01ba65de-6d3b-4eb2-9cd4-be98264e4370 | Eric Hameleers  | alien@slackware.com       |                                                                                                   | 2024-12-22 14:01:37.834+00 | 2024-12-22 14:01:37.829+00 | https://affine.darkstar.lan/api/avatars/01ba65de-6d3b-4eb2-9cd4-be98264e4370-avatar-1734879819544 | t
- The orange highlight shows my
user_id, which is basically a UUID string. We will be using that user_id in the next SQL commands. To get a list of the Plans (features) that are available for AFFiNE users we can do a SQL query as follows:
affinedb=# select id, feature, configs from features;
- But I am going to leave that as an exercise for the reader, because I will show a more tailored version of that command soon. First, let’s look at what Plan (the
feature_id in the user_features table) my user was assigned to:
affinedb=# select * from user_features where user_id = '01ba65de-6d3b-4eb2-9cd4-be98264e4370‘;
 id |               user_id                | feature_id |  reason  |         created_at         | expired_at | activated
----+--------------------------------------+------------+----------+----------------------------+------------+-----------
 11 | 01ba65de-6d3b-4eb2-9cd4-be98264e4370 |         13 | sign up  | 2024-12-22 14:44:20.203+00 |            | t
- Apparently I am on a Plan with a
feature_id of “13”. Let’s get more details about that Plan, and let’s already add “16” to that query (you will soon see why I want that)
affinedb=# select id, feature, configs from features where id = 13 or id = 16;
 id |   feature    |                                                                             configs
----+--------------+-----------------------------------------------------------------------------------------------------------------------------------------------------------------
 13 | free_plan_v1 | {"name":"Free","blobLimit":10485760,"businessBlobLimit":104857600,"storageQuota":10737418240,"historyPeriod":604800000,"memberLimit":3,"copilotActionLimit":10}
 16 | lifetime_pro_plan_v1 | {"name":"Lifetime Pro","blobLimit":104857600,"storageQuota":1099511627776,"historyPeriod":2592000000,"memberLimit":10,"copilotActionLimit":10}
- By looking in more detail to the feature definition for id “13” aka the “Free” plan (the ‘configs‘ field) we see that there is a 10 MB upload limit (the blobLimit in bytes); a 10 GB storage limit (the storageQuota in bytes), a 7-day historical version retention (the historyPeriod in seconds), and a limit of 3 members who can collaborate on your workspace (the memberLimit). You also notice that the “Lifetime Pro” plan with an id of “16” has considerably higher limits (100 MB file upload limit, 1 TB of storage, 30 days history retention, 10 members to collaborate with).
These queries show that by default when you sign up with the self-hosted version, you get assigned to the “Free Plan” which corresponds to a feature_id of “13”. We are going to change that for our user and set it to “16” which is the “Unlimited Pro Plan”:
affinedb=# update user_features set feature_id = 16, reason = 'selfhost' where user_id = '01ba65de-6d3b-4eb2-9cd4-be98264e4370' and feature_id = 13;
- Now, when you look at the user_features table, my account shows the “selfhost” string as the reason for change:
affinedb=# select * from user_features where user_id = '01ba65de-6d3b-4eb2-9cd4-be98264e4370‘;
 id |               user_id                | feature_id |  reason  |         created_at         | expired_at | activated
----+--------------------------------------+------------+----------+----------------------------+------------+-----------
 11 | 01ba65de-6d3b-4eb2-9cd4-be98264e4370 |         16 | selfhost | 2024-12-28 13:23:17.826+00 |            | t
- If we look at our account settings in AFFiNE now, we see that the Plan has changed:
You need to repeat this for every user who registers at your AFFiNE instance.
User passwords
There’s a difference between users who are logging in via OIDC, and the rest of them. When your users login via OIDC using an Identity Provider (IDP) such as Keycloak, the password is not stored in AFFiNE, and the user can always logout and login again.
But when you (the admin) create an account, or you have self-registration enabled (which is the default) and the user submits their email to the server, then AFFiNe will send the user a “magic link” via email every time they want to login to your server. That is a bit cumbersome, but the user can do something about that.
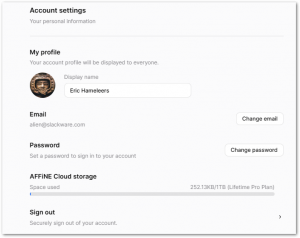
In the “Account settings” dialog which you reach by clicking on the user avatar, there’s a “Password” section which tells you “Set a password to sign in to your account“. When the user has set a password, then subsequet login attempts will not trigger a “magic link” any longer, but a password entry field will be displayed instead.
Connecting to the workspace
The admin user has been created and you can keep using that to create content in your AFFiNE workspaces of course. But you can also create a separate user account; see the previous section on how to allow more users access to your server.
I’ll come to the login later, let’s first have a look at what happens when you connect to your AFFiNE server again, after having logged out your admin user account.
There’s a difference, caused by cookies that are set by the AFFiNE server, in what you see when you connect without being logged in.
- You have not yet converted your local data to a Cloud sync workspace.
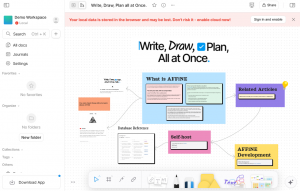
If you access https://affine.darkstar.lan/ you will land into the “Demo Workspace“, containing the single Doc “Write, Draw, Plan all at Once“:
By default, anything you create will stay in the browser cache.
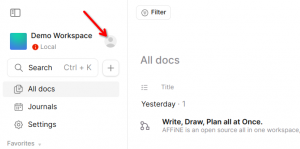
If you want to start syncing to your AFFiNE server, click the avatar icon in the top left of the window:
 A login dialog opens, the same actually that you will get in “option 2” below. Enter your email address and click “Continue with email” to login. After completing your login, the Cloud-sync of your workspaces commences.
- You were already syncing your workspace to your AFFiNE Cloud, then logged off, and now you want to login again.
You will now be greeted with these options instead of the “Demo Workspace“:
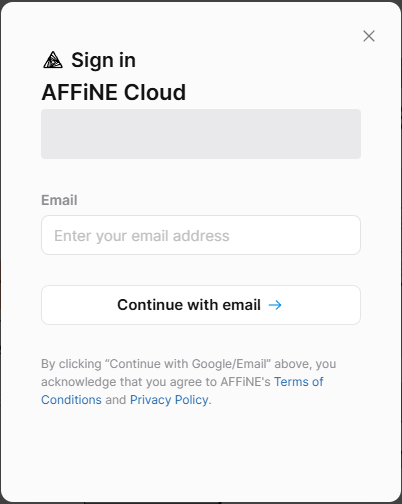
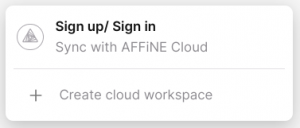 … and if you click on either the “Sign up / Sign in” or the “Create cloud workspace” you will be taken to the actual login screen:
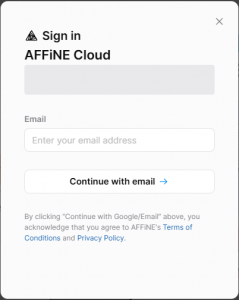 Here you type your account’s email address and press “ENTER” or click the “Continue with email“. Depending on whether you have already defined a password for your account, the next screen will either show a password entry field or else a message informing you that a “Magic link” has been sent to your email address. The “Magic link” URL contains a login token allowing you to login without a password. The token expires after 30 minutes. You’ll keep getting “Magic links” until you configure a password for your user account.
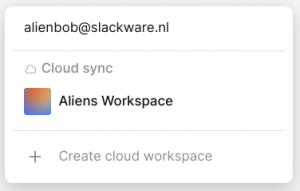
The workspaces that you had already created will be presented and you can select which one you want to continue working on, or else create a new one right away:
You’re all set, enjoy AFFiNE!
Adding Single Sign-On (SSO)
Any Slackware Cloud Server user will have their account already setup in your Keycloak database. The first time they login to your AFFiNE server using SSO, the account will be activated automatically.
We need to define a new Client ID in Keycloak, which we are going to use with AFFiNE. Essentially, Keycloak and AFFiNE need a shared credential.
Add a AFFiNE Client ID in Keycloak
Point your browser to the Keycloak Admin console https://sso.darkstar.lan/auth/admin/ to start the configuration process.
Add a ‘confidential’ openid-connect client in the ‘foundation‘ Keycloak realm (the realm where you created your users in the previous Episodes of this article series):
- Select ‘foundation‘ realm; click on ‘Clients‘ and then click ‘Create‘ button.
- ‘Client ID‘ = “affine“
- ‘Client Type‘ = “OpenID Connect” (the default)
Note that in Keycloak < 20.x this field was called ‘Client Protocol‘ and its value “openid-connect”.
- Toggle ‘Client authentication‘ to “On”. This will set the client access type to “confidential”
Note that in Keycloak < 20.x this was equivalent to setting ‘Access type‘ to “confidential”.
- Check that ‘Standard Flow‘ is enabled.
- Save.
- Also in ‘Settings‘, configure how AFFiNE server connects to Keycloak.
Our AFFiNE container is running on https://affine.darkstar.lan . We add
- ‘Root URL‘ = https://affine.darkstar.lan/
- ‘Home URL‘ = https://affine.darkstar.lan/auth/callback/
- ‘Valid Redirect URIs‘ = https://affine.darkstar.lan/*
- ‘Web Origins‘ = https://affine.darkstar.lan/
- Save.
To obtain the secret for the “affine” Client ID:
- Go to “Credentials > Client authenticator > Client ID and Secret“
- Copy the Secret (TZ5PBCw66IhDtZJeBD4ctsS2Hrb253uY). This secret is an example string of course, yours will be different. I will be re-using this value below. You will use your own generated value.
Add an OIDC definition to AFFiNE
We have all the information we need to enhance our Docker stack.
First, add the credentials that AFFiNE shares with Keycloak, to the ‘.env’ file of your Docker Compose definition (I left a hint already in magenta higher-up in this article):
# OIDC (OpenID Connect):
AFFINE_OIDC_ISSUER=https://sso.darkstar.lan/auth/realms/foundation
AFFINE_OIDC_CLIENT_ID=affine
AFFINE_OIDC_CLIENT_SECRET=TZ5PBCw66IhDtZJeBD4ctsS2Hrb253uY
Then, add these variables in our ‘docker-compose.yml’ file at the location which I highlighted for you in magenta:
  - OAUTH_OIDC_ISSUER=${AFFINE_OIDC_ISSUER}
  - OAUTH_OIDC_CLIENT_ID=${AFFINE_OIDC_CLIENT_ID}
  - OAUTH_OIDC_CLIENT_SECRET=${AFFINE_OIDC_CLIENT_SECRET}
  - OAUTH_OIDC_SCOPE=openid email profile offline_access
  - OAUTH_OIDC_CLAIM_MAP_USERNAME=preferred_username
  - OAUTH_OIDC_CLAIM_MAP_EMAIL=email
  - OAUTH_OIDC_CLAIM_MAP_NAME=preferred_username
Lastly, the OIDC plugin needs to be enabled. You do that by adding the following text block to the end of the file ‘/opt/dockerfiles/affine/config/affine.js’:
/* OAuth Plugin */
AFFiNE.use('oauth', {
  providers: {
    oidc: {
      // OpenID Connect
      issuer: 'https://sso.darkstar.lan/auth/realms/foundation',
      clientId: 'affine',
      clientSecret: 'TZ5PBCw66IhDtZJeBD4ctsS2Hrb253uY',
      args: {
        scope: 'openid email profile offline_access',
        claim_id: 'preferred_username',
        claim_email: 'email',
        claim_name: 'preferred_username',
      },
    },
  },
});
This OIDC definition block is already part of that file (apart from the magenta bit), but commented-out, and also includes examples for Google and Github authentication. Adding the complete block is cleaner than un-commenting a batch of lines.
Note: this duplicates the configuration for the OIDC client (at least the relevant values are also configured in the ‘.env’ file), but I did not find a way around that. The complete configuration must be present inside ‘affine.js’ otherwise you will not get an option to use OIDC as a login provider.
Bugs to resolve first
Two things had been bugging me for days until I found hints online and by combining their fixes, I was finally able to make my self-hosted AFFiNE server (version 0.18) work with Single Sign-On.
Right after Christmas 2024, a new version 0.19.1 was released which solved one of those two bugs (clicking “Continue with OIDC” button would take you to the ‘https://app.affine.pro/oauth‘ page instead of your own ‘https://affine.darkstar.lan/oauth‘ page. Inside the container, there was a hard-coded URL).
The other bug hopefully gets resolved in a future release, it has already been reported in the project tracker:
- The OIDC plugin would not be enabled even after properly configuring ‘/opt/dockerfiles/affine/config/affine.js’. It turns out that AFFiNE is not reading that file and the internal defaults take precedence.
In order to work around this bug, I simply mounted my local ‘affine.js’ file into the container, overwriting the internal version. To do this, you need to add this line to your ‘docker-compose.yml‘ file at the magenta highlighted location under “volumes“:
- ${CONFIG_LOCATION}/affine.js:/app/dist/config/affine.js:ro
All set!
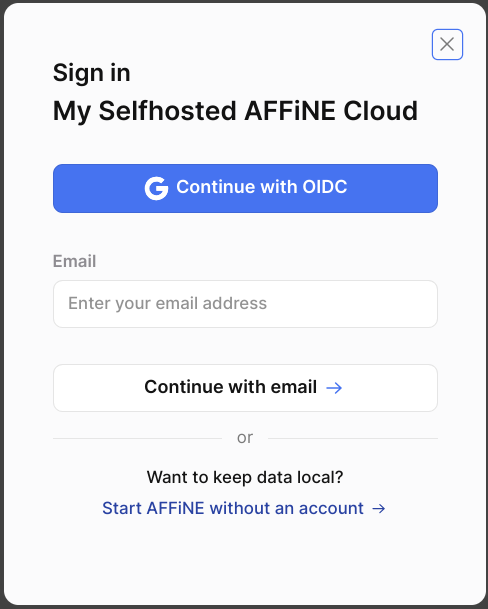
This completes the Single Sign-On configuration. Now when you access your AFFiNE server and want to login, the screen will show the following:
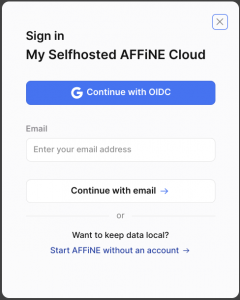
Clicking on that “Continue with OIDC” will take you to the Keycloak login dialog. After you logged on using your SSO credentials, you will be asked to select an existing workspace or create a new one.
You will then be returned to the AFFiNE landing page https://affine.darkstar.lan … but here you run into another bug, or perhaps it is a configuration oversight which I do not recognize: the page appears exactly as before you logged in.
You need to do a page refresh (Ctrl-R in your browser) and then you’ll see that you are indeed logged-in and you are syncing to the AFFiNE Cloud (aka your own server).
Configuring mail transport (Docker container & host)
Note that a large chunk of this section was copied from a previous article in the series. I do not know whether you actually read all of them in order, so I think it is prudent to share a complete set of instructions in each article.
AFFiNE needs to be able to send emails in the following circumstances:
- You create the user accounts manually, or else you want to give users an option to sign up via e-mail. In both cases, AFFiNE sends a “magic link” to that email address when the user attempts to login.
The “magic link” will allow the user to create an account without initial password: the URL contains a login token. The user should then set a password in AFFiNE to be able to login later without the need for an another email with a “magic link”.
- A user wants to invite collaborators to their workspace. The invites are sent via email.
In the ‘/usr/local/docker-affine/.env‘ file which contains the configuration for Docker Compose, the hostname or IP address and the TCP port for your own SMTP server needs to be provided. You can configure TLS encrypted connections, but that is not mandatory.
User credentials for sending the emails and a return address need to be added as well. The complete set looks like this:
# Mailer service for sending collaboration invites:
AFFINE_MAILER_HOST=affine.darkstar.lan
AFFINE_MAILER_PORT=587
AFFINE_MAILER_USER=affinemailer
AFFINE_MAILER_PASSWORD=E9X46W3vz8h1nBVqBHgKCISxRufRsHlAXSEbcXER/58=
AFFINE_MAILER_SENDER=affinemailer@darkstar.lan
AFFINE_MAILER_SECURE=false
Note that when I tried “AFFINE_MAILER_SECURE=true“, I was not able to make AFFiNE send emails, the encrypted SMTP connection would fail due to OpenSSL compatibility issues. My Docker host is running a hardened Slackware-current, perhaps I disabled some older cipher or protocol that the container needs? This is something I would like to see resolved.
Make the host accept mail from the AFFiNE container
When AFFiNE starts sending emails from its Docker container, we want Sendmail or Postfix to accept and process these. What commonly happens if a SMTP server receives emails from an unknown IP address is to reject those emails with “Relaying denied: ip name lookup failed“. We don’t want that to happen.
In Docker, you already performed these steps:
- Create an IP network for AFFiNE and assign a name to it
- Assign a fixed IP address to the AFFiNE container
On the Docker host, these are the steps to complete:
- Announce the Docker IP/hostname mapping
- Setup a local DNS server
- Configure SASL authentication mechanisms to be used by the MTA (mail transport agent, eg. Postfix)
- Create a system user account to be used by AFFiNE when authenticating to the MTA
- Add SASL AUTH and also TLS encryption capabilities to the MTA
Assign IP address to the Docker container.
The ‘affine.lan‘ network definition is in the section “Docker network” higher-up.
The ‘docker-compose.yml‘ file contains the lines hard-coding the IP address:
networks:
  affine.lan:
    ipv4_address: ${AFFINE_IPV4_ADDRESS}
    aliases:
      - affine.affine.lan
With the value for that variable ${AFFINE_IPV4_ADDRESS} being defined in the ‘.env‘ file:
# We hard-code the IP address for the server so that we can make it send emails:
AFFINE_IPV4_ADDRESS=172.22.0.5
Add IP / name mapping to the Docker host
In ‘/etc/hosts‘ you need to add the following:
172.22.0.5 affine affine.affine.lan
And to ‘/etc/networks‘ add this line:
affine.lan 172.22
DNS serving local IPs on the Docker host
Under the assumption that your Cloud Server does not act as a LAN’s DNS server, we will use dnsmasq as the local nameserver. Dnsmasq is able to use the content of /etc/hosts and /etc/networks when responding to DNS queries. We can use the default, unchanged ‘/etc/dnsmasq.conf‘ configuration file.
But first, add this single line at the top of the host server’s ‘/etc/resolv.conf‘ (it may already be there as a result of setting up Keycloak), so that all local DNS queries will will be handled by our local dnsmasq service:
nameserver 127.0.0.1
If you have not yet done so, (as root) make the startup script ‘/etc/rc.d/rc.dnsmasq‘ executable and start dnsmasq manually (Slackware will take care of starting it on every subsequent reboot):
# chmod +x /etc/rc.d/rc.dnsmasq

# /etc/rc.d/rc.dnsmasq start
If dnsmasq is already running (eg. when you have Keycloak running and sending emails) then send SIGHUP to the program as follows:
# killall -HUP dnsmasq
That tells dnsmasq to reload its configuration. Check that it’s working and continue to the next step:
# nslookup affine.affine.lan
Server: 127.0.0.1
Address: 127.0.0.1#53
Name: affine.affine.lan
Address: 172.22.0.5
Configuring SASL on the Docker host
The mailserver aka MTA (Sendmail or Postfix) requires that remote clients authenticate themselves. The Simple Authentication and Security Layer (SASL) protocol is used for that, but typically, these MTA’s do not implement SASL themselves. There are two usable SASL implementations available on Slackware: Cyrus SASL and Dovecot; I picked Cyrus SASL just because I know that better.
We need to configure the method of SASL authentication for the SMTP daemon, which is via the saslauthd daemon. That one is not started by default on Slackware.
If the file ‘/etc/sasl2/smtpd.conf‘ does not yet exist, create it and add the following content:
pwcheck_method: saslauthd

mech_list: PLAIN LOGIN
Don’t add any further mechanisms to that list, except for PLAIN LOGIN. The resulting transfer of cleartext credentials is the reason that we also wrap the communication between mail client and server in a TLS encryption layer.
If the startup script ‘/etc/rc.d/rc.saslauthd‘ is not yet executable, make it so and start it manually this time (Slackware will take care of starting it on every subsequent reboot):
# chmod +x /etc/rc.d/rc.saslauthd

# /etc/rc.d/rc.saslauthd start
Create the mail user
We need a system account to allow AFFiNE to authenticate to the SMTP server. Let’s go with userid ‘affinemailer‘.
The following two commands will create the user and set a password:
# /usr/sbin/useradd -c "AFFiNE Mailer" -m -g daemon -s /bin/false affinemailer

# passwd affinemailer
Write down the password you assigned to the user ‘affinemailer‘. Both this userid and its password are used in the ‘.env‘ file of Docker Compose; in fact this is what I already posted higher-up:
AFFINE_MAILER_USER=affinemailer
AFFINE_MAILER_PASSWORD=E9X46W3vz8h1nBVqBHgKCISxRufRsHlAXSEbcXER/58=
After the account creation, you can test whether you configured SASL authentication correctly by running:
# testsaslauthd -u affinemailer -p E9X46W3vz8h1nBVqBHgKCISxRufRsHlAXSEbcXER/58=
… which should reply with:
0: OK "Success."
Configuring Sendmail on the Docker host
Since Postfix has replaced Sendmail as the MTA in Slackware a couple of years ago already, I am going to be concise here:
Make Sendmail aware that the AFFiNE container is a known local host by adding the following line to “/etc/mail/local-host-names” and restarting the sendmail daemon:
affine.affine.lan
The Sendmail package for Slackware provides a ‘.mc’ file to help you configure SASL-AUTH-TLS in case you had not yet implemented that: ‘/usr/share/sendmail/cf/cf/sendmail-slackware-tls-sasl.mc‘.
Configuring Postfix on the Docker host
If you use Postfix instead of Sendmail, this is what you have to change in the default configuration:
In ‘/etc/postfix/master.cf‘, uncomment this line to make the Postfix server listen on port 587 as well as 25 (port 25 is often firewalled or otherwise blocked):
submission inet n - n - - smtpd
In ‘/etc/postfix/main.cf‘, add these lines at the bottom:
# ---
# Allow Docker containers to send mail through the host:
mynetworks_style = class
# ---
Assuming you have not configured SASL AUTH before you also need to add:
# ---
# The assumption is that you have created your server's SSL certificates
# using Let's Encrypt and 'dehydrated':
smtpd_tls_cert_file = /etc/dehydrated/certs/darkstar.lan/fullchain.pem
smtpd_tls_key_file = /etc/dehydrated/certs/darkstar.lan/privkey.pem
smtpd_tls_security_level = encrypt

# Enable SASL AUTH:
smtpd_sasl_auth_enable = yes
syslog_name = postfix/submission
smtpd_recipient_restrictions = permit_sasl_authenticated,permit_mynetworks,reject_unauth_destination
# ---
After making modifications to the Postfix configuration, always run a check for correctness of the syntax, and do a reload if you don’t see issues:
# postfix check

# postfix reload
More details about SASL AUTH to be found in ‘/usr/doc/postfix/readme/SASL_README‘ on your own host machine.
Note: if you provide Postfix with SSL certificates through Let’s Encrypt (using the dehydrated tool) be sure to reload the Postfix configuration every time ‘dehydrated’ refreshes its certificates.
-
In ‘/etc/dehydrated/hook.sh’ look for the ‘deploy_cert()‘ function and add these lines at the end of that function (perhaps the ‘apachectl‘ call is already there):
# After successfully renewing our Apache certs, the non-root user 'dehydrated_user'
# uses 'sudo' to reload the Apache configuration:
sudo /usr/sbin/apachectl -k graceful
# ... and uses 'sudo' to reload the Postfix configuration:
sudo /usr/sbin/postfix reload
-
Assuming you are not running dehydrated as root but instead as ‘dehydrated_user‘, you need to add a file in ‘/etc/sudoers.d/‘ – let’s name it ‘postfix_reload‘ – and copy this line into the file:
dehydrated_user ALL=NOPASSWD: /usr/sbin/postfix reload
Success or failure
You can query your mail server to see if you were successful in adding SASL AUTH and TLS capabilities:
$ telnet smtp.darkstar.lan 587

Trying XXX.XXX.XXX.XXX...

Connected to smtp.darkstar.lan.

Escape character is '^]'.

220 smtp.darkstar.lan ESMTP Postfix

EHLO foo.org

250-PIPELINING

250-SIZE 10240000

250-VRFY

250-ETRN

250-STARTTLS

250-ENHANCEDSTATUSCODES

250-8BITMIME

250-DSN

250-SMTPUTF8

250 CHUNKING

AUTH LOGIN

530 5.7.0 Must issue a STARTTLS command first

QUIT

221 2.0.0 Bye

Connection closed by foreign host.
Conclusion
I hope to have given a complete overview to get your own self-hosted AFFiNE server up and running. Much of the information available online is quite scattered.
I’d love to hear from you if you were successful after following these instructions. Let me know your feedback below.
Have fun!
 Hey folks. While working I needed to find a historical page in my Chromium browser history and failed. I thought “here we go again” and decided to share some quick tips for users of Ungoogled Chromium at the year’s end.
 When Slackware-current upgraded the Grub package to 2.12,
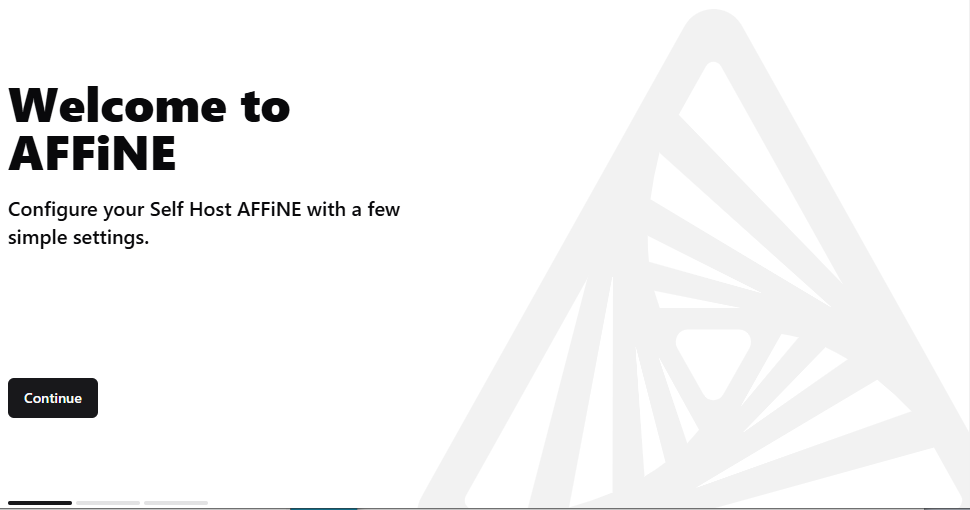


 It has been a long time since I had a serious look at
 And no, don’t try to convince me that I should switch to
Recent comments