 Are passkeys the future?
Increasingly, applications and web sites pop up the suggestion that you should create a passkey to make the login process easier for you.
Hmm, you think. I just enabled two-factor authentication to make the login more secure, and now I need to change methods again to make my life easier? What about the security aspect?
What is a passkey? How does it differ from a password? How does it make your logins easier? And more secure?
Questions that I will answer in this article. Some of what I write will be Slackware specific of course, but I will try to paint a general picture.
What is a passkey?
Passkeys are the product of a collaboration between Apple, Google, and Microsoft in order to improve online security for their users; commonly referred to as the “consumerization” of the two established security standards FIDO and WebAuthn.
Passkey technology is based on asymmetric key encryption; using a pair of private and public encryption keys. When you access a server or service and it suggests that you create and use a passkey instead of using a password to authenticate, what happens is that your own local device (your computer or your smartphone) generates a random private/public keypair, stores the private key on your local device and sends a copy of the public key to the remote server.
When you next want to login to that service, the remote server will generate a challenge, encrypted with your public key, and your local device is the only one that can decrypt that message, proving to the remote server that it is really you.
Your private key will never leave your local device. If you think that is a risk (what happens if you lose your device or it crashes and burns) look below for remote sync options.
On the other hand, when you use a password to create an account on a remote server, you first need to think of a string that is not too predicable and you haven’t used before. After you type the new password, the remote service creates an encrypted ‘hash‘ out of your password string and some random characters (the ‘seed‘) and stores that hashed value – not the plaintext string. This is a one-way encryption: a hacker will not be able to retrieve the original password from that hash. When later, you need to authenticate against that server, you send it your password string again (this hopefully uses an encrypted ‘https‘ connection). The remote server applies the exact same hashing algorithm and then compares the resulting hashed value against the stored value. When the two match, you have successfully authenticated.
Summarizing:
Passkeys make the login process (authentication) seamless and convenient: you do not have to manually create them, you do not have to remember them. They are unique for every service you use. They are never “weak”.
And it’s secure. Mind you, passwords are always sent to the remote server! That is why you’re urged to use a second authentication factor (a 2FA app) like Ente Auth to make it harder for hackers to steal and abuse your credentials.
A passkey still requires an unlock via PIN or biometric data (fingerprint, face recognition) similar to any 2FA app.
How does the server recognize my passkey?
The remote server will of course have to support passkeys in the first place.
Passkeys are so-called discoverable FIDO credentials. A passkey is a blob of data which not only contains a private/public key pair but also stores your login ID (usually your loginname) as well as the ID (usually the website URL) for the relying party aka the remote service that you want to login to.
That is why you do not have to type your username or email when you use a passkey – the browser detects that it stores a passkey for the remote server based on the ‘relying party‘ ID and asks you if that passkey should be used for authenticating to the remote server. Subsequently all required information is extracted from the passkey and passed automatically and securely between your local device and the remote service. If you have multiple identities on the remote server, your browser stores multiple passkeys and will popup a selection prompt to let you pick the correct one.
Passkey support
Passkeys are used in online transactions, commonly browser-based. In order to be able to use passkeys, you will need a supported browser. Chrome/Chromium and Firefox allow you to use passkeys. That’s good, but the Operating System then still needs to support the storage and protection of your passkeys – in an encrypted vault protected for instance using a PIN or biometric data.
Some Operating Systems do not yet contain a ‘platform passkey provider‘. Microsoft Windows and Apple’s iOS do, but Linux based OS’es don’t. So what do we Slackers do?
On Linux (Slackware for instance) you will need a bit of extra support if you want to create and store a passkey.
If you are in possession of a hardware security key such as a Yubikey or a Nitrokey (my personal choice because of the open source hard- and software), you can store passkeys on these devices and unlock them using a PIN. If you use the NFC version of such a hardware USB key, it makes the authentication easier because touching the USB key will trigger the approval to use the passkey.
This works nicely on Slackware if you install pcsc-lite and have its daemon running when you insert the USB key into your computer.
If you do not possess a hardware security key, you need to install a software-based password vault manager like KeepassXC (alternative suggestions below) along with its associated browser plugin to manage the creation and secure storage of your passkeys.
Storing and syncing passkeys across all your devices
A passkey by nature gets generated and stored on your local device.
When you login to your Google account on Chrome on Windows, the passkeys you generate are stored in your Chrome vault and synced across all your Chrome instances so that you can then also use that passkey on a Linux OS. I don’t use Firefox but I assume it uses a similar distribution mechanism if you are logged in to your Firefox account.
If you use Chromium (ungoogled or regular) you will not be able to use Google’s cloud services; the passkey will only be stored locally (on a hardware key or a software vault).
If you appreciate the value of passkeys that are synced across devices (making it harder to accidentally lose them when your device crashes) there are options you can explore. Several password database solutions exist that are able to store passkeys end-to-end encrypted and sync them via the cloud. Have a look at Bitwarden or 1Password for instance, they both have free plans that allow you to store passkeys. Or use the fully open source KeepassXC for which I will share usage examples below.
Note that when you use a hardware security key, you personally are the mechanism by which the passkey becomes usable across devices!
Passkeys and KeepassXC
I prefer Open Source solutions above all else. Higher up I already linked to Ente Auth, a 2FA app and backend which you can run self-hosted and under your control. Similarly, you can create, store, use and synchronize your passkeys using only Open Source technology.
First, install KeepassXC (any version later than 2.7.7, as I write this I have version 2.7.9 installed) for which I have a Slackware package available. Take care of its dependencies botan, minizip and pcsc-lite for which I also have packages on http://slackware.com/~alien/slackbuilds/ . You’ll find more info about KeepassXC’s initial configuration in one of my previous articles.
Once KeepassXC is up and running and you have opened an encrypted database, install the KeepassXC browser extension for your Chrome/Chromium or Firefox browser. Open the extension’s configuration dialog and connect it to the KeepassXC database. From that moment on, you can already use its capabilities for storing credentials (username/password) securely and let it autofill the login fields on web sites that you visited before.
But we go one step further and enable full support for passkeys: in the Settings page of the KeePassXC browser extension, there’s a ‘Passkeys‘ section in the ‘General‘ tab. Enable passkey support by checking both
- Enable Passkeys (disabled by default)
- Enable Passkeys Fallback (enabled by default)

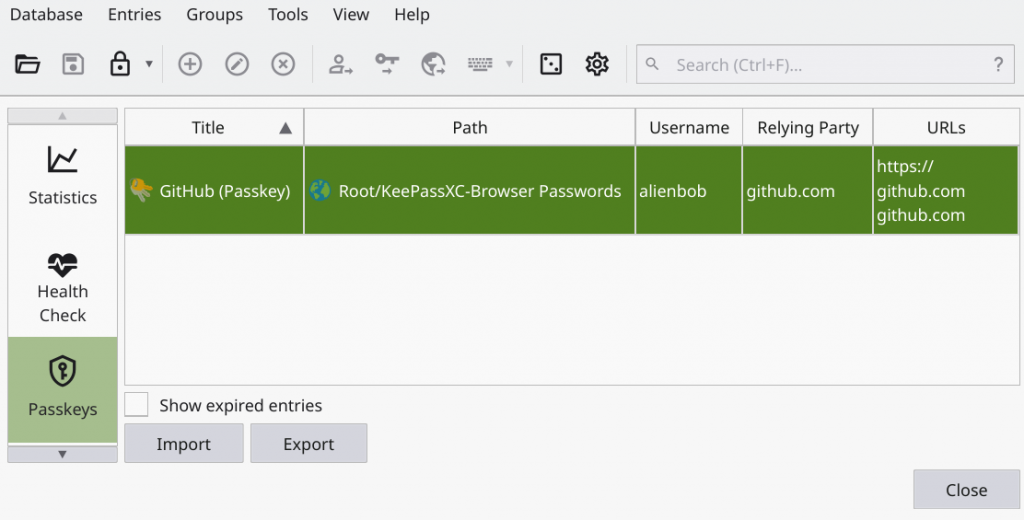
Now you are ready to start creating passkeys, to be stored in the KeepassXC vault. Full documentation for that can be found in the KeepassXC User Guide. The passkeys will be stored in the section “KeePassXC-Browser Passwords” of the database which you can access from the KeepassXC program via the menu ‘Database > Passkeys‘:

You’ll notice the ‘Import‘ and ‘Export‘ buttons in the above picture. KeepassXC allows you to im- or export passkeys. Please note that the exported passkey (a JSON file with extension ‘.passkey‘) contains your credential data unencrypted! Therefore, keep that file for just as long as you need for an import into another KeepassXC database and then shred (1) it!
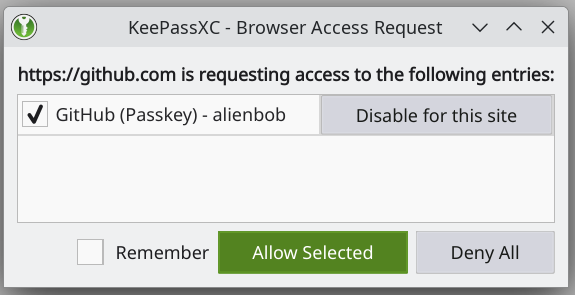
Let’s re-use the example in the User Guide and login to GitHub using the passkey which I already created there. When you browse to a web site, for instance github.com and have an existing passkey, you will get a popup from KeepassXC asking you whether you want to use it. Click ‘Allow Selected’ and if you want it to be used by default in future, also check the box ‘Remember‘.

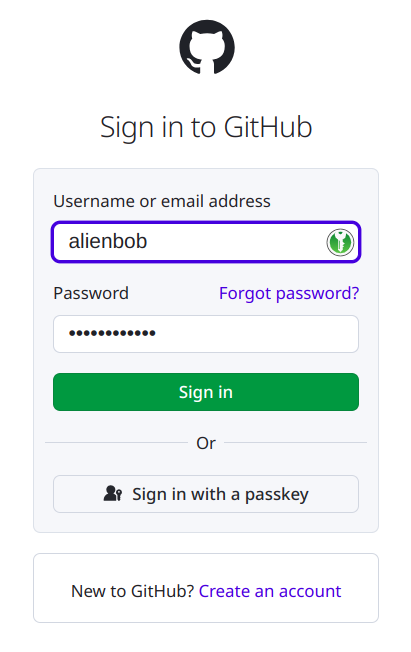
The web site offers the login prompt and has a button ‘Sign in with a passkey‘ which you click of course:
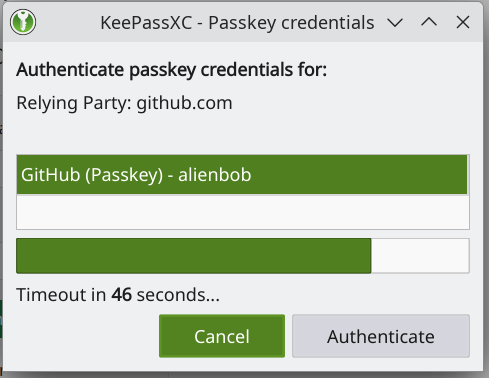
KeepassXC will open a modular popup asking you whether to use the stored passkey. You have 60 seconds to press ‘Authenticate‘. That’s it! You are logged in.

If you press ‘Cancel‘ or let the dialog time-out, the fallback mechanism will kick in and the browser will allow you to pick another means of login.
So far, so good. But this only covers the creation and storage of your passkeys, not the synchronization across devices.
I have good news: I have already written the instructions on how to sync the KeepassXC database with a cloud storage provider like Nextcloud or Dropbox. Instead of repeating that here, I encourage you to read the “Syncing your browser’s online passwords” section in Sync and share your (Chromium and more) browser data among all your computers.
I hoped you liked this topic. Please use the comment section below to point out flaws in the article or give feedback (or have a discussion on merits).
Have fun! Eric
 I recently quit using Twitter altogether. Its owner has been abusing the platform for political gain and profit. It made no sense to keep supporting that. I am more active on Mastodon anyway, the friendly federated social platform that all of you should prefer over Twitter, BlueSky or Threads 😉


Recent comments