 I had promised to write a follow-up article about my journey to find a good alternative for the “Chrome Sync” feature that used to be available in my Chromium packages for Slackware. This is that article. It is fairly large and I hope it is written well enough that you can follow the explanations and examples and are able to implement this yourself. The article is divided into a couple of main sections:
- Securely syncing your browser’s online passwords to (and retrieving them from) a central location under your control
- Syncing your browser’s bookmarks to a central location under your control
- Migrating your Chromium passwords into a central password database under your control
- Migrating your Chromium bookmarks into a bookmark server under your control.
If you run into anything that is not clear, or does not work for you, please let me know in the comments section!
I’d like to remind you that after 15 March 2021 the Chrome Sync service provided by Google’s cloud infrastructure will only be accessible by Google’s own (partly closed-source) Chrome browser. All other Chromium-based software products are blocked from what Google calls “their private API services”.
All non-Google-controlled 3rd parties providing software binaries based on the Chromium source code are affected, not just my Slackware package. The Chromium browser packages that have been provided in most Linux distros for many years, will lose a prime selling point (being able to sync your browser history, bookmarks and online passwords to the cloud securely) while Google will still be able to follow your browsing activities and monetize that data.
For many people (including myself) using Chromium, the ability to sync your private browser data securely to Google’s cloud and thus get a unified browser experience on all platforms (Linux, Android, Windows, Mac operating systems) certainly outweighed the potential monetary gain for Google by using a product with its origins in Google – like Chromium. Compiling the sources on Slackware allowed me to deal with some of the privacy concerns. But now the balance has been tipped.
Google took away this Chrome Sync from us Linux Chromium users, and it’s important to come with alternatives.
If you don’t use Chrome or Chromium, then this article is probably not relevant. I will assume you are using Mozilla’s Firefox and that browser has its own open source cloud sync server. You use Mozilla’s own cloud sync or else setup a Sync Server on a machine which is fully under your control. The same is not possible for Chromium browsers unfortunately, although Brave and Vivaldi – two not completely open source Chromium derivatives – have developed their own cloud sync server implementations. But (again unfortunately) those sync solutions are fully entangled with their own browser products.
I already wrote about “un-Googled Chromium“, the browser which is stripped from everything that would attempt to connect to a Google service. The browser that is provided by my “chromium-ungoogled” package is as good as the original “chromium” browser in terms of core functionality and perhaps it is even a tad faster than the original. I urge you to read that article before continuing below.
Because the remainder of this article will deal with: how do you sync, or save, your browser’s online passwords, your bookmarks and your history to a remote server? Using only open source tools? And in such a way that no one will be able to access these data unless you approve it?
Let’s start with a disappointment: there is currently no Open Source solution available that lets you sync your browser history to a cloud server and then access that history in other browsers on other computers. But, one of the products further below (xBrowserSync) does have this feature on its development roadmap – we will just have to be a wee bit patient.
With that out of the way, let’s focus on what is possible.
Syncing your browser’s online passwords
The internet is not a safe place. Sometimes, web sites are hacked and user credentials obtained. If you deal with web sites where you have to authenticate yourself to gain access to certain functionality, that server needs to store your credentials (hopefully encrypted) locally. If you want to prevent that hackers use your credentials to do you harm, it is highly recommended to always use strong passwords, and to use different passwords for every web site that you need to login to.
Remembering all these strong passwords is an impossible task for the average human, which is why we have password managers. A password manager is an application that provides a means to store your credential data in an encrypted database which you unlock with just a single passphrase – and that leaves you with the more easily achievable task to remember one strong password to gain access to all the others. Password managers have become quite user-friendly and some of them integrate with your web-browser.
I present one of those password managers here, KeePassXC. I think it is the best solution to our problem. It is cross-platform (Linux, Windows, MacOS), uses strong encryption, is open source and integrates with Google and Mozilla browsers. Including un-Googled Chromium.
KeePassXC is not a client-server based service though – it all happens on your local computer. In order to make your password database accessible on multiple computers, you will have to store it in such a way that it automatically gets uploaded to (and then kept in sync with) a networked location. If you want to be able to access your passwords while on the move (i.e. outside of your house) the most logical solution is to use a “cloud storage” provider who offers cross-platform sync clients – at a minimum we want Slackware Linux to be supported.
The steps to take:
- Ensure that you have a cloud storage client installed on your computers. I’ll give two examples: a client application for the free basic plan of the commercial Dropbox, or for a NextCloud server you operate yourself. There are other solutions of course, use whatever you like most.
Key here is that you are going to create an encrypted password database somewhere inside the directory tree that you sync to this cloud storage provider. - Download and install chromium-ungoogled. Start it and go through the initial configuration as explained in a previous article so that browser extensions can be installed properly and easily, and ensure that you install the KeepassXC extension from the Web Store. Don’t configure that extension yet.
- On your Slackware-current computer, download and install the keepassxc package. Like my chromium-ungoogled package, I have this only available for Slackware-current but in future I intend to add Slackware 14.2 support also for chromium-ungoogled and the sync software.
- Start KeePassXC – it is a graphical program so you need to be logged in to a graphical session like Plasma5 or XFCE – and configure it to automatically launch at system startup i.e. when you login (in General > Basic Settings). Configure all other convenience settings to your liking, such as minimizing to system tray, automatically locking the database etc.
- Enable browser integration in KeePassXC (Tools > Settings > Browser integration > Enable). In the “General” tab, check the box to at least enable “Chromium” integration. Check any other browser that you would like to use with KeepassXC but for the purposes of this article “Chromium” is the only mandatory choice.
- [Only if you use my chromium-ungoogled package instead of regular chromium]: Open the “Advanced” tab and check the box “Use a custom browser configuration location”. Select “Chromium” in the “Browser Type” dropdown. In the “Config Location” entry field you write “~/.config/chromium-ungoogled/NativeMessagingHosts”. This will generate a file “org.keepassxc.keepassxc_browser.json” in that location, specifying the integration parameters between the KeePassXC program and the browser extension.
You may have to fiddle a bit with that last step, to get KeePassXC to actually create the JSON file. It may be that you have to startup your chromium-ungoogled first and then enable browser integration in KeePassXC. - In KeepassXC you now create a new database (or point it to a database you may already have) in your cloud-sync directory. That database will then sync remotely and will be accessible by KeepassXC instances running on other computers that have the same cloud sync client installed.
Word of advice: If you do not have a password database already and are starting from scratch, it will be easier to import your old browser’s passwords right now instead of having to merge them later. Look at the end of this article for the section “Importing your passwords from Chromium/Chrome into KeePassXC” which will tell you exactly how to import your old passwords before you continue to the next step! - Now that we have successfully connected KeePassX to its browser extension, your browser will ask you if it should store any new credentials you enter on web sites, into its encrypted KeePassXC database. The KeePassXC extension will automatically add icons to credential entry fields on web pages that allow you to auto-fill these fields if the web site is already known in your database. And if you don’t want to invent strong passwords yourself, password fields can be enhanced with an icon that gives access to the KeePassXC strong random password generator.
- Goal achieved. You can now share and use your online passwords on multiple computers. Note that this functionality is not limited to your (un-googled) Chromium but also to the Firefox browsers that you use.
Note: For Android if you installed un-Googled Chromium from F-Droid following these instructions, there’s the compatible KeePass2Android or KeePassDX, both are recommended by the KeepassXC developers, so you can access all your passwords even if there’s no integration with the browser.
Syncing your browser’s bookmarks
For this part, I had already done some preparations. I shared those in a previous post: how to build and configure a MongoDB database server. The best open source bookmark sync server I could find is xBrowserSync, and it uses MongoDB as its database backend.
XBrowserSync is a service you can operate yourself by installing it on a machine you control, but you can also use any of the free online xBrowserSync servers that are operated by volunteers on the internet. Registration to a server is not required, access is anonymous and only you know the sync ID and password which are used to store your data.
I’ll first instruct you how to get the browser-side working with the developers’ freely accessible servers and then I’ll show you how to setup your own sync server.
Setting up your browser
It starts with installing xBrowserSync browser extension into your (un-Googled) Chromium from the Web Store. Important: if you want to use xBrowserSync you need to disable other synchronization mechanisms like Chrome Sync first to prevent interoperability issues. Opening the settings for this extension takes you through a set of introduction messages and then lets you pick a sync server to connect to – the default is the developers’ own server. You then specify a password which will be used to encrypt your data before it gets uploaded. The server will assign you a “Sync ID“, a seemingly random string of 32 hex characters. Write down that Sync ID! It is the combination of the Sync ID and your password that will grant access to your bookmarks if you install the xBrowserSync extension in another browser.
Sync will start immediately.
Setting up your server
Now onto setting up a xBrowserSync server yourself. After all, what’s the fun in using someone else’s services, right? You could have stuck with Chrome otherwise.
To install a xBrowserSync service, you’ll require an online computer which ideally runs 24/7. You can use a desktop or a real server, but it needs to be a 64bit system. The reason? MongoDB, the database backend, only supports 64-bit computers. You won’t be able to compile it on 32-bit.
I run mine from a computer at home, but you can rent a server online too if you would like that better. Assuming here that the computer runs 64-bit Slackware 14.2 or higher, the requirements are:
- Apache’s webserver “httpd” is installed and running (other web servers like nginx are also possible but outside the scope of this article). Apache httpd is part of a Slackware full installation. In this article we will assume that the URL where you can reach the webserver is https://darkstar.net/ .
- You have configured your Apache httpd for secure connections using HTTPS and the SSL certificates come from Let’s Encrypt. If this is something you still need to do, read a previous article here on the blog, on how to set that up using the ‘dehydrated‘ script (which was added to Slackware-current since I wrote that post).
- TCP ports 80 (http) and 443 (https) are open to the Internet (if you want to be able to access your server while on the move). For a server that is running in your own home, you’ll have to port-forward these ports 80 and 443 from your ISP’s modem/router to your own computer.
- Node.js is installed. You can get a package from my repository.
- MongoDB is installed and the database server is running. A package is available in my repository and configuration of MongoDB is covered in my previous article.
We start by creating a dedicated user account to run the xBrowserSync service on our computer:
# groupadd xsync

# useradd -g xsync -d /home/xsync -m -s /bin/false xsync
Then clone the xBrowserSync API source repository. My suggestion is to use /usr/local for that and give our new “xsync” user the access permissions to maintain the xBrowserSync files. The ‘#’ depicts root’s shell prompt and ‘$’ is a user shell prompt:
# mkdir /usr/local/xbrowsersync

# chown xsync /usr/local/xbrowsersync

# su - xsync -s /bin/bash

$ cd /usr/local/xbrowsersync

$ git clone https://github.com/xbrowsersync/api.git
Still as user ‘xsync’, install and build the xBrowserSync API package:
$ cd api

$ npm install

$ npm audit fix

$ exit
As ‘root’, configure the log location we will use when the service starts :
# mkdir /var/log/xBrowserSync/

# chown xsync:xsync /var/log/xBrowserSync/
We have xBrowserSync installed, now we need to create the conditions for it to work. So we start with configuring a MongoDB database for xBrowserSync. Below I will use example names for that database, the DB user account and its password. You should of course pick the names of your choosing! So change the bold red texts when talking to the database.
Database: xbrowsersyncdb
DB User: slackadmin
DB Pass: slackpass
Start a mongo shell – it does not matter under which user account you do this as long as you know the MongoDB admin account (mongoadmin in this example) and its password:
$ mongo -u mongoadmin -p

>
Run the following commands in the mongo shell:
use admin
db.createUser({ user: "slackadmin", pwd: "slackpass", roles: [{ role: "readWrite", db: "xbrowsersyncdb" }] })
use xbrowsersyncdb
db.newsynclogs.createIndex({ "expiresAt": 1 }, { expireAfterSeconds: 0 })
db.newsynclogs.createIndex({ "ipAddress": 1 })
With the MongoDB database ready for use, we can proceed with configuring xBrowserSync. Login again to your computer as user ‘xsync’ and make a copy of the default settings file so that we can insert our own custom settings:
$ cd /usr/local/xbrowsersync/api

$ cp config/settings.default.json config/settings.json
In that file “/usr/local/xbrowsersync/api/config/settings.json”, change the following values from their defaults (or at least ensure that the values below are present). I highlighted the MongoDB connection parameters in red:
"status.message": "Welcome to Slackware xBrowserSync"

"db.name": "xbrowsersyncdb"

"db.username": "slackadmin"

"db.password": "slackpass"

"port": "8080"

"location": "your_two_character_country_id"

"log.file.path": "/var/log/xBrowserSync/api.log"

"server.relativePath": "/"
Note that the nodejs server listens at port 8080 by default and I leave it so. But if you are already running some kind of program using that same port number, you can change the port to a different value, say “8888” in the above file – look for “port”: “8080”, .
To operate the new xBrowserSync server, we create a shell script we can start at boot. The commands below show the use of a “here-document” to write a file. If you are unsure how to deal with below commands, check out what a “here-document” actually means.
Still as user ‘xsync’ you run:
$ mkdir ~/bin

$ cat <<EOT > ~/bin/xbs_start.sh

#!/bin/sh

cd /usr/local/xbrowsersync/api

node dist/api.js

EOT

$ chmod 755 ~/bin/xbs_start.sh
This is a simple script to start a node.js server. That server does not move itself to the background, but we need the command to ‘disappear’ into the background if we want our computer to complete its boot sequence. There is a nice way to deal with backgrounding a program that can not run as a background service all by itself: we offer it a ‘virtual console’ and then move that virtual console to the background. A VNC server would be the graphical X analog of such a ‘virtual console’.
Slackware comes with two programs that offer what we need: screen and tmux. I am a screen fan so I’ll use that. As user ‘root’, add this to ‘/etc/rc.d/rc.local’:
# Start the xBrowserSync Server:
if [ -x /home/xsync/bin/xbs_start.sh ]; then
  echo "Starting xBrowserSync Server:  ~xsync/bin/xbs_start.sh"
  su - xsync -s /bin/bash -c "/usr/bin/screen -AL -mdS XSYNC bash -c '/home/xsync/bin/xbs_start.sh'"
fi
This ensures that your xBrowserSync service will start at boot, and the service will run in a detached ‘screen‘ session for user ‘xsync’. If you want to access the running program, you can attach to (and detach from) that running ‘screen’ session from your console or terminal prompt. As user ‘xsync’, simply run:
$ screen -x
… to connect to the virtual terminal, to look at the program output or perhaps even to terminate it with “Ctrl-c“. And if you have seen enough, you can easily detach from the ‘screen’ session again using the “Ctrl-d” key combination, leaving that session to continue running in the background undisturbed.
I will not force you to reboot your computer just to get the service up in the air, so this one time we are going to start it manually. Login as user ‘xsync’ and then run:
$ screen -AL -mdS XSYNC bash -c '/home/xsync/bin/xbs_start.sh'
You will not see a thing but XBrowserSync is now running on your computer.
All that’s left to do now, is to allow connections to the xBrowserSync program by your Chromium or Firefox browser. The program listens at the loopback address (127.0.0.1 aka localhost) on TCP port 8080, so access is only possible from that same computer. That is a safety measure – no one can access your service from a remote computer by default.
Note that if you changed the default xBrowserSync listen port from 8080 to a different value in “settings.json” above, you need to use that same port number in the Apache configuration block below.
We will configure Apache httpd to act as a reverse proxy – this means that we will deploy the httpd server as the frontend for xBrowserSync. Browsers will never connect to xBrowserSync directly (it is not even accessible from other computers), but instead we let them connect to Apache httpd. The webserver will relay these browser connections to the sync server running on the same machine.
Apache’s httpd is much better at handling a multitude of connections than the nodejs server used for xBrowserSync and we can also let httpd handle the encrypted connections so that we don’t have to complicate the xBrowserSync setup unnecessarily.
In the context of this article, we will operate our xBrowserSync server at the URL https://darkstar.net/xbrowsersync/ – this will be the URL you enter in the browser extension’s configuration instead of the default service URL https://api.xbrowsersync.org/. The bit I highlighted in red will be reflected in our Apache configuration.
There is no need to add anything to your VirtualHost configuration for the HTTP (80) web service, since we want to access the service exclusively over HTTPS (encrypted connections). This is the block of text you have to add to your VirtualHost configuration for the HTTPS (443) web service:
ProxyRequests Off
ProxyVia on
ProxyAddHeaders On
ProxyPreserveHost On

<Proxy *>
  Require all granted
</Proxy>

<Location "/xbrowsersync/">
  # Route incoming HTTP(s) traffic at /xbrowsersync/ to port 8080 of XBrowserSync
  ProxyPass        http://127.0.0.1:8080/
  ProxyPassReverse http://127.0.0.1:8080/
</Location>
Check your Apache configuration before starting the server:
# apachectl configtest

# /etc/rc.d/rc.httpd restart
Check the server status at https://darkstar.net/xbrowsersync/info
A nice GUI view of your service, and also the URL that you need to enter in the browser add-on: https://darkstar.net/xbrowsersync/
Importing your passwords from Chromium/Chrome into KeePassXC
You don’t have to start from scratch with storing web site credentials if you were already saving them in Chromium – whether you were using Chrome Sync or not.
This is how you export all your stored credential data from your Chromium browser and import that into KeePassXC:
- In Chromium, open “chrome://settings/passwords” and next to “Saved Passwords” click the triple-dot menu and select “Export Passwords”.
By default, a comma-separated values (CSV) file will be generated as “~/Documents/Chrome Passwords.csv”. That file contains all your passwords un-encrypted, so be sure to delete that file immediately after the next steps! - If you also save Android app passwords into Google’s password vault and your Chromium browser was using Chrome Sync, you’ll have to clean the above CSV file from all lines that start with the string “,android:”. For instance using a command like this:
$ sed -e "/^,android:/d" -i ~/Documents/Chrome\ Passwords.csv - Open the KeePassXC program on your computer. We are going to import the CSV file containing the credentials we just exported from Chromium via the menu “Database > Import > CSV File”. The first thing to do is to pick your new database’s format and encryption parameters. The default values are perfectly OK. Then define the password that is going to protect your database, and the location to store that database.
- If this is actually going to be the database you intend to use with your browser, then select a directory that is being synchronized with an external cloud storage location.
- If you already have a password database you are using in your browser but you want to import your old Chromium passwords after the fact, then the location of this database does not matter since it is only a temporary one and can be deleted after merging its contents with the real password database. So in this case, anywhere inside your homedirectory is just fine.
- An import wizard will then guide you through the process of associating the CSV data to matching database fields.
One picture says more than a thousand words here, so this is what you should aim for to match the columns in the CSV file (name, user, password, url) to the corresponding fields in the KeePassXC database (Title, Username, Password, URL):
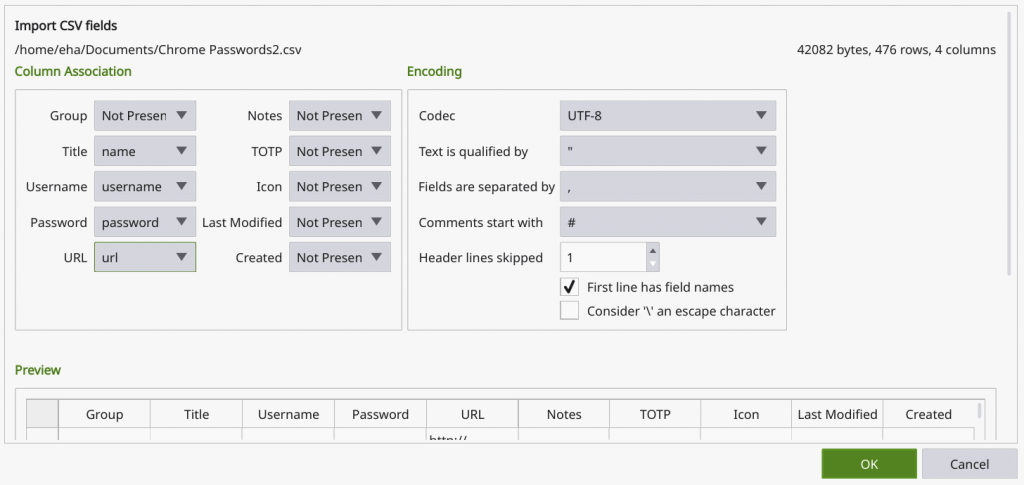 The trick here is to check the box “First line has field names” and then select: “name” in the Title dropdown; “username” in the Username dropdown; “password” in the Password dropdown and “url” in the URL dropdown. The dropdown for Group will show “name” as well but you need to select “Not Present” there and also ensure that all the other dropdowns are showing “Not Present”.
 - After importing has completed and you have validated that the CSV values (name, user, password and url) are indeed imported into the correct database fields, the final question: is this your passwords database to use with the browser plugin?
- If yes, then you are done!
- If no, then we need to merge the database we just created into your real passwords database.
Open your real passwords database in KeePassXC and then select the menu “Database > Merge from Database…”. You get the chance to select your temporary database you just created from the imported CSV data. Enter that database’s password to unlock it and its data will immediately be merged. You can now safely delete the temporary database where you imported that CSV data.
- You must now delete the CSV file containing all your clear-text passwords. It is no longer needed.
- That’s all. Good luck with using your passwords across devices and browsers safely and under your exclusive control.

Importing your browser bookmarks into XBrowserSync
Like with your passwords above, there’s also an easy way to import the bookmarks you were using in Chromium into XBrowserSync so that you can make these available in un-Googled Chromium. Remember that Chromium’s use of Chrome Sync conflicts with the xBrowserSync extension. You can of course first disable that Chrome Sync (and after 15 March 2021 you should do that anyway) and then enable xBrowserSync, but the procedure below will likely also work when you want to export bookmarks from another browser not supported by xBrowserSync.
- In Chromium, open the bookmark manager: “chrome://bookmarks/“
- Click on the triple-dot menu in the top-right and select “Export bookmarks”. Save the resulting HTML file somewhere, it is temporary and can be deleted after importing its contents into un-Googled Chromium.
- Open the resulting HTML file into an editor. The “Kate” editor in KDE Plasma can deal pretty well with the HTML and breaks it down for you into sections you can easily collapse, expand or remove. You need to remove the “Apps” bookmark section in the HTML which is not useful for the un-Googled version, and perhaps you want to remove some other stuff as well.
- In un-Googled Chromium, open “chrome://bookmarks/” and this time select “Import bookmarks” from the triple-dot menu in the top-right corner. Pick the HTML file you exported from Chromium and the imported content will show up in your Bookmarks Bar as a bookmark-menu called “Imported”.
- You’ll probably want to move stuff out of that “Imported” menu and into the locations where you previously had them in your old Chromium’s Bookmarks Bar. You can do that most easily from within the bookmark manager by right-clicking stuff, selecting “Cut” and then pasting them into another location on the Bookmarks Bar.
One caveat: I found out empirically that the xBrowserSync extension does not like it when it is still syncing a change in your bookmarks, and then you make another change before it is finished. It will simply invalidate the sync and try to revert to the previously known bookmark list. The thing is, if you did a “Cut” in the meantime with the intention to “Paste” a set of bookmarks somewhere else, that set will be gone forever. Best is to keep an eye on the xBrowserSync extension’s icon next to the URL entry field and do not try to make changes while it is still in the process of syncing. If you keep this in mind, then the experience will be just great. - All done! Enjoy the fact that the bookmarks you create or modify in one browser, will be immediately accessible in other connected browsers.
This concludes a lengthy article, I hope it contains information you can make good use of. In the days and weeks to come, we’ll see what happens with the original Chromium and whether un-Googled Chromium can take its place. Let me know your experiences.
Have fun! Eric
Hi Eric.
Thanks!.
Clear and well written article. I will try it by parts. In my case and as a precondition, I will study and install https apache. I will let you know of my progress. Thanks again.
Hi Eric!
I don’t know if this will work for everyone, but worked for me. 🙂
To create JSON file in step 6 (chromium-ungoogled and KeePassXC integration), instead of using ” ~ ” to represent my $HOME, what actually worked for me was write the full path In the “Config Location” entry field.
So, for example, instead of “~/.config/chromium-ungoogled/NativeMessagingHosts”, using “/home/diniz/.config/chromium-ungoogled/NativeMessagingHosts” did the trick.
Good article, however I cannot seem to get the xbrowsersync working on the ungoogled-chromium apk, it doesn’t show the bookmarks in the browser app. Do you have a solution for this?
I don’t think the Android version of Chromium supports extensions. Let me know if you find the solution.
They seem to have an app, but it only shows the bookmarks in the app itself, not chromium. Therefore the user would have to add bookmarks manually in the app and also open it to access the bookmarks, which is awkward. I hope this is implemented in future releases.
Thanks for the detailed explanations. As it happens, I explored the KeepassXC extension in the past, in combination with Syncthing for ubiquitous access. Unfortunately, the requirement of having to keep KeepassXC running and open at all times is a big security drawback that compelled me to dismiss this approach.
my 2 cents 🙂
Have you checked out KeePassXC Settings on Security – Timeouts ?
Could “Lock databases after inactivity of ___ secs” and clear timeous address some of your concerns?
That’s exactly what I do.
Thank you for this detailed article! The main problem is Android Chromium because it does not support extensions. So all solutions are outside the browser…
I would recommend Floccus (https://github.com/floccusaddon/floccus) over XBrowserSync. I have a little over 1,000 bookmarks, around 60KB, and this meager amount was enough to cause XBrowserSync to bring my browser to a crawl and peg the CPU with a high load. It took well over a minute to sync as well. I use Floccus combined with free Box.com account and access it via WebDAV. You can use any WebDAV provider, NextCloud, or Google Drive. On Android, I’m able to use Floccus as an extension with Kiwi browser (Chromium based) and Firefox. I wish it was available as a standalone app on mobile devices as I see this as a better model, but I’m content with being able to use it in my two primary browsers.