Last sunday was not a good weekend, from a software usability point of view.
I had not worked with the laptop (running 64-bit Slackware-current) for a few days and thought I’d do some preparation work for the upcoming KDE release (you know, checking out if any dependencies needed adding or updating, build script checks and such). However, I spent most of my time swearing at the Firefox browser.
What happened? I still do not know the cause, but within seconds of starting Firefox, it would consume roughly 70% of all available memory… that is 2 GB of real RAM and 3 GB of swap. Even with one tab open, and a simple HTML page loaded, and with all my add-ons disabled, the situation did not improve.
Let me tell you, in such a situation a man can go nuts! Every click on a Firefox menu or button, or a page flip, would cause the laptop to freeze for up to 20 seconds while Linux was swapping massive amounts of useless data back and forth between RAM and swap.
Finally and enraged, I killed the firefox process, deleted my ~/.mozilla/firefox directory (to be honest, I renamed it) and fired up the browser again. And voilà! Firefox was behaving like a gentleman again. Of course, that left me without my bookmarks, browsing history, browser preferences, and saved passwords. Or did it?
A month or so ago, I decided to try the feature which is supported in Firefox since version 4, called “Mozilla Sync”. This feature allows you to store your bookmarks, browsing history, browser preferences, and saved passwords on a remote server. It even allows you to work on multiple computers and have the same Firefox configuration on all these computers. That’s a pretty cool feature. I have setup sync on my Android phone’s Firefox browser too. Having enabled the sync feature was my life saver during this weekend horror show! After I had removed the ~/.mozilla/firefox directory I quickly configured Firefox with my sync key and moments later I had my old browser configuration back… sans the ludicrous memory consumption. I was a happy puppy again.
That could have been the end of my blog post.
However I wrote this as a preamble to what I am going to show you next – how to setup your own Sync Server at home (or at work).
When I was contemplating the (dis)advantages of using Mozilla Sync, I was not too fond of the idea that the Sync Server which Firefox will use by default is hosted by Mozilla. Even though your data is supposedly being encrypted with your unique sync key before it gets uploaded to Mozilla, it feels awkward to see all your passwords and browsing data being transfered to a 3rd party. Furthermore, the geek in me was just dying to setup a sync server of my own.
Luckily, Mozilla is open as always and makes the Open Source Sync Server code available to everyone who wants to play with it. And setting it up proved to be not difficult at all. Note: Mozilla have re-designed and re-written the original Sync Server (it was called “Mozilla Weave Server” at the time, and was almost impossible to setup… I tried, back in october 2010). It’s now written in Python, and the steps to create your own Sync Server are described on this page: http://docs.services.mozilla.com/howtos/run-sync.html. That page is what you should follow. The rest of my article tries to bring more detail to the process of configuring your Slackware box to become a real Sync Server.
Of course you want to install this on a Slackware server! There are some explicit dependencies as mentioned on the Mozilla page I referred to earlier, but python 2.6 and sqlite3 are already suppied by Slackware, and I created a package for virtualenv (for Slackware 13.1 and 13.37) which you can download here: http://slackware.com/~alien/slackbuilds/virtualenv/ .
Note (20120627): it looks like installing this virtualenv package is no longer needed, but I did not check this. A comment from Old_Fogie at the bottom of this package indicates that virtualenv is downloaded automatically during the “make build” you will run as part of the next step in my procedure. My suggestion is to skip the installation of my virtualenv package at first, and see what happens you run the “make build”. If you get an error about missing virtualenv, then install that package and re-run “make build”…
The Sync Server code is hosted in a Mercurial repository and since Slackware ships a Mercurial client, that code is easy to check out to a local directory where you continue to build the server binary:
$ mkdir -p /usr/local/server-full
$ cd /usr/local/server-full
$ hg clone https://hg.mozilla.org/services/server-full/ .
$ make build
Now, this server is ready to run, but unless you make some configuration changes it is not going to do you much good.
By default, the server stores your sync data in a sqlite database, which is fine with me (you can use a real MySQL server database if you want), but it will create the sqlite database in /tmp which is entirely inappropriate. Further down I will show you what to modify so that your clients’ sync data go somewhere less “volatile”.
The python-based Sync Server can run all by itself on a configurable port number (5000 by default) which is just fine if you are its only user in your little LAN. But even Mozilla advises to put a real webserver between you and the Sync Server. For this I used Slackware’s apache webserver. This means, you will need one additional package, mod_wsgi which you can download here: http://slackware.com/~alien/slackbuilds/mod_wsgi/ . I created a separate system user and group (weave:sync) which is going to run the Sync Server so that it can not interfere with Apache if anything goes crazy:
# groupadd sync
# useradd -g sync weave
If you omitted the creation of the homedirectory for this “weave” user account, then create it like this:
# mkdir /home/weave
# chown weave:sync /home/weave
# chmod 711 /home/weave
You then create a new file “/etc/httpd/extra/httpd-wsgi.conf” with the following content (adapt to your actual sync server hostname):
   <Directory /usr/local/server-full>
      Order deny,allow
      Allow from all
    </Directory>

    <VirtualHost *:80>
      ServerName sync.myserver.net
      DocumentRoot /usr/local/server-full
      WSGIProcessGroup sync
      WSGIDaemonProcess sync user=weave group=sync processes=2 threads=25
      WSGIPassAuthorization On
      WSGIScriptAlias / /usr/local/server-full/sync.wsgi
      CustomLog /var/log/httpd/sync.myserver.net-access.log combined
      ErrorLog  /var/log/httpd/sync.myserver.net-error.log
    </VirtualHost>
As you may notice, this tells that a script called “sync.wsgi” is going to be spawned as user “weave:sync” whenever a client connects to http://sync.myserver.net . You will have to modify your apache main configuration too (i.e. “/etc/httpd/httpd.conf“), in order to make it load the mod_wsgi module and use its configuration file. Add these lines to the httpd.conf:
# Activate the WSGI module (serving python binaries to the web):
Include /etc/httpd/extra/mod_wsgi.conf
# Act as a reverse proxy to the Mozilla Sync server:
Include /etc/httpd/extra/httpd-wsgi.conf
… followed by an Apache restart (you can run “apachectl configtest” first, to check for mistakes in the modified configuration if you can’t affort your webserver to go down thanks to a typo)
Now comes the part where you configure the Sync Server configuration files. Take a look inside your directory “/usr/local/server-full” where the Sync Server code has been downloaded and built. You will find the aforementioned “sync.wsgi” script there. Open the file in an editor. Read through the file and change it to something which you find better suited. For instance, I changed “/tmp” to “/var/tmp” in the line “os.environ[‘PYTHON_EGG_CACHE’] = ‘/tmp/python-eggs'”:
os.environ['PYTHON_EGG_CACHE'] = '/var/tmp/python-eggs'
Next, edit the file “development.ini” (that name is configured in “sync.wsgi” in case you want to give it another). In that file, I changed the location of another log file so that it gets written in “/var/tmp”. The line “args = (‘/tmp/sync-error.log’,)” changes to:
args = ('/var/tmp/sync-error.log',)
This “development.ini” file also mentions the filename of the actual sync configuration (yeah, my idea too was that this level of nesting configuration files seems unwanted): it has the name “etc/sync.conf” relative to the server’s directory. It requires some editing! For instance, look for the two lines that look like this and change the path name to a safer location in your filesystem! I decided to create the SQL database file in the “weave” user’s own homedirectory, so I changed the line “sqlite:////tmp/test.db” to:
sqluri = sqlite:////home/weave/my_weave_server.db
The default value for the quota assigned to each sync account is too low (it’s set to 5 MB). Mozilla states that 99.9% of all clients which connect to its public server use less than 25 MB of quota, so use that value. The line “quota_size = 5120” changes to:
quota_size = 25600
Then, look for the following line and make absolutely certain that it is changed to the Apache http:// URL of your Sync Server, i.e. the URL that the sync clients are going to use:
fallback_node = http://localhost:5000/
You can play with other options in this file to see what they can offer. For instance, I disabled “captcha” and did not enable SSL, but you may decide that this is important to you.
Don’t forget to restart your apache server if you have not yet done so.
And now it is time to tell your Firefox browser to use this new service!
- Select “Tools > Setup sync…”:

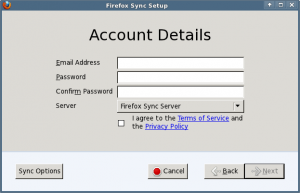
- In case this is the first time you talk to your Sync Server, you need to setup an account, so click the button “Create a New Account“. This opens a new dialog box where you can type your email address (this is your account name), associated password and then in the dropdown do not select “Firefox Sync Server“… instead, you choose “Use a custom server“, it allows you to enter the URL for your brand-new private Sync Server. Once the account has been created, Firefox will show you the sync key it will be using to encrypt your data. That key is important, you will need it if you want to add more computers to your sync account. And that’s basically it – the sync process will start immediately:

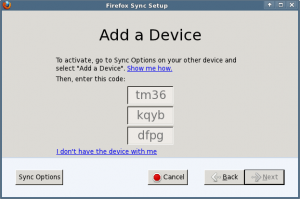
- Else if you already have a Sync Account and want to add a second computer to it, you can click on “Connect” in the first dialog which will open a new dialog. There are two ways to add this computer to your existing sync account. Either enter the code which is being shown on another computer which is already syncing to the server; or else you click on “I don’t have the device with me“. This is what you would usually do I guess… it is combersome to search for another computer or hand-held if all you need to do is know your sync key:

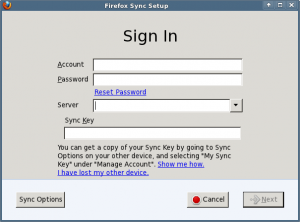
- If you know your sync key you can enter that in the following dialog, along with your account details and the server URL:

- The sync key which is associated with your sync account can be retrieved at any moment should you have forgotten to write it down. Just go to a computer which has been setup for Sync, and open your Firefox browser’s Preferences at the “Sync” tab. Under “Manage your account” you will find a menu item to display your key (as well as a way to change your account’s password). More help can be found at http://support.mozilla.com/kb/what-firefox-sync .
Have fun! Eric
 Calibre is my favorite e-book library management program. My repository contains a package for Calibre 4.x which works well, but it is using Python2 and has been superseded since September 2020 by the new 5.x releases which are based on Python3.
 When Python3 was updated from 3.9 to 3.10 in Slackware-current two weeks ago, lots of 3rd-party packages (i.e. software packages that are not part of the Slackware distro itself) containing python modules were suddenly broken.
 Today’s message for you is that I have fixed the
  Warning for people running Slackware-current and have 3rd party packages installed (who doesn’t) that depend on Python3. That includes you who are running KDE Plasma5!


Recent comments