Secure Boot ???
Secure Boot is part of the UEFI specification and first appeared in the Unified Extensible Firmware Interface (UEFI) 2.3.1 specification (Errata C). It is meant to prevent the execution of unauthorized code upon boot of a computer. Most modern Personal Computers will have a way of enabling Secure Boot in UEFI, but it is common to leave it disabled if you are not running a Microsoft OS on it since Microsoft controls Secure Boot.
For dual-boot scenario’s the story is different however. Microsoft Windows 8 and 10 advise to have Secure Boot enabled but don’t enforce it, but as far as I know, for Microsoft Windows 11 enabling Secure Boot will be a requirement to get full upgrade support.
Microsoft’s own Windows OS-es fully support Secure Boot (naturally), but non-Microsoft Operating Systems that want to boot on a Secure Boot enabled computer, must have an initial bootloader which has been cryptographically signed with the ‘Microsoft UEFI CA‘ key. Getting Microsoft to sign a 3rd-party (mostly Linux) bootloader is a complex procedure which involves money (but not always) and establishment of trust. You need to realize that if a malicious bootloader gets accidentally signed by Microsoft, this bootloader could be used to deliver all kinds of nasty to every Secure Boot platform in existence. And that would defy the whole purpose of a tightly controlled ‘Secure Boot‘ environment.
It’s likely that more and more computers with MS Windows installed or with a dual-boot configuration will have Secure Boot enabled in the near future. For Slackware and its derivatives, including my liveslak based ISOs, this is a potential problem because Secure Boot is not supported yet and therefore our OS will not launch.
Additionally, one of the use-cases of liveslak ISOs is to take it along with you on a USB stick on your key-chain and boot random PC hardware with it – just for fun, or to test the Slackware compatibility of new hardware, or simply to have your Slackware desktop with you on a stick all the time.
A liveslak ISO will be a lot less useful if every PC you encounter has Secure Boot enabled.
So I set out to find a solution.
One possible way out of this dilemma is to acquire a Microsoft-signed first-stage bootloader, just like Red Hat, Fedora, Debian, Ubuntu and the other big brothers already provide. Like said before – this process is complex and I am not able to satisfy the requirements at the moment. In future, who knows? I am working on that.
Alternatively, and other small distros seem to do this too, an already signed bootloader can be ‘borrowed’ from another distro and used to boot a liveslak ISO. But that has consequences which I will elaborate further down. This is the solution I chose.
Note: In case you have doubts: the liveslak ISOs support Secure Boot from now on. But nothing changes when your computer does not have Secure Boot enabled. Slackware Live Edition will boot and work exactly like before.
Boot sequence
Let me give a quick and dirty and possibly not 100% terminology-accurate explanation of the boot procedure in a Secure Boot computer.
- The TPM chip in the computer may be used to store a bunch of (Microsoft) security certificates which are trusted by the Secure Boot subsystem of UEFI, as well as (potentially) a list of certificates that have been revoked due to security violations. Otherwise these keys are stored in NVRAM (non-volatile RAM).
Secure Boot will load only bootloaders that have been signed by a trusted Microsoft certificate. The most widely used Linux bootloader which Microsoft accepts for signing is the ‘shim‘, a trivial application which does not do much more than verifying the signatures of the second-stage bootloader which it is hard-coded to look for. A signed ‘shim’ binary also contains an embedded SSL certificate of the distro that owns the shim binary.
The shim accepts two certificates when it checks the signature of the second-stage bootloader and other binaries: one is the Microsoft certificate and the other is this embedded distro certificate. This allows such a distro to provide a nice unattended problem-free boot on every computer with Secure Boot enabled. - The shim loads the second-stage bootloader, this is most often the Grub2 bootloader but it could be any EFI image file (such as rEFInd). The hard-coded default filename that the shim will attempt to load is ‘grubx64.efi’ so whatever your distro bootloader, it needs to be renamed to that.
Shim will check the signing certificate of that file and will proceed only if it recognizes the certificate as valid. - Grub will be informed by the shim that it loads in a Secure Boot environment and because of that, Grub will ask the shim if it is OK to load the kernel it is configured for. Shim will check the signing certificate of your kernel and will signal an ‘OK’ to Grub only if it recognizes the kernel’s signing certificate as valid.
- Your Linux OS will now boot properly.
But what happens if Grub or the kernel are not signed, or when they are signed with an un-recognized certificate? Well, your computer will refuse to boot.
Lack of trust
The problem for liveslak (and for Slackware) is that neither Patrick nor I own any of the private keys corresponding to the SSL certificate that these big distros embed in the signed ‘shim’ binary they provide (naturally). Therefore I must sign the liveslak grub and kernel images using my own private key and public certificate pair.
The public certificate I use for signing is not recognized by UEFI SecureBoot, since it is not embedded in any bootloader which has been signed by the Microsoft Certificate Authority. If Secure Boot is enabled then the signing certificate of liveslak’s grub and kernel images will not be accepted by shim… and the Live OS fails to boot.
As the owner of your PC, you can clear the Microsoft certificates from the local certificate store and load your own certificate instead. Your computer will then boot without issue because your bootloader finds the certificate that it is validating in the trust store.
This is probably the best solution if you are never going to run MS Windows on it anyway. But if you do, or might, or if you want to provide a solution that works on a multitude of computers besides your own, you need to come up with something else.
You are the Machine Owner
Lucky for us poor distro developers, Secure Boot recognizes a database of Machine Owner Keys (MOK) next to the Microsoft trusted keys. And you are the Machine Owner if you have physical access to the computer and know the password to unlock the MOK database (it is empty by default).
The MOK can be populated with public keys of your own making, or of your friends… and/or with liveslak’s public key. And then the shim will accept liveslak’s signed Grub and kernel… and liveslak will boot just fine.
Managing Machine Owner Keys (MOK)
My repository contains two relevant packages: mokutil and sbsigntools. The mokutil package contains the ‘mokutil’ program which allows you to query the SecureBoot NVRAM and to manipulate MOK certificates (the latter only if Secure Boot is enabled). The sbsigntools package contains ‘sbsign’ which is used by liveslak to cryptographically sign the Grub and kernel images.
To check whether Secure Boot is enabled, run:
# mokutil --sb-state
If this returns “Secure Boot enabled” then you are probably running a commercial Linux distro :-). In this case, you can generate a MOK enroll request to the shim before rebooting:
# wget https://download.liveslak.org/secureboot/liveslak.der
# mokutil --import liveslak.der
You will be prompted for an optional password. If you enter one, this password then needs to be entered again after reboot to complete the MOK enrollment.
If Secure Boot is not enabled, don’t worry: you can still enroll this ‘liveslak.der’. Just continue reading.
Adding liveslak.der certificate to MOK database
The remainder of the article will describe in detail how to add the liveslak public key (a SSL certificate) to the MOK if you were unable to use the mokutil program as described above.
Note that adding the certificate is a one-time action. Once the MOK database contains the liveslak certificate, future liveslak ISOs will boot on your SecureBoot-enabled computer out of the box.
Enable Secure Boot in your UEFI (press F1 or whatever key your computer needs to enter setup and find the proper menu to enable SB). Then reboot your computer with a liveslak (1.5.0 or later release) medium inserted.
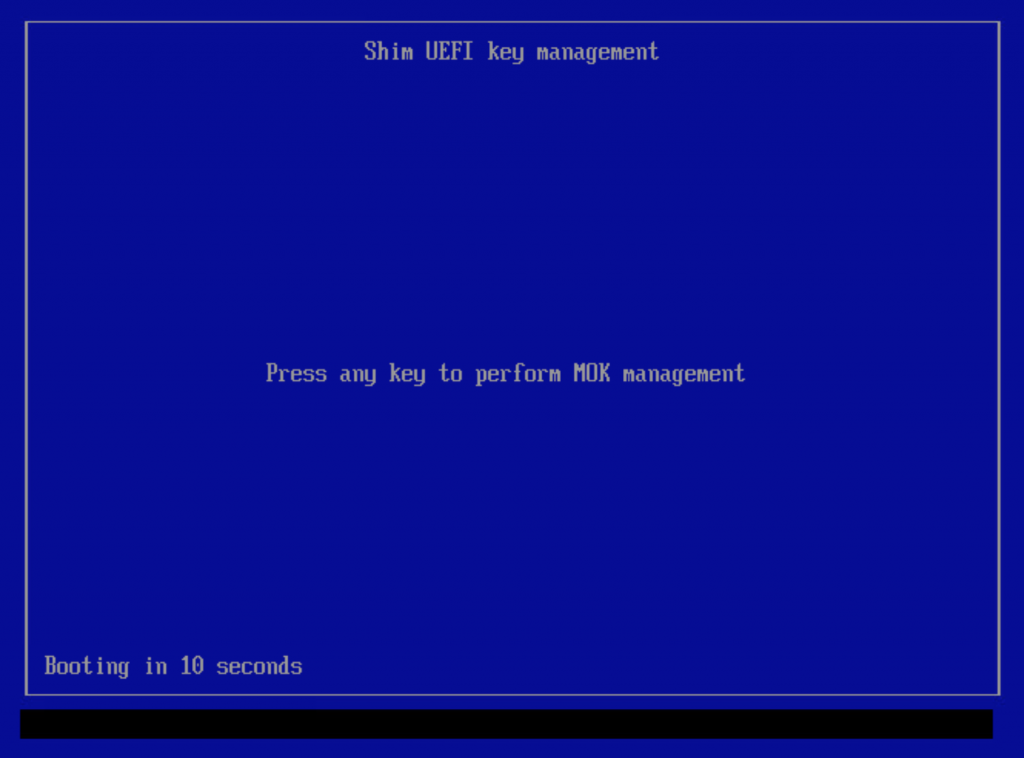
UEFI will look for the first-stage bootloader on the liveslak medium in the ESP partition (ESP = EFI System Partition which is a FAT partition with partition type 0xEF00). According to UEFI spec, it wants to load the file ‘/EFI/BOOT/bootx64.efi’. The Fedora ‘shim’ binary which is now contained in the liveslak ISO has been renamed to that exact filename. Shim loads, it will try to load our Grub and discovers that its SSL signature is invalid/unknown. Shim will then ask you if it should load the MokManager instead (the ‘mmmx64.efi file in the same directory) which is signed with the distro certificate embedded in the shim.
If you press ‘any key’ within 10 seconds, the MokManager will load and you will have your opportunity to enroll the ‘liveslak.der’ certificate. If you wait instead, the computer reboots and if you had already made an enrollment request as described in the previous paragraph, that request will then be erased and you’ll have to try again.
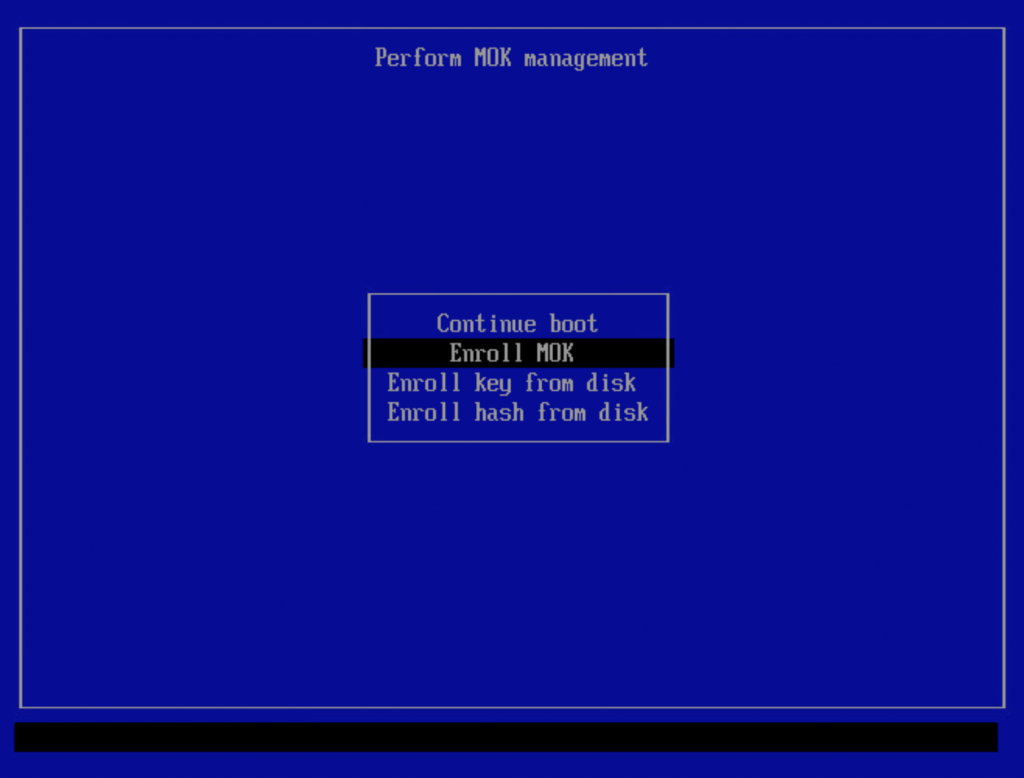
If MokManager loads, it will show the below screen if you created an enrollment request before the reboot. Select the “Enroll MOK” to complete that enrollment request.

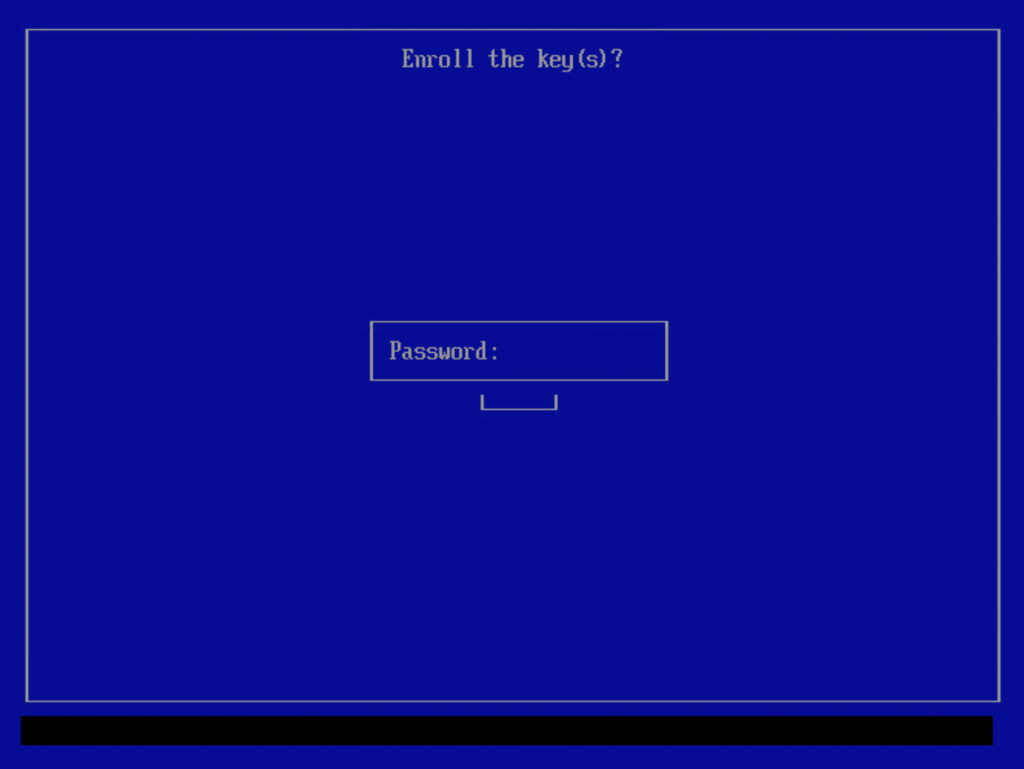
If you entered a password during the “mokutil –import” command you will have to enter that same password next:
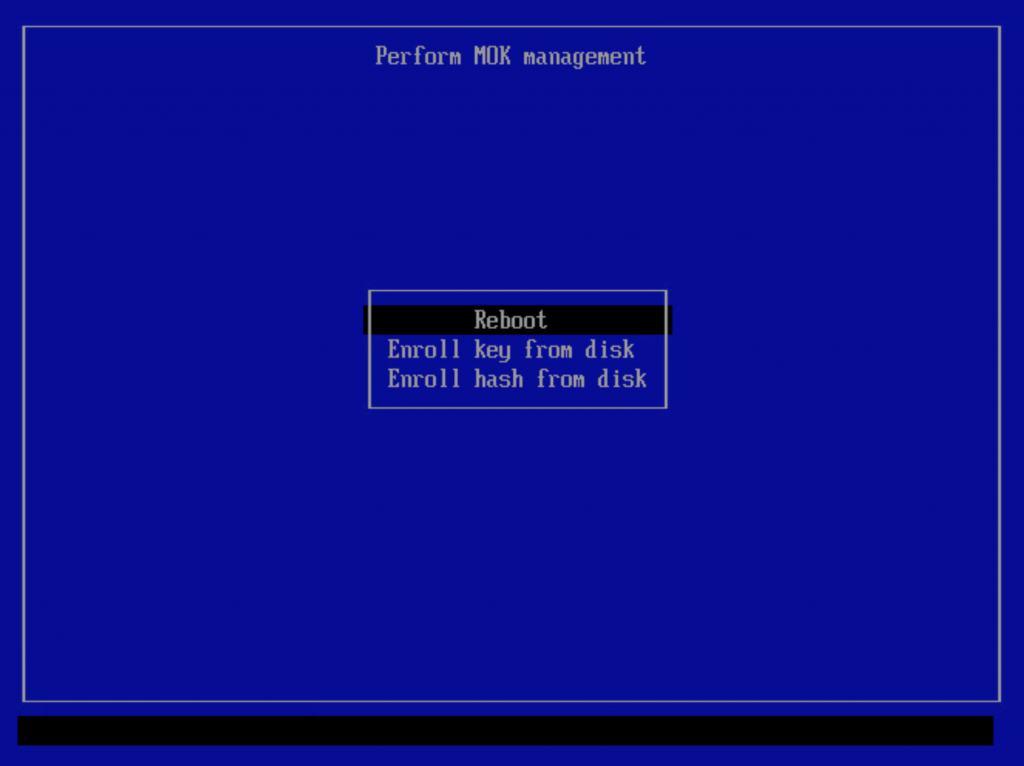
If you did not create an enrollment request prior to reboot, then this particular menu item will not be present and you should use the “Enroll key from disk” menu instead.
A simple and spartan file browser will be your guide towards the ‘/EFI/BOOT/’ directory on the liveslak medium; select ‘liveslak.der’ file and confirm.
After enrollment of the ‘liveslak.der’ certificate, you must reboot.
After the reboot, your Slackware Live Edition should boot as usual. If you watch closely you will see a flash right before Grub loads – that is the shim loading right before it.
Now, you can check that Secure Boot is actually enabled:
root@darkstar:~# dmesg |grep -i secure
[ 0.016864] Secure boot enabled
Cool!
Download Slackware Live Edition
You can find a set of new ISOs based on liveslak on download.liveslak.org/latest/, the 64bit versions of them support Secure Boot.
I tried also generating 32bit ISOs but they refuse to load the init script. The kernel loads, it unpacks the initrd image, but then the boot process stalls right before control is handed over to the initrd. I have no idea why. I tried generating ISOs with an older release of liveslak (1.4.0) that had proven to produce working 32bit ISOs but no luck. Something in the new 5.15 kernel perhaps which liveslak fails to add to the ISO? Suggestions are welcome.
It will probably work best if you use the ‘iso2usb.sh‘ script provided with liveslak to transfer the ISO content to a USB stick, it will give you a persistent environment with optional data encryption and apparently this will allow it to boot on a lot more computers.
Get liveslak sources
The liveslak project is hosted in git. Its browsable cgit interface is here: https://git.liveslak.org/liveslak/
A set of the liveslak scripts can also be downloaded from http://www.slackware.com/~alien/liveslak/ or https://slackware.nl/people/alien/liveslak/
The liveslak public key (SSL certificate in DER encoding) that you need to enroll can be downloaded from https://download.liveslak.org/secureboot/liveslak.der
Let me know your experiences!
Cheers, Eric


Recent comments