 As promised in an earlier blog article, I am going to talk about setting up a ‘cloud sync’ backend server for the Ente Authenticator app.
This specific article will be deviating slightly from one of the goals of the series. So far, I have shown you how to run a variety of services on your own private cloud server for family, friends and your local community, and using Single Sign-On (SSO) so that your users only have one account and password to worry about.
The difference here is that the Ente Auth backend server does not offer SSO (yet… although there’s a feature request to add OIDC functionality).
You will learn how to setup Ente Auth backend server in a Docker Compose stack. Administration of the server is done via ‘ente-cli‘ which is contained in that Docker stack.
Check out the list below which shows past, present and future episodes in the series, if the article has already been written you’ll be able to click on the subject.
The first episode also contains an introduction with some more detail about what you can expect.
- Episode 1: Managing your Docker Infrastructure
- Episode 2: Identity and Access management (IAM)
- Episode 3 : Video Conferencing
- Episode 4: Productivity Platform
- Episode 5: Collaborative document editing
- Episode 6: Etherpad with Whiteboard
- Episode 7: Decentralized Social Media
- Episode 8: Media Streaming Platform
- Episode 9 (this article): Cloudsync for 2FA Authenticator
Setting up an Ente backend server as a cloud sync location for the Ente Auth 2FA application (Android, iOS, web).
Stop worrying that you’ll lose access to secure web sites when you lose your smartphone and with it, the two-factor authentication codes that it supplies. You’ll be up and running with a new 2FA authenticator in no time when all your tokens are stored securely and end-to-end encrypted on a backend server that is fully under your own control.
- Introduction
- Preamble
- Web Hosts
- Secrets
- Apache reverse proxy configuration
- Ente server setup
- Preparations
- Cloning the git repository and preparing the web app image
- Considerations for the .env file
- Creating the Docker Compose files
- Running the server
- Connecting a client
- Administering the server
- User registration
- Ente CLI
- Logging into and using the CLI
- Enabling email (optional)
- Account self-registration or not?
- (1) pre-defining the OTT (one-time token) for your users
- (2) configuring mail transport in Ente
- Make the host accept mails from Ente container
- Considerations
- Using Ente server to store your photos
- CORS
- Conclusion
- Episode X: Docker Registry
Introduction
 In the blog post that I recently wrote about Ente Auth, the open source 2FA authenticator, I mentioned that this application can save its token secrets to the cloud. This is an optional feature and requires that you create an account at ente.io. This cloud backend service is where Ente (the company) runs a commercial Photo hosting service with end-to-end encryption for which the authenticator is a bolt-on.
Even when you decline to sign up for an account, the authenticator app offers its full functionality. Also it is able to import tokens from multiple other 2FA tools, and export your 2FA seeds to an encrypted file. In other words, there is no vendor lock-in. You do not really have a need for cloud sync, as long as you remember from time to time to make that manual backup of your 2FA secrets. These backups can later be restored even if you lose your phone and need to re-install the Ente authenticator app on a new phone.
The cloud sync is no more than a convenience, and it is completely secure, but I understand why some people would avoid creating an account and hand over their (encrypted) data to a 3rd party. That’s the premise behind writing this very article.
Ente has open-sourced all its products: the authenticator and photo apps, but also the back-end server which stores not just your 2FA secrets but also your photo collections.
This article focuses on getting the Ente ‘Museum‘ server running as a self-hosted backend for the 2FA authenticator app – a server fully under your control. Your secret data will never leave your house and you can rest assured that your 2FA seeds are always synced to your server and stored with solid encryption. You can even create local Ente accounts for your friends and family.
This article concludes with some considerations about expanding the server’s capabilities and turn it into a full-blown picture library a la Google Photos.
Preamble
This section describes the technical details of our setup, as well as the things which you should have prepared before trying to implement the instructions in this article.
Web Hosts
For the sake of this instruction, I will use the hostname “https://ente.darkstar.lan” as the URL where the authenticator will connect to the Ente API endpoint, and “https://enteauth.darkstar.lan” as the URL where users will point their browser when they want to access the web app.
Setting up your domain (which will hopefully be something else than “darkstar.lan”…) with new hostnames and then setting up web servers for the hostnames in that domain is an exercise left to the reader. Before continuing, please ensure that your equivalent for the following host has a web server running. It doesn’t have to serve any content yet but we will add some blocks of configuration to the VirtualHost definition during the steps outlined in the remainder of this article:
- ente.darkstar.lan
- enteauth.darkstar.lan
Using a Let’s Encrypt SSL certificate to provide encrypted connections (HTTPS) to your webserver is documented in an earlier blog article.
Note that I am talking about webserver “hosts” but in fact, all of these are just virtual webservers running on the same machine, at the same IP address, served by the same Apache
httpdprogram, but with different DNS entries. There is no need at all for multiple computers when setting up your Slackware Cloud server.
Secrets
All data is encrypted before Ente server stores it in its database or storage. The Docker stack uses several secrets to provide that encryption, next to your own password that only you know.
In this article, we will use example values for these secrets – be sure to generate and use your own strings here!
# Key used for encrypting customer emails before storing them in DB:
ENTE_KEY_ENCRYPTION=yvmG/RnzKrbCb9L3mgsmoxXr9H7i2Z4qlbT0mL3ln4w=
ENTE_KEY_HASH=JDYkOVlqSi9rLzBEaDNGRTFqRyQuQTJjNGF0cXoyajA3MklWTjc1cDBSaWxaTmh0VUViemlGRURFUFZqOUlNCg==
ENTE_JWT_SECRET=wRUs9H5IXCKda9gwcLkQ99g73NVUT9pkE719ZW/eMZw=
# Credentials for the Postgres database account:
ENTE_DB_USER=entedbuser
ENTE_DB_PASSWORD=9E8z2nG3wURGC0R51V5LN7/pVapwsSvJJ2fASUUPqG8=
# Credentials for the three hard-coded S3 buckets provided by MinIO:
ENTE_MINIO_KEY=AeGnCRWTrEZVk8VjroxVqp7IoHQ/fNn4wPL7PilZ+Hg=
ENTE_MINIO_SECRET=wdZPtr0rEJbFxr4GsGMB6mYojKahA3nNejIryeawloc=
Here are some nice convoluted ways to generate Base64-encoded strings you can use as secrets:
A 45-character string ending on ‘=’:
$ cat /dev/urandom | tr -dc 'a-zA-Z0-9' | fold -w 32 | head -n 1 | openssl dgst -binary -sha256 | openssl base64A 89-character string ending on ‘==’
$ cat /dev/urandom | tr -dc 'a-zA-Z0-9' | fold -w 256 | head -n 1 | openssl passwd -stdin -6 | fold -w 48 | head -n 1 | openssl base64 |tr -d '\n'The ente.io documentation recommends this to generate the key and jwt hashes:
 $ cd ente-git/server/

$ go run tools/gen-random-keys/main.go
Apache reverse proxy configuration
We are going to run Ente in a Docker container stack. The configuration will be such that the server will only listen for clients at a number of TCP ports at the localhost address (127.0.0.1).
To make our Ente API backend available to the authenticator at the address https://ente.darkstar.lan/ we are using a reverse-proxy setup. The flow is as follows: an authenticator (the client) connects to the reverse proxy and the reverse proxy connects to the Ente backend on the client’s behalf. The reverse proxy (Apache httpd in our case) knows how to handle many simultaneous connections and can be configured to offer SSL-encrypted connections even when the backend can only communicate over clear-text un-encrypted connections.
Add the following reverse proxy lines to your VirtualHost definition of the “ente.darkstar.lan” web site configuration and restart httpd:
# ---
# Required modules:
# mod_proxy, mod_ssl, proxy_wstunnel, http2, headers, remoteip

ProxyRequests Off
ProxyVia on
ProxyAddHeaders On
ProxyPreserveHost On

<Proxy *>
  Require all granted
</Proxy>

# Letsencrypt places a file in this folder when updating/verifying certs.
# This line will tell apache to not to use the proxy for this folder:
ProxyPass "/.well-known/" "!"

<IfModule mod_ssl.c>
  RequestHeader set X-Forwarded-Proto "https"
  RequestHeader set X-Forwarded-Port "443"
</IfModule>

# Ente API endpoint is hosted on https://ente.darkstar.lan/
<Location />
  ProxyPass "http://127.0.0.1:8180/"
  ProxyPassReverse "http://127.0.0.1:8180/"
</Location>
# ---
To make our Ente WeB App frontend available for the users who need read-only access to their 2FA codes, at the address https://enteauth.darkstar.lan/ , we are using a slightly different reverse-proxy setup.
Add the following reverse proxy lines to your VirtualHost definition of the “enteauth.darkstar.lan” web site configuration and restart httpd:
# ---
# Required modules:
# mod_proxy, mod_ssl, proxy_wstunnel, http2, headers, remoteip

ProxyRequests Off
ProxyVia on
ProxyAddHeaders On
ProxyPreserveHost On

<Proxy *>
  Require all granted
</Proxy>

# Letsencrypt places a file in this folder when updating/verifying certs.
# This line will tell apache to not to use the proxy for this folder:
ProxyPass "/.well-known/" "!"

<IfModule mod_ssl.c>
  RequestHeader set X-Forwarded-Proto "https"
  RequestHeader set X-Forwarded-Port "443"
</IfModule>

# Ente Auth Web App is hosted on https://enteauth.darkstar.lan/
<Location />
  ProxyPass "http://127.0.0.1:3322/"
  ProxyPassReverse "http://127.0.0.1:3322/"
</Location>
# ---
The hostname and TCP port numbers shown in bold green are defined elsewhere in this article, they should stay matching when you decide to use a different hostname and port numbers.
Ente Server setup
Preparations
We will give the Ente server its own internal Docker network. That way, the inter-container communication stays behind its gateway and prevents snooping the network traffic.
Docker network
Create the network using the following command:
docker network create \
  --driver=bridge \
  --subnet=172.21.0.0/16 --ip-range=172.21.0.0/25 --gateway=172.21.0.1 \
  ente.lan
Select a yet un-used network range for this subnet. You can find out about the subnets which are already defined for Docker by running this command:
ip route |grep -E '(docker|br-)'
The ‘
ente.lan‘ network you created will be represented in the Entedocker-compose.ymlfile with the following code block:networks: ente.lan: external: true
Create directories
Create the directory for the docker-compose.yml and other startup files:
# mkdir -p /usr/local/docker-ente
Create the directories to store data:
# mkdir -p /opt/dockerfiles/ente/{cli-data,cli-export,museum-data,museum-logs,postgres-data,minio-data,webauth-data}
Cloning the git repository and preparing the web app image
Ente offers a Docker image of their Museum server (the core of their product) via the public Docker image repositories, but there is no official Docker image for the Web Apps (Auth and Photos). Using the Auth Web App you will have read-only access to your 2FA tokens in a web browser, in case you don’t have your phone with you. That makes it a must-have in our container stack. The Auth Web App also allows you to create an account on the server if you don’t want to use the Mobile or Desktop App for that.
We need to build this Docker image locally. Building a Docker image involves cloning Ente’s git repository, writing a Dockerfile and then building the image via Docker Compose. Let’s go through these steps one by one.
Clone the repository in order to build the Auth Web App:
# cd /usr/local/docker-ente # git clone https://github.com/ente-io/ente ente-git # cd ente-git # git submodule update --init --recursive # cd -
Create the file ‘Dockerfile.auth‘ in the directory ‘/usr/local/docker-ente‘ and copy the following content into it:
FROM node:20-alpine AS builder WORKDIR /app COPY . . ARG NEXT_PUBLIC_ENTE_ENDPOINT=https://ente.darkstar.lan ENV NEXT_PUBLIC_ENTE_ENDPOINT=${NEXT_PUBLIC_ENTE_ENDPOINT} RUN yarn install && yarn build:auth FROM node:20-alpine WORKDIR /app COPY --from=builder /app/apps/auth/out . RUN npm install -g serve ENV PORT=3322 EXPOSE ${PORT} CMD serve -s . -l tcp://0.0.0.0:${PORT}
NOTE: I chose to let the web-app use another port than the default ‘3000’ because in the Slackware Cloud Server that port is already occupied by the jitsi-keycloak adapter. I picked another port: 3322.
I also already anticipate that the Auth Web App should accessible outside of my home, so I point the App to the public API endpoint ente.darkstar.lan instead of a localhost address.
Considerations for the .env file
Docker Compose is able to read environment variables from an external file. By default, this file is called ‘.env‘ and must be located in the same directory as the ‘docker-compose.yml‘ file (in fact ‘.env‘ will be searched in the current working directory, but I always execute ‘docker-compose‘ in the directory containing its YAML file anyway).
In this environment file we are going to specify things like accounts, passwords, TCP ports and the like, so that they do not have to be referenced in the ‘docker-compose.yml‘ file or even in the process environment space. You can shield ‘.env‘ from prying eyes, thus making the setup more secure. Remember, we are going to store two-factor authentication secrets in the Ente database. You want those to be safe.
Apart from feeding Docker a set of values, we need to make several of these values find their way into the containers. The usual way for Ente server (not using Docker) is to write the configuration values into one or more configuration files. These parameters are all documented in the ‘local.yaml‘ file in the git repository of the project.
Basically we should leave the defaults in ‘local.yaml‘ alone and specify our own custom configuration in ‘museum.yaml‘ and/or ‘credentials.yaml‘.
These two files will be parsed in that order, and parameters defined later will override the values for those parameters that were defined before. Both files will be looked for in the current working directory, again that should be the directory where the ‘docker-compose.yml‘ file is located.
Now the good thing is that all of Ente’s configuration parameters can be overridden by environment variables. You can derive the relevant variable name from its corresponding config parameter, by simple string substitution. Taken verbatim from that file:
The environment variable should have the prefix “
ENTE_“, and any nesting should be replaced by underscores.
For example, the nested string “db.user” in the config file can alternatively be specified (or be overridden) by setting an environment variable named “ENTE_DB_USER“.
We are going to make good use of this.
This is the content of the ‘/usr/local/docker-ente/.env‘ file:
# --- # Provide an initial OTT if you decide not to setup an email server:. # Change 'me@home.lan' to the email you will use to register your initial account. # The string '123456' can be any 6-number string: ENTE_HARDCODED_OTT_EMAIL="me@home.lan,123456" # Various secret hashes used for encrypting data before storing to disk: ENTE_KEY_ENCRYPTION=yvmG/RnzKrbCb9L3mgsmoxXr9H7i2Z4qlbT0mL3ln4w= ENTE_KEY_HASH=JDYkOVlqSi9rLzBEaDNGRTFqRyQuQTJjNGF0cXoyajA3MklWTjc1cDBSaWxaTmh0VUViemlGRURFUFZqOUlNCg== ENTE_JWT_SECRET=wRUs9H5IXCKda9gwcLkQ99g73NVUT9pkE719ZW/eMZw= # The Postgres database: ENTE_DB_PORT=5432 ENTE_DB_NAME=ente_db ENTE_DB_USER=entedbuser ENTE_DB_PASSWORD=9E8z2nG3wURGC0R51V5LN7/pVapwsSvJJ2fASUUPqG8= # MinIO credentials: ENTE_MINIO_KEY=AeGnCRWTrEZVk8VjroxVqp7IoHQ/fNn4wPL7PilZ+Hg= ENTE_MINIO_SECRET=wdZPtr0rEJbFxr4GsGMB6mYojKahA3nNejIryeawloc= # We hard-code the IP address for Museum server, # so that we can make it send emails: MUSEUM_IPV4_ADDRESS=172.21.0.5 # ---
Note that the bold purple information in the ‘.env‘ file defines the initial user account, which you need to create immediately after first startup of the Ente Docker stack. You will be asked to assign a (strong) password. It’s this account which we are going to make the admin for the service.
Note that I kept having issues with some environment variables not getting filled with values inside the containers. I found out that a variable in the ‘
.env‘ file that had a dash ‘-‘ as part of the name would not be recognized inside a container, that is why now I only use capital letters and the underscore,
Creating the Docker Compose files
The ‘Dockerfile.auth‘ and ‘.env‘ files from the previous chapters are already some of the Docker Compose files that we need.
In addition, we create a script ‘minio-provision.sh‘; two configuration files ‘museum.yaml‘ and ‘cli-config.yaml‘; and finally the ‘docker-compose.yml‘ file which defines the container stack.
You will find the contents of these files in this very section. All of them go into directory /usr/local/docker-ente/ .
museum.yaml
Create a file ‘museum.yaml‘ in the directory /usr/local/docker-ente/ . We won’t have a need for a ‘credentials.yaml‘ file.
Copy the following content into the file, which then provides a basic configuration to the Ente Museum server.
Note that some of the values remain empty – they are provided via the ‘.env‘ file:
# ---
# This defines the admin user(s):
internal:
admins:
- # Account ID (a string of digits - see 'Administering the server')
# This defines the Postgres database:
db:
host: ente-postgres
port:
name:
user:
password:
# Definition of the MinIO object storage.
# Even though this will all run locally, the three S3 datacenter names must
# remain the hard-coded values used by Ente in their commercial offering
# even though the names of endpoints/regions/buckets are not fixed.
s3:
are_local_buckets: true
b2-eu-cen:
key:
secret:
endpoint: ente-minio:3200
region: eu-central-2
bucket: b2-eu-cen
wasabi-eu-central-2-v3:
key:
secret:
endpoint: ente-minio:3200
region: eu-central-2
bucket: wasabi-eu-central-2-v3
compliance: false
scw-eu-fr-v3:
key:
secret:
endpoint: ente-minio:3200
region: eu-central-2
bucket: scw-eu-fr-v3
# Key used for encrypting customer emails before storing them in DB
# We will give them a value in the '.env' file of Docker Compose
# Note: to override a value that is specified in local.yaml in a
# subsequently loaded config file, you should specify the key
# as an empty string (`key: ""`) instead of leaving it unset.
key:
encryption: ""
hash: ""
# JWT secrets
jwt:
secret: ""
# ---
cli-config.yaml
The ente CLI (command-line interface tool) to administer our Ente server needs to know where to connect to the Museum server API endpoint.
Add the following block into a new file called ‘/usr/local/docker-ente/cli-config.yaml‘. We will map this file into the CLI container using the docker-compose file.
# --- # You can put this configuration file in the following locations: # - $HOME/.ente/config.yaml # - config.yaml in the current working directory # - $ENTE_CLI_CONFIG_PATH/config.yaml endpoint: # Since we run everything in a Docker stack, # the hostname equals the service name. # And since the CLI inside one container is going to connect # to the Museum container via the internal Docker network, # we need to access the internal port (8080), # instead of the published port (8180): api: "http://ente-museum:8080" log: http: false # log status code & time taken by requests # ---
minio-provision.sh
The script which we create as ‘/usr/local/docker-ente/minio-provision.sh‘ is used to provision the S3 buckets when this container stack first initializes. It is slightly modified from the original script which is found in the ente repository. because I do not want to have credentials in that script. So this is what it should look like when you create it:
#!/bin/sh
# Script used to prepare the minio instance that runs as part of the Docker compose cluster.
# Wait for the server to be up & running (script arguments 1 and 2 are the user/password):
while ! mc config host add h0 http://ente-minio:3200 $1 $2
do
echo "waiting for minio..."
sleep 0.5
done
cd /data
# Create the S3 buckets:
mc mb -p b2-eu-cen
mc mb -p wasabi-eu-central-2-v3
mc mb -p scw-eu-fr-v3
# ---
docker-compose.yml
Create a file ‘/usr/local/docker-ente/docker-compose.yml‘ with these contents:
# ---
name: ente
services:
ente-museum:
container_name: ente-museum
image: ghcr.io/ente-io/server
ports:
- 127.0.0.1:8180:8080 # API endpoint
depends_on:
ente-postgres:
condition: service_healthy
# Wait for museum to ping pong before starting the webapp.
healthcheck:
test: [ "CMD", "echo", "1" ]
environment:
# All of the credentials needed to create the first user,
# connect to the DB and MinIO and to encrypt data:
ENTE_INTERNAL_HARDCODED-OTT_EMAILS: ${ENTE_HARDCODED_OTT_EMAIL}
ENTE_KEY_ENCRYPTION: ${ENTE_KEY_ENCRYPTION}
ENTE_KEY_HASH: ${ENTE_KEY_HASH}
ENTE_JWT_SECRET: ${ENTE_JWT_SECRET}
ENTE_DB_PORT: ${ENTE_DB_PORT}
ENTE_DB_NAME: ${ENTE_DB_NAME}
ENTE_DB_USER: ${ENTE_DB_USER}
ENTE_DB_PASSWORD: ${ENTE_DB_PASSWORD}
ENTE_S3_B2-EU-CEN_KEY: ${ENTE_MINIO_KEY}
ENTE_S3_B2-EU-CEN_SECRET: ${ENTE_MINIO_SECRET}
ENTE_S3_WASABI-EU-CENTRAL-2-V3_KEY: ${ENTE_MINIO_KEY}
ENTE_S3_WASABI-EU-CENTRAL-2-V3_SECRET: ${ENTE_MINIO_SECRET}
ENTE_S3_SCW-EU-FR-V3_KEY: ${ENTE_MINIO_KEY}
ENTE_S3_SCW-EU-FR-V3_SECRET: ${ENTE_MINIO_SECRET}
volumes:
- ./museum.yaml:/museum.yaml:ro
- /opt/dockerfiles/ente/museum-logs:/var/logs
- /opt/dockerfiles/ente/museum-data:/data
networks:
ente.lan:
ipv4_address: ${MUSEUM_IPV4_ADDRESS}
aliases:
- ente-museum.ente.lan
restart: always
# Resolve "localhost:3200" in the museum container to the minio container.
ente-socat:
container_name: ente-socat
image: alpine/socat
network_mode: service:ente-museum
depends_on:
- ente-museum
command: "TCP-LISTEN:3200,fork,reuseaddr TCP:ente-minio:3200"
ente-postgres:
container_name: ente-postgres
image: postgres:12
ports:
- 127.0.0.1:${ENTE_DB_PORT}:${ENTE_DB_PORT}
environment:
POSTGRES_DB: ${ENTE_DB_NAME}
POSTGRES_USER: ${ENTE_DB_USER}
POSTGRES_PASSWORD: ${ENTE_DB_PASSWORD}
# Wait for postgres to be accept connections before starting museum.
healthcheck:
test:
[
"CMD",
"pg_isready",
"-q",
"-d",
"${ENTE_DB_NAME}",
"-U",
"${ENTE_DB_USER}"
]
start_period: 40s
start_interval: 1s
volumes:
- /opt/dockerfiles/ente/postgres-data:/var/lib/postgresql/data
networks:
- ente.lan
restart: always
ente-minio:
container_name: ente-minio
image: minio/minio
# Use different ports than the minio defaults to avoid conflicting
# with the ports used by Prometheus.
ports:
- 127.0.0.1:3200:3200 # API
- 127.0.0.1:3201:3201 # Console
environment:
MINIO_ROOT_USER: ${ENTE_MINIO_KEY}
MINIO_ROOT_PASSWORD: ${ENTE_MINIO_SECRET}
command: server /data --address ":3200" --console-address ":3201"
volumes:
- /opt/dockerfiles/ente/minio-data:/data
networks:
- ente.lan
restart: always
ente-minio-provision:
container_name: ente-minio-provision
image: minio/mc
depends_on:
- ente-minio
volumes:
- ./minio-provision.sh:/provision.sh:ro
- /opt/dockerfiles/ente/minio-data:/data
networks:
- ente.lan
entrypoint: ["sh", "/provision.sh", "${ENTE_MINIO_KEY}", ${ENTE_MINIO_SECRET}"]
restart: always
ente-auth-web:
container_name: ente-auth-web
image: ente-auth-web:latest
build:
context: ./ente-git/web
# The path for dockerfile is relative to the context directory:
dockerfile: ../../Dockerfile.auth
tags:
- "ente-auth-web:latest"
environment:
NEXT_PUBLIC_ENTE_ENDPOINT: "https://ente.darkstar.lan"
volumes:
- /opt/dockerfiles/ente/webauth-data:/data
ports:
- 127.0.0.1:3322:3322
depends_on:
ente-museum:
condition: service_healthy
restart: always
ente-cli:
container_name: ente-cli
image: ente-cli:latest
build:
context: ./ente-git/cli
tags:
- "ente-cli:latest"
command: /bin/sh
environment:
ENTE_CLI_CONFIG_PATH: /config.yaml
volumes:
- ./cli-config.yaml:/config.yaml:ro
# This is mandatory to mount the local directory to the container at /cli-data
# CLI will use this directory to store the data required for syncing export
- /opt/dockerfiles/ente/cli-data:/cli-data:rw
# You can add additional volumes to mount the export directory to the container
# While adding account for export, you can use /data as the export directory.
- /opt/dockerfiles/ente/cli-export:/data:rw
stdin_open: true
tty: true
restart: always
networks:
  ente.lan:
    external: true
# ---
In the service definition for ‘
ente-cli‘ we build the local image ‘ente-auth-web‘ if it does not yet exist (i.e. in case we had not built it before) and we also tag the image as ‘ente-auth-web:latest‘ so that it is more easily found in a ‘docker image ls‘ command.
Running the server
Now that we have created the docker-compose.yml (defining the container stack), the .env file (containing credentials and secrets), museum.yaml (outlining the basic configuration of Ente and defining the initial user and its one-time token), cli-config.yaml (telling the CLI where to find the server), a Dockerfile.auth to build the ente-auth-web app and a minio-provision.sh script with which we initialize the MinIO S3-compatible storage…. we are ready to fire up the barbeque.
If you hadn’t created the Docker network yet, do it now! See the “Docker network” section higher up.
Start the Docker container stack (seven containers in total) as follows:
# cd /usr/local/docker-ente

# docker-compose up -d
And monitor the logs if you think the startup is troublesome. For instance, check the logs for the Museum service (Ente’s backend) using the name we gave its container (ente-museum):
# docker-compose logs ente-museum
When the server is up and running, use a webbrowser to access the Ente Auth web app athttps://enteauth.darkstar.lan/
You can test the server backend (the API endpoint) by ‘pinging‘ it. Just point curl (or a web browser) at the URL https://ente.darkstar.lan/ping – it should return ‘pong‘ in the form of a YAML string which looks a lot like this:
{"id":"qxpxd7j59pvejjzpz7lco0zroi2cq8l13gq9c2yy8pbh6b6lg","message":"pong"}
Connecting a client
Download and install the Ente Auth mobile or desktop app, then start it.
When the start screen appears, you would normally click “New to Ente” and then get connected to Ente’s own server at api.ente.io. We want to connect to our self-hosted instance instead but how to enter the server URL?
Ente developers implemented this as follows, and it works for the mobile as well as the desktop clients:
Tap the opening screen seven (7) times to access “Developer settings” (on the desktop you’d perform 7 mouse clicks):
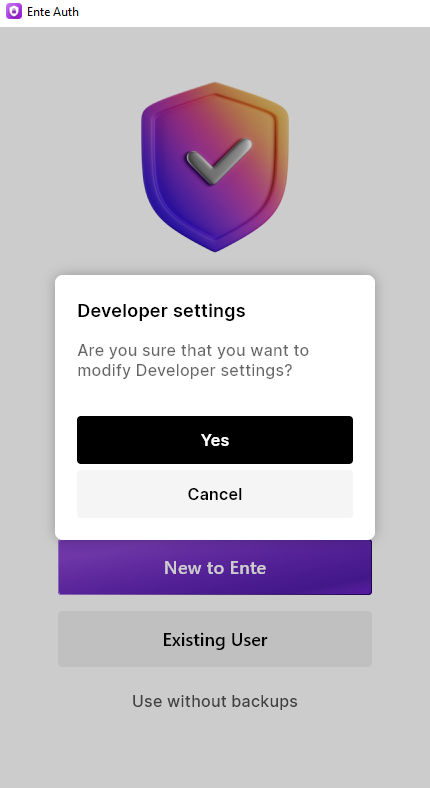
When you click “Yes“, a new prompt for “Server Endpoint” will appear.
Here you enter “https://ente.darkstar.lan” which is our API endpoint:

The client will then proceed connecting to your server and then take you back to the opening screen .
Click “New to Ente“. You can now sign in using the initial email address we configured in museum.yaml . Be sure to define a strong password! The security of your 2FA secrets is as strong as that password.
The app will then ask you for an One-Time Token (OTT). This is the 6-digit string which we configured along with the email of the initial user account, again in museum.yaml . Enter this code and the registration process is complete.
Now logoff and login again to the authenticator and then open the Museum log file:
# docker-compose logs ente-museum |less
Search for ‘user_id‘ to find your user’s 16-digit ID code. We will need that ID later on when we promote your account to admin.
The relevant line will look like this:
ente-museum | INFO[1071]request_logger.go:100 func3 outgoing

client_ip=<your_ip> client_pkg=io.ente.auth.web client_version= h_latency=2.59929ms latency_time=2.59929ms query= req_body=null req_id=35f11344-c7ab-48a6-b2c4-25cd82df3a23 req_method=POST req_uri=/users/logout status_code=200 ua=<your_browser_useragent> user_id=5551234567654321
NOTE: That ‘
user_id‘ will initially reflect with a value of ‘0’ but it will show the correct value after you logged off and logged back in again to the authenticator app.
Administering the server
User registration
On your self-hosted server you may want to disable self-registration of user accounts. See the section ‘”Account self-registration or not?” for considerations regarding this choice. If you decide to keep email capabilities disabled, you’ll have to assist your family and friends when they register their account: you need to fetch their One-Time Token (OTT) from the Museum server log.
You access the Museum server logs via the following command (‘ente-museum‘ being the name of the container):
# docker-compose logs ente-museum |less
And then grep the output for the keyword “SendEmailOTT“
To give an example of that, when registering the initial user account for whom we hard-coded the email address and OTT code, you would find the following lines in your server log:
ente-museum | WARN[0082]userauth.go:102 SendEmailOTT returning hardcoded ott for me@home.lan

ente-museum | INFO[0082]userauth.go:131 SendEmailOTT Added hard coded ott for me@home.lan : 123456
When subsequent new users go through the registration process, the log entry will be different, but “SendEmailOTT” will be present in the line that contains the OTT code (519032) whereas the next line will mention the new user’s registration email (friend@foo.bar):
ente-museum | INFO[2626]userauth.go:125 SendEmailOTT Added ott for navQ5xarR9du1zw3QmmnwW4F48dAm7f52okwSkWFFS4=: 519032

ente-museum | INFO[2626]email.go:109 sendViaTransmail Skipping sending email to friend@foo.bar: ente Verification Code
That way, you can share the OTT with your user during the account registration so that they can complete the process and start using the authenticator.
Don’t worry if you can not share the OTT code with a new user immediately. The user can close their browser after creating the account and before entering the OTT.
When they re-visit https://enteauth.darkstar.lan/ in future and login again, the Web App will simply keep asking for the OTT code, until the user enters it, thereby completing the registration process.
Ente CLI
You can administer the accounts on your Museum server via the CLI (Ente’s Command Line Interface) tool which is part of the Docker stack and runs in its own container. Therefore we actually execute the ‘ente-cli‘ tool via Docker Compose. Like this example (the container name is ‘ente-cli‘ but also the program in the container is renamed to ‘ente-cli‘)
# docker-compose exec ente-cli /bin/sh -c "./ente-cli admin list-users"
NOTE: to use the CLI for any administrative tasks, you need to have whitelisted the server’s admin user(s) beforehand.
So let’s copy our own account ‘s ID 5551234567654321 to the server configuration in order to make it a server administrator. Ensure that the ‘internal‘ section in'museum.yaml‘ in the root directory for our Docker configuration (/usr/local/docker-ente/) looks like this:
# ---
 internal:
  admins:
    - 5551234567654321
# ---
That 16-digit number is your own initial account ID which you retrieved by peeking into the server logs – see the previous section ‘Connecting a client‘.
After adding your account ID to the 'museum.yaml‘ file, you need to bring your Docker stack down and back up again:
# cd /usr/local/docker-ente
# docker-compose down
# docker-compose up -d
Now your account has been promoted to admin status.
Logging in to and using the CLI
Before you can administer any user account, you have to login to the CLI. Otherwise the CLI admin actions will show a message like this:
# docker-compose exec ente-cli /bin/sh -c "./ente-cli admin list-users"
Assuming me@home.lan as the Admin
------------
Error: old admin token, please re-authenticate using `ente account add`
All CLI commands and options are documented in the repository.
# docker-compose exec ente-cli /bin/sh -c "./ente-cli account add"
Enter app type (default: photos): auth
Enter export directory: /data
Enter email address: me@home.lan
Enter password:
Please wait authenticating...
Account added successfully
run `ente export` to initiate export of your account data
The ‘app type‘ must be ‘auth‘. The ‘/data‘ directory is internal to the container, we mapped it to ‘/opt/dockerfiles/ente/cli-export‘ in the ‘docker-compose.yml‘ file. You don’t have to run the proposed “ente export” command, since for now there is nothing to export.
The email address and password that are prompted for, are your own admin email ‘me@home.lan‘ and the password you configured for that account.
Now that we have ‘added’ our account to the CLI (aka we logged into the tool with our admin credentials), let’s see what it can tell us about ourselves:
# docker-compose exec ente-cli /bin/sh -c "./ente-cli account list"
Configured accounts: 1
====================================
Email: me@home.lan
ID: 5551234567654321
App: auth
ExportDir: /data
====================================
As a follow-up, let’s use our new admin powers to generate a listing of existing user accounts:
# docker-compose exec ente-cli /bin/sh -c "./ente-cli admin list-users"
Assuming me@home.lan as the Admin
------------
Email: me@home.lan, ID: 5551234567654321, Created: 2024-07-15
Email: friend@foo.bar, ID: 5555820399142322, Created: 2024-07-15
Account self-registration or not?
Since Ente’s self-hosted instance is not yet able to use Single Sign-On, the question becomes: should you disable self-registration on your Ente Auth server?
Out of the box, the Ente Auth server accepts everyone with a valid email address and creates an account for them. The account won’t however be activated until after the new user enters a One-Time Token (OTT) which the Ente server sends to the user’s email address.
You could simply not configure mail transport on the Ente server, so that nobody will receive their one-time password which they need to be able to login. If you do want to allow people to register accounts themselves without your involvement, then you need to setup email transport capability. Here follow those two scenarios – apply only one of them.
(1) pre-defining the OTT (one-time token) for your users
Let’s look at the case where you don’t configure email transport. For your users to create an account and activate that, they still have to enter a six-digit One-Time Token (OTT) after registering their email address and setting a password.
Earlier in this article, I pointed you to the server logs where you’ll find the OTT codes for your new users.
But as the server owner you can also choose to pre-define as many hard-coded OTT’s as needed – as long as you know in advance which email address your user is going to use for the registration. You then share their pre-defined 6-digit code with that person so that they can complete the registration process and can start using the app.
To pre-define one or more OTT, you add the following to the file ‘museum.yaml‘:
internal:
  hardcoded-ott:
    emails:
      - "example@example.org,123456"
      - "friend@foo.org,987654"
After changing ‘museum.yaml’ you need to restart/rebuild the container stack (‘docker-compose down‘ followed by ‘docker-compose up -d‘) because this file must be included inside the container.
I myself did not want to pre-fill the server with a plethora of hard-coded OTT strings. I want to be in control over who registers, and when. So whenever someone asks me for an account on the Ente server, I ask them which email address they will be using and then scan the Ente Museum log for the OTT which will be generated but not sent out. I will communicate the OTT to my new user – via text message or by just telling them. It’s up to you to pick what works best for you.
(2) configuring mail transport in Ente
Next is the case where you don’t want to be involved getting new accounts activated. In that case, the Ente server needs to be able to send One-Time Tokens to the email address of a new user during the registration process.
Configure SMTP capability as follows, by adding the following to the file ‘museum.yaml‘:
smtp:
  host: <your_smtp_server_address>
  port: <usually 587>
  username: <required>
  password: <required>
  # The email address from which to send the email.
  # Set this to an email address
  # whose credentials you're providing. If left empty,
  # the reply-to address will be verification@ente.io
  email: <your_own_replyto_address>
Provide the hostname or IP address and the TCP port for your own SMTP server. Ente Museum requires a TLS encrypted connection as well as SMTP AUTH, see further below on how to configure your mailserver accordingly.
The ’email:’ field should be set to a return email address which allows people to reply to you in case of issues during the verification stage. For instance, Ente themselves use ‘verification@ente.io‘ here but that’s not very useful for us.
Make the host accept mail from Ente container
When the Museum server starts sending emails from its Docker container, we want Sendmail or Postfix to accept and process these. What commonly happens if a SMTP server receives emails from an unknown IP address is to reject those emails with “Relaying denied: ip name lookup failed“. We don’t want that to happen, so I had already added some glue in the Docker configuration to create a level of trust and understanding.
On the host side we have some remaining steps to complete:
- Announce the Docker IP/hostname mapping
- Setup a local DNS server
- Configure SASL authentication mechanisms to be used by the MTA (mail transport agent, eg. Postfix)
- Create a system user account to be used by Ente Museum when authenticating to the MTA
- Add SASL AUTH and also TLS encryption capabilities to the MTA
Assign IP address to the Museum server
This section contains the part which is already done. The next sections document what still needs to be done.
To the ‘.env‘ file I had already added some lines to assign the value of an IP address to variable ‘$MUSEUM_IPV4_ADDRESS‘ in the ‘ente.lan‘ network range:
# We hard-code the IP address for Museum server,

# so that we can allow it to send emails:

MUSEUM_IPV4_ADDRESS=172.21.0.5
In ‘docker-compose.yml‘ I had already added the following lines, using the above variable to assign the hard-coded IP to the ‘ente-museum‘ container:
networks:
  ente.lan:
    ipv4_address: ${MUSEUM_IPV4_ADDRESS}
    aliases:
      - ente-museum.ente.lan
Add IP / name mapping to the host
In ‘/etc/hosts‘ you still need to add the following:
172.21.0.5 ente-museum ente-museum.ente.lan
And to ‘/etc/networks‘ add this line:
ente.lan 172.21
DNS serving local IPs
Under the assumption that your Cloud Server does not act as a LAN’s DNS server, we will use dnsmasq as the local nameserver. Dnsmasq is able to use the content of /etc/hosts and /etc/networks when responding to DNS queries. We can use the default, unchanged ‘/etc/dnsmasq.conf‘ configuration file.
But first, add this single line at the top of the host server’s ‘/etc/resolv.conf‘ (it may already be there as a result of setting up Keycloak), so that all local DNS queries will will be handled by our local dnsmasq service:
nameserver 127.0.0.1
If you have not yet done so, (as root) make the startup script ‘/etc/rc.d/rc.dnsmasq‘ executable and start dnsmasq manually (Slackware will take care of starting it on every subsequent reboot):
# chmod +x /etc/rc.d/rc.dnsmasq

# /etc/rc.d/rc.dnsmasq start
If dnsmasq is already running (eg. when you have Keycloak running and sending emails) then send SIGHUP to the program as follows:
# killall -HUP dnsmasq
Done! Check that it’s working and continue to the next step:
# nslookup ente-museum.ente.lan
Server: 127.0.0.1
Address: 127.0.0.1#53
Name: ente-museum.ente.lan
Address: 172.21.0.5
Configuring SASL
The mailserver aka MTA (Sendmail or Postfix) requires that remote clients authenticate themselves. The Simple Authentication and Security Layer (SASL) protocol is used for that, but typically, these MTA’s do not implement SASL themselves. There are two usable SASL implementations available on Slackware: Cyrus SASL and Dovecot; I picked Cyrus SASL just because I know that better.
We need to configure the method of SASL authentication for the SMTP daemon, which is via the saslauthd daemon. That one is not started by default on Slackware.
If the file ‘/etc/sasl2/smtpd.conf‘ does not yet exist, create it and add the following content:
pwcheck_method: saslauthd

mech_list: PLAIN LOGIN
Don’t add any further mechanisms to that list, except for PLAIN LOGIN. The resulting transfer of cleartext credentials is the reason that we also wrap the communication between mail client and server in a TLS encryption layer.
If the startup script ‘/etc/rc.d/rc.saslauthd‘ is not yet executable, make it so and start it manually this time (Slackware will take care of starting it on every subsequent reboot):
# chmod +x /etc/rc.d/rc.saslauthd

# /etc/rc.d/rc.saslauthd start
Create the mail user
We need a system account to allow Ente to authenticate to the SMTP server. Let’s go with userid ‘verification‘.
The following two commands will create the user and set a password:
# /usr/sbin/useradd -c "Ente Verification" -m -g users -s /bin/false verification

# passwd verification
Write down the password you assigned to the user ‘verification‘. Both this userid and its password need to be added to the ‘username:‘ and ‘password:‘ definitions in the ‘smtpd:‘ section of our ‘museum.yaml‘ file.
When that’s done, you can test whether you configured SASL authentication correctly by running:
# testsaslauthd -u verifification -p thepassword
… which should reply with:
0: OK "Success."
Configuring Sendmail
Since Postfix has replaced Sendmail as the MTA in Slackware a couple of years ago already, I am going to be concise here:
Make Sendmail aware that the Ente Museum container is a known local host by adding the following line to “/etc/mail/local-host-names” and restarting the sendmail daemon:
ente-museum.ente.lan
The Sendmail package for Slackware provides a ‘.mc’ file to help you configure SASL-AUTH-TLS in case you had not yet implemented that: ‘/usr/share/sendmail/cf/cf/sendmail-slackware-tls-sasl.mc‘.
Configuring Postfix
If you use Postfix instead of Sendmail, this is what you have to change in the default configuration:
In ‘/etc/postfix/master.cf‘, uncomment this line to make the Postfix server listen on port 587 as well as 25 (port 25 is often firewalled or otherwise blocked):
submission inet n - n - - smtpd
In ‘/etc/postfix/main.cf‘, add these lines at the bottom:
# ---
# Allow Docker containers to send mail through the host:
mynetworks_style = class
# ---
Assuming you have not configured SASL AUTH before you also need to add:
# ---
# The assumption is that you have created your server's SSL certificates
# using Let's Encrypt and 'dehydrated':
smtpd_tls_cert_file = /etc/dehydrated/certs/darkstar.lan/fullchain.pem
smtpd_tls_key_file = /etc/dehydrated/certs/darkstar.lan/privkey.pem
smtpd_tls_security_level = encrypt

# Enable SASL AUTH:
smtpd_sasl_auth_enable = yes
syslog_name = postfix/submission
smtpd_recipient_restrictions = permit_sasl_authenticated,permit_mynetworks,reject_unauth_destination
# ---
After making modifications to the Postfix configuration, always run a check for correctness of the syntax, and do a reload if you don’t see issues:
# postfix check

# postfix reload
More details about SASL AUTH to be found in ‘/usr/doc/postfix/readme/SASL_README‘ on your own host machine.
Note: if you provide Postfix with SSL certificates through Let’s Encrypt (using the dehydrated tool) be sure to reload the Postfix configuration every time ‘dehydrated’ refreshes its certificates.
-
In ‘/etc/dehydrated/hook.sh’ look for the ‘
deploy_cert()‘ function and add these lines at the end of that function (perhaps the ‘apachectl‘ call is already there):# After successfully renewing our Apache certs, the non-root user 'dehydrated_user' # uses 'sudo' to reload the Apache configuration: sudo /usr/sbin/apachectl -k graceful # ... and uses 'sudo' to reload the Postfix configuration: sudo /usr/sbin/postfix reload
-
Assuming you are not running dehydrated as root but instead as ‘dehydrated_user‘, you need to add a file in ‘
/etc/sudoers.d/‘ – let’s name it ‘postfix_reload‘ – and copy this line into the file:dehydrated_user ALL=NOPASSWD: /usr/sbin/postfix reload
Success or failure
You can query your mail server to see if you were successful in adding SASL AUTH and TLS capabilities:
$ telnet smtp.darkstar.lan 587

Trying XXX.XXX.XXX.XXX...

Connected to smtp.darkstar.lan.

Escape character is '^]'.

220 smtp.darkstar.lan ESMTP Postfix

EHLO foo.org

250-PIPELINING

250-SIZE 10240000

250-VRFY

250-ETRN

250-STARTTLS

250-ENHANCEDSTATUSCODES

250-8BITMIME

250-DSN

250-SMTPUTF8

250 CHUNKING

AUTH LOGIN

530 5.7.0 Must issue a STARTTLS command first

QUIT

221 2.0.0 Bye

Connection closed by foreign host.
In case you succeeded in setting up your mailserver you will find lines like this in the ente-museum log whenever a new user registers their Ente account:
ente-museum | INFO[0083]request_logger.go:83 func3 incoming client_ip=<your_ip> client_pkg=io.ente.auth.web client_version= query= req_body={"email":"friend@foo.org","client":"totp"} req_id=dda6b689-8e96-4e66-bade-68b53fe2d910 req_method=POST req_uri=/users/ott ua=<your_browser_useragent>
ente-museum | INFO[0083]userauth.go:125 SendEmailOTT Added ott for JLhW32XlNU8GchWneMPajdKW+UEDpYzh8+6Yjf6VhK4=: 654321
ente-museum | INFO[0084]request_logger.go:100 func3 outgoing client_ip=<your_ip> client_pkg=io.ente.auth.web client_version= h_latency=130.00083ms latency_time=130.00083ms query= req_body={"email":"friend@foo.org","client":"totp"} req_id=dda6b689-8e96-4e66-bade-68b53fe2d910 req_method=POST req_uri=/users/ott status_code=200 ua=<your-browser_useragent> user_id=0
Considerations
Using Ente server to store your photos
Ente uses a S3 (Amazon’s Simple Storage Service) compatible object storage. The Docker Compose stack contains a MinIO container which effectively hides your local hard drive behind its S3-compatible API. The company Ente itself uses commercial S3 storage facilities in multiple datacenters to provide redundancy and reliability in storing your data. That may be too much (financially) for your self-hosted server though.
In the scope of this article, all you’ll store anyway is your encrypted 2FA token collection. However, Ente’s main business model is to act as an alternative to Google Photos or Apple iCloud. I.e. all your photos can also be stored in a S3 bucket. You just need a different app but your server is already waiting for your picture uploads. Your Ente Auth user account is the same to be used for Ente Photos.
The self-hosted Ente server is just as feature-rich as the commercial offering! You can instruct the mobile Photos client to automatically upload the pictures you take with your phone for instance. Documenting how to setup the Photos Web app is currently beyond the scope of this article, because similar functionality is already provided by Nextcloud Sync and documented in this same Cloud Server series.
If you want to have a public Photos Web application (similar to how we have built an Auth Web app) that’s relatively straightforward: just look at how the Auth Web app is built in the ‘docker-compose.yml’ and copy that block to add an extra container definiton (substituting ‘auth’ with ‘photos’). More info to be found in this Ente Discussion topic.
Now, the issue with acting as a picture library is that you need to grant Ente Photo clients direct access to your S3-compatible storage. The Ente Photos server only acts as the broker between your client app and the remote storage. The photo upload happens through direct connection to the S3 bucket.
When you host your own Ente server, that direct access means you’ll have to open a separate hole in your NAT router (if your server is behind NAT) and/or in your firewall. Your Ente (mobile) client wants to connect to TCP port 3200 of your server to reach the MinIO container. Perhaps this can be solved by configuring another reverse proxy, but I have not actually tried and tested this.
Note that you should not open the MinIO console port (3201) to the general public!
Another thing to be aware of is that users of the Photo app, when they create an account on your server, will effectively be given a “trial period” of one year in which they can store up to 1 GB of photos. The first thing you would do after a new account gets created on your server, is to remove those limitations by running:
docker-compose exec ente-cli /bin/sh -c "./ente-cli account admin update-subscription --no-limit true"
which increases the storage lifetime to a 100 years from now, and the maximum storage capacity to 100 TB. If you need custom values for lifetime and storage capacity, then you’ll have to edit the database directly using a SQL query.
CORS
When testing the Ente Web Auth app against my new Ente backend server, I ran into “Network Error” when submitting my new email address and password, thus preventing my account registration process to complete.
I could debug the connection issue by using Chromium browser and opening a Developer Tools sidebar (Shift-Ctrl-I) and keeping the ‘Network‘ tab open while making the connection. It turned out that the “Network Error” issue was caused by CORS (Cross-Origin Resource Sharing) headers that I had configured my Apache server to send along with every server response to client requests. I was able to verify by inspecting the logs of the ‘ente-museum’ container that my browser input never reached that container.
What I had configured on my server were the following lines which I took from this discussion on Stack Overflow – I think I wanted to address a similar CORS issue in the past – but now it was really not helping me with Ente:
Header always set Access-Control-Allow-Origin "*"
Header always set Access-Control-Allow-Headers "Authorization"
Header always set Access-Control-Allow-Methods "GET"
Header always set Access-Control-Expose-Headers "Content-Security-Policy, Location"
Header always set Access-Control-Max-Age "600"
I fixed this by simply removing this section from my Apache httpd configuration, but I suppose sometimes you cannot just remove a bothersome piece of configuration. In that case, you could prevent Apache from sending these headers, but only for the Ente virtual hosts, by adding these lines inside the ‘VirtualHost‘ declaration for ente.darkstar.lan:
Header unset Access-Control-Allow-Origin
Header unset Access-Control-Allow-Headers
Header unset Access-Control-Allow-Methods
Header unset Access-Control-Expose-Headers
After removing these CORS Header definitions, the Web Auth app could successfully register my new account on the Ente server.
Conclusion
When I sort-of promised to write up the documentation on how to self-host an Ente backend server, I did not know what I was getting into. There’s a lot of scattered documentation about how to setup a Dockerized Ente server. That documentation also seems to have been written with developers in mind, rather than to aid a security-minded spirit who wants complete control over their secret data.
I managed to get all of this working flawlessly and I hope that this Cloud Server episode will benefit more than just my fellow Slackware users!
Leave your constructive comments below where I can hopefully answer them to your satisfaction.
Have fun!
Hi Eric.
2 consecutive epic articles to expand Slackware legendary cloud server series.
Thanks for your time and effort!
Hello Eric,
I was looking into Ente as an alternative to Google-Photos and was happy to read your blog 🙂
A few questions:
1) Why docker? I assume it was to avoid the hassle of packaging the dependencies like Minio…
2) Did you notice that you can configure the S3 bucket as local?
From https://help.ente.io/self-hosting/guides/configuring-s3
“Set the S3 bucket endpoint in credentials.yaml to a yourserverip:3200 or some such IP/hostname that accessible from both where you are running the Ente clients (e.g. the mobile app) and also from within the Docker compose cluster.”
Thanks for posting this article!
Great stuff 😀
> you can configure the S3 bucket as local
In that article, ‘local’ has the meaning of ‘not a cloud instance’ and in fact that is how I describe it. Whatever solution you find, it will work as long as the server as well as your mobile clients can find the address or hostname you configure.
Yes, I got that.
Since I already use tailscale with other ‘local only’ services I have like jellyfin (I have a Chromecast with jellyfin client and tailscale on my travel bag) I was thinking of going the same route with ente
> Why docker?
To make it fit with the purpose behind this article series.
I do not want a scattering of programs on my server iron, it is more manageable if you give them all their own little container.
Understood.
I’ll try to like docker in the future:)
For now, I’ll go for the ‘tradicional’ server.
Thanks for the clarifications
Eric, Big Thank You for this series.
I finally cought up and finished instaling almost every thing per instruction.
Now all we need is to get this all working with Apache Mesos so we can have redandancy.
Cheers