 I assume many of you are watching the Twitter soap, waiting for the moment that the social media platform burns down completely. Its fresh owner Elon Musk is abusing his newfound powers to vent his far-right extremist ideas, firing most of Twitter’s employees, shutting down the content moderation team, and so on.
You should definitively be looking for an alternative if you are interested in socially interacting with other people through online platforms. And especially if you represent a business or an organization and use Twitter as a communication medium, you must absolutely reconsider whether you are using the right platform.
A lot of people have been looking for alternatives to satisfy their Twitter habits. That process already started in February 2022 when Musk announced his intention to buy Twitter. But after completing that deal and essentially taking over daily operations, there has been a massive exodus. The platform which is absorbing most of this exodus as new users seems to be Mastodon. But Mastodon is a different platform than Twitter and a lot of new users struggle with the concepts. There’s a lot of documentation but not everyone reads documentation prior to jumping into the action.
I will share some pointers that may help you make the decision to move to Mastodon and getting all setup there.
Choose a Mastodon server
Mastodon is a federated network as opposed to Twitter which is a centralized network. To use Twitter, you login to a single URL, and have access the tweets of every other user of the platform.
Federated on the other hand means, the Mastodon network is run by any amount of independently and non-commercially hosted server instances, that are all interconnected and share updates in real-time. You login to your account on a specific server and have access to the full federated network’s content from there.
Unlike Twitter, where you have a unique handle (mine would be @erichameleers), your identity on the Mastodon network will also show the server you are operating from. My identity is a combination of the nick ‘alien’ on server ‘fosstodon.org’ which would make my Mastodon handle @alien@fosstodon.org.
If you have difficulties grasping the concept of a server or an instance… compare it to a local community center in your town. You go there to hang out with like-minded people but the television screens on the walls will show you what’s going on in the outside world. But you won’t enter just the first community center you encounter… you’d want to know a bit about the kind of people that frequent the place. But if you just want to mingle in a large crowd, I guess you would rather go to the football stadium.
I hope the comparison was not too cheesy, but I have been told that “you techies built this stuff but normal people do not know what words like server or instance mean at all”. Fair enough.
So, your first step will be to pick and choose the server where you are going to create an account. Server instances are sometimes topic based (with a focus on for instance open source, food, journalism, art and so on) which will influence the nature of the posts you will see scrolling by in your Local and Federated timelines (see below).
There is a searchable list of available servers at https://instances.social/list which can help in your decision making. Do you want an account on a server with lots of user accounts already present, which usually means the admins know what they are doing and they have long-term commitment? Or do you want a smaller instance but with a focus on a specific topic so you’ll have a bigger chance to hang out with like-minded people?
Also there’s https://joinmastodon.org/servers which is a page you can set a bunch of conditions (location, language, topic, legal entity, speed of account enablement, community-size) and which will then show a shortlist of Mastodon instances that match your preferences.
I chose fosstodon.org as my logon server because of its focus on people who like to work with Free and Open Source Software.
Configure your profile
Once you have selected a server, open its URL in a web browser, click the “Create Account” button and start building your user profile. Be sure to tell a bit about yourself.
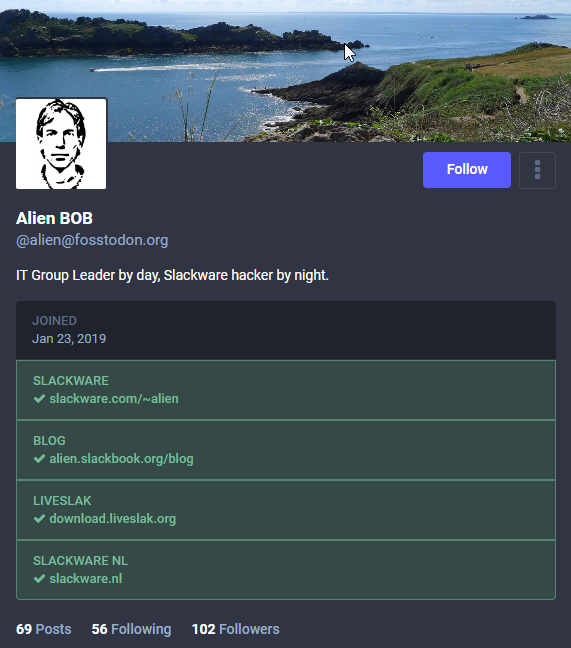
Mastodon allows a form of identity verification, not unlike the idea behind Twitter’s “blue badge” but then done right, and without cost! Your profile can list up to 4 personal web sites, and if you own or control these, you can add a bit of text on its web page which will be used by Mastodon to validate that it is actually your website. And it will color that website green on your profile page. Check out how that looks on my profile page:
Apps
Any Mastodon server is accessible by a web browser, and for many users that is sufficient. Don’t forget to enable the “enhanced web interface” in your profile settings!
On a smartphone however, the web user interface experience is not optimal. There are apps that you can use instead.
On Android, there’s the official Mastodon app, or else you could try Tusky. Both are free but there’s also paid-for apps available in the Store, like Fedilab.
Apple also has the official Mastodon app in their Store, but Tootle could be an alternative option.
Timelines
The way in which other people’s posts are presented chronologically on your home page (the so-called timeline) is fundamentally different in Mastodon compared to Twitter. There you have a single timeline, populated by posts from the people you follow, combined with other people’s posts that have been favored (liked) by people you follow. Twitter will additionally show posts from people unknown to you, if its algorithms decide that these posts may be relevant for you based on the behavioral profile it created from your interactions with the platform. Therein lies the danger that you get pulled into an information bubble.
Plus you will see lots of targeted advertising by Twitter’s affiliates, again based on your interests and the posts you liked or replied to in the past.
Mastodon on the other hand does not analyze your posting behavior, it does not run algorithms to influence your experience of the platform. You decide what you will see on your home timeline.
Regarding timelines, Mastodon has three of them!
- The Home timeline is displayed on your home screen by default, and contains the posts of people you follow, as well as posts from other people that were favored (boosted) by the people you follow, plus posts that contain hashtags that you have subscribed to (see below) and posts that directly mention your @nick.
- The Local timeline is a separate view, showing posts of all the other users of the Mastodon server instance where you are logged-in.
- The Federated timeline finally is a chronological feed of all the posts that are originating from outside your local server, of which the local server has been made aware. Meaning, you will see an arbitrary subset of all communication in the Fediverse, their relevance boosted by the interests of all users of your local server instance.
The nature of the content displayed in Local and Federated timelines is why I mentioned earlier that you might want to create an account on a Mastodon server centering around a specific topic that interests you. You will see more posts on such a server that are relevant to you.
Find people and hashtags to follow
Curating your timeline is a matter of following people you are interested in, apply proper filtering to hide unwanted content, and subscribe to hashtags to drag in the news from far away.
How to find people to follow?
Let’s start with people you are already following on Twitter. To find out who is already on Mastodon you can enter “mastodon” in the Twitter search bar and then limit the search results to “people you follow”.
Also, there are Twitter-to-Mastodon gateways which expose Twitter accounts to the Mastodon network; when you search for someone on Mastodon and the server part of their account contains a word like “birdsite” then this is a person whose Twitter posts are automatically being replicated on Mastodon.
And there’s a lot of folks who already migrated of course, and you will easily find them by entering their name or any nick/handle you know into the search box.
If you want to know who I am following, that’s not a secret: https://fosstodon.org/@alien/following
How to subscribe to hashtags?
If your server runs Mastodon version 4 or newer (most of them will do by now, the current version at the time of writing this is 4.0.2), and if you are using a Web browser to access Mastodon, you perform the following steps: enter a word in the Mastodon search box; in the results pane click on “hashtags” to display only the hashtags that match your search phrase; click on the hashtag that interests you; and finally click the “follow” icon which will be shown to the right of that hashtag.
Now, posts containing this hashtag will start showing on your Home timeline.
How to filter out the unwanted content?
In “Settings > Filters” you can use the “Add new filter” button to create filters that trigger on text strings that optionally match whole words. Posts containing the trigger text can be hidden from your Home, Local and/or Federated timelines, and/or conversations/mentions. You can set an expiry date to a filter if you are only temporarily fed up with someone you follow.
Next to filtering, you can also mute people you follow. The easiest way to do so is when you go that user’s profile page, click on the 3-dot menu to the right of the username and select “mute”. By the way, that menu contains a whole lot of ways to change your level of interaction with this person, go have a look!
Inform your Twitter friends
What I did to inform my Twitter friends and followers that I migrated to Mastodon, was adding my Mastodon handle to my Twitter display name. I am now known as “Eric Hameleers (@alien@fosstodon.org)“. If you want to be a bit less conspicuous about it, you could also just update your profile description to tell people where they can find you on Mastodon. After all, everyone remembers the ban hammers on Freenode IRC network where every account was auto-banned and channel auto-disowned when you mentioned you had moved to Libera.Chat. Musk is maniacal and so emotionally unstable that he could just do something similar to Twitter.
Documentation!
Detailed explanations on how to use Mastodon and interact with other people on the network can be found in https://docs.joinmastodon.org/ . I encourage you to read that page, it will prove quite useful.
Move to a different server (optional)
If you decide that you actually like another community better, it is possible to move your Mastodon account from one server to another. There’s multiple ways to achieve this. It all starts with the creation of your new account of course, and adding aliases for both the old and the new account that link them together.
Then you set a redirect from your old to your new account. People visiting your old profile will be informed where you moved to. Next to a redirect, you can also initiate a formal move of your account, and in this case Mastodon will automatically move all your followers from your old to your new account. Your old account will become a redirect to your new account but at least to your followers the process is relatively transparent.
Redirected accounts will be excluded from search results so that people searching for you will only find the new account.
What is not moved, are your historical posts and the people your old account is following. Both your accounts will also go into a cooldown period, where it is not possible to initiate another account move.
Interested? Curious? I hope to see some of you on Mastodon!
Eric

 I have been using Authy for a couple of years, precisely because of the convenience it offers in the rare case that you lose (access to) your phone. Now being really pissed about the vendor lock-in, I went to look for an acceptable alternative authenticator. And I found Ente Auth. It is an open source 2FA authenticator, with the option (not mandatory) to create an account at Ente and sync your local 2FA tokens to their cloud server. The end-to-end encryption used by Ente has been independently audited, and the app allows you to both import (from other authenticators that are not Authy) as well as export your tokens. Ente’s server offers a read-only version of the authenticator interface which means, after login you can find your 2FA codes in your browser as well.
 Chromium 121
  A
A
Recent comments