My thoughts on Slackware, life and everything

Category: Politics

Setting up an Outline server to bypass state firewalls

If you live or work (as a journalist for example) in a country which limits free access to information, and you have difficulties penetrating the state firewalls for access to the outside world, you may want to read on. In this article I will inform you about an interesting Open Source VPN solution called Outline which puts you (or your company) in full control. I will also show in great detail how to setup such a VPN server yourself.
One caveat though – you’ll have to rent an online Linux server in a ‘free country’.
Luckily, the cost can be fairly low especially if you share your VPN server with friends or colleagues.

What is Outline

Jigsaw is a daughter company of Alphabet, which is also Google’s parent company. It’s mission: “Jigsaw is a unit within Google that forecasts and confronts emerging threats, creating future-defining research and technology to keep our world safer.”

Jigsaw created the Open Source program “Outline” specifically to enable journalists and news organizations to work in adverse and hostile environments such as dictatorships with state-controlled and censored access to information. Access to information should always be free, uncensored and uncontrolled!

Outline is a client-server solution which uses the VPN capabilities of your device’s Operating System to encrypt and tunnel all your device’s traffic (like web searches, DNS queries) through a SOCKS proxy running on a remote server that you, or your organization, controls.
Outline is able to bypass the Great Firewall for instance. Note that Outline does not provide anonymity; all your traffic will exit from your Outline server. Your online activity will appear to originate there and not from the location you are actually in. Once you have installed an Outline client on your device (an Android phone, a Windows/Linux/Mac computer) you can try sites like dnsleak.com and ipv6leak.com to verify that your network communication is indeed not leaking data that may be snooped by your country’s enforcers. The pixelprivacy website provides a guide to help you understand, find and fix DNS leaks: https://pixelprivacy.com/resources/dns-leak/

The Outline Server runs on a Linux server. You use Outline’s Server Manager program to create the Outline Server configuration. The Manager application comes with pre-configured setups for Google Cloud Platform, Azure Web Services and DigitalOcean. While that’s nice, I will focus in this article on installing Outline on an online Linux machine that you yourself manage – any Linux cloud server, VPS or even your machine at home will do.
No commercial VPN offering will be as secure as the one that you run and control yourself! And if you wonder about the quality of the Outline source code – Jigsaw had their code audited twice, by Radically Open Security (in 2017) and Cure53 (in 2018) and you can read their reports online.

Outline Clients are available for Windows, Android, Linux, macOS and iOS. The client is what sets up the VPN connection to an Outline Server.

Use your own online VPS

Or any other kind of online subscription really. I am happy with the price, feature set and performance of the small dedicated servers offered by online.net aka scaleway. Especially the unmetered 1 Gbps connectivity is important when you want to offer a proxy server to accommodate your users’ secure internet access.
Your linux server needs to be able to run Docker, the light-weight containerization program. For obvious reasons, I will assume that your server is running Slackware, and you’ll have to install a couple of packages first through slackbuilds.org.

Setting up your Slackware server

The Outline Server runs as a docker container. We need to install docker first because it is not a standard offering in the Slackware distro.
Docker has a set of dependencies which we also need to install first: tini, google-go-lang, docker-proxy, libseccomp, runc and containerd.

To make our life easier, we will use sbopkg to manage building and installing these packages from the slackbuilds.org scripts.
If you did not yet install sbopkg, download and install it now (the current version of sbopkg may differ from the package version in the example below):

# wget https://github.com/sbopkg/sbopkg/releases/download/0.38.1/sbopkg-0.38.1-noarch-1_wsr.tgz
# installpkg sbopkg-0.38.1-noarch-1_wsr.tgz

If you are running Slackware-current instead of a stable release like 14.2, then you need to edit the following two files before you run sbopkg for the first time:

# vi /etc/sbopkg/sbopkg.conf
# vi /usr/sbin/sqg

… and change the lines:

REPO_NAME=${REPO_NAME:-SBo}
REPO_BRANCH=${REPO_BRANCH:-14.2}

to:

REPO_NAME=${REPO_NAME:-SBo-git}
REPO_BRANCH=${REPO_BRANCH:-current}

When that’s been taken care of, we need to initialize the local sbopkg database by letting it clone the git repository of slackbuilds.org. Next we run the SlackBuild Queuefile Generator (sqg) script which is part of the sbopkg package. The sqg script examines the “.info” files of the complete slackbuilds.org locally downloaded copy. It uses the dependency information inside these info files to generate “queue files”. A queue file contains the list of packages which have to be built before the actual program you are interested in… aka “the dependencies”. This saves us from reading these info files ourselves to find out what it is that we need to build and in what order.

# sbopkg -r
# sqg -a

After you have initialized the sbopkg program this way, you could now simply run:

# sbopkg -k -i docker

And that should compile and install all the docker dependencies (skipping those packages that are already installed to avoid duplicate effort) and finally, also the docker package.
There’s a snag however… when you install the “google-go-lang” package, it is not ready for use yet. The google-go-lang package installs a profile script “/etc/profile.d/go.sh” which is essential to compile the “runc” and “containerd” packages. So, we cut the compilation in two halves and run the “go.sh” script in between:

# sbopkg -k -i google-go-lang
# source /etc/profile.d/go.sh
# sbopkg -k -i docker

Note that sbopkg checks whether a queuefile exists with the name of the program you attempt to compile. Therefore you will be asked the question whether you want to compile just the “docker” SlackBuild script or the “docker” queuefile. You must select “Queuefile (Q)”.

Assuming the compilation runs error-free you end up with a batch of packages which sbopkg will automatically have installed for you. If you want to save these packages for re-use, you will find them in the “/tmp” directory or whatever your $TMP variable points to. Save them to a less volatile location.

When the packages are installed, we still do not have a system which runs Docker containers automatically. So we add the following block of script code to the file “/etc/rc.d/rc.local” – this causes the Docker daemon to start automatically on every boot:

if [ -x /etc/rc.d/rc.docker ]; then
  # Start Docker daemon
  echo "Starting Docker Daemon: /etc/rc.d/rc.docker start"
  /etc/rc.d/rc.docker start
fi

And to achieve a proper shutdown of your Docker containers when you want to shutdown your server, add the following code block to the file “/etc/rc.d/rc.local_shutdown” – note that this file does not exist by default on a Slackware server, so you may have to create the file “/etc/rc.d/rc.local_shutdown” first, and make it executable:

if [ -x /etc/rc.d/rc.docker ]; then
  # Stop Docker daemon
  echo "Stopping Docker Daemon: /etc/rc.d/rc.docker stop"
  /etc/rc.d/rc.docker stop
fi

We will start docker manually this one time, because I do not want to reboot:

 # /etc/rc.d/rc.docker start

This ends the Slackware server preparation for Outline.

Setting up the Outline server

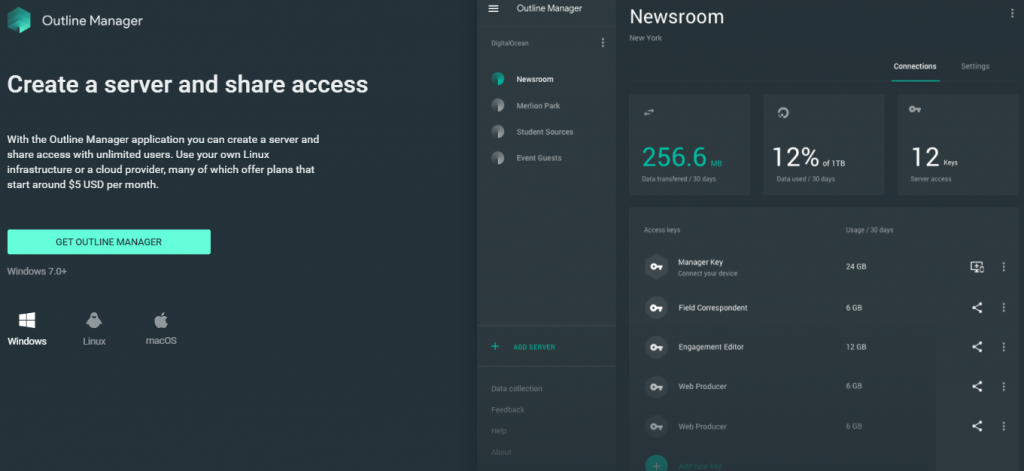
The Outline website offers downloads for the Outline Manager. This software sets up and manages your Outline VPN server and it also generates the access keys that a computer or smartphone needs in order to connect with your Outline Server. You’ll generate separate access keys for every user of your Outline server. Never share a key with more than one user or they will be able to see the other’s online activity and all data!
Outline Manager is available as a Windows or MacOS binary and a Linux AppImage. We’ll proceed to download the variant which suits our OS:

Again, I guess it is logical that I downloaded the Linux AppImage because my laptop runs Slackware 🙂
Start the binary after making it executable:

alien@hogan:~$ chmod +x ~/Downloads/Outline-Manager.AppImage
alien@hogan:~$ ~/Downloads/Outline-Manager.AppImage
(electron) 'getName function' is deprecated and will be removed. Please use 'name property' instead.
Outline Manager is starting
Launching web app from outline://web_app/index.html?version=1.3.0&sentryDsn=https%3A%2F%2F533e56d1b2d64314bd6092a574e6d0f1%40sentry.io%2F215496
(node:13952) ProtocolDeprecateCallback: The callback argument of protocol module APIs is no longer needed.
Checking for update
Generated new staging user ID: 7d7c2930-c574-5d3f-afd9-20401310d20f
Update for version 1.3.0 is not available (latest version: 1.3.0, downgrade is disallowed).

.. and the GUI appears:

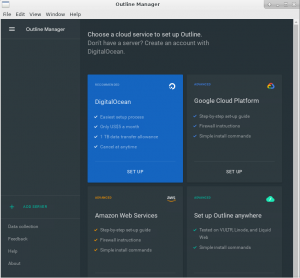
The first screen in the Outline Manager offers four choices in setting up an Outline Server. If you already have a paid account with DigitalOcean, Google Cloud Platform or Azure Web Services, you can click the corresponding square and you’ll have a server setup in no time. As I saiod before, I am more interested in a self-hosted VPN on a server which I control. So click the fourth square labeled “Set up Ouline anywhere”  and this brings us to the second screen:
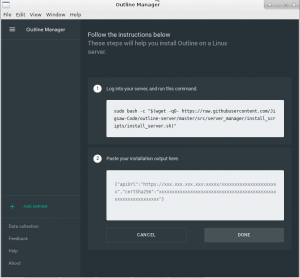
This shows a two-stage approach: the first box shows a command we need to run on a server we control; the command will download and prep an Outline Docker container. You’ll notice below that “Shadowbox” is started, this is the ShadowSocks server which is the actual proxy implementation. Additionally a “Watchtower” is started, this is a service which will keep your Outline Docker container updated automatically with security/bugfixes and new features.

At the end of the setup, a unique configuration string will be emitted which we then have to enter in the Manager‘s input field as proof that we control the server. This is what that looks like:

alien@server:~$ sudo bash -c "$(wget -qO- https://raw.githubusercontent.com/Jigsaw-Code/outline-server/master/src/server_manager/install_scripts/install_server.sh)"
> Verifying that Docker is installed .......... OK
> Verifying that Docker daemon is running ..... OK
> Creating persistent state dir ............... OK
> Generating secret key ....................... OK
> Generating TLS certificate .................. OK
> Generating SHA-256 certificate fingerprint .. OK
> Writing config .............................. OK
> Starting Shadowbox .......................... OK
> Starting Watchtower ......................... OK
> Waiting for Outline server to be healthy .... OK
> Creating first user ......................... OK
> Adding API URL to config .................... OK
> Checking host firewall ...................... OK

CONGRATULATIONS! Your Outline server is up and running.

To manage your Outline server, please copy the following line (including curly
brackets) into Step 2 of the Outline Manager interface:

{"apiUrl":"https://xx.xx.xx.xx:yyyyy/zzzzzzzzzzzzzzzzzz","certSha256":"e4888ec20b2302bcec440655e515625de7a9b6dfe180d7ecd54791a644a6ae32"}

If you have connection problems, it may be that your router or cloud provider
blocks inbound connections, even though your machine seems to allow them.

Make sure to open the following ports on your firewall, router or cloud provider:
- Management port yyyyy, for TCP
- Access key port bbbbb, for TCP and UDP

These last two lines mention the (randomly chosen during installation) TCP and UDP ports which are used by the Outline Server. If your online server is firewalled (and it should be… if not, go to http://www.slackware.com/~alien/efg and generate a firewall configuration stat) you need to open these TCP & UDP ports in your firewall before pasting the red line into your Outline Manager window.

If the firewall is OK, and you enter the above red line, then the Manager will contact the Server to validate the setup. And once that succeeds, you’re all set!

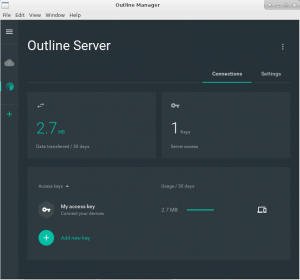
The Outline Manager window will look like below with a configured Outline Server. One single access key has already been generated for you as part of the server installation, and you can add more. You can also revoke keys that you shared and that are in use by people you don’t trust, and you see the amounts of data traffic each user consumes (but you can not see the actual content):

Install an Outline Client

On your computer you can download and install an Outline Client from the getoutline.org web site, for your phone you can get the Outline app from the respective Store. The Linux Outline Client is offered as an AppImage similar to the Manager application, and it runs on Slackware:
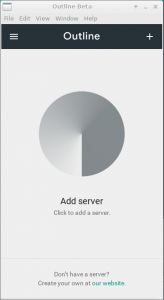
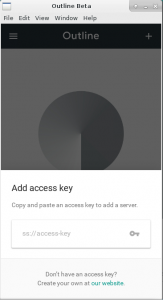
   
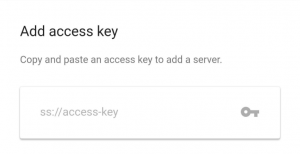
The client needs an access key so it knows where to connect and how to authenticate. An access key is nothing more than a URI which starts with “ss://

As a server administrator, you use the Outline Manager application to create and share these access keys with your prospective users in a secure manner – by using a chat app with end-to-end encryption or encrypted emails for instance. The Access key contains the IP address of your server, not a hostname, so that DNS lookups are not needed to make the initial connection.

After connecting the Client to the Server and establishing a VPN tunnel (or rather a sophisticated encrypted proxy setup), all subsequent DNS queries (and the rest of your online requests) are tunneled to the Outline Server.
And once the access key is loaded into the Client, all you need to setup a VPN at any time is just to open the application and press the big “Connect” button.

Summarizing

I hope this article helps some groups of people or organizations in non-free countries to re-gain their access to sources of uncensored information. The Outline VPN software is Open Source, free to use and security-audited. There’s a (small) cost involved to run an online Linux server – either a cheap Virtual Private Server (VPS) or a real server in a network you control. Take good care to rent a server with a generous monthly bandwidth plan to avoid unexpected high cost afterwards. Online.net offers servers with unlimited bandwidth for instance.

Good luck out there!
Eric
 

Using Let’s Encrypt to Secure your Slackware webserver with HTTPS

In the ‘good old days‘ where everyone was a hippy and everyone trusted the other person to do the right thing, encryption was not on the table. We used telnet to login to remote servers, we transferred files from and to FTP servers in the clear, we surfed the nascent WWW using http:// links; there were no pay-walls; and user credentials, well who’d ever heard of those, right.
Now we live in a time where every government spies on you, fake news is the new news, presidents lead their country as if it were a mobster organisation and you’ll go to jail – or worse – if your opinion does not agree with the ruling class or the verbal minority.
So naturally everybody wants – no, needs – to encrypt their communication on the public Internet nowadays.

Lucky for us, Linux is a good platform for the security minded person. All the tools you can wish for are available, for free, with ample documentation and support on how to use them. SSH secure logins, PGP encrypted emails, SSL-encrypted instant messaging, TOR clients for the darkweb, HTTPS connections to remote servers, nothing new. Bob’s your uncle. If you are a consumer.

It’s just that until not too long ago, if you wanted to provide content on a web-server and wanted to make your users’ communications secure with HTTPS, you’d have to pay a lot of money for a SSL certificate that would be accepted by all browsers. Companies like VeriSign, DigiCert, Komodo, Symantec, GeoTrust are Certificate Authorities whose root certificates ended up in all certificate bundles of Operating Systems, browsers and other tools, but these big boys want you to pay them a lot of money for their services.
You can of course use free tools (openssl) to generate SSL vertificates yourself, but these self-signed certificates are difficult to understand and accept for your users if they are primarily non-technical (“hello supportline, my browser tells me that my connection is insecure and your certificate is not trusted“).

SSL certificates for the masses

Since long I have been a supporter of CACert, an organization whose goal is to democratize the use of SSL certificates. Similar to the PGP web-of-trust, the CACert organization has created a group of ‘assurers‘ – these are the people who can create free SSL certificates. These ‘assurers’ are trusted because their identities are being verified face-to-face by showing passports and faces. Getting your assurer status means that your credentials need to be signed by people who agree that you are who you say you are. CACert organizes regular events where you can connect with assurers, and/or become one yourself.
Unfortunately, this grass-roots approach is something the big players (think Google, Mozilla) can not accept, since they do not have control over who becomes an assurer and who is able to issue certificates. Their browsers are therefore still not accepting the CACert root certificate. This is why my web site still needs to display a link to “fix the certificate warning“.
This is not manageable in the long term, even though I still hope the CACert root certificate will ultimately end up being trusted by all browsers.

So I looked at Let’s Encrypt again.
Let’s Encrypt is an organization which has been founded in 2016 by a group of institutions (Electronic Frontier Foundation, Mozilla Foundation, Michigan University, Akamai Technologies and Cisco Systems) who wanted to promote the use of encrypted web traffic by allowing everyone to create the required SSL certificates in an automated way, for free. These institutions have worked with web-browser providers to get them to accept and trust the Let’s Encrypt root certificates. And that was successful.
The result is that nowadays, Let’s Encrypt acts as a free, automated, and open Certificate Authority. You can download and use one of many client programs that are able to create and renew the necessary SSL certificates for your web servers. And all modern browsers accept and trust these certificates.

Let’s Encrypt SSL certificates have a expiration of 3 months after creation, which makes it mandatory to use some mechanism that does regular expiration checks on your server and renews the certificate in time.

I will dedicate the rest of this article to explain how you can use ‘dehydrated‘, a 3rd-party and free Let’s Encrypt client which is fully compatible with the official ‘CertBot’ client of Let’s Encrypt.
Why a 3rd-party tool and not the official client? Well, dehydrated is a simple Bash shell script, easy to read and yet fully functional. On the other hand, please have a look at the list of dependencies you’ll have to install before you can use CertBot on Slackware! That’s 17 other packages! The choice was easily made, and dehydrated is actively developed and supported.

I will show you how to download, install and configure dehydrated, how to configure your Apache web server to use a Let’s Encrypt certificate, and how to automate the renewal of your certificates. After reading the below instructions, you should be able to let people connect to your web-server using HTTPS.


Configure dehydrated

Dehydrated is part of Slackware since the 15.0 release. It ships with a default configuration, a man-page and documentation.

The installed package will also create a cron job “/etc/cron.d/dehydrated” which makes dehydrated run once a day at midnight. I want that file to have some comments about what it does and I do not want to run it at midnight, so I overwrite it with a line that makes it run once a week at 21:00 instead. It will also log its activity to a logfile, “/var/log/dehydrated” in the example below:

cat <<EOT > /etc/cron.d/dehydrated
# Check for renewal of Let's Encrypt certificates once per week on Monday:
0 21 * * Mon /usr/bin/dehydrated -c >> /var/log/dehydrated 2>&1
EOT

Dehydrated uses a directory structure below “/etc/dehydrated/”.
The main configuration file you’ll find there is called “config”.
The file “domains.txt” contains the host- and domain names you want to manage SSL certificates for.
The directory “accounts” will contain your Let’s Encrypt user account and private key, once you’ve registered with them.
And a new directory “certs” will be created to store the SSL certificates you are going to create and maintain.

How to deal with these files is going to be addressed in the next paragraphs.

The dehydrated configuration files

config

The main configuration file “/etc/dehydrated/config” is well-commented, so I just show the lines that I used:

DEHYDRATED_USER=alien
DEHYDRATED_GROUP=wheel
CA="https://acme-staging-v02.api.letsencrypt.org/directory"
#CA="https://acme-v02.api.letsencrypt.org/directory"
CHALLENGETYPE="http-01"
WELLKNOWN="/usr/local/dehydrated"
PRIVATE_KEY_RENEW="no"
CONTACT_EMAIL=eric.hameleers@gmail.com
LOCKFILE="${BASEDIR}/var/lock"
HOOK=/etc/dehydrated/hook.sh

Let’s go through these parameters:

  • We are starting the ‘dehydrated script as root, via a cron job or at the commandline. The values for DEHYDRATED_USER and DEHYDRATED_GROUP are the user and group the script will switch to at startup. All activities will be done as user ‘alien’ and group ‘wheel’ and not as the user ‘root’. This is a safety measure.
  • CA: this contains the Let’s Encrypt URL for dehydrated to connect to. You’ll notice that I actually list two values for “CA” but one is commented out. The idea is that you use the ‘staging’ URL for all your tests and trials, and once you are satisfied with your setup, you switch to the URL for production usage.
    Also note that Let’s Encrypt expects clients to use the ACMEv2 protocol. The older ACMEv1 protocol will still work, but you can not register a new account using the old protocol. Its only use nowadays is to assist in migrating old setups to ACMEv2. The “CA” URL contains the protocol version number, and I highlighted that part in red.
  • CHALLENGETYPE : we will be using HTTP challenge type because that’s easiest to configure. Alternatively if you manage your own DNS domain you could let dehydrate update your DNS zone table to provide the challenge that Let’s Encrypt demands.
    What is this challenge? Let’s Encrypt’s ACME-protocol wants to verify that you are in control of your domain and/or hostname. It will try to access a verification file via a HTTP request to your webserver.
  • WELLKNOWN: this defines the local directory  where dehydrated creates the ‘challenge-tokens’ which are then served by your webserver. The Let’s Encrypt ‘ACME server’ will connect to your server as part of the ‘http-01’ challenge and expects to find a specific file there with specific content (created by dehydrated). In the case of a webserver running on our example domain “foo.net”, that URL would be  http://foo.net/.well-known/acme-challenge/m4g1C-t0k3n . The dehydrate client must provide that “m4g1c-t0k3n” file which it will create during a certificate creation or renewal. Below I will explain how to create this URL location “.well-known/acme-challenge” and make it readable for an external server like Let’s Encrypt.
    If your “domains.txt” file contains more than one hostname or domain, the ACME server will repeat this challenge for every one of them. Usually, multiple hostnames or (sub-)domains means that you have defined multiple VirtualHost in your Apache webserver configuration. For every VirtualHost you need to enable access to this ‘http-01’ challenge location (I will show you how, below).
    Note: The first connect from the ACME server will always be over HTTP on port 80, but if your site does a redirect to HTTPS, that will work.
  • PRIVATE_KEY_RENEW: whether you want the certificate’s private key to be renewed along with the certificate itself. I chose “no” but the default is “yes”.
  • CONTACT_EMAIL: the email address which will be associated with your Let’s Encrypt account. This is where warning emails will be sent if your certificate about to expire but has not been renewed.
  • LOCK: the directory (which must be writable by our non-root user) where dehydrated will place a lock file during operation.
  • HOOK: the path to an optional script that will be invoked at various parts of dehydrate’s activities and which allows you to perform all kinds of related administrative tasks – such as restarting httpd after you have renewed its SSL certificate.
    NOTE: do not enable this “HOOK” line – i.e. put a ‘#” comment character in front of the line – until you actually have created a working and executable shell script with that name! You’ll get errors otherwise about the non-existing script.

domains.txt

The file “/etc/dehydrated/domains.txt” contains the list hosts and domain names you want to associate with your SSL certificates. You need to realize that a SSL certificate contains the hostname(s) or the domain name(s) that it is going to be used for. That is why you will sometimes see a “hostname does not match server certificate” warning if you open a URL in your browser, it means that the remote server’s SSL certificate was originally meant to be used with a different hostname.

In our case, the “domains.txt” file contains just one hostname on a single line:

www.foo.net

… but that line can contain any amount of different space-separated hosts under the same domain. For instance the line could be “foo.net www.foo.net” which would tell Let’s Encrypt that the certificate is going to be used on two separate web servers: one with hostname “foo.net” and the other with the hostname “www.foo.net“. Both names will be incorporated into the certificate.

Your “/etc/dehydrated/domains.txt” file can be used to manage the certificates of multiple domains, each domain on its own line (e.g. domain foo.org on one line, and domain foo.net on another line). Each line corresponds to a different SSL certificate – e.g. for different domains. Every line can contain multiple hosts in a single domain (for instance: foo.org www.foo.org ftp.foo.org).

Directory configuration

Two directories are important for dehydrated, and we need to create and/or configure them properly.

/etc/dehydrated

First, the dehydrated configuration directory. We have configured dehydrated to run as user ‘alien’ instead of user ‘root’ so we need to ensure that the directory is writable by this user. Or better (since we installed this as a Slackware package and a package upgrade would undo an ownership change of /etc/dehydrated) let’s manually create the subdirectories “accounts” “certs”, “chains” and “var” where our user actually needs to write, and make ‘alien’ the owner:

# mkdir -p /etc/dehydrated/accounts
# chown alien:wheel /etc/dehydrated/accounts
# mkdir -p /etc/dehydrated/certs
# chown alien:wheel /etc/dehydrated/certs
# mkdir -p /etc/dehydrated/chains
# chown alien:wheel /etc/dehydrated/chains
# mkdir -p /etc/dehydrated/var
# chown alien:wheel /etc/dehydrated/var

/usr/local/dehydrated

The directory “/usr/local/dehydrated” is the location where dehydrated to will generate the Let’s Encrypt challenge files. These files provide the proof that we actually own the domain(s) we are requesting a certificate for.
So let’s create that directory and allow our non-root user to write there:

# mkdir -p /usr/local/dehydrated
# chown alien:wheel /usr/local/dehydrated

SUDO considerations

We configured the dehydrated script to drop its root privileges at startup and continue as user ‘alien’, group ‘wheel’. Because we also change the group iit is important that the sudo line for root in the file “/etc/sudoers” is changed from the default:

#root ALL=(ALL) ALL

to

root ALL=(ALL:ALL) ALL

Else you’ll get the error “Sorry, user root is not allowed to execute ‘/usr/bin/dehydrated -c’ as alien:wheel on localhost.“.

Apache configuration

I expect that you have already setup your Apache for un-encrypted connections and already have a web site. If you still need to figure out how to setup a web site using Apache, I suggest you look for a good tutorial before you proceed with my article, like https://docs.slackware.com/howtos:network_services:setup_apache .

Before we register an account with Let’s Encrypt and start generating certificates, let’s first update our existing Apache configuration so that it works with dehydrated. We need to make the ‘http-01’ challenge location (http://foo.net/.well-known/acme-challenge/) accessible to external web clients, else the certificate generation will fail.

Note that the above example mentions the “foo.net” hostname. If your “/etc/dehydrated/domains.txt” contains lines with multiple hosts under a domain, you’ll have to make the URL path component “/.well-known/acme-challenge” accessible through every domain host you configured in Apache. The complete certificate generation process will fail in case any of these challenge URLs cannot be validated.
To make life more simple if you run multiple web servers, we created “/usr/local/dehydrated/” to store the challenge file. It’s a single file location.  With the help of the Apache “Alias” directive we can use that single file location in all our web servers.

Use this snippet of text in the <VirtualHost></VirtualHost> configuration block for every webserver host:

# We store the dehydrated info under /usr/local and use an Apache 'Alias'
# to be able to use it for multiple domains. You'd use this snippet:
Alias /.well-known/acme-challenge /usr/local/dehydrated
<Directory /usr/local/dehydrated>
    Options None
    AllowOverride None
     Require all granted
</Directory>

You can use “lynx” on the command-line to test whether a URL is valid:

$ lynx -dump http://www.foo.net/.well-known/acme-challenge/
Forbidden: You don't have permission to access /.well-known/acme-challenge/ on this server.

Despite that error, this message actually shows that the URL works (otherwise the return message would have been “Not Found: The requested URL /.well-known/acme-challenge was not found on this server.“).

This completes the required Let’s Encrypt modifications to your Apache web server configuration.
Next, and before we restart ‘httpd‘, our Apache server must be enabled to accept SSL connections. This is achieved by un-commenting the following line in “/etc/httpd/httpd.conf”:

# Secure (SSL/TLS) connections
Include /etc/httpd/extra/httpd-ssl.conf

You can now restart Apache httpd to activate our modifications (but always test the syntax of your configuration first:

# apachectl configtest
# /etc/rc.d/rc.httpd restart

To end the Apache configuration instructions, here are the bits that define the SSL parameters for your host. Note that you should not add them yet! You do not have a SSL certificate yet. Only after you have executed “dehydrated -c” and obtained the certificates, you can add the following lines to every <VirtualHost</VirtualHost> block where where you previously added the ‘Alias’ related stuff above:

SSLEngine on
SSLCertificateFile /etc/dehydrated/certs/foo.net/cert.pem
SSLCertificateKeyFile /etc/dehydrated/certs/foo.net/privkey.pem
SSLCertificateChainFile /etc/dehydrated/certs/foo.net/chain.pem
SSLCACertificatePath /etc/ssl/certs
SSLCACertificateFile /etc/ssl/certs/ca-certificates.crt

Note the hostname “foo.net” in these SSL lines above? This is an example of course and you need to change that to your own hostname.
What you need to realize is that this name corresponds to the first name of the line in your “/etc/dehydrated/domains.txt” file. Earlier in the article I used an example line for this “domains.txt” file which looks like this: “foo.net www.foo.net“. Even more hosts are possible, they should be space-separated. A single certificate will be generated which is valid for all of these hosts, and the directory where they are stored in is “/etc/dehydrated/certs/” followed by “./foo.net” which the name of that first entry of the line.

Running dehydrated for the first time, using the Let’s Encrypt staging server:

With all the preliminaries taken care of, we can now proceed and run ‘dehydrated’ for the first time. Remember to make it connect to the Let’s Encrypt ‘staging’ server during all your tests, to prevent their production server from getting swamped with bogus test requests!

Examining the manual page (run “man dehydrated“) we find that we need the parameter ‘–cron’, or ‘-c’, to sign/renew non-existent/changed/expiring certificates:

# /usr/bin/dehydrated -c
# INFO: Using main config file /etc/dehydrated/config
# INFO: Running /usr/bin/dehydrated as alien/wheel
# INFO: Using main config file /etc/dehydrated/config

To use dehydrated with this certificate authority you have to agree to their terms of service which you can find here: https://letsencrypt.org/documents/LE-SA-v1.2-November-15-2017.pdf

To accept these terms of service run `/usr/bin/dehydrated --register --accept-terms`.

What did we learn here?
In order to use dehydrated, you’ll have to register first. Let’s create your account and generate your private key!

Do not forget to set the “CA” value in /etc/dehydrated/config to a URL supporting ACMEv2. If you use the old staging server URL you’ll see this error: “Account creation on ACMEv1 is disabled. Please upgrade your ACME client to a version that supports ACMEv2 / RFC 8555. See https://community.letsencrypt.org/t/end-of-life-plan-for-acmev1/88430 for details.

With the proper CA value configured (you’ll have to do this both for the staging and for the production server URL) , you’ll see this if you run “/usr/bin/dehydrated –register –accept-terms”:

# /usr/bin/dehydrated --register --accept-terms
# INFO: Using main config file /etc/dehydrated/config
# INFO: Running /usr/bin/dehydrated as alien/wheel
# INFO: Using main config file /etc/dehydrated/config
+ Generating account key...
+ Registering account key with ACME server...
+ Fetching account ID...
+ Done!

Generate a test certificate

We’re  ready to roll. As said before, it is proper etiquette to run all your tests against the Let’s Encrypt ‘staging’ server and use their production server only for the real certificates you’re going to deploy.
Let’s run the command which is also being used in our weekly cron job, “/usr/bin/dehydrated -c”:

# /usr/bin/dehydrated -c
# INFO: Using main config file /etc/dehydrated/config
# INFO: Running /usr/bin/dehydrated as alien/wheel
# INFO: Using main config file /etc/dehydrated/config
+ Creating chain cache directory /etc/dehydrated/chains
Processing www.foo.net
+ Creating new directory /etc/dehydrated/certs/www.foo.net ...
+ Signing domains...
+ Generating private key...
+ Generating signing request...
+ Requesting new certificate order from CA...
+ Received 1 authorizations URLs from the CA
+ Handling authorization for www.foo.net
+ Found valid authorization for www.foo.net
+ 0 pending challenge(s)
+ Requesting certificate...
+ Checking certificate...
+ Done!
+ Creating fullchain.pem...
+ Done!

This works! You can check your web site now if you did not forget to add the SSL lines to your VirtualHost block; your browser will complain that it is getting served an un-trusted SSL certificate issued by “Fake LE Intermediate X1“.

Generate a production certificate

First, change the “CA” variable in “/etc/dehydrated/config” to the production CA URL “https://acme-v02.api.letsencrypt.org/directory”.
Remove the fake certificates that were created in the previous testing step so that we can create real certificates next:

# rm -r /etc/dehydrated/certs/www.foo.net

Now that we’ve cleaned out the fake certificates, we’ll generate real ones:

# /usr/bin/dehydrated -c
# INFO: Using main config file /etc/dehydrated/config
# INFO: Running /usr/bin/dehydrated as alien/wheel
# INFO: Using main config file /etc/dehydrated/config
Processing www.foo.net
+ Creating new directory /etc/dehydrated/certs/www.foo.net ...
+ Signing domains...
+ Generating private key...
+ Generating signing request...
+ Requesting new certificate order from CA...
+ Received 1 authorizations URLs from the CA
+ Handling authorization for www.foo.net
+ 1 pending challenge(s)
+ Deploying challenge tokens...
+ Responding to challenge for www.foo.net authorization...
+ Challenge is valid!
+ Cleaning challenge tokens...
+ Requesting certificate...
+ Checking certificate...
+ Done!
+ Creating fullchain.pem...
+ Done!

If you reload the Apache server configuration (using the command “apachectl -k graceful”) you’ll now see that your SSL certificate has been signed by “Let’s Encrypt Authority X3” and it is trusted by your browser. We did it!

Automatically reloading Apache config after cert renewal

When your weekly cron job decides that it is time to renew your certificate, we want the dehydrated script (which runs as a non-root account) to reload the Apache configuration. And of course, only root is allowed to do so.

We’ll need a bit of sudo magic to make it possible for the non-root account to run the “apachectl” program. Instead of editing the main file “/etc/sudoers” with the command “visudo” we create a new file “httpd_reload” especially for this occasion, in sub-directory “/etc/sudoers.d/” as follows:

# cat <<EOT > /etc/sudoers.d/httpd_reload
alien ALL=NOPASSWD: /usr/sbin/apachectl -k graceful
EOT

This sudo configuration allows user ‘alien’ to run the exact command “sudo /usr/sbin/apachectl -k graceful” with root privileges.

Next, we need to instruct the dehydrated  script to automatically run “sudo /usr/bin/apachectl -k graceful” after it has renewed any of our certificates. That is where the “HOOK” parameter in “/etc/dehydrated/config” comes to play.

As the hook script, we are going to use dehydrated’s own sample “hook.sh” script that can be downloaded from https://raw.githubusercontent.com/lukas2511/dehydrated/master/docs/examples/hook.sh or (if you used the SlackBuilds.org script to create a package) use “/usr/doc/dehydrated-*/examples/hook.sh”.

# cp -i /usr/doc/dehydrated-*/examples/hook.sh /etc/dehydrated/
# chmod +x /etc/dehydrated/hook.sh

This shell script contains a number of functions, each is relevant and will be called at a certain stage of the certificate renewal process. The dehydrated script will provide several environment variables to allow a high degree of customization, and all of that is properly documented in the sample script, but we do not need any of that. Just at the end of the “deploy_cert()” function we need to add a few lines:

deploy_cert() {
# ...
# After successfully renewing our Apache certs, the non-root user 'alien'
# uses 'sudo' to reload the Apache configuration:
sudo /usr/sbin/apachectl -k graceful
}

That’s all. Next time dehydrated renews a certificate, the hook script will be called and that will reload the Apache configuration at the appropriate moment, making the new certificate available to visitors of your web site.

Summarizing

I am glad you made it all the way down here! In my usual writing style, the article is quite verbose and gives all kinds of contextual information. Sometimes that makes it difficult for the “don’t bother me with knowledge, just show me the text I should copy/paste ” user but I do not care for that.

I do hope you found this article interesting, and useful. If you spotted any falsehoods,let me know in the comments section below. If some part needs more clarification, just tell me.

Have fun with a secure web!

Eric

Continue reading

Reset The Net – 05 june 2014

ResetTheNet_05jun2014

Did I make you jump by showing the intrusive banner?

Today marks the start of a campaign, called Reset the Net, sponsored by digital rights groups and well-known Internet companies. It is meant to encourage both users of the Internet and companies with an active presence there, to take measures to prevent getting their data snooped by surveillance agencies. The campaign focuses on the promotion of privacy-enhancing tools.

Today’s launch of the campaign is not coïncidentally linked to the first anniversary of the publication of the leaked NSA documents through news articles online and on paper.

Last month saw the HeartBleed bug, today we are confronted with yet another bloody serious leak in OpenSSL., only a few days after the disclosiure of another serious leak in GnuTLS, the OpenSSL alternative. The Internet is never a safe place. Slackware is a fairly sane OS security-wise but the highest risk always comes from the user of that OS.

When you are on-line, act consciously, and think before you do. Guard your privacy and respect that of others. No, Edward Snowden is not a traitor. He sacrificed a lot in order to get the truth out there, and we should have respect for that, too.

Eric

City of Munich completes migration to Linux of 15000 desktops

munich_logoOn 12 december 2013, a full ten years after deciding to move away from the vendor-lock in that is called Microsoft Windows, the german city of Munich has completed the migration to their own Linux distribution called “LiMux“, a brand of Ubuntu with a KDE desktop environment. A full 15,000 computers are running Linux now. What an accomplishment!

The project had its setbacks but I applaud it for its successful ending. I know firsthand how hard it is to migrate institutions (governmental or commercial) to Linux – all my involvements have met with “death from above” meaning higher up in the hierarchy the decision was made to stop the pilots.

It is obvious that the commitment of the city counsil has been the crucial factor here. For the council, cost savings were not the goal, it was the realization that an external entity was able to dictate its terms to the city: to be precise, Microsoft required that all Munich computers would have to be upgraded from Windows NT to a newer version of the OS, and of  its Office Suite. At great cost since it affected 14,000 computers. In order to remove Microsoft from the equation, the “LiMux” project was started. During the ten years this project ran, Steve Ballmer visited the city in order to convince the council that they should reconsider and offered licenses for the Microsoft OS and Office suite at ridiculous discounts. But his words fell on infertile grounds.

Munich has calculated that it saved ten million euros by not upgrading their Windows software and instead going for Linux and Open Source. A number that has been disputed by several parties, including Microsoft. And to be honest, licenses are not the only cost factor in a migration like this, if you take into consideration rewriting/porting of critical software, educating people and running two IT infrastructures in parallel for a decade. A rock-solid conviction that freedom is more important than cost is required to stand fast against the big influencers. But Munich has a socialist majority, which has certainly helped to sustain the project through uncertain times. In this regard, when I look at my own dutch government, mostly my representatives are spineless and talking out of their asses. It’s not possible for me to point at someone who will get my vote and is member of a political party I hold in high esteem.

A shining example of the council’s commitment on the other hand, is the story told at LinuxTag 2013 by Peter Hoffman (LiMux project leader) about the time when Bill Gates himself spoke with the Major. At one point, Gates asked the Major what his reasons were for this Linux migration. The answer ‘We want more freedom” did not satisfy Gates, and he asked “Freedom from what?”. The major replied with “Freedom from you, Mr. Gates!'”

Read more about this epic voyage on the European Union’s JoinUp site, in Linux Magazin (in german) or on Tech Republic,  and of course the web site dedicated to the LiMux project (in german).

© 2024 Alien Pastures

Theme by Anders NorenUp ↑