My thoughts on Slackware, life and everything

Category: Hardware (Page 4 of 4)

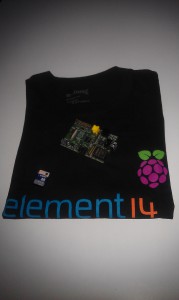
Raspberry Pi deserves Slackware

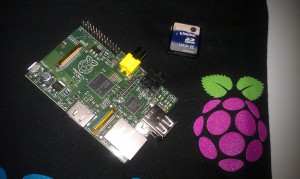
Some time ago I ran into this website promoting a very cheap computer the size of a credit card. The Raspberry Pi is being created by a charitable foundation. It is designed to “plug into a TV or be combined with a touch screen for a low cost tablet“. Typically its target is “teaching computer programming to children“, but such a cheap computing device will certainly have “many other applications both in the developed and the developing world“.

You have to see the device to believe it, I guess. The videos and photos look very promising. It’s not in production yet but according to the developer team’s schedule first shipments should commence before the end of the year.

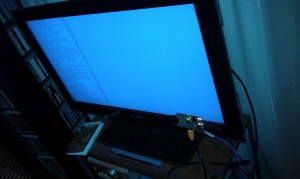
Its specifications are not stellar (256 MB of RAM will likely rule out the top-heavy desktop environments like KDE) but hey! it only costs 35 euros! And the ARM processor, a Broadcom BCM2835 SoC with a ARM1176JZF-S core seems to have good support in the Linux kernel (a patch that adds support to linux-3.0.4 is fairly trivial). Check out this video which shows the Raspberry Pi running Quake III in 1920×1080 resolution with 4x antialiasing.

There is a thread on LinuxQuestions which shows that it may in fact not be hard to boot Slackware – or rather, ARMedslack. Using the latest QEMU which supports the Broadcom’s ARM version, and a recent kernel compiled for ARM (see above), QEMU can successfully boot one of ARMedslack’s “mini rootfs” filesystem images.

So, I think that the Raspberry Pi deserves Slackware. If we are going to bring Slackware to the masses, this ARM device would be a nice vehicle. I am going to get myself one or two of them. Stuart Winter (ARMedslack developer) promised to help me with the nasty bits. We will see how this ends up – either incorporated into ARMedslack, or as a separate development tree hosted by me, or (nicest option but not a very realistic one perhaps) folded into the main Slackware tree. It would be cool to have the main tree expand to support a third architecture besides x86 and x86_64.

Cool, another project for my evergrowing TODO list! Oh my… I can’t even find the time to spend on another project that is itching at the back of my mind… I guess should at least make an effort to upload all of the OCR related packages I created a month ago.

Eric

Digitizing my paperback books

Part one: what do I want?

I hinted at this topic in a previous post. I have a big collection of (mostly) paperback Science Fiction books – some hardcover books too. I used to read a lot more in the pre-Internet days, nowadays it’s just during my holidays that I get enough time to read whole books in a short enough time… so many of those old paperbacks are 20-30 years old and yellowed.

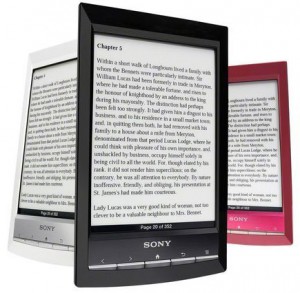
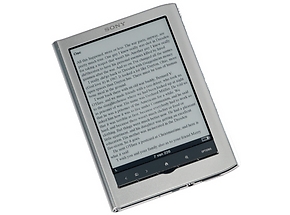
In this digital age it would be appropriate to have digital versions of my books and save them from crumbling to dust. I am in anticipation of Sony’s new e-reader, the PRS-T1 which I want to buy once it is out:

This is a very nice device. It is also a lot cheaper than the previous generation Sony e-reader (the PRS-650) while at the same time adding wireless connectivity. This device needs content once I have it in my possession.

A lot of the “newer” books, and those written by contenporary authors can be purchased online, or downloaded from fan sites where people scan their own collections into EPUB or MOBI e-books.  That is all good and well, but on my bookshelves I have many dozens good books that will probably never see a new life as an e-book. That is very unfortunate… I had a lot of fun reading them and do not want to see them go into oblivion.

I decided to do something about this. I am going to try and describe (and hopefully implement) how I am going to digitize my book library. Note: at the moment this is all just ideas, “dreams” if you wish, although I have already found quite a bit of information on the Internet that I will be sharing with you. I want it to be more than just a dream.

What does one need to get a paper book converted into an e-book?

  1. the book’s pages need to be scanned
  2. the scanned bitmaps may have to be cleaned-up digitally (enhancing the contrast between characters and background, de-skewing or rotating the text blocks, …)
  3. I need an Optical Character Recognition (OCR) program to convert the bitmap images into character text
  4. I need an e-book editor to layout the bare text that I got from the OCR program – the ebook has to look largely like the original paper version.
  5. I want to use a library program to make my book catalogue available, to myself of course, to my e-reader device, and possibly to other interested parties.

And I want this to be as low-cost as possible. Any software that I am going to use for this should preferably be Open Source and run on Slackware.

Those are the main topics I will write about. Each of these topics deserves its own separate article. Why is that?

I can already see how this project will confront me with interesting challenges. I am going to write a multi-post story with interlinked articles (this being the first) in order to preserve this hobby project of mine for posterity. Having separate topic articles allows me to split up your feedback as well (heh… I hope I do get some feedback!), so that discussions about, say, scanning techniques will not interfere with talk about what is the best OCR program for Linux.

The articles are not going to be “static” per se. I value your feedback and important new insights will find their way back into the main text.

Let’s see where this ends. It is probably going to take days, or weeks,  to write. It delends a bit on Slackware development – if that picks up speed again, I will have less time for this ebook side show. But for the moment , there is silence in the ChangeLog.txt and I have time to spare.

Eric

E-book management on Slackware

Managing your e-book collection

In an earlier post, I hinted about a Slackware package I was trying to create for Calibre. The reason being that I bought my wife an e-reader: a Sony PRS650 with a touch screen using infrared instead of a touch-sensitive layer and pearl e-ink technology. Both those features make for an extremely pleasant reading experience.

However, the Sony Reader software that accompanies the device, is a Windows-only application (of course…) and second, it is not all that much of an application either. Even for Windows, the usual advice you get it is to install Calibre for  managing your e-books – including uploading them to your device.

So, I needed to have Calibre available on my Slackware computers. In fact, I used to have a package for Calibre already! At some point in time the Calibre developer decided to increase the required version of the Python interpreter to 2.7.1. And since Slackware ships Python 2.6.6 to this day, I was no longer able to compile updated packages  (I got stuck at 0.7.23 but I guess it would have been possible to keep compiling Calibre as far as 0.7.45).

I still wanted a recent version of Calibre, the software has updates about once a week! So I spent quite a lot of time researching how I could add an embedded Python interpreter plus several supporting Python modules into the Calibre package.

And I think I succeeded. I have uploaded Slackware packages for calibre-0.8.6 to my repository yesterday (for Slackware 13.1 as well as Slackware 13.37). During the period where I did not actually have an e-reader at my disposition (it arrived at the house only a few days ago) I used the testing genius of my pal mrgoblin who happened to have an e-reader device in his possession. His beta tests made me realize that I was missing the dbus-python module which is needed for Calibre to recognize when a device is plugged into the computer.

I must say, using Calibre is a lot of fun! I have a small collection of e-books and after installing the Slackware package, I was able to transfer my books to the Sony device and read them there. Then, I managed to almost brick the device by ripping out the USB cable before selecting “Eject Device” in Calibre… let that be a warning for prospective users! It took a lot of reading about soft and hard resets before I had a working e-reader again. I had to reset the device to factory defaults – which means you lose all the books that were already present on the device. It was a good learning experience with only minor inconvenience (because I had transfered only two books to the e-reader at the time) but I kept feeling my wife’s prying eyes in the back of my neck… she was not too pleased with seeing her birthday present getting bricked only 15 minutes after unpacking it!

Calibre will also be very useful for everyone who owns a Kindle (Amazon’s own e-reader). The Kindle only accepts Amazon’s own MOBI format and refuses the “open” EPUB format (which is the most commonly used e-book format outside the US). Using Calibre, you can easily convert your EPUB collection to MOBI format – when you select an EPUB file and tell it to upload it to a Kindle, Calibre will show a dialog that prompts for the automatic conversion to the Kindle’s format. Perfect!

OK, enough talk. Get a package and/or SlackBuild script at:

and don’t forget to also install the icu4c and podofo packages; these two are the only dependencies now. If you want to build the package yourself, be warned if you are running Slackware-current. There is a bug in the “file” utility in Slackware-current which prevents it from recognizing a ZIP file as such, and this bug will cause the SlackBuild script to fail. Thanks to Francesco Allertsen who first ran into this issue and reported it to me, a quick fix is to change the line 235 in the calibre.SlackBuild script:

if $(file ${SOURCE[$i]} | grep -qi “: zip”); then

to:

if $(echo ${SOURCE[$i]} | grep -qi “.zip$”); then

I hope to see a fixed “file” soon. A bugfix has been applied to the file repository already, so file-5.08 should detect ZIP files correctly when it gets released.

Have fun! Eric

Wireless Ethernet Bridge

This weekend, I setup a Wireless Ethernet Bridge.

What the heck, I hear you say! I’d better explain why I did this, and what it actually means.

I have a wireless network in the house that extends to a large part of the rooms. Unfortunately we have thick walls and ceilings with a lot of steel-reenforced concrete, and this causes less-than-ideal wireless reception in parts of the house. The thick concrete walls do not invite drilling a lot of holes for CAT5 cables. I had to think of something else that minimized the drilling of holes and still gave me a network that covers all of the house.

I have been using a WRT54GL (its selling point being that it can easily be flashed with alternative Linux based firmware) until now. This gave me a wireless speed of 54 Mbit/sec (802.11g) maximum. I have flashed this router with an alternative firmware, tomato, which really helped me getting my Internet router stable and feature-rich while at the same time I was able to raise the transmission power a bit… but not enough.
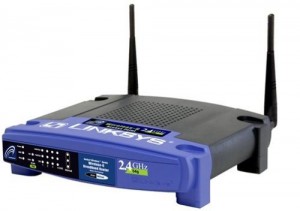
Linksys WRT54GL

So what I did was to buy a new wireless dual-band router with 802.11n speeds (300 Mbit/sec) which gives the existing wireless LAN a boost. This new router had to be capable of running tomato firmware too (because I am fond of it) and the dual-band gave me a way to leverage the old WRT54GL without killing the speeds of the larger wireless LAN: a dual-band router basically has two wireless access points built-in. I found the Cisco/Linksys E3000EW at a very interesting price (it is being followed up by a new device, the E4200). It also has an USB port (for connecting a hard drive or a printer) and I found that the tomatousb firmware (a successful mod of the tomato firmware) fully supports this device.
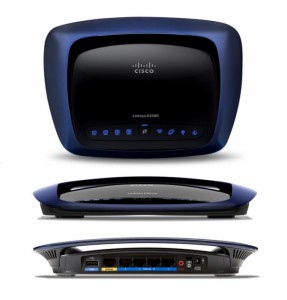
Cisco/Linksys E3000-EW

The E3000EW was switched on and two minutes later, the poor bugger was running tomato firmware! A firmware upgrade through HTTP upload using the standard Linksys firmware worked flawlessly.

Now the first task was to copy the configuration of the old WRT54GL to the new E3000EW. That was not too hard. AlsoI setup the two internal access points with two different ESSIDS of course. Then I quickly swapped the two (after “cloning” the WAN MAC address so that I would not have to go through my ISP’s provisioning setup again) and I had freed the WRT54GL for re-configuration into a Wireless Ethernet Bridge.

What was my plan? To position the WRT54GL in the house, nearby the area where wireless signals were weak because of the steel and concrete. Its position would be where I do have a good wireless connectivity. From that point on, I would run CAT5 cable from the WRT54GL to the computers that needed to be connected. This would mean, much less cable and much less drilling.

Actually, that was the final plan, which I implemented. Originally I wanted to create a distributed wireless network using WDS, which is a technique (supported by the tomato firmware) to connect multiple wireless access points. However, when I started reading about these techniques, it turned out that WDS effectively cuts your wireless network speeds in half with every “hop” that you create in your network. And I was not prepared for lower speeds… even though the advantage would be that I did not have to run new CAT5 cables. Access points with WDS still accept client connections, so all I would have to do was put the second AP in a location where it gave good coverage to the computers that suffered from problematic wireless reception.

The thing with Wireless Ethernet Bridging (WET) is this: the second Access Point, deployed to connect to the “master” and create the bridge, dedicates its wireless link to that bridged connection. It will no longer accept connections from wireless clients. It means that the computers need to connect to it using conventional cable!

It was a matter of weighing the pros and the cons. I decided on creating the bridge and using cables, because that would keep the maximum network speed acceptible.

So the old WRT54GL was reconfigured (using a network cable of course, you can not do this wirelessly). And it works surprisingly well! I am writing this article while my laptop is connected to this device using a cable and the traffic is bridged across the air. So, whoopee!

There are a few gotcha’s that I ran into, before I finally found out what it takes to successfully create a wireless bridge.

  • The “master” router (the E3000EW in this case) needs to be configured as a Wireless Access Point – that is the default, so I could leave that one alone.
  • The secondary router (the WRT54GL) needs to be configured, not as a gateway but as a router (in the tomato’s Advanced > Routing menu) or else your traffic is not going to reach the “master” router at the other end of the bridge.
  • The wireless security must be set to “WPA Personal”, with AES encryption (in the tomato’s Basic > Network menu). I had left this setting to “WPA/WPA2 Personal” at first, using AES for ecryption (this was what I used when the WRT54GL was still my Internet router), and it would refuse to connect to the wireless master. If you look more closely to the dropdown menu for the security settings, you’ll see that the tomato warns that WPA is the only accepted choice…
  • The WRT54GL can function as a wireless bridge without having an IP address assigned to it. However, you lose the ability to make a HTTP connection to the administrative interface – and someday that will prove to be very inconvenient. So I gave the router an unused IP address from my LAN address range.

Remember, when you setup a bridge, you are extending your network transparently. A network bridge passes network packets back and forth without dividing the network in two segments. Computers in the LAN will be unaware of the bridged connection – it does not show up in a traceroute. There is another solution for my problem that I have not gone deeper into, and that is to setup the WRT54GL as a “wireless client”. This creates a new network segment though… which requires that you run a DHCP server on the WRT54GL for the wired client computers that you connect to the device.

And yet another option is to install the “dd-wrt” firmware and configure the WRT54GL as a Wireless Repeater which allows you to connect your computers wirelessly to the device… but dd-wrt is not nearly as userfriendly as tomato. Pick your choice.

This is the network diagram I ended up with (courtesy of oldspeak where I also obtained the final piece of the puzzle):
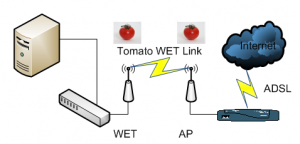
Wireless Ethernet Bridge

And what about powerline / homeplug, you ask?

I have considered that, and sometime ago, when my wireless conneciton problems became aggravating, I even wanted to buy a set of 200 Mbit Devolo mini adapters. They would give me 100 Mbit effective network speeds, but I still would have to buy a second wireless access point if I wanted to extend my wireless LAN, or else I would have had to use conventional cable. That made me decide to pick the geeky solution.

Eric
Re-encoding video for Android

So I bought myself a nice Android phone in april. It’s a HTC Desire, a real “tweakers’ phone”. It runs Android 2.1 – and before the end of the year, HTC should have an update to Android 2.2 available.

It is an impressive piece of work, and when I compare it to the iPhone or Windows Mobile based phones some of my friends/collegues carry with them, it clearly gives me a lot of freedom – I do not have any desire to “root” or “jailbreak” my phone in order to make it do what I want. I dream of putting Slackware on it, sometimes, but then I usually wake up fast… It’s a real Linux phone (with a SSH and a VNC client installed from the Android Market!), and the HTC Sense interface makes it just perfect and enjoyable as it is.

It goes without saying that I took a flat-fee Internet subscription; this kind of phone is not fully functional unless it is always online. I have been running a bandwidth metering app which told me that I transfered 440 MB in my first month. That would result in a pretty heavy bill if I did not have unlimited traffic.

I may write some more about my experiences with the Desire in future posts (so may exciting things to tell!), but for this one I want to talk about video playback on Android. Android has decent multimedia support out of the box, and audio as well as video players can make use of the standard codec libraries that the Android platform offers.

The “native format” I think you may call it that, for the Android seems to be H.264 video and AAC audio in a MP4 container. There are some limitations however, as people found out when trying unsuccessfully to play MP4  video files on their Android device that would not have had playback issues on a normal PC or mediabox.

Android only supports the H.264 baseline profile, meaning that some of the fancy encoding tricks that give you great video quality at lower bitrates (but require more processing power on playback) can not be used for videos you want to play on your Android device.

And rest assured, you do want to watch videos on the 800 x 480 pixel WVGA screen of the Desire! The AMOLED display has fantastic vibrant colours.

So, in order to create a video file that fits the display dimensions perfectly (without the scaling/resizing which would result in an ugly picture) and contains fully compatible MP4 video, I once again turned to my faithful companion… ffmpeg.

Here is a ffmpeg command line for you. This will take a video file (any supported format will work as input) and produce an Android-compliant MP4 file with WVGA dimensions (800 by 480 pixels). The input file will be transcoded in a two-pass process in order to achieve the best possible results. The transcoding will take a long time, so find something else to do in the meantime.

$ ffmpeg -i [inputfile] -threads 0 -vcodec libx264 \
    -vpre slow_firstpass -vpre baseline -b 480k -r 13 \
    -acodec aac -ab 128k -sameq \
    -pass 1 -f rawvideo -an -y /dev/null && \
    ffmpeg -i [inputfile] -threads 0 -vcodec libx264 \
    -vpre slow -vpre baseline -b 480k -r 13 \
    -acodec aac -ab 128k -ac 2 -sameq -pass 2 [outputfile].mp4

If you are on Slackware, then you get lucky. My ffmpeg packages (the variant that supports AAC audio encoding) are right here: http://slackware.org.uk/people/alien/restricted_slackbuilds/ffmpeg/

Have fun experimenting!

Eric

Newer posts »

© 2024 Alien Pastures

Theme by Anders NorenUp ↑