 Here is a new installment in the series which teaches how you can run a variety of services on your own private cloud server for family, friends and your local community, remaining independent of any of the commercial providers out there.
Today we will look into setting up a media streaming platform. You probably have a subscription – or multiple! – for Netflix, Prime, Disney+, AppleTV, HBO Max, Hulu, Peacock or any of the other streaming media providers. But if you already are in possession of your own local media files (movies, pictures, e-books or music) you will be excited to hear that you can make those media available in really similar fashion to those big platforms. I.e. you can stream – and enable others to stream! – these media files from just about anywhere on the globe.
Once we have this streaming server up and running I will show you how to setup our Identity Provider (Keycloak) just like we did for the other services I wrote about in the scope of this article series. The accounts that you already have created for the people that matter to you will then also have access to your streaming content via Single Sign-On (SSO).
Check out the list below which shows past, present and future episodes in the series, if the article has already been written you’ll be able to click on the subject.
The first episode also contains an introduction with some more detail about what you can expect.
- Episode 1: Managing your Docker Infrastructure
- Episode 2: Identity and Access management (IAM)
- Episode 3 : Video Conferencing
- Episode 4: Productivity Platform
- Episode 5: Collaborative document editing
- Episode 6: Etherpad with Whiteboard
- Episode 7: Decentralized Social Media
- Episode 8 (this article): Media Streaming Platform
Setting up Jellyfin as an open source alternative to the big subscription-based streaming media platforms.- Introduction
- The good and bad of subscription-based streaming services
- Preamble
- Apache reverse proxy configuration
- Jellyfin server setup
- Prepare the Docker side
- Start your new server
- Initial runtime configuration
- Jellyfin Single Sign On using Keycloak
- Adding Jellyfin Client ID in Keycloak
- Creating Roles and Groups in Keycloak
- Add OIDC plugin to Jellyfin
- Configure the SSO plugin
- Add SSO button to the login page
- Start Jellyfin with SSO
- Jellyfin usage
- Initial media libraries for first-time users
- Scheduled tasks
- Further considerations
- Running Jellyfin at a URL with subfolder
- Custom background for the login page
- Conclusion
- Episode 9: Cloudsync for 2FA Authenticator
- Episode X: Docker Registry
Introduction
![]() Before we had on-demand video streaming services, linear television was basically the only option to consume movies, documentaries and shows in your home. The broadcasting company decides on the daily programming and you do not have any choice in what you would like to view at any time of any day. Your viewing will be interrupted by advertisements that you cannot skip. Of course, if there’s nothing of interest on television, you could rent a video-tape or DVD to watch a movie in your own time, instead of going to the theater.
Before we had on-demand video streaming services, linear television was basically the only option to consume movies, documentaries and shows in your home. The broadcasting company decides on the daily programming and you do not have any choice in what you would like to view at any time of any day. Your viewing will be interrupted by advertisements that you cannot skip. Of course, if there’s nothing of interest on television, you could rent a video-tape or DVD to watch a movie in your own time, instead of going to the theater.
Actually, Netflix started as an innovative DVD rental company, sending their customers DVD’s by regular postal mail. They switched that DVD rental service to a subscription model but eventually realized the potential of subscription-based on-demand video streaming. The Netflix as we know it was born.
![]() Nowadays we cannot imagine a world without the ability to fully personalize the way you consume movies and tv-shows. But that creates a dependency on a commercial provider. In this article I want to show you how to setup your own private streaming platform which you fully control. The engine of that platform will be Jellyfin, This is a fully open source program, descended from the final open source version of Emby before that became a closed-source product. Jellyfin has a client-server model where the server is under your control. You will learn how to set it up and run it as a Docker container. Jellyfin offers a variety of clients which can connect to this server and stream its content: there’s a client program for Android phones and Android TV, WebOS, iOS and there’s always the web client which is offered to browsers that connect to the server’s address.
Nowadays we cannot imagine a world without the ability to fully personalize the way you consume movies and tv-shows. But that creates a dependency on a commercial provider. In this article I want to show you how to setup your own private streaming platform which you fully control. The engine of that platform will be Jellyfin, This is a fully open source program, descended from the final open source version of Emby before that became a closed-source product. Jellyfin has a client-server model where the server is under your control. You will learn how to set it up and run it as a Docker container. Jellyfin offers a variety of clients which can connect to this server and stream its content: there’s a client program for Android phones and Android TV, WebOS, iOS and there’s always the web client which is offered to browsers that connect to the server’s address.
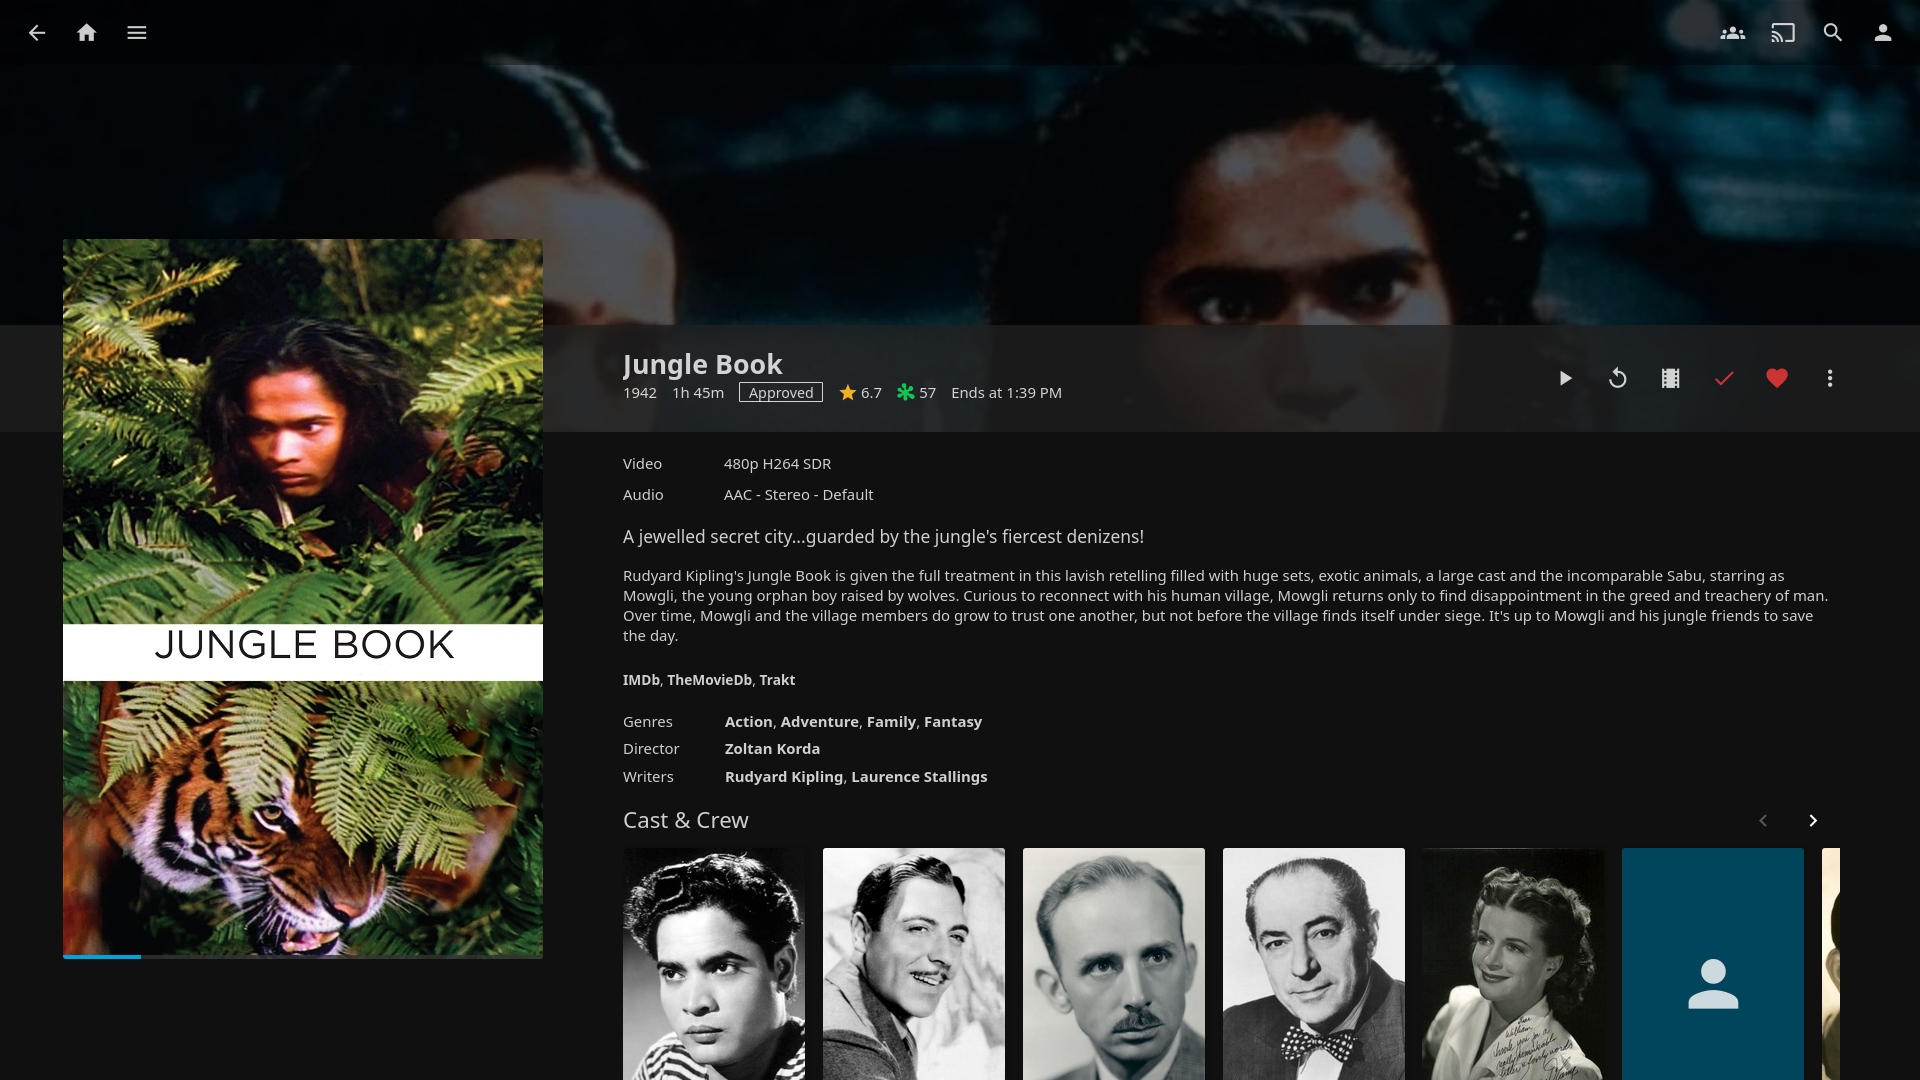
The Jellyfin interface for clients is clean and informative, on par with commercial alternatives. The server collects information about your local content from online sources – as scheduled tasks or whenever you add a new movie, piece of music or e-book.
The good and bad of subscription-based streaming services
The Netflix business model has proven so successful that many content providers followed its lead, and present-day we are spoiled with an abundance of viewing options. If there’s anything you would like to watch, chances are high that the video is available for streaming already. The same is true for music – a Spotify subscription opens up a huge catalog of popular music negating the need to buy physical audio CD media.
The flipside of the coin is of course the fact that we are confronted with a fundamentally fragmented landscape of video streaming offerings. There’s a lot of choice but is that good for the consumer?
Streaming video platforms strategically focus on exclusive content to entice consumers into subscribing to their service offering. Exclusive content can be the pre-existing movie catalog of a film studio (see MGM+, Paramount+, Disney+ and more) or else entirely new content – movies/series that are commissioned by a streaming platform. Netflix, Apple TV, Amazon Prime are pouring billions of euros into the creation of new content since they do not have a library of existing content that they own. Social media are used as the battle field where these content providers try to win you over and subscribe. News outlets review the content which premieres on all these platforms and you read about that and want to take part in the excitement.
The result is that you, the consumer, are very much aware of all those terrific new movies and series that are released on streaming platforms, but the only way to view them all is to pay for them all. The various platforms will not usually license their own cool stuff to other providers. So what happens? You subscribe to multiple platforms and ultimately you are paying mostly for content you’ll never watch.
Worse, there seems to be a trend where these subscription fees are increasing faster than your salary is growing, and on top of that, the cheaper subscriptions not just reduce the viewing quality but also force you to watch advertisements. At that point you are basically back at where you were trying to get away from: linear television riddled with ads from which you cannot escape.
The big companies make big bucks and have created an over-priced product which sucks. The consumer loses.
Bottom-line, any subscription based service model gives you access to content for as long as you pay. And sometimes you even need to pay extra – simply to have a comfortable viewing experience. You do and will not own any of that content. When you cancel your subscription you lose access to the content permanently.
In order to gain control over what you want to view, where and when, there is quite the choice when it comes to setting up the required infrastructure. Look at Kodi, Plex, Emby or Jellyfin for instance. All of those programs implement private streaming servers, with slightly different goals. The catch is that they can only stream the content which you already own and store on local disks. Did you already back up your DVD’s and music CD’s to hard-disk? Then you are in luck.
Preamble
This section describes the technical details of our setup, as well as the things which you should have prepared before trying to implement the instructions in this article.
For the sake of this instruction, I will use the hostname “https://jellyfin.darkstar.lan” as the URL where users will connect to the Jellyfin server.
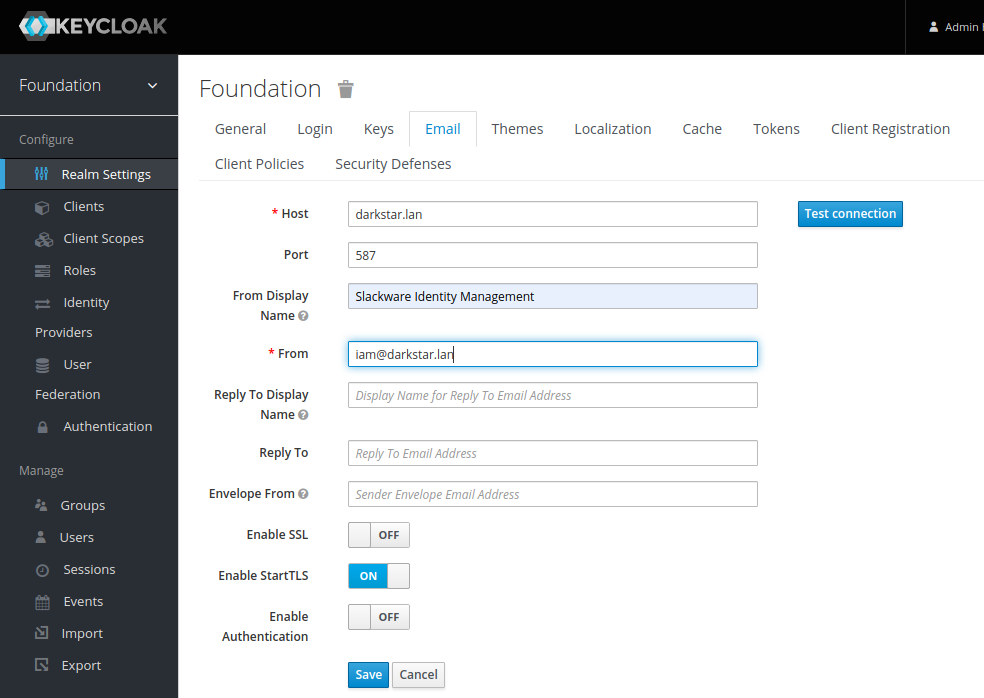
Furthermore, “https://sso.darkstar.lan/auth” is the Keycloak base URL (see Episode 2 to read how we setup Keycloak as our identity provider).
Setting up your domain (which will hopefully be something else than “darkstar.lan”…) with new hostnames and then setting up web servers for the hostnames in that domain is an exercise left to the reader. Before continuing, please ensure that your equivalent for the following host has a web server running. It doesn’t have to serve any content yet but we will add some blocks of configuration to the VirtualHost definition during the steps outlined in the remainder of this article:
- jellyfin.darkstar.lan
I expect that your Keycloak application is already running at your own real-life equivalent of https://sso.darkstar.lan/auth .
Using a Let’s Encrypt SSL certificate to provide encrypted connections (HTTPS) to your webserver is documented in an earlier blog article.
Note that I am talking about webserver “hosts” but in fact, all of these are just virtual webservers running on the same machine, at the same IP address, served by the same Apache
httpdprogram, but with different DNS entries. There is no need at all for multiple computers when setting up your Slackware Cloud server.
Apache reverse proxy configuration
We are going to run Jellyfin in a Docker container. The configuration will be such that the server will only listen for clients at a single TCP port at the localhost address (127.0.0.1).
To make our Jellyfin available for everyone at the address https://jellyfin.darkstar.lan/ we are using a reverse-proxy setup. This step can be done after the container is up and running, but I prefer to configure Apache in advance of the Jellyfin server start. It is a matter of preference.
Add the following reverse proxy lines to your VirtualHost definition of the “jellyfin.darkstar.lan” web site configuration and restart httpd:
# ---
# Required modules:
# mod_proxy, mod_ssl, proxy_wstunnel, http2, headers, remoteip

ProxyRequests Off
ProxyVia on
ProxyAddHeaders On
ProxyPreserveHost On

<Proxy *>
  Require all granted
</Proxy>

# Letsencrypt places a file in this folder when updating/verifying certs.
# This line will tell apache to not to use the proxy for this folder:
ProxyPass "/.well-known/" "!"

<IfModule mod_ssl.c>
  # Tell Jellyfin to forward that requests came from TLS connections:
  RequestHeader set X-Forwarded-Proto "https"
  RequestHeader set X-Forwarded-Port "443"
</IfModule>

# To work on WebOS TV, which runs the Jellyfin client in an I-Frame,
# you need to mitigate the SAMEORIGIN setting for X-Frame-Options
# if you configured this in your Apache httpd,
# or else you will just see a black screen after login:
Header always unset X-Frame-Options env=HTTPS

# Jellyfin hosted on https://jellyfin.darkstar.lan/
<Location /socket>
  ProxyPreserveHost On
  ProxyPass "ws://127.0.0.1:8096/socket"
  ProxyPassReverse "ws://127.0.0.1:8096/socket"
</Location>

<Location />
  ProxyPass "http://127.0.0.1:8096/"
  ProxyPassReverse "http://127.0.0.1:8096/"
</Location>
# ---
Jellyfin server setup
Prepare the Docker side
The Jellyfin Docker container runs with a specific internal user account. In order to recognize it on the host and to apply proper access control to the data which will be generated by Jellyfin on your host, we start with creating the user account on the host:
# /usr/sbin/groupadd -g 990 jellyfin
# /usr/sbin/useradd -c "Jellyfin" -d /opt/dockerfiles/jellyfin -M -g jellyfin -s /bin/false -u 990 jellyfin
Create the directories where our Jellyfin server will save its configuration and media caches, and let the user jellyfin own these directories:
# mkdir -p /opt/dockerfiles/jellyfin/{cache,config}
# chown -R jellyfin:jellyfin /opt/dockerfiles/jellyfin
![]() If you want to enable GPU hardware-assisted video transcoding in the container, you have to add the
If you want to enable GPU hardware-assisted video transcoding in the container, you have to add the jellyfin user as a member of the video group:
# gpasswd -a jellyfin video
Additionally you’ll require a dedicated Nvidia graphics card in your host computer and also install the Nvidia driver on the host, as well as the Nvidia Container Toolkit in Docker. This is an advanced setup which is outside of the scope of this article.
With the preliminaries taken care of, we now create the ‘docker-compose.yml‘ file for the streaming server. Store this one in its own directory:
# mkdir /usr/local/docker-jellyfin
# vi /usr/local/docker-jellyfin/docker-compose.yml
… and copy this content into the file:
version: '3.5'
services:
  jellyfin:
    image: jellyfin/jellyfin
    container_name: jellyfin
    user: '990:990'
    network_mode: 'host'
    ports:
    - 8096:8096
    volumes:
    - /etc/localtime:/etc/localtime:ro
    - /opt/dockerfiles/jellyfin/config:/config
    - /opt/dockerfiles/jellyfin/cache:/cache
    - /data/mp3:/music:ro     # Use the location of your actual mp3 collection here
    - /data/video:/video:ro   # Use the location of your actual video collection here
    - /data/books/:/ebooks:ro # Use the location of your actual e-book collection here
    restart: 'unless-stopped'
    deploy:
      resources:
        limits:
          cpus: '2'
          memory: 1024M
    # Optional - alternative address used for autodiscovery:
    environment:
      - JELLYFIN_PublishedServerUrl="https://jellyfin.darkstar.lan"
    # Optional - may be necessary for docker healthcheck to pass,
    # if running in host network mode
    extra_hosts:
      - "host.docker.internal:host-gateway"
Some remarks about this docker-compose file.
- In green, I have higlighted the userIdNumber, the exposed TCP port and the URL by which you want to access the Jellyfin server once it is up and running. You will find these being referenced in other sections of this article.
- I show a few examples of how you can bind your own media library storage into the container so that Jellyfin can be configured to serve them. You would of course replace my example locations with your own local paths to media you want to make available. Following my example, these media directories would be available inside the container as “
/music“, “/video” and “/ebooks“. When configuring the media libraries on your Jellyfin server, you are going to point it to these directories. - From experience I can inform you that in its default configuration, the Jellyfin server would often get starved of memory and the OOM-killer would kick in. Therefore I give the server 2 CPU cores and 1 GB of RAM to operate reliably. Tune these numbers to your own specific needs.
- The ‘host‘ network mode of Docker is required only if you want to make your Jellyfin streaming server discoverable on your local network using DLNA. If you do not care about DLNA auto-discovery then you can add a comment in front of the
network_mode: 'host'line out or simply delete the whole line.
FYI: DLNA will send a broadcast signal from Jellyfin. This broadcast is limited to Jellyfin’s current subnet. When using Docker, the network should use ‘Host Mode’, otherwise the broadcast signal will only be sent to the bridged network inside of docker.
Note: in the case of ‘Host Mode’, the Docker published port (8096) will not be used. - You may have noticed that there’s no database configuration. Jellyfin uses SQLite for its databases.
Start your new server
Starting the server is as simple as:
# cd /usr/local/docker-jellyfin/
# docker-compose up -d
For now, we limit the availability of Jellyfin to only localhost connections (unless you have already setup the Apache reverse configuration). That’s because we have not configured an admin account yet and do not want some random person to hi-jack the server. The Apache httpd reverse proxy makes the server accessible more universally.
Note that the Jellyfin logfiles can be found in /opt/dockerfiles/jellyfin/config/log/. Check these logs for clues if the server misbehaves or won’t even start.
Initial runtime configuration
Once our Jellyfin container is up and running, you can access it via http://127.0.0.1:8096/
The first step to take is connect a browser to this URL and create an admin user account. Jellyfin will provide an initial setup wizard to configure the interface language, and create that first user account who will have admin rights over the server. You can add more users later via the Dashboard, and if you are going to configure Jellyfin to use Single Sign-On (SSO, see below) then you do not need to create any further users at all.
When the admin user has been created, you can start adding your media libraries:
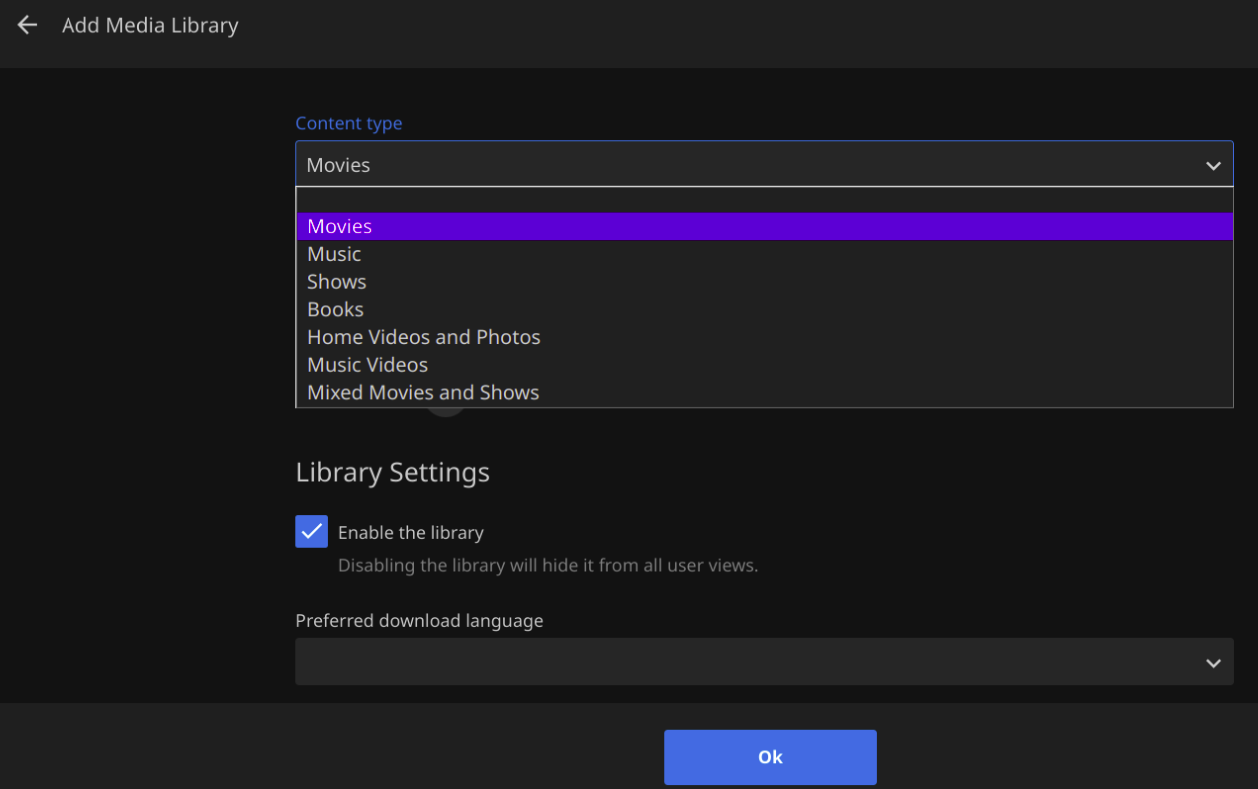
Depending on the content type which you select for your libraries, Jellyfin will handle these libraries differently when presenting them to users. Movies will be presented along with metadata about the movie, its actors, director etc while E-books will show a synopsis of the story, its author and will offer the option to open and read them in the browser. Picture libraries can be played as a slide-show. And so on.
The next question will be to allow remote access and optionally an automatic port mapping via UPnP:
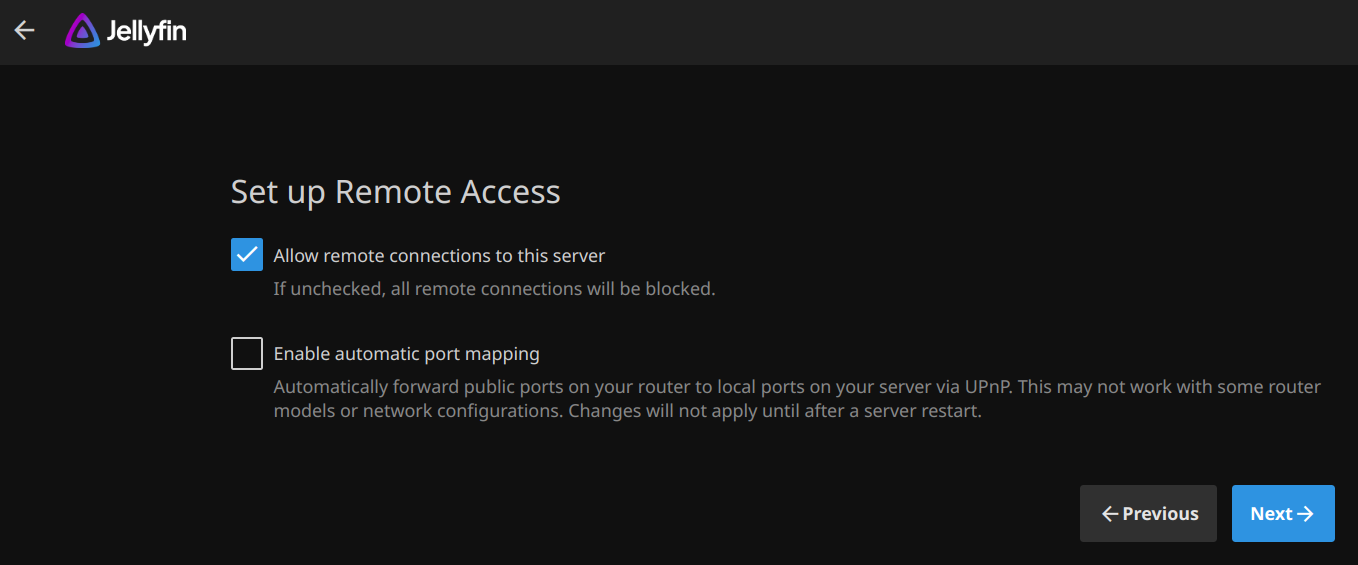
Leave the first checkbox enabled, since we want people to be able to access the streaming server remotely. Leave the UPnP option un-checked as it is not needed and may affect your internet router’s functioning.
This concludes the initial setup. Jellyfin will immediately start indexing the media libraries you have added during the setup. You can always add more libraries later on, by visiting the Admin Dashboard.
Jellyfin Single Sign On using Keycloak
Jellyfin does not support OpenID Connect by itself. However, a plugin exists which can add OIDC support. This will allow our server to offer Single Sign On (SSO) to users using our Keycloak identity provider.
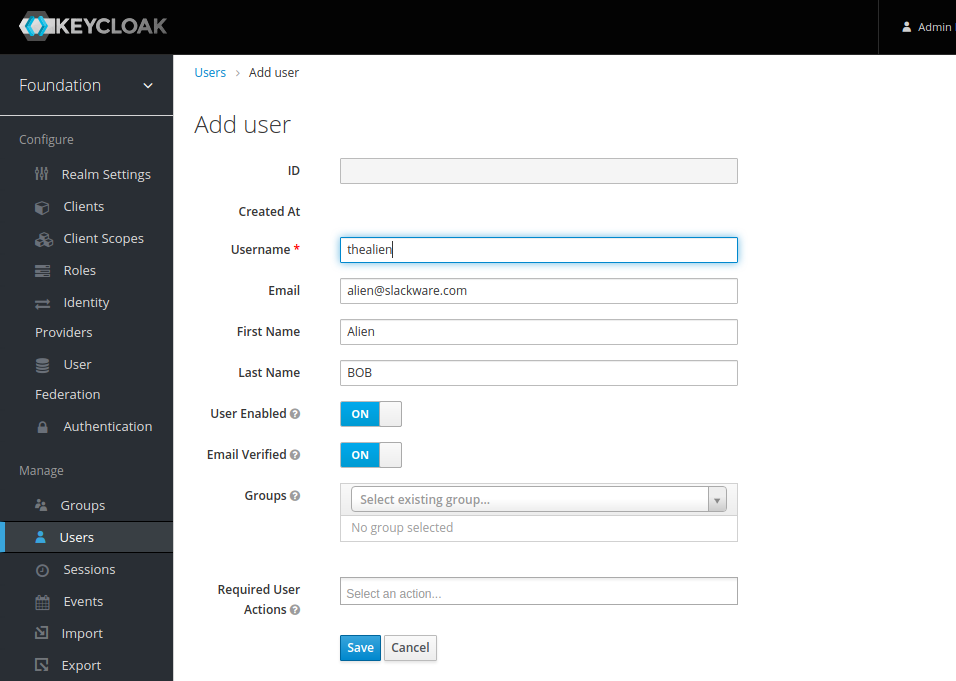
Only the admin user will have their own local account. Any Slackware Cloud Server user will have their account already setup in your Keycloak database. The first time they login to your Jellyfin server using SSO, the account will be activated automatically.
We will now define a new Client in Keycloak that we can use with Jellyfin, add the OIDC plugin to Jellyfin, configure that plugin using the newly created Keycloak Client ID details, add a trigger in the login page that calls Keycloak for Single Sign-On, and then finally enable the plugin.
Adding Jellyfin Client ID in Keycloak
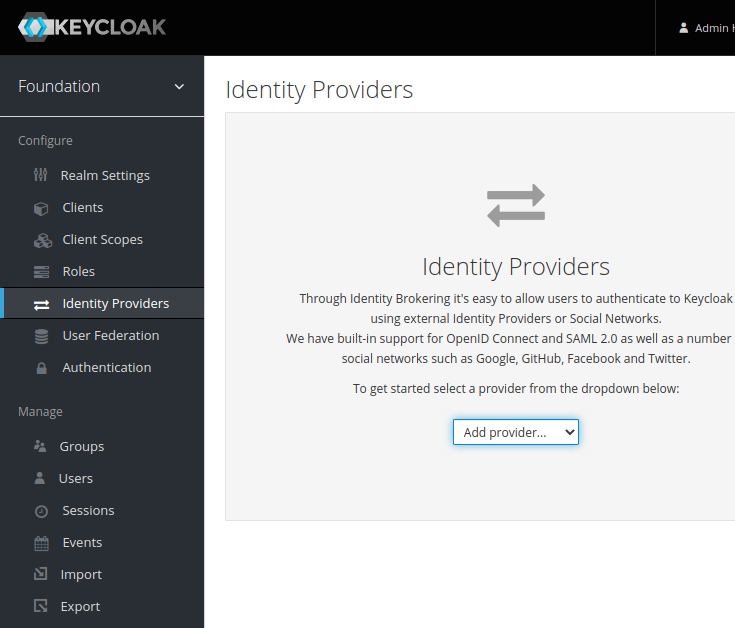
Point your browser to the Keycloak Admin console https://sso.darkstar.lan/auth/admin/ to start the configuration process.
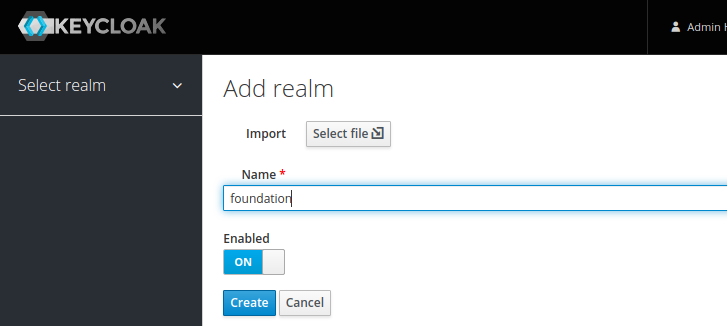
Add a ‘confidential’ openid-connect client in the ‘foundation‘ Keycloak realm (the realm where you created your users in the previous Episodes of this article series):
- Select ‘foundation‘ realm; click on ‘Clients‘ and then click ‘Create‘ button.
- ‘Client ID‘ = “jellyfin“
- ‘Client Type‘ = “OpenID Connect” (the default)
Note that in Keycloak < 20.x this field was called ‘Client Protocol‘ and its value “openid-connect”. - Toggle ‘Client authentication‘ to “On”. This will set the client access type to “confidential”
Note that in Keycloak < 20.x this was equivalent to setting ‘Access type‘ to “confidential”. - Check that ‘Standard Flow‘ is enabled.
- Save.
- Also in ‘Settings‘, allow this app from Keycloak.
Our Jellyfin container is running onhttps://jellyfin.darkstar.lan. We add- ‘Valid Redirect URIs‘ = https://jellyfin.slackware.nl/sso/OID/redirect/keycloak/*
- ‘Root URL‘ = https://jellyfin.darkstar.lan/
- ‘Web Origins‘ = https://jellyfin.darkstar.lan/+
- ‘Admin URL‘ = https://jellyfin.darkstar.lan
- Save.
To obtain the secret for the “jellyfin” Client ID:
- Go to “Credentials > Client authenticator > Client ID and Secret“
-
- Copy the Secret (MazskzUw7ZTanZUf9ljYsEts4ky7Uo0N)
This secret is an example string of course, yours will be different. I will be re-using this value below. You will use your own generated value.
Finally, configure the protocol mapping. Protocol mappers map items (such as a group name or an email address, for example) to a specific claim in the ‘identity and access token‘ – i.e. the information which is going to be passed between Keycloak Identity Provider and the Jellyfin server.
This mapping will allow Jellyfin to determine whether a user is allowed in, and/or whether the user will have administrator access.
- For Keycloak versions < 20.x:
- Open the ‘Mappers‘ tab to add a protocol mapper.
- Click ‘Add Builtin‘
- Select either “Groups”, “Realm Roles”, or “Client Roles”, depending on the role system you are planning on using.
In our case, the choice is “Realm Roles”.
- For Keycloak versions >= 20.x:
- Click ‘Clients‘ in the left sidebar of the realm
- Click on our “jellyfin” client and switch to the ‘Client Scopes‘ tab
- In ‘Assigned client scope‘ click on “jellyfin-dedicated” scope
- In the ‘Mappers‘ tab, click on ‘Add Predefined Mapper‘
- You can select either “Groups”, “Realm Roles”, or “Client Roles”, depending on the role system you are planning on using.
In our case, use “Realm Roles” and click ‘Create‘. The mapping will be created.
- Once the mapper is added, click on the mapper to edit it
- Note down the ‘Token Claim Name‘.
In our case, that name is “realm_access.roles“. - Enable all four toggles: “Multivalued”, “Add to ID token”, “Add to access token”, and “Add to userinfo”.
- Note down the ‘Token Claim Name‘.
Creating roles and groups in Keycloak
Jellyfin supports more than one admin user. Our initial local user account is an admin user by default. You may want to allow another user to act as an administrator as well. Since all other users will be defined in the Keycloak identity provider, we need to be able to differentiate between regular and admin users in Jellyfin. To achieve this, we use Keycloak groups, and we will use role-mapping to map OIDC roles to these groups.
Our Jellyfin administrators group will be : “jellyfin-admins”. Members of this group will be able to administer the Jellyfin server. The Jellyfin users group will be called: “jellyfin-users”. Only those user accounts who are members of this group will be able to access and use your Jellyfin server.
The Keycloak roles we create will have the same name. Once they have been created, you can forget about them. You will only have to manage the groups to add/remove users.
Let’s create those roles and groups in the Keycloak admin interface:
- Select the ‘foundation‘ realm; click on ‘Roles‘ and then click ‘Create role‘ button.
- ‘Role name‘ = “jellyfin-users“
- Click ‘Save‘.
- Click ‘Create role‘ again: ‘Role name‘ = “jellyfin-admins“
- Click ‘Save‘.
- Select the ‘foundation‘ realm; click on ‘Groups‘ and then click ‘Create group‘ button.
- ‘Group name‘ = “jellyfin-users“
- Click ‘Create‘
- In the ‘Members‘ tab, add the users you want to become part of this group.
- Go to the ‘Role mapping‘ tab, click ‘Assign role‘. Select “jellyfin-users” and click ‘Assign‘
- Click ‘Save‘.
- Click ‘Create group‘ again, ‘Group name‘ = “jellyfin-admins“
- Click ‘Create‘
- In the ‘Members‘ tab, add the users you want to be the server administrators.
- Go to the ‘Role mapping‘ tab, click ‘Assign role‘. Select “jellyfin-admins” and click ‘Assign‘
- Click ‘Save‘.
Add OIDC plugin to Jellyfin
Install the 9p4/jellyfin-plugin-sso github repository into Jellyfin:
- Go to your Jellyfin Administrator’s Dashboard:
- Click your profile icon in top-right and click ‘Dashboard‘
- Click ‘Plugins‘ in the left sidebar to open that section.
- Click ‘Repositories‘:
- Click ‘+‘ to add the following repository details:
Repository Name: “Jellyfin SSO”
Repository URL:
“https://raw.githubusercontent.com/9p4/jellyfin-plugin-sso/manifest-release/manifest.json“
- Click ‘+‘ to add the following repository details:
- Click ‘Save‘.
- Click ‘Ok‘ to acknowledge that you know what you are doing – this completes the repository installation.
- Now, click ‘Catalog‘ in the left sidebar.
- Select ‘SSO Authentication‘ from the ‘Authentication‘ section.
- Click ‘Install‘ to install the most recent version (pre-selected).
- Click ‘Ok‘ to acknowledge that you know what you are doing – this completes the plugin installation.
After installing this plugin but before configuring it, restart the Jellyfin container, for instance via the commands:
# cd /usr/local/docker-jellyfin/
# docker-compose restart
Configure the SSO plugin
- Go to your Jellyfin Administrator’s Dashboard:
- Click your profile icon in top-right and click ‘Dashboard‘
- Click ‘Plugins‘ in the left sidebar to open that section.
- Click the ‘SSO-Auth‘ plugin.
- Add a provider with the following settings:
- Name of the OIDC Provider: keycloak
- OID Endpoint: https://sso.darkstar.lan/auth/realms/foundation
- OpenID Client ID: jellyfin
- OID Secret: MazskzUw7ZTanZUf9ljYsEts4ky7Uo0N
- Enabled: Checked
- Enable Authorization by Plugin: Checked
- Enable All Folders: Checked
- Roles: jellyfin-users
- Admin Roles: jellyfin-admins
- Role Claim: realm_access.roles
- Set default username claim: preferred_username
- All other options may remain unchecked or un-configured.
- Click ‘Save‘.
- Enable the plugin.
Note that for Keycloak the default role claim is ‘realm_access.roles’. I tried to use Groups instead of Realm Roles but ‘groups’ are not part of Default Scope. My attempt to configure ‘Request Additional Scopes’ and entering ‘groups’ resulted in ‘illegal scope’ error.
By default the scope is limited in Jellyfin SSO to “openid profile”.
Add a SSO button to the login page
Finally, we need to create the trigger which makes Jellyfin actually connect to the Keycloak identity provider. For this, we make smart use of Jellyfin’s ‘branding’ capability which allows to customize the login page.
- Go to your Jellyfin Administrator’s Dashboard:
- Click your profile icon in top-right and click ‘Dashboard‘
- Click ‘General‘ in the left sidebar
- Under ‘Quick Connect‘, make sure that ‘Enable Quick Connect on this server‘ is checked
- Under ‘Branding‘, add these lines in the ‘Login disclaimer‘ field:
<form action="https://jellyfin.darkstar.lan/sso/OID/start/keycloak">

<button class="raised block emby-button button-submit">

Single Sign-On

</button>

</form> - Also under ‘Branding‘, add these lines to ‘Custom CSS Code‘:
a.raised.emby-button {

padding: 0.9em 1em;

color: inherit !important;

}

.disclaimerContainer {

display: block !important;

width: auto !important;

height: auto !important;

}
Start Jellyfin with SSO
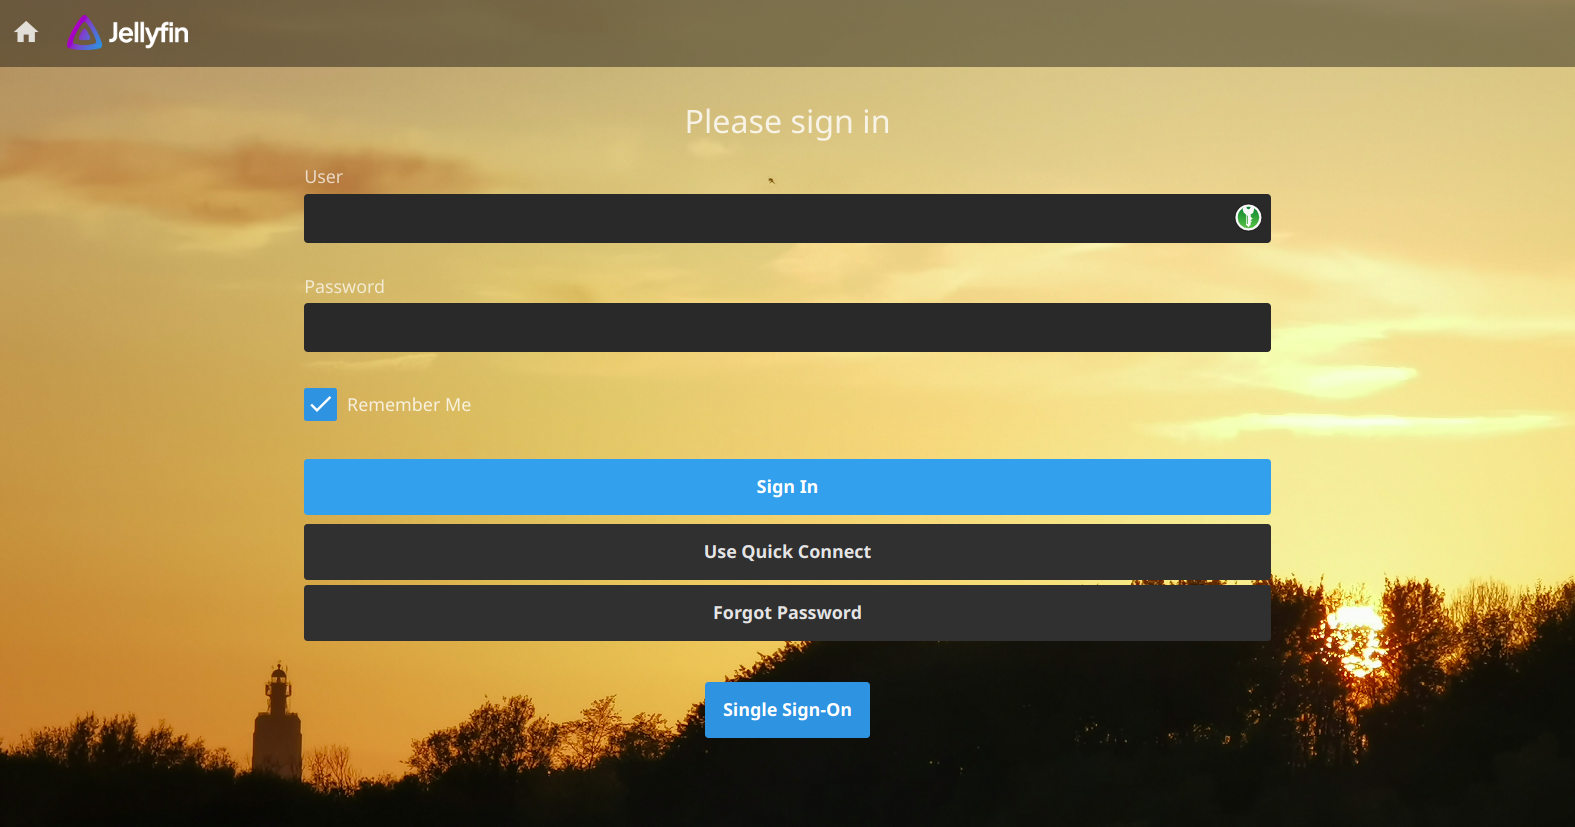
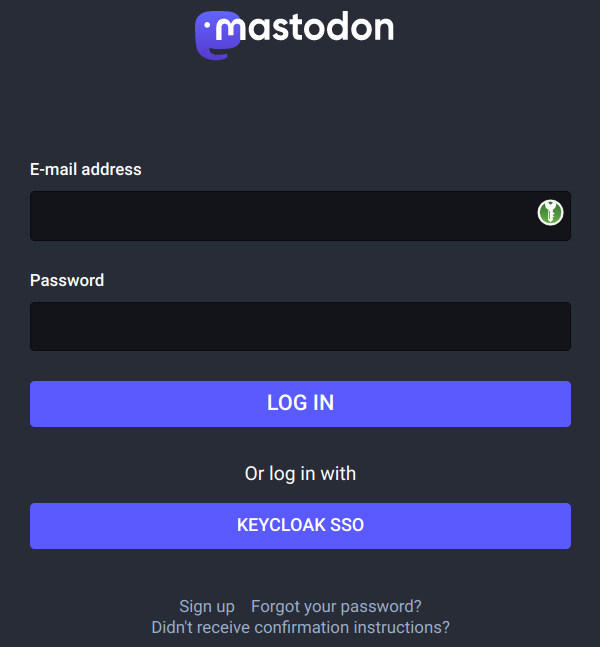
The jellyfin server needs to be restarted after configuring and enabling the SSO plugin. Once that is done, we have an additional button in our login page, allowing you to login with “Single Sign-On“.
Only the local admin user would still use the User/Password fields, but all other users will click the “Single Sign-On” button to be taken to the Keycloak login page; and return to the Jellyfin content once they are properly authenticated.
Jellyfin usage
Initial media libraries for first-time users
When you have your server running and are preparing for your first users to get onboarded, you need to consider what level of initial access you want to give to a user who logs in for the first time.
In the SSO Plugin Configuration section, the default access was set to “All folders” meaning all your libraries will be instantaneously visible. If you do not want that, you can alternatively enable only the folder/folders that you want your first-time users to see (which may be ‘None‘). Then, once a user logs into Jellyfin for the first time and the server adds the user, you can go to that user’s profile and manually enable additional folders aka media libraries for them.
Note that after re-configuring any plugin, you need to restart Jellyfin.
Scheduled tasks
In the Admin Dashboard you’ll find a section ‘Scheduled tasks‘. One of these tasks is scanning for new media that get added to your libraries. The frequency with which this task is triggered may be to low if you add new media regularly. This is definitely not as fancy as how PLEX discovers new media as soon as it is added to a library, but hey! You get what you pay for 🙂
You can always trigger a scan manually if you do not want to wait for the scheduled task to run.
Further considerations
Running Jellyfin at a URL with subfolder
Suppose you want to run Jellyfin at https://darkstar.lan/jellyfin/ – i.e. in a subfolder of your host’s domainname.
To use a subfolder you will have to do some trivial tweaks to the reverse proxy configuration:
# Jellyfin hosted on https://darkstar.lan/jellyfin
<Location /jellyfin/socket>
  ProxyPreserveHost On
  ProxyPass "ws://127.0.0.1:8096/jellyfin/socket"
  ProxyPassReverse "ws://127.0.0.1:8096/jellyfin/socket"
</Location>
<Location />
  ProxyPass "http://127.0.0.1:8096/jellyfin"
  ProxyPassReverse "http://127.0.0.1:8096/jellyfin"
</Location>
More importantly, you also need to set the “Base URL” field in the Jellyfin server. This can be done by navigating to the “Admin Dashboard -> Networking -> Base URL” in the web client. Fill this field with the subfolder name “/jellyfin” and click Save.
The Jellyfin container will need to be restarted before this change takes effect and you may have to force-refresh your browser view.
Custom background for the login page
You saw in the screenshot above that you can customize the backdrop for your login screen. To achieve that, add these lines to ‘Custom CSS Code’ and supply the correct path to your own background image:
/*turn background container transparent*/

.backgroundContainer{

background-color: transparent;

}

/*add image to loginPage only*/

#loginPage{

background-image: url("/graphics/mybg.jpg");

background-size: cover;

/*background-size: cover; scales image to fit bg*/

/*background-size: contain; repeat to fit bg*/
}
Note that the location "/graphics/mybg.jpg" translates to https://jellyfin.darkstar.lan/graphics/mybg.jpg for any web client, so that is where you will have to make it available via Apache on your host.
Conclusion
This concludes the instructions for setting up your private streaming server. I hope I was clear enough, but if I have omitted steps or made mistakes, please let me know in the comments section.
I hope you like this article and when you do implement a Jellyfin server, may it bring you lots of fun.
Cheers, Eric
 Twitter alternatives seem to be in high demand these days. It’s time to provide the users of your Slackware Cloud services with an fully Open Source social media platform that allows for better local control and integrates with other servers around the globe. It’s time for
 When you run a server that offers all kinds of web-based services, and you want all these services to be protected with an

Recent comments