My thoughts on Slackware, life and everything

Tag: alsa

PulseAudio comes to Slackware-current Beta

pulseaudio_medHah! Got you there! Oh wait – it’s true.

Yup folks, thanks to the new bluetooth stack in slackware-current (brought to you by BlueZ 5.x) we have introduced a dependency on PulseAudio. Bluetooth audio no longer accepts ALSA as the output driver.

So, Pat has added a pulseaudio package and with it, a lot of dependency packages: ap/pamixer l/alsa-plugins l/atkmm l/cairomm l/glibmm l/gtkmm3 l/json-c l/libasyncns l/libsigc++ l/pangomm l/speexdsp xap/pavucontrol and finally xfce/xfce4-pulseaudio-plugin

Also, we have a Beta!

Wed Jan 13 00:01:23 UTC 2016
Also, enjoy a shiny new LTS 4.4.0 kernel and consider this 14.2 beta 1.

Coming back to PulseAudio: the alsa-plugins package ensures that ALSA applications can remain unaware that PulseAudio is now handling audio in- and output. A file “/etc/asound.conf” will be installed by a recompiled “alsa-libs” package. This configures Pulse as the default audio device. Please take care in case you created a “/etc/asound.conf” yourself that you have to merge yours with the freshly installed “/etc/asound.conf.new” !

Several other Slackware core packages needed a recompile against PulseAudio, but note that you may not have to. As said before, ALSA output still works transparently, it’s just that ALSA’s output is now an input for PulseAudio which in turn controls your audio hardware.

Yes, some people will be opiniated. We invited the Devil into our house and stuff. Well, PulseAudio is not maintained by Lennart anymore, and saner people took the helm. We expect no big mess as a result, just a learning curve to understand the new sound configuration. And truthfully, we were left no choice. The alternative would have been to say bye-bye to bluetooth in Slackware because already, major pieces of software are dropping or preparing to drop support the old and incompatible BlueZ 4.x API.

Note: Slackware is NOT going to add systemd. It’s too controversial and there is no need. Your sleep will be sound now.

People who installed the Jack audio connection kit should probably carefully evaluate the possible changes to their configuration. I stopped using “jackd” here  so I can not tell you at the moment.

Happy hacking! Eric

Setting up Jack Audio in Slackware

Note: this article has been superseded by the (much less complex) instructions in a newer article “Configuring Slackware for use as a DAW“.

If you are using your computer as a Digital Audio Workstation (DAW) then the ALSA sound subsystem is just not up for the task. Musicians and audio professionals prefer to use Jack Audio on Linux. Let me quote from the Jack Audio web site:

What is JACK?

Have you ever wanted to take the audio output of one piece of software and send it to another? How about taking the output of that same program and send it to two others, then record the result in the first program? Or maybe you’re a programmer who writes real-time audio and music applications and who is looking for a cross-platform API that enables not only device sharing but also inter-application audio routing, and is incredibly easy to learn and use? If so, JACK may be what you’ve been looking for.

JACK is system for handling real-time, low latency audio and MIDI.

We “ordinary” users of Slackware don’t usually have a need for Jack. It makes your computer’s sound subsystem more complex, meaning that more things can go wrong (where you end up with distorted or even no sound) and that fixing things requires more knowledge.

However there are cases even for non-musicians to want to install Jack Audio. I am one of them. As I explained in my previous post, I want to record videos of programs running on my desktop, along with the comments I may record through a microphone. When I selected SimpleScreenRecorder as my tool for doing this, I found out that it needs Jack in order to record the audio (but come to think of it… after reading bradpit’s comment in the previous post I realize that there may be a way around Jack – something I will check out soon and report if I find anything worth mentioning).

This article is meant to show you how to install and configure Jack Audio, and how to configure ALSA so that applications will still have sound even if they are unaware of Jack (Jack grabs the computer’s sound hardware and won’t allow ALSA applications to use it).

The article will center around you, being the one behind the physical computer. No system file needs to be changed, all configuration is done in your own home directory, for your use only. If someone else logs in, he or she will not be bothered by Jack and everything will work as before.


Installing Jack Audio

In order to install Jack Audio, you need the following packages: jack and qjackctl.

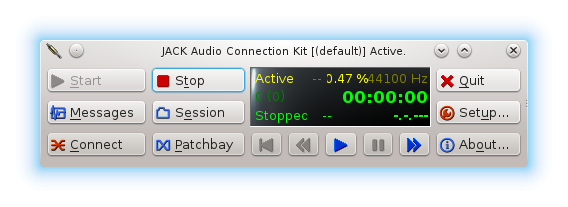
The qjackctl package contains the “de facto” configuration utility for Jack Audio, also called qjackctl. It is a Qt-based graphical program which allows you to configure “several JACK daemon parameters, which are properly saved between sessions, and a way control of the status of the audio server daemon” according to the program description. It also allows you to configure and autoload the patchbay and offers full connection control.

qjackctl_main

Configuring ALSA

The goal is to have a configuration where ALSA applications can access a “audio hardware” device even when the real device is locked by Jack Audio. That way, ALSA applications will not complain about unavailable audio hardware. I will show you how to provide ALSA with such a virtual hardware, and ensure that all sound which goes into that virtual hardware will be picked up by Jack and played through your speakers (hence the phrase “bridged”).

This “virtual hardware” is provided by the ALSA loop driver. When loaded into the kernel, this driver provides a pair of cross-connected devices, forming a full-duplex loopback soundcard.

First: load the kernel module (as root)

# /sbin/modprobe snd-aloop

You should add the above command-line to the file “/etc/rc.d/rc.modules” or to “/etc/rc.d/rc.local” so that the module will be loaded automatically on every boot.

The driver creates 8 independent substreams by default, but we need only two. Therefore you can add the following line to a (new) file called “/etc/modprobe.d/alsaloop.conf”:

options snd-aloop pcm_substreams=2

Next: write an ALSA configuration file which uses the new loopback devices

Create your ~/.asoundrc file as follows – if this file exists in your home directory, please back it up first!

# ------------------------------------------------------
# hardware 0,0 : used for ALSA playback
pcm.loophw00 {
  type hw
  card Loopback
  device 0
  subdevice 0
  format S32_LE
  rate 44100
}

# ------------------------------------------------------
# hardware 0,1 : used for ALSA capture
pcm.loophw01 {
  type hw
  card Loopback
  device 0
  subdevice 1
  format S32_LE
  rate 44100
}

# ------------------------------------------------------
# playback PCM device: using loopback subdevice 0,0
pcm.amix {
  type dmix
  ipc_key 196101
  slave {
    pcm "loophw00"
    buffer_size 8192
    period_size 4096
    periods 2
  }
}

# capture PCM device: using loopback subdevice 0,1
pcm.asnoop {
  type dsnoop
  ipc_key 196102
  slave {
   pcm loophw01
   period_size 4096
   periods 2
  }
}

# ------------------------------------------------------
# software volume
pcm.asoftvol {
  type softvol
  slave.pcm "amix"
  control { name PCM }
  min_dB -51.0
  max_dB   0.0
}

# ======================================================

# ------------------------------------------------------
# duplex device combining our PCM devices defined above
pcm.aduplex {
  type asym
  playback.pcm "asoftvol"
  capture.pcm "loophw01"
  hint {
    description "ALSA->JACK Loop Bridge"
  }
}

# ======================================================

# ------------------------------------------------------
# Mixer control definitions to keep JACK and some other apps happy
ctl.amix {
    type hw
    card Loopback
}

ctl.asnoop {
    type hw
    card Loopback
}

ctl.aduplex {
    type hw
    card Loopback
}

# ======================================================

# ------------------------------------------------------
# for jack alsa_out: looped-back signal at other end
pcm.ploop {
  type hw
  card Loopback
  device 1
  subdevice 1
  format S32_LE
  rate 44100
}

# ------------------------------------------------------
# for jack alsa_in: looped-back signal at other end
pcm.cloop {
  type hw
  card Loopback
  device 1
  subdevice 0
  format S32_LE
  rate 44100
}

# ======================================================

# ------------------------------------------------------
# default device

pcm.!default {
  type plug
  slave.pcm "aduplex"
}

When you save that file, its content will re-define your ALSA configuration with immediate effect. KDE may complain about hardware that was added or went missing, you can ignore that for now.

What these definitions do for ALSA, is to create a new full-duplex PCM device called “pcm.aduplex” with a description (which you will see mentioned in your programs’ ALSA device selectors) of “ALSA->JACK Loop Bridge”. What these definitions also do, is to create additional PCM devices for capture (pcm.cloop) and playback (pcm.ploop) which we will connect Jack to. That way, your ALSA applications are going to pipe their audio into one end of the loopback device and Jack will see this as incoming audio and play it on your speakers.

 You can test your new ~/.asoundrc file even though you will not hear a thing because the new virtual device is not yet connected to a real audio device (we will come to that in the next section). If you run the following command (under your own account – not as root) you should not see any error message:

$ aplay /usr/share/sounds/alsa/Front_Center.wav

Playing WAVE ‘/usr/share/sounds/alsa/Front_Center.wav’ : Signed 16 bit Little Endian, Rate 48000 Hz, Mono

If you see errors instead of the above text, then there is something wrong with the ~/.asoundrc file you just created.

Configuring Jack Audio

You should use qjackctl to configure the jack daemon. Jack installs a D-Bus service which qjackctl will connect to. Qjackctl can launch the daemon by itself or attach to an already running jack daemon (the qjackctl tray icon will be green if it had to start jackd and orange if it connected to an already running jackd).

qjackctl_setup_misc

Qjackctl will write the jack daemon configuration to a file in your homedirectory: ~/.jackdrc .It will write its own configuration to a different file: ~/.config/rncbc.org/QjackCtl.conf

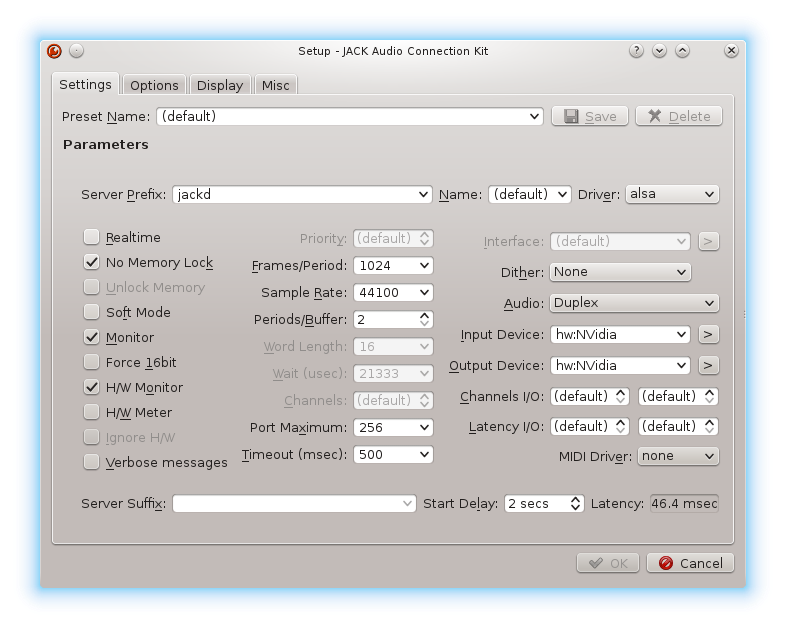
I found out that I needed to have a sampling frequency of 44100 (the Jack default) instead of what musicians usually use (48000) in order to prevent distorted sounds coming from ALSA applications (youtube flash videos!). Whatever frequency you choose, you will need to use the same sampling frequency in ~/.asoundrc (see above) and for jackd.

qjackctl_setup

Using qjackctl, you can easily configure jack to use the soundcard hardware to which your speakers are connected: it shows a list of available devices in a dropdown menu. If you want to construct the jackd command-line manually, the names of all hardware devices can be obtained by running the following command:

$ aplay -l
**** List of PLAYBACK Hardware Devices ****
card 0: NVidia [HDA NVidia], device 0: VT1708S Analog [VT1708S Analog]
  Subdevices: 2/2
  Subdevice #0: subdevice #0
  Subdevice #1: subdevice #1
card 0: NVidia [HDA NVidia], device 1: VT1708S Digital [VT1708S Digital]
  Subdevices: 1/1
  Subdevice #0: subdevice #0

The content of my ~/.jackdrc file looks like this:

/usr/bin/jackd -r -m -dalsa -r44100 -p1024 -n2 -m -H -D -Chw:NVidia -Phw:NVidia

The various jackd parameters all correspond to selections in the qjackctl dialog window.

Now when jack starts, it will still not know what to do with our modified ALSA configuration. A few commands need to be executed to form a bridge between ALSA and Jack using  the loopback driver. This is done most easily by creating a script file (for instance as user root create the file “/usr/local/bin/loop2jack” so that other users of your PC can use it as well) and in that file, add the following:

#!/bin/sh
#
# script loop2jack, located in /usr/local/bin
#
# Start jack if it is not already running:
/usr/bin/jack_control start
# loop client creation
/usr/bin/alsa_out -j ploop -dploop -q 1 2>&1 1> /dev/null &
/usr/bin/alsa_in -j  cloop -dcloop -q 1 2>&1 1> /dev/null &
# give it some time before connecting to system ports
sleep 1
# cloop ports -> jack output ports
/usr/bin/jack_connect cloop:capture_1 system:playback_1
/usr/bin/jack_connect cloop:capture_2 system:playback_2
# system microphone to "ploop" ports
/usr/bin/jack_connect system:capture_1 ploop:playback_1
/usr/bin/jack_connect system:capture_2 ploop:playback_2
# done
exit 0

Don’t forget to make the script executable:

chmod +x /usr/local/bin/loop2jack

This script should to be started after jackd has been started, but if jackd is not yet running, the script will start it for you. You can run it manually to see if there are any errors in your ~/.asoundrc file that you have to fix first. You can use qjackctl to run this script automatically when it starts:

qjackctl_setup_options

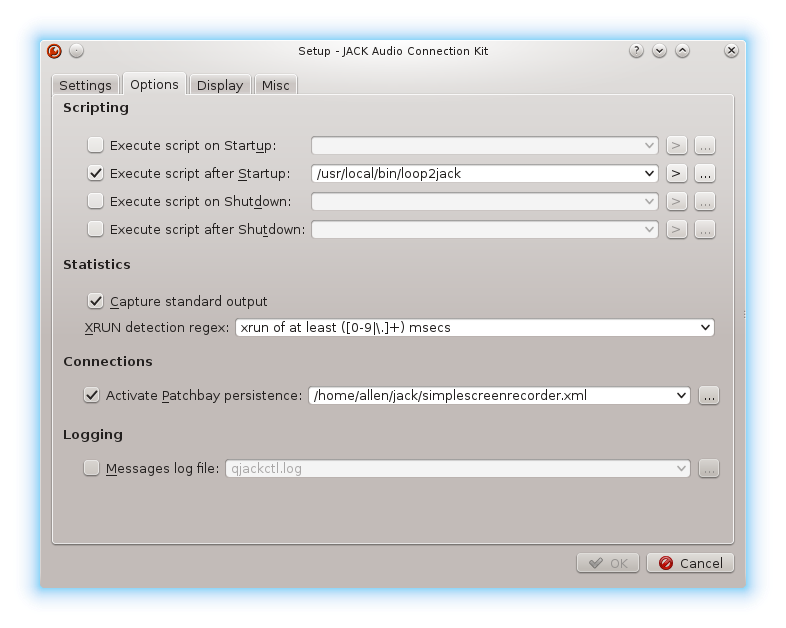
In the above screenshot you will also notice how the patchbay definitions are made persistent – I will show why this is important when I get to the section on SimpleScreenRecorder.


Starting Jack Audio

You will want to start the  jack daemon before any of your ALSA applications start! The ALSA driver grabs the audio hardware as soon as an application tries to make a sound using ALSA. Desktop Environments like KDE and XFCE have a feature called “session restore” which means that programs which were running when you logged out, will be started again – automatically – when you login again. A program like Skype, or even the startup sounds of your KDE desktop, will prevent Jack from launching properly.

If you are in runlevel 4 (graphical login) then you can start jackd by adding an appropriate command line in the following file: ~/.xprofile

If you are in runlevel 3 then you can start jackd from your normal login, using the file: ~/.profile

For instance, I have added this text to my ~/.xprofile :

# Create the bridge between ALSA applications and JACK output:
/usr/local/bin/loop2jack

… which will solve all timing issues: the loop2jack script will start the Jack daemon if it was not yet running, and it will bridge the ALSA and Jack in- and output channels using our virtual loopback device. This way, qjackctl does not even have to start anything (but we will not change the qjackctl configuration, in case you need to stop and restart Jack during a desktop login session).


Caveats

You have to keep in mind that running Jack is now required after making these modifications to your ALSA setup! When Jack is stopped (or not started) your ALSA sound system is no longer bridged to the physical sound card and you’ll hear nothing.

Also note that you may have a system-wide ALSA configuration file “/etc/asound.conf” which may interfere with your setup. Your own ~/.asoundrc definitions are added on top of the definitions in /etc/asound.conf and do not replace them.


Reverting this bridged ALSA-Jack setup

Reverting to the original Jack-less configuration is easy.

  1. Stop the Jack daemon using the qjackctl menu, and then stop qjackctl

  2. Remove or rename the file ~/.asoundrc (and restore your backup if you had an earlier version of this file)

  3. Remove or rename the file ~/.jackdrc

  4. Remove the invocation of “/usr/local/bin/loop2jack” from your ~/.xprofile and/or ~/.profile scripts.

The steps (1) and (2) are sufficient to restore the default ALSA behaviour and steps (3) and (4) ensure that Jack will not interfere at next login.

Getting audio into SimpleScreenRecorder (SSR)

In the “connections” window of qjackctl, my computer’s audio layout looks like this when I have started SimpleScreenRecorder (read my earlier post about this video recording tool):

qjackctl_connections_ssr

It’s a fairly simple layout with just a single Jack input client (being SSR) and a single output client (the entry “alsa-jack.jackP5161.0” which is the VLC program playing music).

The connections you see here between Jack’s “monitor” outputs (which were activated by checking the “Monitor” box in qjackctl’s setup dialog) and SSR’s inputs are automatically created when SSR connects to the Jack server. This happens because I defined these connections in qjackctl’s “patchbay” and let them be automatically activated. It seemed to be necessary this way because I could not get the monitor’s output to start inputting into SSR except by creating manual connections everytime.

qjackctl_patchbay_ssr

This is how I was finally able to record videos of (programs running on) my Slackware Linux desktop. Feedback highly appreciated!

Eric


A simpler solution (but not as robust)

There is another way to route the audio to and from ALSA-using applications when Jack is the sound server. In http://jackaudio.org/routing_alsa you can see how to use the “ALSA Jack PCM plugin” which creates a new PCM type called “jack”. This is a lot simpler to setup than the above article but it is not as robust and flexible. I used this solution for a little while and was happy with it – until I found out that it will not enable me to record audio with the SimpleScreenRecorder. So I had to abandon it.

You will need my alsa-plugins package for this. This package has two dependencies: jack (naturally) and ffmpeg. Note that if you want to use alsa-plugins and you are running 32-bit software which plays or records audio (think of Skype, Steam games) and you are on a 64-bit Slackware system, then you will additionally need multilib (of course) as well as “compat32” versions of the 32-bit ffmpeg and jack packages.


References

These pages have been helpful (most important info in the first link):

A journey into recording sound & video in Slackware

ssr When it comes to audio and sounds in Slackware, we’re happy to have
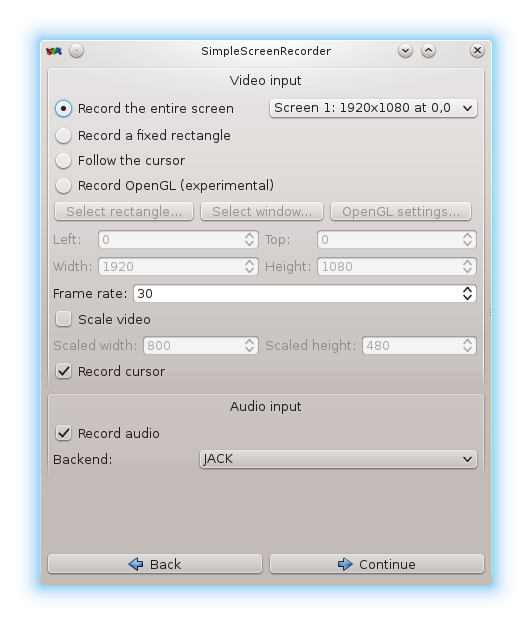
 ALSA as the sound subsystem. It works reliably, and has done so ever since it replaced OSS in Slackware all those years ago. In due course ALSA got capable of dynamically mixing multiple sound sources – which is basically what a sound server does, too. We were never plagued with the issues of other distros when they abandoned ALSA for PulseAudio.
When the Arts sound daemon of KDE was deprecated and finally removed with the release of KDE4, Slackware was left without a sound “server” that ran out of the box. We still have ESD, the Enlightened Sound Daemon but that one has limited use because of the wrapper programs it needs.
There are however scenarios where you wish Slackware had some sort of audio server. Until now, the only times when that thought crossed my mind it was related to streaming audio over a network – think of remote desktop sessions and virtual machines. I may write some more about that topic in a future post because I think I have the solution now – read on.

A more immediate need arose when I went looking for software that can record videos of my Slackware desktop – individual program windows and gameplay footage. My son is a huge Minecraft fan and wants to be able to do in Slackware what he already does with Fraps in Windows. My intention is to task him with creating some Slackware “end-user” videos to attract newcomers to the distro 🙂

It turns out that there really is not all that many good desktop video recording software in Linux land. I have tried recordmydesktop and like it well enough (that is how it ended up in Slackware’s “/extra” section) but it does not deliver stellar videos, in particular I don’t think it is suited for recording gameplay. It also produces OGG video only, which is OK since that gives you the only free and open video format and codecs… but I believe this design decision limits my options too much.

I read up on ArsTechnica’s attempts to record gameplay footage on SteamOS. To this day, the ArsTechnica folk have not found a way to record the audio of a game… apparently it is not as easy as you might think, to record OpenGL games. Programs like FFMPEG and VLC are able to record (parts of) your desktop but it is cumbersome and also does not deliver high-quality video with properly synced audio. These programs are not capable of intercepting OpenGL renders either, which limits their use.
So I went looking… and came across GLC, an ALSA & OpenGL recording software for Linux which was inspired by Fraps and Yukon, but it seems mostly abandoned by its author. Then there also is SimpleScreenRecorder, a relatively new piece of work by Maarten Baert. The program uses FFMPEG’s codecs to allow you to record audio and video into any format supported by the locally installed version of ffmpeg. It supports the recording of ALSA sound sources (think of a microphone). The word “simple” in its name only characterizes the ease-of-use, not the featureset! And it has a Qt-based GUI which nicely blends into my KDE desktop. By means of an OpenGL injection library it also supports direct recording of OpenGL renders (read: games). That should produce superior videos compared to merely recording the desktop window (because that produces lower frame rate videos or lower quality).

Unfortunately it turned out that SimpleScreenRecorder was not capable of recording my Slackware desktop’s sound, and therefore game videos are silent.
That is a show stopper… apparently you need a sound server like PulseAudio in order to record the audio as well. I am not prepared to install PulseAudio on Slackware – as you are well aware, this is a personal issue I have with the PA author and the way he writes code. So I investigated further, and found out that the unreleased GIT sources of SimpleScreenRecorder support JACK as a new sound source next to ALSA (and PulseAudio). I built the program from its GIT sources and then went on to learn about JACK Audio Connection Kit. I knew that JACK is primarily used by audio professionals and musicians because of its low-latency core design. But as it goes with versatile programs, it is inherently difficult to grasp its concepts and complex to configure. But I persevered and ultimately found a way to configure JACK on my desktop, and reconfigure my ALSA setup so that all the programs that I use can still emit sound, and SimpleScreenRecorder is now capable of recording video and audio! I put a demo video online which I recorded for the intro sequence from the Metro: Last Light game.

As you can see, the game stutters a bit, but that is not caused by the recording software – it’s my desktop PC which is just not fast enough for the game.

ssr_qtui

My next post will be about how I built and configured JACK, and what I had to change in my ALSA configuration so that for instance Steam games (using SDL for audio) and MineCraft (using OpenAL for audio) would still make sounds.

In the meantime, if you want to try SimpleScreenRecorder, there’s a couple of dependencies you need to install as well. SimpleScreenRecorder was built against ffmpeg (version 2.1 to be precise – please note that upgrades of ffmpeg will usually break a lot of applications that depend on it due to a change in library versions). Also, the package which I released has been built against jack – even if you do not plan on using it, you’ll have to install it… or you can rebuild SimpleScreenRecorder yourself.
If you want to use SimpleScreenRecorder to record 32-bit OpenGL programs (Steam games, WINE based games) and are running a 64-bit Slackware, it will have to be a multilib system and you will have to use the “convertpkg-compat32″ script (part of my compat32-tools package) to convert and install the 32-bits “compat32” versions of the simplescreenrecorder, ffmpeg and jack packages as well as the 64-bit versions.
If you want to try and record a Steam game without the Steam windows being visible (those are also rendered in OpenGL), you’ll definitely have to read these instructions: http://www.maartenbaert.be/simplescreenrecorder/recording-steam-games/#native-steam-for-linux because currently it involves some manual tweaking to get this working (I expect that this will get easier in time). Judging by his Wiki, Maarten is responsive to the users of his program and is able to write meaningful documentation.

Get packages (and sources) here:

Have fun! Eric

Steam games in Slackware

steamValve is updating its Steam client for Linux regualarly, fixing the issues which are reported by lots of interested Linux gamers. I was a bit behind with updating my Slackware remix of the client binaries but I have overcome the flue and pushed an update, bringing the steamclient package for Slackware to the latest version, 1.0.0.22.

I did not have to change a lot to the “steam” script which is part of the original debian/ubuntu package. Basically I had to ensure that Steam and its games will be using ALSA instead of PulseAudio since we do not use PA in Slackware. I also added a ‘hack’ which causes the steam startup script to execute a file “${HOME}/.steam4slackware” if it exists. You can add extra definitions of environment variables into that file if you run into sound issues. The default definition of “export SDL_AUDIODRIVER=alsa” may not be enough for you, perhaps something like adding “export AUDIODEV=hw” is needed for your system. Using “${HOME}/.steam4slackware” allows you to leave the steam script unmodified.

Another script which is present in the debian package and which is called every time Steam starts, is “/usr/bin/steamdeps”. Originally this was a Python script which checks (using apt) if you have all required dependencies installed, and will attempt to download and install any missing packages… that was too unfriendly to my liking, so I changed that script’s content to only display a message on standard output (which means you won’t even see that text if you start steam from the desktop menu). If anyone comes up with a decent Slackware alternative for “steamdeps” I”ll consider adopting it.

Gameplay

I have only played two of the available Linux games a lot so far. The Linux Steam client allows you to play the Linux Beta of Team Fortress 2 for free (and of course TF2 will remain free even after the beta) but I found that I am no longer so fond of fast-action, multi-player shooter games playing against hordes of unknown people. I like to team up with people I know… perhaps my age shows 😉

Luckily Valve published a new Beta game last week: their very first game Half-Life is now available as a native Linux game in Steam, and if you already own Half-Life (not the Source version, but the original game) in Steam  then you will get the Linux Beta of Half-Life added to your game inventory automatically! If you bought a CD of the game in the past (before Steam existed, like I did) then you can import its CD key into Steam and it will cost you nothing. Playing Half-Life brought back fond memories. I have been in Deathmatches with my son for hours this weekend (he is a Team Fortress 2 guy but was hooked  to HL and its interesting choice of weapons immediately).

Half-Life is of course an old game which every modern computer should play effortlessly. TF2 is built around the Source engine and is newer, but still my PC’s have no issues with it. I remember that Half-Life had measurable level load times, but on my current quad-core desktop, the load times are merely fractions of a second.

Sound works, in all games so far. I verified that I could use my microphone in Steam (View > Settings > Voice) by explicitly selecting the ALSA device instead of PulsAudio, but I have not yet tried in-game if the voice functionality actually works (I don’t like it when other people talk during a deathmatch, so I hesitate using voice myself).

Caveat: For some people (as seen on Google+), sound stops working when Steam updates itself (which can happen everytime you connect the client to the Steam platform) or even segfaults on startup. A hint from Valve’s developers on their bugtracker, indicates that you could try running “steam” as follows (must be done on a commandline):

STEAM_RUNTIME=0 steam

PulseAudio

One of the dependencies of this steamclient is the pulseaudio library. Installing that is no problem of course, but it had an undesired (at least for me) side-effect: I also have Skype for Linux on my desktop and KDE will autostart it when I logon. For some reason (probably because of the desktop autostart files “/etc/xdg/autostart/pulseaudio.desktop” and “/etc/xdg/autostart/pulseaudio-kde.desktop” which are installed by the pulseaudio package), Skype will see the pulseaudio sound system and grab that instead of using the ALSA drivers. There is no way around that except stopping Skype, killing the pulseaudio processes which have been started by Skype, and then starting Skype again. You can of course delete the above two files, but I found out that the following change to “/etc/pulse/default.pa” will also give Skype back its sound. This change tells PulseAudio to use ALSA for its output:

# Following two lines explicitly enabled to make PulseAudio use ALSA - Eric Hameleers
load-module module-alsa-sink device=dmix
load-module module-alsa-source device=dsnoop

# Commented-out because of two explicit load-module lines above - Eric Hameleers
#### Automatically load driver modules depending on the hardware available
#.ifexists module-udev-detect.so
#load-module module-udev-detect
#.else
#### Use the static hardware detection module (for systems that lack udev/hal support)
#load-module module-detect
#.endif
# End commented out - Eric Hameleers

If an application (like Skype) grabs the PulseAudio sound system, it will now be able to produce sound in your desktop.

Voice in Half-Life dedicated server games

half-life-logo I also saw on-screen messages about Half-Life not being able to use my microphone when I play Deathmatch on a HLDS – Half-Life Dedicated Server. The game tells me “Unable to initialize voice codec voice_miles. Voice disabled”. The miles codec is an old codec which is not very efficient, and Steam games switched to the speex codec which uses less bandwidth and apparently has better voice quality. The issue must be fixed on the server side

Add the following line to your “server.cfg” file:

sv_voicecodec voice_speex

Clients connecting to the server should now use the speex codec instead.

I setup a HLDS dedicated server on my Slackware LAN server / build box. That was not trivial at all, dammit! There’s lots of confusing information in Steam’s own knowledge base. Ten years ago I ran a half-life dedicated server on the Internet, but that was before the Steam era, and setting up a server was painless back then.

I have been playing Half-Life with my son on that server which is a lot of fun. I would like people to discover the joy of playing this old-skool game against their friends. So in one of my next blogs I will document how I have setup that server, so that you can repeat it.

Perhaps we will see a “Slackware” server appearing in the game tracker sometime!

Cheers, Eric


Adding an ALSA software pre-amp to fix low sound levels

Low sound volume in Linux?

Apparently a lot of laptop users are confronted with the issue of very low sound levels – not just in Slackware. Note that this is different from the “sound can not be un-muted” issue I experienced and which I wrote about in a previous article.

If you are among the affected users for whom the sound levels remain too low even when cranking the volume all the way up, there is away around this.

It works by enhancing the ALSA sound system with a sound pre-amplifier and adding that to the available controls. ALSA uses dmix to create the new software volume control. You can then play around with varying percentages of sound amplification. You will have to find an optimum between acceptible sound levels and the possible sound distortion which will be introduced by this pre-amp.

To add the software pre-amp system-wide you need to open the ALSA configuration file “/etc/asound.conf” in an editor (Slackware does not create that file by default, so you may have to edit a new file) and add the following definition to it (note that if you have multiple sound cards and the default is not “card 0” you may have to alter the definition a bit):

pcm.!default {
        type hw
        card 0
}
ctl.!default {
        type hw
        card 0
}
pcm.!default {
        type plug
        slave.pcm “softvol”
}
pcm.softvol {
        type softvol
        slave {
                pcm “dmix”
        }
        control {
                name “Pre-Amp”
                card 0
        }
        min_dB -5.0
        max_dB 20.0
        resolution 6
}

Then, save the file and reboot your computer (you could also try running “/etc/rc.d/rc.alsa restart” but I can not guarantee that that will re-initialize ALSA correctly).

After reboot, you will find an additional control in your mixer (alsamixer or kmix) called “Pre-Amp”. Note that KDE’s mixer does not show all controls by default and you may have to add “Pre-Amp” to the visible controls.

Eric

Addendum:

Note that initially I suggested the use of the block of code you find below. But when I installed Slackware 14 on my new desktop I experiences the same volume level issue. After adding a “pre-amp” I found that ALSA had lost its default device, which caused warning messages every time I logged into KDE and gives programs like aplay and mpg123 the fits. A comment by “d” further down in the article with the above solution worked much better for my desktop machine, so I decided to re-write this article even though I don’t usually do such a thing. I will keep the originally suggested code block below for reference – try it only if the code above does not work for you:

pcm.!default {
      type plug
      slave.pcm "softvol"
  }

  pcm.softvol {
      type softvol
      slave {
          pcm "dmix"
      }
      control {
          name "Pre-Amp"
          card 0
      }
      min_dB -5.0
      max_dB 20.0
      resolution 6
  }

If the Pre-amp control does not appear in your mixer window, you may have to replace the line that says:

type plug

with this line:

type hw

This information was taken from the unofficial ALSA Wiki: http://alsa.opensrc.org/index.php/How_to_use_softvol_to_control_the_master_volume and it was also offered as a solution in this LinuxQuestions.org post on the Slackware forum.

I received a report that the default block of code does not always work. Changing “plug” to “hw” may be necessary with some laptops.

http://www.alsa-project.org/alsalogo.gif

© 2024 Alien Pastures

Theme by Anders NorenUp ↑