My thoughts on Slackware, life and everything

Tag: sourdough

Sourdough weekday adventures

 Time for another lesson in baking a tasty sourdough bread. Sourdough breads are all the breads I eat nowadays.
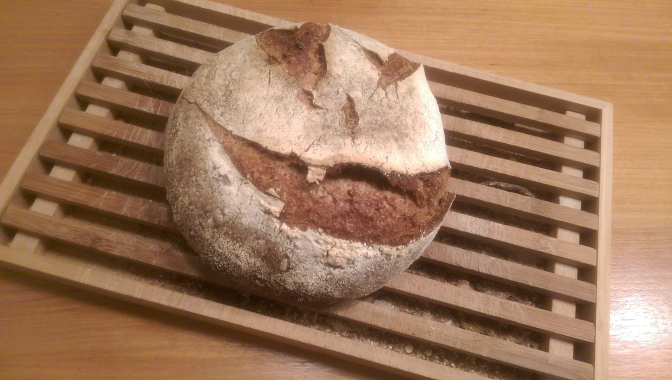
My son wanted me to “score” the bread in a smiley pattern but it turned out more like a Hallowe’en monster…
smiley_sourdough
Anyway, this sourdough loaf was created using another rhythm than my usual “bake one sourdough bread during a weekend day” routine.
This is how I fit it into my work routine.
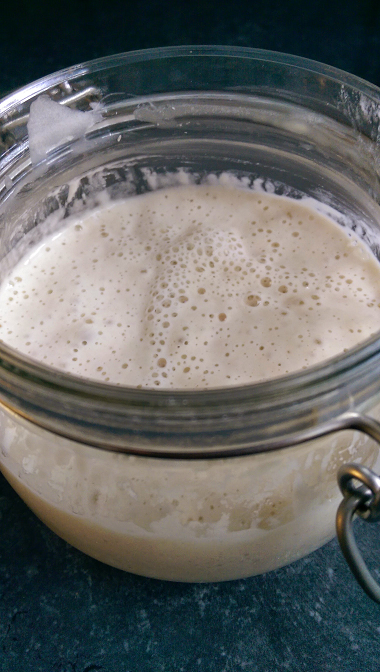
The 100 gr sourdough starter (100% hydration meaning equal weights of flour and water) which I used in the bread, was grown from a single tablespoon of starter. I mixed that with 50 gr flour and 50 gr water at 18:00 in the evening and let it ferment for 6 hours until midnight:
sourdough-starter_jar
The dough for the bread (adding 250 gr whole-wheat flour, 150 gr Waldkorn mix, 50 gr all-purpose flour, 330 gr lukewarm water, 15 gr vegetable oil and 7 gr salt) was then created using this starter at midnight. What I did first was combine all ingredients except oil and salt and autolyse this mix for 25 minutes. Then I added oil and salt and hand-kneaded the dough for 10 minutes.
The kneaded dough ball was left on the kitchen counter at room temperature, covered by plastic wrap in a bowl  (I had a good night’s sleep) until 08:00 the next morning at which time it had about tripled in size.
The dough was deflated carefully, pre-shaped, bench-rested for 15 minutes and then shaped into a boule and put into a basket. The basket went into the fridge inside a sealed plastic bag.
Off to work.
I came back home at 18:00 that evening, transfered the basket from the fridge to the kitchen table (the dough had doubled in size during the day inside the fridge) and set the oven to pre-heat to 250C for an hour, with a pizza stone inside.
At 19:00 I turned the basket over and dumped the dough onto a silicone mat. I scored he bread with a smiley pattern and shoved it onto the pizza stone.
Baked during 20 minutes at 240 C with steam, then 20 minutes at 210 C without steam.
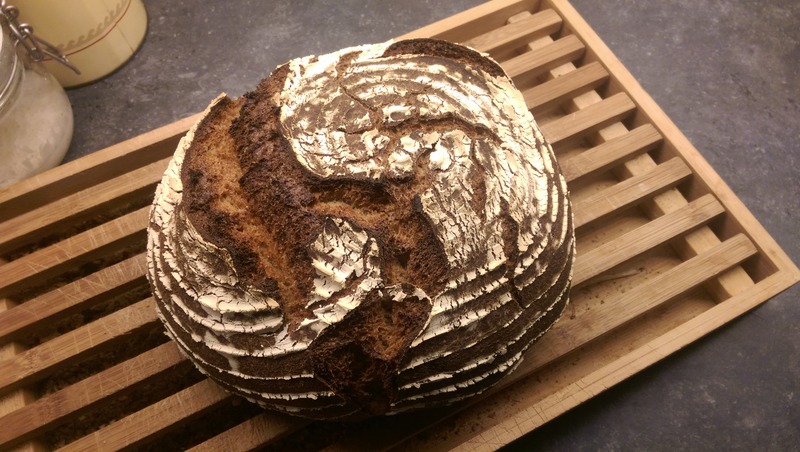
The result: impressive oven bloom, yummy bread with subtly more tones of sourness than my usual weekend breads that ‘only’ take 10 hours from start to finish.

Rye Honey Sourdough Bread

Not everybody follows the Google+ community “The art of bread”, so I will duplicate my post about a great bread I baked last week.

Last year during the christmas holiday, I started my bread baking hobby – basically everything created out of yeasted dough. In the beginning I used the regular “fast-action” yeast – commercial granulated yeast available in small sachets. But then I discovered the health benefits of “wild yeasts” and created several “sourdough starters” to experiment with those. It turns out that the breads I bake from my sourdough starters have so much more depth of flavour than the breads I bake with the fast-action commercial yeast… so that’s what we’ve been eating almost exclusively since spring season.

I felt it was time to create a rye sourdough starter this year’s christmas holiday period, to see how different the breads would be using this new starter compared to the wheat based starters I have used so far.
My first attempt to bake something with that new starter (a buckwheat and dried cherry sourdough bread) failed miserably because the dough collapsed just when I wanted to bake it (was it overproofed? Too much buckwheat?). I still baked the sticky mess in a dutch oven to keep it together somewhat… and the result was a very nicely tasting clump of very dense bread.The second attempt went a lot better:
rye_honey_sourdough
My wife gave me a book on sourdough by the Swedish baker/writer Martin Johansson. Using his recipe for Rye and Honey sourdough, I ended up with the big loaf in the picture. I never had a sourdough grow so much in volume during its bulk fermentation and proofing stages, it was amazing! This time, the dough kept its strength and structure and gave a perfect result. The added honey creates a beautiful dark and tasty crust, and the crumb is soft, with a delicious blend of the rye and acacia honey.
I never cared much for the rye bread we can buy in the shops here in the Netherlands, but I had been adding 10% rye to my whole-wheat sourdough breads lately and that really improved the flavor of my breads. I am glad I finally tried increasing the rye percentage.Here’s the recipe I followed (slightly adapted from the book).The night before you bake, create a levain – mix the following ingredients and leave them to develop overnight (covered under plastic wrap or a towel):

  • 50 gr rye sourdough (100% hydration)
  • 150 gr water
  • 65 gr rye flour (I used stone-milled whole-grain flour)
  • 35 gr whole wheat flour

The next day (in my case, appr. 10 hours later), mix the following together and leave to autolyse for 30 minutes:

  • yesterday’s levain
  • 30 gr honey
  • 165 gr water (tepid)
  • 325 gr strong white flour (I used  200 gr wholewheat and 100 gr plain flour instead)
  • 75 gr rye flour

After the 30 minutes autolyse, mix into the dough:

  • 8 gr salt

Knead the dough by hand for 10 minutes, then leave it in a covered bowl for its bulk fermentation stage. The recipe estimates this to be 3 to 5 hours, but after 3 hours my dough had expanded to more than double the original volume so at that point I decided to continue with the recipe.

Gently press the air out of the dough and fold it into a ball: stretch a bit of the dough to the side and fold it back to the center. Repeat this while rotating the mass of dough. This brings some tension into the skin of the dough ball you are forming.

Dust a round proofing basket with flour (or use any kind of bowl lined with a tea towel and sprinkle the towel generously with flour), and place the dough in the basket with the seam down (the seam-side will be facing upward in the oven, thus creating opportunity for the bread to crack open while baking). Cover the basket (or place it inside a big plastic shopping bag) to prevent draught from messing with it and leave it alone in your kitchen for a further 1.5 hours of proofing.

In the meantime, place an oven stone or pizza stone roughly in the middle of your oven (if you have one of course… the srone adds heat mass which is beneficial for common household ovens), and a metal tray on the oven floor. Pre-heat the oven to 240 C,

When the dough has proofed sufficiently (and roughly doubled in volume again), turn over the basket onto a silicone mat or a sheet of baking parchment, and shove that onto the baking stone in the oven.
Pour a cup of cold water into the metal tray on the oven floor – that will produce steam and develop a great crust.

Bake for 20 minutes on 240 C with the steam, then lower the temp to 210 C, open the oven door slightly to let the steam escape, close the door again and bake for a further 20 minutes.

The smell! The flavor! One of my best.

Waldkorn sourdough bread

Baking with sourdough has its consequences. You have to fit it into your work and life schedule – the fermentation/rising/proofing times are so much longer than when using  commercial fast-action yeast! You have to plan for a 9-hour time span from start mixing to pulling the baked bread out of the oven. Baking after-work is out of the question, so the weekends remain unless I want to get up very early or stay awake all night… not a long-term viable option.

In order to find a way that allows for work during the day, and baking sourdough bread at night, I changed this routine. I did the “bulk fermentation” (the first rise after kneading the dough into a ball) in the fridge at 4 degrees centigrade instead of at room temperature, and it turned out to be a success!

IMAG0529

Fermentation is actually a better name for the process of rising – the yeast consumes sugars and produces alcohol and CO2. The bacteria in the sourdough not only produce lactic and acetic acids but also develop the flavours in the dough. The longer you ferment the dough, the more flavour it gets! Chances are that your bread will become somewhat more sour as well, but I found no evidence of that in my breads.

That is why fermentation in the fridge is not a bad idea at all. The yeast’s metabolic rate is of course a lot lower in the fridge compared to room temperature, therefore the dough can be left alone for much longer when it sits in your fridge. That extra resting time enables me to divide the baking process up. I kept the dough in my fridge for 22 hours (!) and then took it out to warm up to kitchen temperature for two hours.

Ingredients:
100 gr sourdough starter (100% hydration meaning it consists of 50 gr AP flour and 50 gr water)
250 gr cold water
50 gr  AP flour
100 gr whole wheat
300 gr Waldkorn mix (a trademarked dutch multi-grain mix)
25 gr olive oil

7 gr salt

After the 8 o’clock news, I mixed the ingredients to incorporate all the moisture, and hand-kneaded it for 10 minutes (I love hand-kneading… never use a machine).
I then placed the ball of dough in an oiled bowl covered with cling film. That went into the fridge for 22 hours.
Next evening, I took it out of the fridge and left to acclimatize in the kitchen for 2 hours. Then I flattened the dough gently, and shaped it and put it in a flour-dusted proofing basket (a birthday present from my wife), and left it there (covered with cling film) for another 2 hours at room temperature.
I turned the risen dough over onto a baking tray covered with a silicone mat (ideal material for baking a bread, it does not stick), slashed the top and baked for 45 minutes (first 20 minutes at 235 degrees C with steam in the oven, then 25 minutes at 220 degrees C without steam).

The taste of the bread is great! it has complex and subtle flavours and, only the slightest hint of sourness despite the long fermentation time. The typical nutty-sweer flavour of the Waldkorn bread mix is altered by the sourdough’s own flavouring process. My son was not yet sure if he likes this better than the version I usually bake – using fast-action yeast instead of sourdough. Certainly, this sourdough bread is a lot smaller in size… which I like better than the “fluffiness” of the bread baked with commercial yeast.

It’s a win/win: the long fermentation time results in great flavour, and I can now bake sourdough at every day of the week if I want to 🙂

IMAG0527

The finished bread, together with my two sourdough starter cultures

© 2024 Alien Pastures

Theme by Anders NorenUp ↑