My thoughts on Slackware, life and everything

Tag: recipe

Rye Honey Sourdough Bread

Not everybody follows the Google+ community “The art of bread”, so I will duplicate my post about a great bread I baked last week.

Last year during the christmas holiday, I started my bread baking hobby – basically everything created out of yeasted dough. In the beginning I used the regular “fast-action” yeast – commercial granulated yeast available in small sachets. But then I discovered the health benefits of “wild yeasts” and created several “sourdough starters” to experiment with those. It turns out that the breads I bake from my sourdough starters have so much more depth of flavour than the breads I bake with the fast-action commercial yeast… so that’s what we’ve been eating almost exclusively since spring season.

I felt it was time to create a rye sourdough starter this year’s christmas holiday period, to see how different the breads would be using this new starter compared to the wheat based starters I have used so far.
My first attempt to bake something with that new starter (a buckwheat and dried cherry sourdough bread) failed miserably because the dough collapsed just when I wanted to bake it (was it overproofed? Too much buckwheat?). I still baked the sticky mess in a dutch oven to keep it together somewhat… and the result was a very nicely tasting clump of very dense bread.The second attempt went a lot better:
rye_honey_sourdough
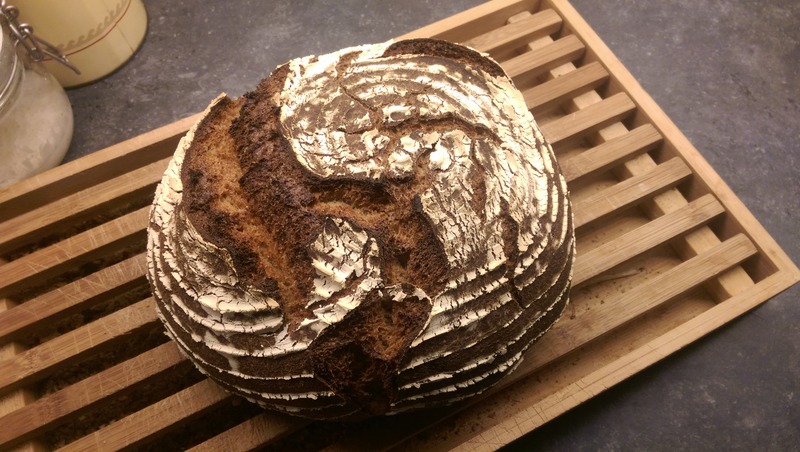
My wife gave me a book on sourdough by the Swedish baker/writer Martin Johansson. Using his recipe for Rye and Honey sourdough, I ended up with the big loaf in the picture. I never had a sourdough grow so much in volume during its bulk fermentation and proofing stages, it was amazing! This time, the dough kept its strength and structure and gave a perfect result. The added honey creates a beautiful dark and tasty crust, and the crumb is soft, with a delicious blend of the rye and acacia honey.
I never cared much for the rye bread we can buy in the shops here in the Netherlands, but I had been adding 10% rye to my whole-wheat sourdough breads lately and that really improved the flavor of my breads. I am glad I finally tried increasing the rye percentage.Here’s the recipe I followed (slightly adapted from the book).The night before you bake, create a levain – mix the following ingredients and leave them to develop overnight (covered under plastic wrap or a towel):

  • 50 gr rye sourdough (100% hydration)
  • 150 gr water
  • 65 gr rye flour (I used stone-milled whole-grain flour)
  • 35 gr whole wheat flour

The next day (in my case, appr. 10 hours later), mix the following together and leave to autolyse for 30 minutes:

  • yesterday’s levain
  • 30 gr honey
  • 165 gr water (tepid)
  • 325 gr strong white flour (I used  200 gr wholewheat and 100 gr plain flour instead)
  • 75 gr rye flour

After the 30 minutes autolyse, mix into the dough:

  • 8 gr salt

Knead the dough by hand for 10 minutes, then leave it in a covered bowl for its bulk fermentation stage. The recipe estimates this to be 3 to 5 hours, but after 3 hours my dough had expanded to more than double the original volume so at that point I decided to continue with the recipe.

Gently press the air out of the dough and fold it into a ball: stretch a bit of the dough to the side and fold it back to the center. Repeat this while rotating the mass of dough. This brings some tension into the skin of the dough ball you are forming.

Dust a round proofing basket with flour (or use any kind of bowl lined with a tea towel and sprinkle the towel generously with flour), and place the dough in the basket with the seam down (the seam-side will be facing upward in the oven, thus creating opportunity for the bread to crack open while baking). Cover the basket (or place it inside a big plastic shopping bag) to prevent draught from messing with it and leave it alone in your kitchen for a further 1.5 hours of proofing.

In the meantime, place an oven stone or pizza stone roughly in the middle of your oven (if you have one of course… the srone adds heat mass which is beneficial for common household ovens), and a metal tray on the oven floor. Pre-heat the oven to 240 C,

When the dough has proofed sufficiently (and roughly doubled in volume again), turn over the basket onto a silicone mat or a sheet of baking parchment, and shove that onto the baking stone in the oven.
Pour a cup of cold water into the metal tray on the oven floor – that will produce steam and develop a great crust.

Bake for 20 minutes on 240 C with the steam, then lower the temp to 210 C, open the oven door slightly to let the steam escape, close the door again and bake for a further 20 minutes.

The smell! The flavor! One of my best.
Recipe: traditional moussaka

Last weekend I prepared another diner which I had not cooked for a very long time.

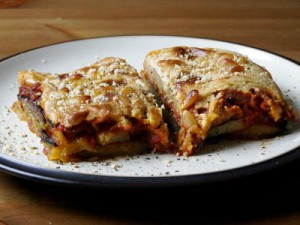
I love rich oven dishes, and traditional greek “moussaka” is a long-time favourite of mine. I learnt how to cook it while I lived in a student home.

There are many variants of moussaka which do not honour the original method of preparation. Things like potatoes do not belong in moussaka.. while cinnamon, oregano and lots of vegetable oil do belong! I try to follow a more traditional approach. Any greek readers, please come up with improvements if your Mom had a different recipe!

The result will be a heavenly smell in your kitchen while the dish is finishing in the oven. Your belly will be all warm and fuzzy after emptying your plate.

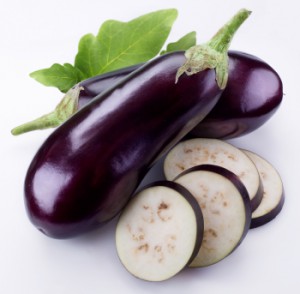
The prime ingredient in moussaka is the aubergine, or eggplant. This fruit (commonly mistaken for a vegetable!)  is one of the family of nightshades – like tomatoes, cayenne, and even tobacco. It’s easy to spot in the pic below that this is a fruit – it contains seeds. Like with tomatoes and potatoes, there is a certain bitterness in the eggplant which you can eliminate by “sweating”, steaming or grilling. I am going to grill the eggplant.

Another ingredient which deserves a separate mention, is the béchamel sauce. This sauce of butter, flour and milk is thought by many people to be difficult to make, but in fact it is dead easy, The béchamel, along with grated cheese, will create a beautiful soft-crunchy crust on top of the moussaka.

Ingredients (4 persons):

  • One eggplant
  • one onion, chopped up
  • three cloves of garlic, chopped up (do not squeeze them out)
  • 400 grams of minced lamb meat (beef will do as well)
  • one can of peeled tomatoes
  • 150ml olive oil (sunflower oil will do)
  • plenty of cinnamon and oregano
  • pepper, salt
  • 50 grams of butter
  • 50 grams of flour
  • 1/2 liter of milk
  • 200 grams of grated young cheese

Preparation:

  • Pre-heat the oven to 200°C
  • First we create the meat/tomato sauce. Heat a few tablespoons of oil in a pan, add the chopped onion and garlic and let it cook for a few minutes until the onion gets a nice golden-brown color. Keep stirring with a wooden spoon to prevent the garlic from getting black and bitter.
  • Add the minced meat, turn up the heat and let it cook for a few minutes until all of the meat has turned brown. Add salt and pepper to taste. Add lots of cinnamon powder and oregano. Don’t hold back! In this dish, more is better. In particular, you can never have too much cinnamon.
  • Leave the meat and onions to simmer on a low fire for a few minutes. Then turn up the heat under the pan again, and add the peeled tomatoes. If these are not chopped-up tomato parts, you cut the tomatoes up into smaller pieces before you add them to the pan. Allow the tomato to integrate with the meat and onions; there is a lot of liquid in the tomatoes which needs to boil away. Then turn down the heat and leave it to simmer on low heat with the lid on the pan. We will not need the meat sauce until later and we might just as well allow the flavors to mix for as long as possible – it will enhance the dish. Don’t forget to taste! It may require more salt and cinnamon.
  • We continue with the béchamel and the eggplant. You can work on these in parallel.

Eggplant:

  • If you have a grill-pan, put it on the stove and heat it up. If you do not have a grill-pan, you can do with a flat frying pan, or use the oven grill – we are going to grill the eggplant
  • Cut the top and bottom off the eggplant, removing the leaves. Cut the eggplant along its long side in slices of 0.5 cm (0.2 inch). Once exposed to the air, the slices will color brownish after a while so it is best to cut only a few slices at a time and apply the next step in the preparations.
  • Brush both sides of an eggplant slice with olive oil and place it in the grill-pan. Leave it on the grill for a minute or two and then turn it over. This will make it tender, eliminate the bitter taste and sweeten the eggplant. You can put several slices in the grill pan at a time, to speed up the process.

Béchamel:

  • Melt the butter in a pan (low heat) or in the microwave.
  • Add the flour (all at once) and keep stirring the mixture (with the heat kept low!) so that you get a smooth mixture. Let the mixture (the “roux”) cook on low heat for about 4 minutes, this will eliminate the floury taste. While stirring, take the pan off the fire from time to time to keep the flour from turning brown – we want the béchamel to keep its white color.
  • Gently, add the milk while you keep stirring the mix. Let it cook for another 10 minutes at least, stirring the béchamel sauce from time to time to keep it smooth and prevent burning. Then turn off the heat.

We continue with the final part:

  • Brush the inside of an oven dish with olive oil. More is better. The oil will prevent the eggplant from sticking to the dish when it bakes in the oven.
  • Cover the bottom of the oven dish with slices of grilled eggplant. On top of that, pour half of your meat/tomato sauce until it covers the eggplant. Then, add a new layer of eggplant slices and on top of that you pour the remaining half of the meat/tomato sauce. Sprinkle this with a generous amount of grated cheese. If you still have eggplant slices left, you can place those on top.
  • Grab the pan with the béchamel sauce,, and pour it over the other ingredients in the oven dish. It will trickle down into the dish, but the majority will remain on top. Sprinkle some more grated cheese over the béchamel. Not too much cheese, the béchamel must remain visible! We do not want a burnt cheese crust, we want to create a soft crust of cheese mixed with the béchamel.
  • Place the dish in the middle of your oven and let it bake for 20 minutes. The moussaka is ready when the crust starts turning light brown.

Serve it with some greek white wine like retsina.

I could eat this every week… but it took years to find an opportunity cook it because my son dislikes the taste of the eggplant. He still did not like it much… but he ate it all anyway.

Enjoy your meal!

Eric

Recipe: Spanish chicken

I cooked diner tonight and it was yummy… so I decided to write it down in the blog.

My son who was going to assist me in the kitchen asked to create “something with cheese” before I drove to the supermarket, so I complied and added cheese, but if you are going to cook this recipe, you will find that it works even better without the cheese.

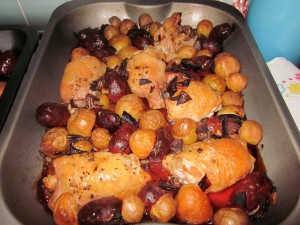
This “spanish chicken with chorizo and potatoes” is a variation on a recipe originally published by Nigella Lawson in her book Kitchen and to which I added some of my own ideas. It will cost you a minimum of effort to prepare this meal, since most of your time will be spent sitting in front of the oven and watching the chicken crackle and pop.

The result tastes deliciously because the combination of the spicy chorizo and the orange peel does wonders. I used an oven-proof pyrex dish which makes for a nice presentation when you serve it at the diner table.

Don’t take the amounts too seriously… this dish can not fail you. If you want, just add more chorizo and onion, or try and leave the tomatoes out.

Ingredients (4 persons):

  • 8 chicken drumsticks
  • one onion, cut into rings
  • two table spoons of vegetable oil (olive or sunflower)
  • black pepper, paprika powder
  • 500 grams of chorizo sausages
  • 600 grams of potatoes
  • 300 grams of cherry tomatoes, cut in halves
  • one orange
  • grated young cheese
  • dried oregano

Preparation:

  • Pre-heat the oven to 220°C
  • Cook the potatoes for about 10 minutes. If you do not cook them before they go into the oven, they might not be fully cooked when it is time to serve the dish.
  • While you are waiting for the poratoes, you can continue with the preparations. Pour two table spoons of vegetable oil into a shallow roast pan or pyrex oven dish and mix in a generous sprinkle of paprika powder and ground black pepper.
  • Add the chicken drumsticks to the oily mixture and use your hands to rub the oil into the skin of the drumsticks. If you like to keep your hands clean, you can just as well put the oil, spices and drumsticks into a plastic bag and mix the ingredients thoroughly, then dump them into the roasting pan. Make sure that the skin side of the chicken is pointing upward.
  • Add the chorizo sausages in between the drumsticks. If you bought a large chorizo, chop it up into chunks of a centimeter first.
  • Use a grater or a vegetable peeler to scrape the outer skin off the orange. be sure not to cut into the white inner skin! That tastes foul. We only want the orange outer skin. You end up with orange peel, or zest. Keep the zest. If you want, you can squeeze the juice out of the orange and drink it, we won’t need the juice for this recipe.
  • By now the potatoes will have cooked long enough. Cut them into slices of half a centimetre and place them inbetween the drumsticks, preferable on the bottom of the roasting pan so that they will be fried in the oil (children will love that)
  • The onion rings and the halved cherry tomatoes are placed in between the other ingredients
  • Sprinkle the orange peel on top – the aromatic smell of the zest is enough to make my mouth water!
  • Sprinkle generously with dried oregano
  • Put the dish in the oven and let it cook for 40 minutes. Be sure to open the oven door from time to time and watch those chickens sizzle!
  • If you want to try this with cheese, you have to get the dish out of the oven after 30 minutes and spread grated young cheese on top, accompanied by another sprinkle of oregano.. The final 10 minutes of oven time will allow for a nice layer of molten cheese.

I served this with a green salad mixed with ground nuts, raspberries and spicy cheese (cut into small cubes) and a vinaigrette of raspberry-flavored balsamico (the salad was another idea from my son, which he executed while I was busy with the chicken).

Enjoy your meal!

Eric

Recipe: Bogracs Gulyas

… or traditional Goulash stew – which might sound more familiar to you.

In my previous post I suggested that I might give you a food recipe, in an attempt to write about something different than software. After some thought, that actually sounded like a nice addition to Alien Pastures. So here we go.

I used to cook a lot when I was younger (as a student and after my study, before I became a father and life overwhelmed me). And a rather good one too if I may have my moment of not-so-humbleness. In the years that followed, I traveled a lot, got ever buysier with work and no longer was able to prepare a decent meal, instead depending on my dear wife for my diner. And she cooks a whole lot better than I ever did! All the good food, it made me lazy!

Then, before you know you’re ten years older and your son needs to get initiated in the art of cooking. We decided that he and I will cook diner once a week – in the weekends when I have the time to prepare things that may take hours. For me that was a nice way to get back my skills and learn new techniques and cook stuff my way.

One of those weekend days, I decided to make a goulash. Not the soup that everybody knows from the store, but the original Hungarian recipe which is somewhat between a soup and a stew.

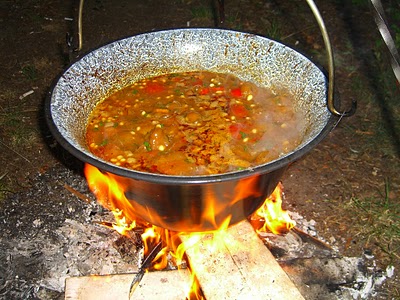
Photo by "Hungaro phantasto"

Hungary is known for its paprikas of course, and the goulash. You may not be aware, but the Gulyás were hungarian herdsmen who traveled across large parts of Europe with their cattle. They would cook their beef stew in large copper kettles above a wood fire – these kettles were called bogrács. This is how the traditional meal became known as “bogrács gulyás” – or just goulash. It took until the 18th century, when paprika and potato became widely known in Hungary, to turn the gulyás into the watery stew we all know and love.

Here is the recipe for 3 to 4 dishes (we are no meat eaters here,  so for some of you this may amount to only 2 to 3 dishes). Forgive me if I do not use the correct english words, I am used to write my recipes in dutch…

Ingredients:

  • 1 big onion, sliced into coarse pieces
  • 1 clove of garlic, cut into bits
  • 50 grams of butter
  • vegetable oil (olive or sunflower oil)
  • 1 tablespoon of mild paprika powder
  • pinch of hot paprika powder
  • pinch of salt & pepper
  • 400 grams of beef stew, cut into cubes
  • 1 teaspoon of caraway seeds
  • 1 tablespoon of thick tomato sauce –or- 3 to 4 peeled and chopped-up tomatoes
  • 1 green pepper (also called green paprika), cut into coarse pieces
  • ½ celery root (celeriac) or turnip, cut into cubes
  • 300 grams of potatoes, sliced into cubes

Preparation:

  • Heat the butter together with a generous sprinkle of vegetable oil in a large (iron) pot until the butter turns brown and stops sizzling.
  • Add the sliced onions and garlic, and sauté until they turn yellowish-brown.
  • Add the paprika powder and stir it through the onion. Add the beef cubes, the caraway seeds and a few tablespoons of hot water.
  • Sauté together until the meat begins to change colour, white to lightbrown. Keep stirring to prevent burning the onion. Sprinkle with the salt and pepper.
  • Simmer for 10 minutes, then add the tomato sauce (or the chopped tomatoes), the green paprika and the celery root.
  • Stir and mix the ingredients, then add half a liter of water, enough to cover the pot’s content.
  • Close the lid on the pot and leave the pot to cook on a small fire for two hours, until the meat is almost done.
  • Add the potato cubes (and salt to taste) and leave on the fire to cook for another 20 minutes.

Serve on hot plates with some bread on the side if you want.

Enjoy your meal tonight!

Eric

© 2024 Alien Pastures

Theme by Anders NorenUp ↑