My thoughts on Slackware, life and everything

Category: Recipes (Page 1 of 4)

Brabantse worstenbroodjes – take two

A year ago, I already wrote a lengthy article about Brabantse worstenbroodjes or dutch sausage rolls as you would call them in english. They are a regional delicacy in the area where I live, and have a unique flavor due to use of freshly ground nutmeg and a sizable amount of white pepper. You can read that older blog article with the recipe and the historical background here. So why am I re-visiting the subject of baking these Brabantse worstenbroodjes?

Brabantse worstenbroodjes

Brabantse worstenbroodjes

The biggest issue I had with then was that half of the bread rolls would inevitably tear in the oven and the meat juices would flow out, leaving a less pretty impression to the end product and causing the meat inside to dry out. So when I promised my team at work to return from holiday with a bunch of home-baked sausage rolls, I had to dive into online information about what causes this bread dough tearing in the oven.
And that resulted in a slightly altered recipe. In particular, the proofing stages for the dough are altered significantly. When following the below steps, the resulting bread rolls come out of the oven intact and with the meat nicely cooked in its own juices.

What are the basic premises for prevention of tearing the dough while baking in the oven?

  1. The dough should be supple by adding sufficient moist ingredients (water, butter): at least 60-65% of the flour content.
  2. Allow sufficient time between the creation of dough balls (which tightens the gluten framework) and flattening/rolling them out (for which the gluten should be in a relaxed state).
  3. Allow sufficient time for the second proofing stage (after the meat sausage has been rolled into the dough): at least 60 minutes. This again relaxes the gluten.
  4. Introduce steam into the oven while baking, at least for the first 5 minutes.

Keeping this in mind, the original recipe changed into this:

Ingredients:

Make and bake 30 sausage rolls of 70 grams each (35 gr dough and 35 gr sausage).

Dough:

  • 650 gr flour
  • 12 gr salt
  • 24 gr sugar
  • 185 gr water (lukewarm)
  • 185 gr milk (lukewarm)
  • 12 gr fast-action yeast (or 35 gr fresh yeast)
  • 55 gr butter (softened)

Saugages:

  • 1000 gr mincemeat (traditionally a mix of beef and pork but I use 100% beef)
  • 1 large egg
  • 25 gr breadcrumb
  • 25 gr spice mix

Spice mix (together will be ~ 25 gr):

  • 1 tsp salt
  • 2 tsp nutmeg powder (freshly ground from the nut gives the best flavour)
  • 2 tsp white pepper
  • 1 tsp paprika powder
  • 1 tsp onion powder
  • 1 tsp ginger powder
  • 1 tsp coriander powder
  • 1 tsp garlic powder
  • 1 tsp mustard powder

Instructies:

  • Combine the water and the milk and heat until lukewarm. Heat the butter until it is soft but not yet molten.
  • Mix the flour with the water and the milk. Don’t knead yet, combining the ingredients into a shaggy mix is sufficient. Leave the mix alone for 30 minutes to allow the flour to incorporate the moisture. This process is called autolyse.
  • While you wait for the autolyse, proceed with the meat. Mix the breadcrumb, spices and egg through the mincemeat. Divide into 30 portions of 35 grams. Roll each portion into a sausage of appr. 10 centimeters long. Coat the sausages lightly with flour by rolling them through a bit of flour you’ve spread on your work surface. This will prevent them from sticking together. Stack the sausages on a plate, cover with clingfilm and place them in your fridge to cool while you continue with the dough.
  • After the autolyse, add the remaining ingredients for the dough to the mix of flour and water/milk. Avoid direct contact between the yeast and the salt before you start mixing the ingredients: salt inhibits the yeast.
  • Knead for at least 10 minutes to achieve a supple dough.
  • Cover a baking tray with clingfilm. Divide the dough into 30 pieces of 35 grams and roll each into a tight ball. Place the balls on the baking tray and allow for some distance between them because they will increase in volume during the proofing stage. Cover with clingfilm and place them in a warm moist place for 20-30 minutes. I use my oven for that: heat the oven on its lowest setting for just 2 minutes, turn the heat off, place a shallow tray containing hot water on the oven floor, place the baking tray into the oven and close the door.
  • Take the proofed dough balls out of the oven. Spread some flour on your work area. Using a small rolling pin, flatten the pieces of dough into oval shapes with their long sides being about the same size as the sausages’ length. The bit of flour that covers the ovals will prevent them sticking together when you stack them.
  • Remove the clingfilm from the backing tray and cover it with parchment paper instead.
  • Now we can create the bread roll by combining dough and meat.
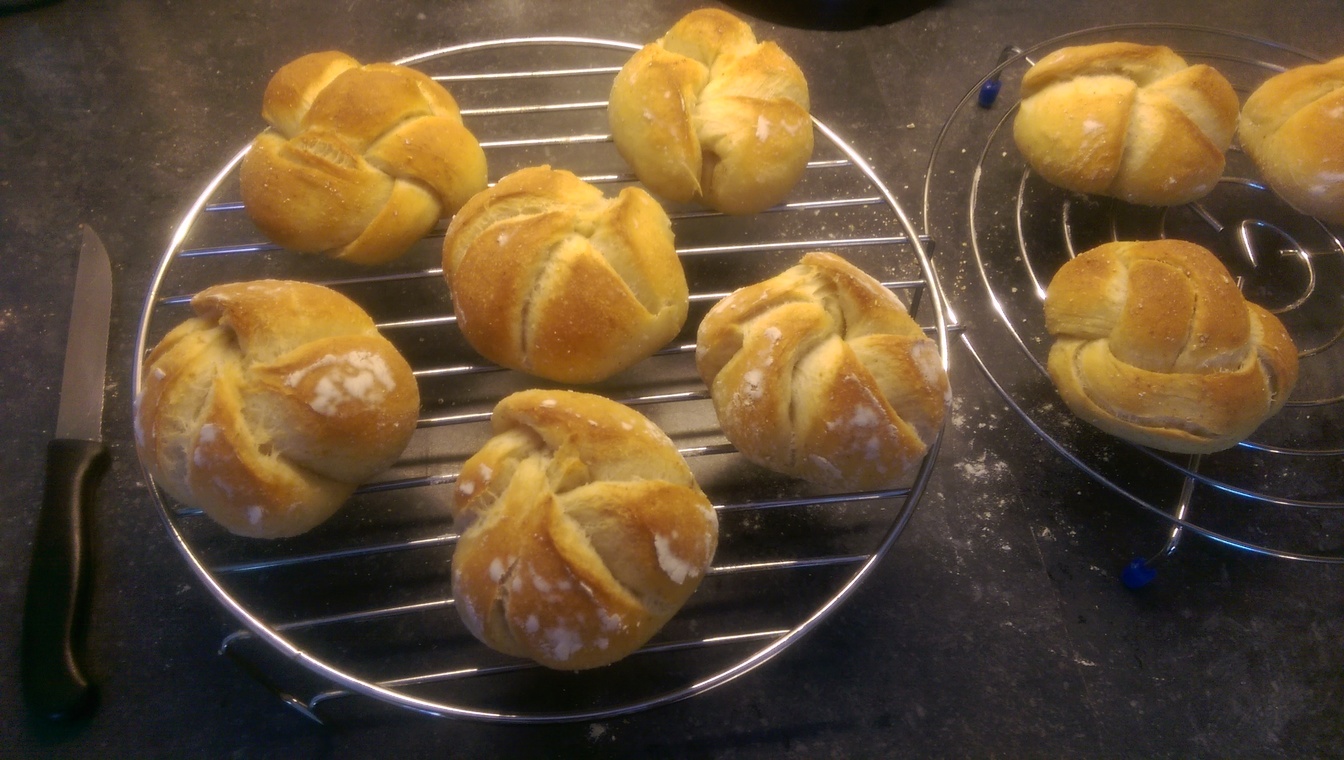
    Take an oval dough piece. Place a sausage roll on top. Fold the short ends of the oval over the ends of the sausage by stretching the dough a little. Grab one of the long sides of the oval and move it over the sausage so that it meets the other long side. Take care not to stretch the dough to much. Pinch the seam with your fingers. Take care to keep your fingers clean: the fat of the meat will prevent the seam to close properly so keep a small bowl of clean water nearby (for your fingers of course). Check this or this video for visual instructions.
  • Roll the sausage roll under your two flattened hands to make the seam disappear and seal the meat into the dough completely. Place the bread roll on the parchment paper with the seam on the bottom. This will prevent the bread to split open at the seam when you bake it.
  • Create the remainder of the bread rolls the same way. Keep some distance between the rolls on the baking tray because they will increase in volume while resting.
  • Cover the rolls with clingfilm to prevent the dough from drying out. Give the rolls a second proofing of at least 60 minutes in a warm moist place. Start the proofing in the oven like I described before. You will then have to find another place 30 minutes before you want to start baking (on top of your oven will be OK).
  • Heat your oven to 230° Celsius. Place the baking tray with the bread rolls just below the middle of the oven. Introduce some steam into the oven by spraying water into the oven or pouring some water in a metal tray on the oven floor. Optionally let the steam escape after 5 to 10 minutes of baking, by briefly opening the oven door. Caution! The steam is hot!
  • If the bread rolls are coloring too fast, you can reduce the oven temperature with 20 degrees. Total baking time is 12-15 minutes, depending on the oven and the thickness of the rolls. The meat inside must cook sufficiently long. The top of the bread rolls must be colored light-brown.
    Bigger bread rolls (70 gr dough, 70 gr meat) must bake for 20 minutes.

Let the worstenbroodjes cool for 30 minutes before eating them. They will still taste fine when completely cold but you can heat them again in the oven, at 170° Celsius for 8 minutes.

Optionally they can be frozen if you can’t eat them all at once. Heat frozen worstenbroodjes up again in an oven at 170° Celsius for 13 minutes.

Brabantse worstenbroodjes

Time for a new post about baking, a detour from the incessant talk about Slackware Linux and Open Source Software.

Today’s topic is “brabantse worstenbroodjes” aka dutch sausage rolls. I wrote about these worstenbroodjes on Google+ (in the Art of Baking community of G+) after I had baked a first batch early last year. Recently I revisited and revised the recipe when I made a new batch to “celebrate” my last day as an IBM employee. My colleagues loved them.
The most important revision is my spice mix, which is more complex than the simple initial attempt, which contained way too much salt. I also opted for pure beef instead of a pork/beef mix. These worstenbroodjes are halal / kosher.

Some background:

In March 2016, the brabantse worstenbroodjes were added by Unesco to the natoinal list of “immaterieel cultureel erfgoed”. In english this is called the Intangible Cultural Heritage List. That sounds big, but actually it is simply a new way to preserve old traditions for future generations. In this case, a tradition originating in the southern region of the Netherlands: Noord-Brabant is a province of the Netherlands. Sausage rolls were initially created as a means to conserve meat by rolling the meat into bread dough and cooking it. Traditionally the brabantse worstenbroodjes were consumed only at special events with a religious context: at the end of Carnival, late tuesday night as a means to compensate for all the alcohol (further south people would consume herring on rye bread instead); and when coming home from night mass on Christmas Eve. Essential part of the tradition is that worstenbroodjes are meant to be shared with friends and family as part of a get-together event.

IMAG0744 worstenbroodjes

On to the recipe:

The brabantse worstenbroodjes are made from yeasted bread dough, which is wrapped around a sausage of beef & pork mincemeat spiced with salt, pepper, nutmeg, mustard (and other spices if you like, but the nutmeg is essential).

My recipe will create 30 worstenbroodjes consisting of 35 grams dough and 35 grams meat.

Dough:

  • 600 gr flour
  • 11 gr salt
  • 22 gr sugar
  • 170 gr water (lukewarm)
  • 170 gr milk (lukewarm)
  • 11 gr fast-action yeast
  • 45 gr butter (softened)

Sausages:

  • 1000 gr mincemeat (either beef or else a mix of beef and pork)
  • 1 egg
  • 25 gr spice mix
  • 25 gr breadcrumb

Spice mix (together will be ~ 25 gr):

  • 1 tsp salt
  • 2 tsp nutmeg
  • 2 tsp white pepper
  • 1 tsp paprika powder
  • 1 tsp onion powder
  • 1 tsp ginger powder
  • 1 tsp coriander powder
  • 1 tsp garlic powder

Execution:

  • Mix flour, sugar and yeast together in a bowl.
  • Combine the water and the milk and heat until lukewarm. Melt the butter and mix the salt and molten butter through the lukewarm fluid.
  • Pour the wet ingredients into the dry ingredients. Mix together during circa 2 minutes with a spoon.
  • Leave this mix to rest for 15 minutes. The process is called autolyse – it ensures that the flour will absorb all the moisture.
  • Dump the dough onto your work area (which you dusted with a bit of four first) and knead for 6 to 10 minutes until you have a supple dough.
  • Place the ball of dough in a bowl and cover the bowl with some plastic wrap or a moist towel.
  • Next comes the “bulk rise” which is the period in which the yeast consumes part of the sugars in the flour which causes the dough rise to roughly twice the original volume.
    • Leave the covered bowl at room temperature for about an hour, or until the volume of the dough has doubled.
    • If you are adventurous and want a deeper, more complex flavor in your dough, don’t leave the dough at room temperature but instead, immediately place the bowl in the refrigerator for at least 10 to 12 hours, but mot more than 5 days. On the day you want to bake the worstenbroodjes you should take the dough out of the fridge 2 hours in advance to give it time to warm up to room temperature,
  • Divide the dough into 30 pieces of 35 grams each. Roll the pieces into small balls (see video below if you do not know how to do this). Cover the dough balls with plastic wrap or a moist towel.
  • While the balls are resting, mix the mincemeat with the egg and spices. Add as much breadcrumb as you need to create a firm meat mixture.
  • Divide the meat into pieces of 35 grams and roll them into sausages using the flat of your hand. The first video below shows you how. Store the sausages in the refrigerator while you work on the next step.
  • Use a small rolling pin to flatten the individual dough balls. Roll them into ovals that are roughly the same length as your sausages.
  • Combine dough and meat into a sausage roll: take a dough oval, place a sausage on top. Fold the ends of the oval over the ends of the sausage by stretching the dough a little. Grab a side of the oval and stretch it over the sausage.Take the other side and pinch the seam with two fingers. Roll the sausage roll under your two flattened hands to make the seam disappear and seal the meat into the dough completely.
  • Place the rolls on a baking tray which has been covered with a baking sheet (paper or silicone). Cover with plastic wrap and leave to rise at room temperature, for at least 45 minutes. This is an essential step. It will create air inside the bread and help prevent tearing of the sides of the bread roll while you are baking it.
  • Pre-heat the oven to 190 degrees centigrade (conventional oven).
  • Optionally if you want a nice shine on top of the worstenbroodjes, combine an egg with a tablespoon of cream and brush the bread rolls with the egg mix. I skip this step.
  • Bake the worstenbroodjes at 190 centigrade during 25 to 30 minutes until they are a golden brown.

When you want to add some extra complexity to the flavor, you should try making these rolls with a dough that has been developing in the fridge for at least 48 hours.

This is an ideal snack which should be eaten straight out of the oven but still tastes great the next day when cold. You can freeze them after baking if you want. Heat them up again when it’s time to eat them, straight from the fteezer into a pre-heated oven during 12 minutes at 180 degrees centigrade.

Video references:

Enjoy this recipe!

Open Source on another level

This blog centers about Linux and Open Source software with occasional side trips to brewing and cooking.

Today I want to raise your attention to a whole new level of “Open Source”.

Logo BrewDog, a UK brewery which soon celebrates its tenth anniversary, has decided to “open source” all of their 215 beer recipes. From their original and still extremely popular (and tasty) beer “PUNK IPA“, moving on to “Hops Kill Nazis“, “Doodlebug” and finally arriving at their latest “Jet Black Heart” which was first brewed last month (!)

Dubbed “DIY Dog“, the two founders have released a big PDF file containing the recipes of every beer the company ever created in their history, appropriately scaled down for 20 liter brewing volume – catering to their intended audience of home brewers.

And not just the recipes, but the PDF also contains an itemized list of the equipment you’ll need to brew like a pro and comes with lots of advice on the side.

Their blog says it all: “We have always loved the sharing of knowledge, expertise and passion in the craft beer community and we wanted to take that spirit of collaboration to the next level. So here it is. The keys to our kingdom. Every single BrewDog recipe, ever.

Way cool. A daring move which should be met with lots of respect.

Sourdough weekday adventures

 Time for another lesson in baking a tasty sourdough bread. Sourdough breads are all the breads I eat nowadays.
My son wanted me to “score” the bread in a smiley pattern but it turned out more like a Hallowe’en monster…
smiley_sourdough
Anyway, this sourdough loaf was created using another rhythm than my usual “bake one sourdough bread during a weekend day” routine.
This is how I fit it into my work routine.
The 100 gr sourdough starter (100% hydration meaning equal weights of flour and water) which I used in the bread, was grown from a single tablespoon of starter. I mixed that with 50 gr flour and 50 gr water at 18:00 in the evening and let it ferment for 6 hours until midnight:
sourdough-starter_jar
The dough for the bread (adding 250 gr whole-wheat flour, 150 gr Waldkorn mix, 50 gr all-purpose flour, 330 gr lukewarm water, 15 gr vegetable oil and 7 gr salt) was then created using this starter at midnight. What I did first was combine all ingredients except oil and salt and autolyse this mix for 25 minutes. Then I added oil and salt and hand-kneaded the dough for 10 minutes.
The kneaded dough ball was left on the kitchen counter at room temperature, covered by plastic wrap in a bowl  (I had a good night’s sleep) until 08:00 the next morning at which time it had about tripled in size.
The dough was deflated carefully, pre-shaped, bench-rested for 15 minutes and then shaped into a boule and put into a basket. The basket went into the fridge inside a sealed plastic bag.
Off to work.
I came back home at 18:00 that evening, transfered the basket from the fridge to the kitchen table (the dough had doubled in size during the day inside the fridge) and set the oven to pre-heat to 250C for an hour, with a pizza stone inside.
At 19:00 I turned the basket over and dumped the dough onto a silicone mat. I scored he bread with a smiley pattern and shoved it onto the pizza stone.
Baked during 20 minutes at 240 C with steam, then 20 minutes at 210 C without steam.
The result: impressive oven bloom, yummy bread with subtly more tones of sourness than my usual weekend breads that ‘only’ take 10 hours from start to finish.

Sourdough Kaiser rolls

I am enjoying a long weekend at home – Ascension day is a national holiday and both my employer (IBM) and my customer (ASML) closed their offices on the friday following it.

So I decided to experiment a bit with the bread I bake. The usual routine is that I bake three breads (two sourdough and one with commercial yeast) to get us through the week without having to rely on factory bread from the supermarket. This weekend, I wanted to have a go at Kaiser rolls, also known in Austria as Kaisersemmel or Handsemmel. A piece of traditional artisanal baking skill in Austria, but here you only get the factory made stuff.

I wanted to hand-make these traditional rolls according to the old ways. Traditionally, the leaven (natural yeast) would be provided to the baker by the local brewery, but that is not a viable solution nowadays. But we have sourdough, which should have some semblance to the old sour mash from the brewery.

So I set out to compare recipes and shaping techniques. There’s lots of recipes to be found actually, and the conclusion with all these white bun recipes is – you just add what you like. In my case, I wanted to go easy on the butter and sugar so that my wife would not have any reservations in sampling the finished product. But afterwards she admitted she would have eaten them whatever the content, they were that tasty.

Here is the recipe I ended up with. It was enough to create 11 rolls of roughly 75g each.

The evening preceding the day you want to eat the rolls, you mix the following ingredients into a rough mass:

  • 100g sourdough starter (100% hydration meaning it’s 50g flour, 50g water)
  • 450g AP flour (of which 200g was Type 00 strong flour)
  • 5g sugar
  • 60g full-fat milk
  • 200g water (cold)

Leave the rough dough to rest for 25 minutes (the flour is allowed to absorb the moisture, this is called “autolyse”) and then add:

  • 20g butter (soft, hand-warm)
  • 7g salt

Knead the dough by hand during 6 minutes until it is silky smooth. Then return the dough ball to a container and cover with clingfilm.
Leave the container on the kitchen counter for a bulk fermentation during the night. Do not place the container in the fridge. In 8 hours, the dough will double or almost triple in size.

Next morning, dump the dough onto your work area and gently push the air out with your flattened hands.
Using a dough cutter divide the mass into pieces of 75 – 80 grams and shape them into balls, creating surface tension. Leave these to rest for 15 minutes.
Gently flatten the balls of dough, creating circular disks. Dip them into some rye flour so that they are coated with a thin layer. This will prevent them sticking together. Leave to rest for another 15 minutes.

Now, shape the Kaiser rolls. There are several techniques for doing this, but I used what I assume is the traditional way. Here is a nice video of shaping a Kaiser roll. No rubber stamp, no knots in the dough. The real stuff!
Place the shaped rolls face-down on an oven tray which has been dusted with rye flour. This is needed so that the folds do not disappear while the dough is proofing. Cover them with a linen cloth or clingfilm. Leave them there for a second proofing, until doubled in size (will take something like 2 hours).
Heat up your oven in time, set the temperature to 200C. Place a low metal baking tray on the oven floor.
Bake the rolls for 20-25 minutes. Introduce steam during the first 10 minutes by pouring a cup of cold water into the tray on the oven floor and quickly closing the oven door, and vent the oven after 10 minutes.
They are ready when the edges are golden brown. When you tap the bottom of a roll with your fingers it should give a “hollow” sound. Leave them to cool for a bit before you cut into them. If you started early in the morning, the rolls will be ready for lunch.

This is how mine came out of the oven:

Kaiserrolls_small

There’s no doubt to it: these sourdough rolls are the best I ever tasted. They have a nice crispy crust and the folds opened up nicely while baking.

You’ll also note that there is one roll that does not look like a Kaiser roll. I also tried my luck at a braiding a knot and that was easier than shaping a Kaiser roll. I need to practice the shaping process. It was a lot of fun, but 9 rolls does not give you a lot of experience. Definitely something I will do again shortly!


« Older posts

© 2024 Alien Pastures

Theme by Anders NorenUp ↑