 Last week the second Beta of the upcoming Slackware 14.2 was released. My goal was to have a new Beta of my liveslak ready by that time, so that I could provide new ISO images to test the Slackware Beta2 on a live medium. Unfortunately, there was an attack of the flu in my team at work and things got a bit busier than usual. There was a plus side to this: some last moment bug fixes which could be applied to my scripts – the result of having more evenings available to test. Therefore the new release is not labeled “0.5.0” but “0.5.1”
Check out my previous articles about Beta1 Beta2 Beta3 and Beta4 releases for these scripts, they contain a lot of background about the reasons for creating “yet another” Live version of Slackware. The articles contain instructions on the use of the Live ISO images and their boot parameters and I am not going to repeat all of them here.
What’s new in 0.5.1?
My releases are meant to accomplish something I think is essential to my Live Edition. When I reach 1.0 it means that no essential functionality is missing, and that the features I am going to add later on are “nice to have”. I think that that liveslak is mostly complete at this point, but it is lacking proper documentation – the last thing to do before 1.0.
One of the essential properties of the USB variant of a Live Distribution is that it should be able to store your changes and make them persistent across reboots. In the 0.4.0 release, I added a LUKS encrypted homedirectory and earlier on, I implemented OS persistence by writing changes to a directory “persistence” in the root of the Linux partition of the Live USB drive. Some people will rather want to be able to use a FAT/NTFS formatted USB stick because that allows them easier data transfers to and from non-Linux computers. So my Beta5 adds an alternative persistence method: writing the changes to a loop-mounted container file instead. That file is called “persistence.img” and should be in the root of the Live partition. The “iso2usb.sh” script takes care of creating the persistence and LUKS container files, the process of transforming the ISO into a practical USB Live OS is straight-forward and simple.
Adding my Slackware Live Edition to a FAT formatted drive is an exercise I will leave to the reader, but in theory this should now be possible.
Some more noteworthy updates in 0.5.0:
- The Compose Key for german keyboards is now Scroll Lock instead of Right-Alt (aka Alt-Gr).
- A “toram” boot parameter allows you to run the Live OS completely in RAM (you can remove the bootable Live medium after boot).
- A “blacklist” parameter allows you to blacklist kernel module(s) that prevent a properly functioning environment (like “nouveau” does with some new hardware).
- The XDM graphical login for the XFCE variant was extended with a “console” button which allows you to effortlessly drop to a console (runlevel 3).
Download the ISO images
I have created ISO images for the SLACKWARE, XFCE, PLASMA5 and MATE flavours using the latest Slackware64-current packages available today (Slackware 14.2 Beta 2).
You can find the ISO images plus their MD5 checksum and GPG signature at any of the following locations – look in the “0.5.1” subdirectory for ISOs based on the liveslak-0.5.1 scripts:
- Primary location: http://taper.alienbase.nl/mirrors/slackware-live/ (rsync URI: rsync://taper.alienbase.nl/mirrors/slackware-live/)
- Willy’s mirror: http://repo.ukdw.ac.id/slackware-live/
- Ryan’s mirror: https://seattleslack.ryanpcmcquen.org/mirrors/slackware-live/
- Shasta’s mirror: http://ftp.slackware.pl/pub/slackware-live/ (rsync: rsync://ftp.slackware.pl/slackware-live/)
Please allow some time to synchronize these mirror servers.
The ISOs have two user accounts: root (with password ‘root’) and live (with password ‘live’). My advice: login as user live and use “su” or “sudo” to get root access (note: “su” and “sudo” will want the live password!).
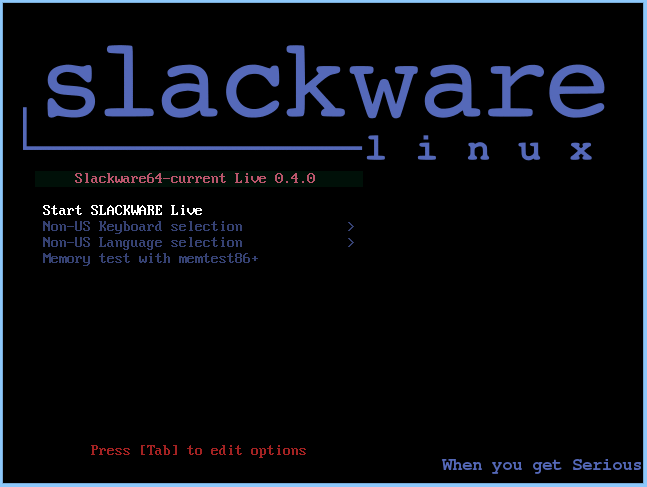
The ISOs are able to boot both on BIOS-based computers (where syslinux takes care of the boot menu) and UEFI systems (where grub builds the boot menu, which looks quite similar to the syslinux menu):
How to create a persistent USB stick from the ISO?
The ISO can be burnt to a DVD or copied to USB stick using ‘dd’ or just plain ‘cp’, but that will give you a read-only medium because all changes to the Live OS are in fact written to your computer’s RAM.
Use the ‘iso2usb.sh‘ script to create a Live OS on the USB device with persistence.
By default, the changes you make while running Slackware Live will then be preserved across reboots because the OS will write all these changes to the directory “persistence” in the root of the USB device. The script requires an input and an output parameter at a minimum:
# ./iso2usb.sh -i ~/Download/slackware64-live-current.iso -o /dev/sdX
… where /dev/sdX is the device name of your USB stick.
Alternatively you can use a file “persistence.img” in the root of the USB device which will be loop-mounted by the Live OS and changes to the system will be written to the filesystem inside this container file. A feature which should be appreciated by people who want to use a USB stick with a VFAT partition instead of a Linux ext4 partition. The script requires an additional parameter “-P” in this case:
# ./iso2usb.sh -P -i ~/Download/slackware64-live-current.iso -o /dev/sdX
Note that your USB stick will get formatted – erasing all data currently stored on it. The iso2usb.sh script will pause to show you the characteristics of the target device and ask you once more if you really want to continue erasing it. You will not easily destroy your hard drive unless you are really not paying attention!
How to create the LUKS encrypted homedirectory container?
The iso2usb.sh script has a parameter “-c” which takes a size argument. If you want to create a 400 MB container file to hide your homedirectory in, then you need to specify “-c 400M”. If you want 2.5 GB for your homedirectory, use “-c 2.5G”. If you are not concerned so much with the exact size but want to allocate a percentage of the free space on the stick, then use “-c 40%” to create a LUKS container that uses 40% of the available free space.
Now to put that into an actual example command line which will create a file (its name will be “slhome.img” starting with the 0.5.0 release) using up 50% of the free space on the stick:
# ./iso2usb.sh -i slackware64-live-xfce-current.iso -o /dev/sdX -c 50%
When the script gets to the point where it creates the LUKS container file, it will prompt you for a passphrase which will be used for encrypting and decrypting the container’s data. Right after that, the script will prompt you to enter that passphrase again when the LUKS container is unlocked and the ISO’s /home content is copied into the container.
Booting the Live OS
When you boot Slackware Live on a BIOS computer, Syslinux will handle the boot and show the following menu:
- Start (SLACKWARE | PLASMA5 | XFCE | MATE) Live (depending on which of the ISOs you boot)
- Non-US Keyboard selection
- Non-US Language selection
- Memory test with memtest86+
You can select a keyboard mapping that matches your computer’s. And/or boot Slackware in another language than US English. You will probably want to change the timezone; syslinux allows you to edit the boot commandline by pressing <TAB> because the syslinux bootmenu does not offer you a selection of timezones.
On UEFI computers, GRUB2 handles the boot and it will show a menu similar (and similarly themed) as the Syslinux menu:
- Start (SLACKWARE | PLASMA5 | XFCE | MATE) Live (depending on which of the ISOs you boot)
- Non-US Keyboard selection
- Non-US Language selection
- Non-US Timezone selection
- Memory test with memtest86+
Editing a Grub menu is possible by pressing the ‘e’ key. After making your changes to the boot commandline, press <F10> to boot.
Another difference between Syslinux and Grub menus: in Grub you select keyboard, language and/or timezone and you’ll return to the main menu every time. You still have to select “Start Slackware Live” to boot. In the Syslinux menu, only the keyboard selection menu will return you to (apparently bot not actually) the same main menu. The non-US language selection will boot you into Slackware Live immediately without returning to the main menu. A limitation of syslinux.
Have fun! Eric
Recent comments